


最终发现还是官方文档靠谱!!!
https://code.visualstudio.com/docs/cpp/config-mingw
本文流程
1. 下载VScode
2. 安装插件
3. 编译调试环境配置
4. 创建helloworld.cpp文件
5. 编译helloworld.cpp
6. 调试helloworld
1. 下载VScode
VScode 官网下载
下载最新版即可,安装位置什么的自己选择,最好别装C盘(如果是固态硬盘,装C盘反而更好)
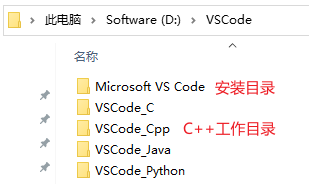
我的安装目录是D:\VSCode\Ins,之所以建两级目录,目的是将Ins作为我们得安装目录,将D:\VSCode\VSCode_Cpp作为我们的CPP工作目录,具体情况看4 .vscode文件配置
2. 安装插件
2.1 设置中文
在插件中搜索chinese,点击安装,重启即可

点击这里,在搜索框搜索chinese,安装之后重启:

还有问题看看这里能不能解决:设置中文
2.2 C/C++插件
点击进入VScode,安装C/C++插件,这是已经安装好了的截图
2.3彩虹花括号
这个插件可以让你的代码的花括号匹配更加明显得显示出来,在扩展插件中搜索Pair第一个就是了。

看看效果图:
3. 编译调试环境配置
3.1 下载MinGW
有两种方法:单独的MinGW和带MinGW的Codeblocks,下载某一个即可。
1. 使用Mingw-w64
Mingw-64下载
除了安装路径自选外,其他一路next即可
2. 使用CodeBlocks自带
这个版本较官网Mingw的缺点是:可能更新不及时。
需要注意的是下载CB时要下载带MinGW的版本
CodeBlocks下载
选择带MinGW的版本:

3.2 设置环境变量
此电脑->系统属性->环境变量->系统变量->在path变量中添加MinGW/bin的路径

测试MinGW是否安装正确
g++ --version
gdb --version
4. 创建.vscode文件夹
最终目标目录树:创建一个单独的文件夹(如VSCode_Cpp),该文件夹下有.vscode,自己的源代码文件夹需要放在和.vscode平级的目录中(如helloworld)
--VSCode_Cpp
	-.vscode
		-tasks.json
		-launch.json
		-c_cpp_properties.json
	-helloworld
		-helloworld.cpp
两种创建.vscode方法
1. 手动创建**(推荐第二种)**
按照上边的目录树创建即可,在VSCode中打开文件夹VSCode_Cpp即可。
2. 命令行
在windows命令行(cmd)中执行以下操作:
mkdir projects
cd projects
mkdir helloworld
cd helloworld
code .
为了方便以后其他语言环境的配置,可以将上边的projects改为”VSCode_Cpp“之类有明显标识的目录。
"code ."命令会在当前目录中打开VSCode,并将当前目录变成你的工作目录。此时你在VSCode中已经可以看到.vscode文件夹了,并且为你创建好了三个文件。
- tasks.json (build instructions)
- launch.json (debugger settings)
- c_cpp_properties.json (compiler path and IntelliSense settings)
添加源文件
在当前文件夹创建helloworld.cpp

#include <iostream>
#include <vector>
#include <string>

using namespace std;

int main()
{
    vector<string> msg {"Hello", "C++", "World", "from", "VS Code", "and the C++ extension!"};

    for (const string& word : msg)
    {
        cout << word << " ";
    }
    cout << endl;
}
crtl+S保存之。
5. 编译helloworld.cpp
5.1 配置tasks.json文件
tasks.json专门管这事
Terminal > Configure Default Build Task->g++.exe build active file


上述操作之后即可自动在.vscode文件夹中创建tasks.json
{
  "version": "2.0.0",
  "tasks": [
    {
      "type": "shell",
      "label": "C/C++: g++.exe build active file",
      "command": "C:\\Program Files\\mingw-w64\\x86_64-8.1.0-posix-seh-rt_v6-rev0\\mingw64\\bin\\g++.exe",
      "args": ["-g", "${file}", "-o", "${fileDirname}\\${fileBasenameNoExtension}.exe"],
      "options": {
        "cwd": "${workspaceFolder}"
      },
      "problemMatcher": ["$gcc"],
      "group": {
        "kind": "build",
        "isDefault": true
      }
    }
  ]
}
注意:
"command"后边的路径改成自己MinGW相应文件的的路径
此时可以可以运行helloworld了。
5.2 运行helloworld
Ctrl+Shift+B 或 Terminal->Run Build Task
(下方为补贴的图,所以显示为中文)
底部出现如下界面:

点击上图的”+“,创建新窗口
输入helloworld.exe或者.\helloworld.exe即可运行
6. 调试helloworld.cpp
6.1 配置launch.json
launch.json管这事,在配置好之后按F5即可开始调试。
下面说明如何配置launch.json
- Run->Add Configuration…->C++(GDB/LLDB)

- 选择g++.exe build and debug active file.

{
  "version": "0.2.0",
  "configurations": [
    {
      "name": "g++.exe - Build and debug active file",
      "type": "cppdbg",
      "request": "launch",
      "program": "${fileDirname}\\${fileBasenameNoExtension}.exe",
      "args": [],
      "stopAtEntry": false,
      "cwd": "${workspaceFolder}",
      "environment": [],
      "externalConsole": false,
      "MIMode": "gdb",
      "miDebuggerPath": "C:\\Program Files\\mingw-w64\\x86_64-8.1.0-posix-seh-rt_v6-rev0\\mingw64\\bin\\gdb.exe",
      "setupCommands": [
        {
          "description": "Enable pretty-printing for gdb",
          "text": "-enable-pretty-printing",
          "ignoreFailures": true
        }
      ],
      "preLaunchTask": "C/C++: g++.exe build active file"
    }
  ]
}
6.2 设断点调试
- 点击进入helloworld.cpp文件,在第9行代码左边点击增加断点(红圈圈)
- 按 F5 或在菜单栏Run->Start Debugging
- 左侧可以看到运行到当前行的变量值等信息。
- 进入函数、单步跳过等调试按钮就不再这里细讲

以下为自己之前的配置方法,接上边3,并不推荐看。
4. .vscode文件配置
写在前边:别将你的CPP工作目录放在VSCode安装目录下,否则会因为更新删掉你的工作目录,找不回的那种。
新建文件夹D:\VSCode\VSCode_Cpp
在VSCode_Cpp目录下新建文件夹.vscode
在.vscode文件夹下新建文件

lauch.json
{
    "version": "0.2.0",
    "configurations": [
        {
            "name": "(gdb) Launch", // 配置名称,将会在启动配置的下拉菜单中显示
            "type": "cppdbg",       // 配置类型,这里只能为cppdbg
            "request": "launch",    // 请求配置类型,可以为launch(启动)或attach(附加)
            "program": "D:/VSCode/VSCode_Cpp/build/${fileBasenameNoExtension}.exe",// 将要进行调试的程序的路径
            "args": [],             // 程序调试时传递给程序的命令行参数,一般设为空即可
            "stopAtEntry": false,   // 设为true时程序将暂停在程序入口处,一般设置为false
            "cwd": "${workspaceFolder}", // 调试程序时的工作目录,一般为${workspaceFolder}即代码所在目录
            "environment": [],
            "externalConsole": false, // 调试时是否显示控制台窗口,一般设置为true显示控制台
            "MIMode": "gdb",
            "miDebuggerPath": "D:\\CodeBlocks\\MinGW\\bin\\gdb.exe", // miDebugger的路径,注意这里要与MinGw的路径对应
            "preLaunchTask": "g++", // 调试会话开始前执行的任务,一般为编译程序,c++为g++, c为gcc
            "setupCommands": [
                {
		            "description": "Enable pretty-printing for gdb",
                    "text": "-enable-pretty-printing",
                    "ignoreFailures": true
                }
            ]
        }
    ]
}
settings.json
{
    "code-runner.runInTerminal": true,
    "code-runner.ignoreSelection": true,
    "code-runner.fileDirectoryAsCwd": true,
    "terminal.integrated.shellArgs.windows": ["-NoExit", "/c", "chcp 65001"],
    "code-runner.executorMap": {
        "cpp": "cd $dir && g++ $fileName -o D:/VSCode/VSCode_Cpp/build/$fileNameWithoutExt.exe && D:/VSCode/VSCode_Cpp/build/$fileNameWithoutExt.exe",
        "c": "cd $dir && g++ $fileName -o D:/VSCode/VSCode_Cpp/build/$fileNameWithoutExt.exe && D:/VSCode/VSCode_Cpp/build/$fileNameWithoutExt.exe",
        "java": "cd $dir && javac -encoding utf-8 $fileName && java $fileNameWithoutExt"
    },
    "files.associations": {
        "iostream": "cpp"
    },
    "files.autoGuessEncoding": true

}
tasks.json
{
    "version": "2.0.0",
    "command": "g++",
    "args": ["-g","${file}","-o","D:/VSCode/VSCode_Cpp/build/${fileBasenameNoExtension}.exe"],    // 编译命令参数
    "problemMatcher": {
        "owner": "cpp",
        "fileLocation": ["relative", "${workspaceFolder}"],
        "pattern": {
            "regexp": "^(.*):(\\d+):(\\d+):\\s+(warning|error):\\s+(.*)$",
            "file": 1,
            "line": 2,
            "column": 3,
            "severity": 4,
            "message": 5
        }
    }
}
5.运行hello world
在VSCode_Cpp文件夹下新建文件夹tempfile,然后新建文件helloworld.cpp

build文件夹是我们在4中配置的文件中生成的,目的是将.exe文件存到该文件夹下;
新建tempfile文件夹是为了方便我们的代码管理。
点击运行->以非调试模式运行(或者ctrl+F5),代码及运行结果如下:


6.遇到的一些问题
- 6.1 配置launch.json中,点击了Run->Add Configuration…->C++(GDB/LLDB),并没有反应。
解决方法:删除launch.json(此时为空文件),然后重新执行上述步骤。


 4621
4621


 被折叠的 条评论
为什么被折叠?
被折叠的 条评论
为什么被折叠?
 到【灌水乐园】发言


