


 本文提出了一种将数值模型解析为Qt控件树的方法,动态生成桌面软件的参数输入界面。通过递归遍历类似JSON的数值模型,可以创建各种类型的Qt控件,包括字符串、浮点数、整数、布尔值、枚举和复合字段。编辑后,再次遍历控件树以获取用户输入数据,并进行合法性校验,高亮显示非法输入。这种方法提高了界面开发的效率和拓展性。
1.前言
参数输入界面是桌面软件开发最繁琐的部分之一。特别是当系统中存在多种可编辑的数值模型时,由于各个模型的字段不同,每个字段的输入类型也不同,需要制作不同的UI,使用不同的UI控件,无疑会耗费大量时间,同时拓展性也非常差,因为每增加一个数值模型,都需要制作相应的参数输入界面。
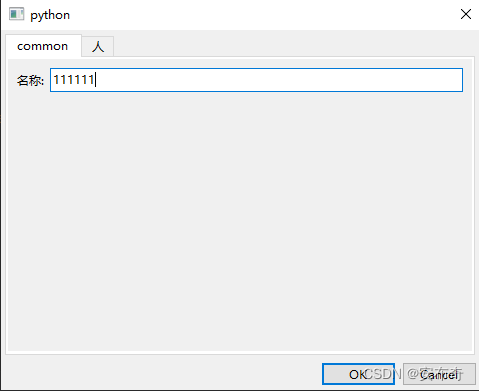
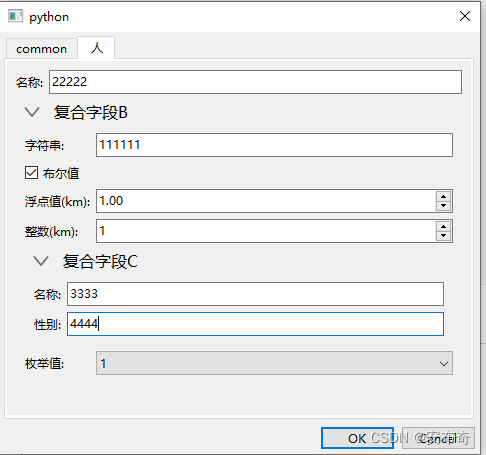
本文提出的解决思路是将数值模型假定为类似于json的树形结构,采用递归遍历树的方式生成对应的Qt 控件树,从而实现根据不同的数值模型动态生成参数输入界面。当用户编辑完数值模型点击ok按钮时,再次遍历生成的Qt控件树,从而获取相应的输入数据。另外还具有合法值校验的功能,可以定位到非法输入对应的控件并以红色边框高亮显示的功能。效果如下:
2.将数值模型解析为Qt控件树
2.1 输入参数类型
本文涉及的数值模型字段包含字符串,浮点数,整数,布尔值,枚举值(用list表示)和复合字段几种类型。参数类型和Qt控件之间的对应关系如下:
-
字符串-QLineEdit
-
浮点数- QDoubleSpinBox
-
整数-QSpinBox
-
布尔值-QCheckBox
-
枚举值-QComboBox
-
复合字段可以又可以分解成上述几种数据类型,所以对应于一个包含多个前述几种控件的QWidget。
2.2 可编辑数值模型定义
本文假设数值模型可以是不同的类,但是它们都有一个editableField属性,定义可编辑的字段信息。例如:
class A:
    @property
    def editableField(self) -> dict:
        return {
            "name": {
                "name": "名称",
                "value": "",
                "required": True
            },
            "B": {
                "name": "复合字段B",
                "value": B()
            },
        }


class B:
    @property
    def editableField(self) -> dict:
        return {
            "string": {
                "name": "字符串",
                "value": "111111"
            },
            "bool": {
                "name": "布尔值",
                "value": False,
                "required": True
            },
            "float": {
                "name": "浮点值",
                "value": 1.0,
                "unit": "km",
                "min": 0,
                "max": -1
            },
            "int": {
                "name": "整数",
                "value": 1,
                "unit": "km",
                "min": 0,
                "max": -1
            },
            "dataObj": {
                "name": "复合字段C",
                "value": C(),
                "required": True
            },
            "enum": {
                "name": "枚举值",
                "value": [1, 2, 3],
                "required": True
            }
        }


class C:
    @property
    def editableField(self) -> dict:
        return {
            "name": {
                "name": "名称",
                "value": "",
                "required": True
            },
            "gender": {
                "name": "性别",
                "value": "",
                "required": True
            }
        }


class Model:
    @property
    def editableField(self) -> dict:
        return {
            "name": {
                "name": "名称",
                "value": "",
                "required": False
            },
            "he": {
                "name": "人",
                "value": A(),
                "root": True
            },
        }
注意
editableField中定义的所有复合字段不能相互嵌套,比如B包含一个C类型的可编辑字段,C又包含一个B类型的可编辑字段,会导致解析时陷入无限循环。
2.3 对话框基本结构
对话框的基本定义如下:
from PySide6.QtGui import Qt
from PySide6.QtWidgets import QDialog, QMessageBox, QWidget, QTabWidget, QSpacerItem, QSizePolicy, QFormLayout, \
    QScrollArea, QFrame, QDialogButtonBox

from editDialog_utils import isDataObj, generate_widget, getContentLayout, checkInput, showErrorInputWidget


class AEditDialog(QDialog):
    def __init__(self, dataObj):
        """
        数据对象编辑对话框
        :param dataObj:  数据对象
        """
        super().__init__()
        self.__dataObj = dataObj
        # 用户数输入数据
        self.inputData = None
        self.resize(480, 360)
        # 控件树
        self.widget_tree = dict()
        self.__loadWidget()
        self.__connectWidget()

    def __loadWidget(self):
        """
        初始化控件
        :return:
        """
        tab = QTabWidget()
        self.tab = tab
        tab1 = QWidget()
        tab1.setLayout(getContentLayout(direction='v'))
        # 滚动视图
        tab1_scroll = QScrollArea()
        tab1_scroll.setObjectName(u"scroll")
        tab1_scroll.setWidgetResizable(True)
        tab1_scroll.setFrameShadow(QFrame.Raised)
        tab1.layout().addWidget(tab1_scroll)
        tab1_scrollArea = QWidget()
        tab1_layout = QFormLayout(tab1_scrollArea)
        tab.addTab(tab1, "common")
        # 控件所处tab索引,用于错误提示
        tab_index = 0
        # 根据数据对象动态生成ui
        for key, item in self.__dataObj.editableField.items():
            # 值
            value = item["value"]
            if isDataObj(value):
                # 顶级属性是数据对象时生成一个tab
                sub_tree = dict()
                self.widget_tree[key] = sub_tree
                # 新建tab
                tab2 = QWidget()
                tab2.setLayout(getContentLayout(direction='v'))
                # 布局和滚动视图
                scrollAreaWidgetContents = QWidget()
                content_layout = getContentLayout(direction='v')
                tab_index += 1
                # 添加控件
                w = generate_widget(sub_tree, key, item, tab_index)
                content_layout.addWidget(w)
                scrollAreaWidgetContents.setLayout(content_layout)
                # spacer
                vSpacer = QSpacerItem(40, 20, QSizePolicy.Minimum, QSizePolicy.Expanding)
                content_layout.addItem(vSpacer)
                # 滚动视图
                scroll = QScrollArea()
                scroll.setObjectName(u"scroll")
                scroll.setFrameShadow(QFrame.Raised)
                scroll.setWidgetResizable(True)
                tab2.layout().addWidget(scroll)
                scroll.setWidget(scrollAreaWidgetContents)
                # 添加tab
                tab.addTab(tab2, item["name"])
            else:
                w = generate_widget(self.widget_tree, key, item, 0)
                if isinstance(w, tuple):
                    tab1_layout.addRow(w[0], w[1])
                else:
                    tab1_layout.addWidget(w)
        # 添加控件到tab1 滚动视图
        tab1_scroll.setWidget(tab1_scrollArea)
        # 外部容器
        container_layout = getContentLayout(direction='v', margin=(4, 4, 4, 4))
        container_layout.addWidget(tab)
        # 添加底部按钮
        self.buttonBox = QDialogButtonBox(self)
        self.buttonBox.setObjectName(u"buttonBox")
        self.buttonBox.setOrientation(Qt.Horizontal)
        self.buttonBox.setStandardButtons(QDialogButtonBox.Cancel | QDialogButtonBox.Ok)
        container_layout.addWidget(self.buttonBox)
        # 设置布局
        self.setLayout(container_layout)
        # 只有一页,隐藏tabbar
        if tab.count() == 1:
            tab.tabBar().setVisible(False)

    def __connectWidget(self):
        """
        连接槽函数
        :return:
        """
        self.buttonBox.accepted.connect(self.accept)
        self.buttonBox.rejected.connect(self.reject)

    def accept(self) -> None:
        """
        确定
        :return:
        """
        input_data = dict()
        # 输入数据校验
        inputData = checkInput(self.widget_tree, data_key="", input_data=input_data)
        if "widget" in inputData.keys():
            showErrorInputWidget(errorData=inputData, tab=self.tab)
            # 显示数据错误提示
            QMessageBox.critical(self, "错误", str("{} 必须填写!".format(inputData["name"])))
            return
        self.inputData = inputData
        super().accept()
上述QDialog中,控件树被保存在widget_tree字典中。这里最主要的函数是__loadWidget。这个函数首先创建一个QTabWidget添加到对话框中,然后开始遍历数值模型的editableField进行控件解析。弹字段是基本数据类型时,调用generate_widget生成控件添加到当前tab;当字段是个复合字段时,它会新建一个tab并设置滚动视图,然后将它添加到QTabWidget中。其中generate_widget正是递归遍历数值模型字段生成控件树的方法。
accpet函数是用户点击ok按钮时调用的方法。检查用户输入和高亮显示错误输入的方法checkInput和showErrorInputWidget将在后面介绍。
isDataObj和getContentLayout是辅助方法,分别用于判断复合字段和生成样式统一的QVBoxLayout或QHBoxLayout。定义如下:
def isDataObj(data):
    """
    判断数据是否是基本类型之外的数据对象
    :param data:
    :return:
    """
    return type(data) not in [str, float, int, list, tuple, bool]


def getContentLayout(direction: str = "v", margin: tuple = (0, 0, 0, 0)) -> QVBoxLayout:
    """
    生成存放内容的布局
    :param margin:
    :param direction:
    :return:
    """
    if direction == "v":
        layout = QVBoxLayout()
    else:
        layout = QHBoxLayout()
    layout.setContentsMargins(*margin)
    return layout
2.4 解析得到Qt控件树
首先根据基本数据类型生成控件:
def generateFloatWidget(item: dict) -> QDoubleSpinBox:
    """
    生成浮点数值控件
    :param item:
    :return:
    """
    dSpinbox = QDoubleSpinBox()
    minVal = 0
    maxVal = 0
    if "min" in item.keys():
        minVal = item["min"]
    if "max" in item.keys():
        maxVal = item["max"]
    if minVal > maxVal:
        # 设置无穷大
        maxVal = 1e20
        minVal = -maxVal
    dSpinbox.setMinimum(minVal)
    dSpinbox.setMaximum(maxVal)
    dSpinbox.setValue(item["value"])
    dSpinbox.setMinimumHeight(24)
    return dSpinbox

def generateIntWidget(item: dict) -> QSpinBox:
    """
    生成整数控件
    :param item:
    :return:
    """
    spinbox = QSpinBox()
    minVal = 0
    maxVal = 0
    if "min" in item.keys():
        minVal = item["min"]
    if "max" in item.keys():
        maxVal = item["max"]
    if minVal > maxVal:
        # 设置无穷大
        maxVal = int(1e9)
        minVal = -maxVal
    spinbox.setMinimum(minVal)
    spinbox.setMaximum(maxVal)
    spinbox.setValue(item["value"])
    spinbox.setMinimumHeight(24)
    return spinbox


def generateStrWidget(item: dict) -> QLineEdit:
    """
    生成单行文本输入控件
    :param item:
    :return:
    """
    lineEdit = QLineEdit()
    lineEdit.setMinimumHeight(24)
    value = item["value"]
    lineEdit.setText(value)
    return lineEdit


def generateBoolWidget(item: dict) -> QCheckBox:
    """
    生成布尔值输入控件
    :param item:
    :return:
    """
    checkBox = QCheckBox()
    name = item["name"]
    value = item["value"]
    checkBox.setChecked(value)
    checkBox.setText(name)
    return checkBox


def generateEnumWidget(item: dict) -> QComboBox:
    """
    生成枚举值对应的列表控件
    :param item:
    :return:
    """
    comboBox = QComboBox()
    comboBox.setMinimumHeight(24)
    value = item["value"]
    value = [str(i) for i in value]
    comboBox.addItems(value)
    return comboBox
然后递归遍历数值模型字段:
# 展开和收起图标
ic_down_arrow = "ic_down_arrow.svg"
ic_right_arrow = "ic_right_arrow.svg"

def generate_widget(widget_tree: dict, key, item, tab_index: int):
    """
    根据数据对象生成控件
    :param tab_index: 顶层tab索引
    :param item: 数据对象
    :param key: 数据键
    :param widget_tree: 控件树
    :return:
    """
    # 数据项名称
    name = item["name"]
    # 值
    value = item["value"]
    # 单位
    unit = None
    if "unit" in item.keys():
        # 单位
        unit = item["unit"]

    # 控件容器
    w = QWidget()
    w.setSizePolicy(QSizePolicy.Expanding, QSizePolicy.Fixed)

    # 字段名称和单位
    if unit is not None:
        label = QLabel("{}({}):".format(name, unit))
    else:
        label = QLabel("{}:".format(name))
    label.setSizePolicy(QSizePolicy.Fixed, QSizePolicy.Preferred)

    required = False
    if "required" in item.keys():
        # 必填字段
        required = item["required"]

    widget_tree_node = {"tab_index": tab_index, "required": required, "name": name}

    if type(value) is float:
        doubleSpinBox = generateFloatWidget(item)
        widget_tree_node["widget"] = doubleSpinBox
        widget_tree[key] = widget_tree_node
        return label, doubleSpinBox

    if type(value) is int:
        intSpinBox = generateIntWidget(item)
        widget_tree_node["widget"] = intSpinBox
        widget_tree[key] = widget_tree_node
        return label, intSpinBox

    if type(value) is str:
        lineEdit = generateStrWidget(item)
        widget_tree_node["widget"] = lineEdit
        widget_tree[key] = widget_tree_node
        return label, lineEdit

    if type(value) is bool:
        checkBox = generateBoolWidget(item)
        widget_tree_node["widget"] = checkBox
        widget_tree[key] = widget_tree_node
        return checkBox

    if type(value) is list:
        comboBox = generateEnumWidget(item)
        widget_tree_node["widget"] = comboBox
        widget_tree[key] = widget_tree_node
        return label, comboBox

    if isDataObj(value):
        # 复合字段容器
        container = QWidget()
        container_layout = getContentLayout(direction='v')
        container_layout.setSpacing(0)
        container.setLayout(container_layout)
        # 子控件容器
        contentWidget = QWidget()
        contentWidget.setObjectName(u"contentWidget")
        if "root" not in item.keys() or not item['root']:
            # 非顶级对象添加收放按钮
            btnCollapse = QPushButton()
            btnCollapse.setObjectName(u"btnCollapse")
            btnCollapse.setLayout(getContentLayout(direction='h'))
            sizePolicy = QSizePolicy(QSizePolicy.Expanding, QSizePolicy.Preferred)
            btnCollapse.setSizePolicy(sizePolicy)
            btnCollapse.setFocusPolicy(Qt.NoFocus)
            btnCollapse.setFlat(True)
            # 图标
            iconBtn = QPushButton(btnCollapse)
            iconBtn.setObjectName(u"iconBtn")
            iconBtn.setFlat(True)
            iconBtn.setIconSize(QSize(20, 20))
            iconBtn.setIcon(QIcon(ic_down_arrow))
            btnCollapse.layout().addWidget(iconBtn)
            # 名称
            labelName = QLabel(name)
            labelName.setStyleSheet("font-size:12pt")
            sizePolicy = QSizePolicy(QSizePolicy.Expanding, QSizePolicy.Preferred)
            labelName.setSizePolicy(sizePolicy)
            btnCollapse.layout().addWidget(labelName)
            container.layout().addWidget(btnCollapse)
            # 收放槽函数
            iconBtn.clicked.connect(partial(collapseWidget, iconBtn, contentWidget))
            btnCollapse.clicked.connect(partial(collapseWidget, iconBtn, contentWidget))

        contentWidget.setSizePolicy(QSizePolicy.Expanding, QSizePolicy.Fixed)
        contentWidget_layout = QFormLayout()
        # formlayout换行策略
        contentWidget_layout.setRowWrapPolicy(QFormLayout.WrapLongRows)
        contentWidget.setLayout(contentWidget_layout)
        # 添加子控件
        for key, item in value.editableField.items():
            sub_tree = dict()
            widget_tree[key] = sub_tree
            w = generate_widget(sub_tree, key, item, tab_index)
            if isinstance(w, tuple):
                # 子控件有label
                contentWidget_layout.addRow(w[0], w[1])
            else:
                # 无label,跨列
                row_index = contentWidget_layout.rowCount()
                contentWidget_layout.setWidget(row_index, QFormLayout.SpanningRole, w)
        container.layout().addWidget(contentWidget)
return container上述函数中,当字段类型是基本数据类型时,生成上述几种基本控件,添加到控件树中;当字段是复合字段时,新建一个QWidget作为容器,向其中添加一个收放按钮,然后新建一个contentWidget,递归生成子控件放入其中。每次遇到一个复合字段类型就向控件树中添加一个树枝,即sub_tree字典。函数collapseWidget用来收放控件,定义为:
def collapseWidget(iconBtn: QPushButton, collapsedWidget: QWidget, hold: bool = None):
    """
    收放控件
    :param hold: 保持某个状态
    :param iconBtn: 指示图标控件
    :param collapsedWidget:
    :return:
    """
    show = not collapsedWidget.isVisible()
    if hold is not None:
        show = hold
    if show:
        icon = QIcon(ic_down_arrow)
    else:
        icon = QIcon(ic_right_arrow)
    collapsedWidget.setVisible(show)
    iconBtn.setIcon(icon)
3.检查并获取用户输入
3.1 遍历控件树获取并检查用户输入
获取用户输入其实就是把控件树,即widget_tree这个字典再遍历一遍。首先定义获取单个控件输入的函数:
def getWidgetInput(widget):
    """
    获取单个控件输入
    :param widget:
    :return:
    """
    if type(widget) == QLineEdit:
        return widget.text()
    if type(widget) == QCheckBox:
        return widget.isChecked()
    if type(widget) == QDoubleSpinBox:
        return widget.value()
    if type(widget) == QSpinBox:
        return widget.value()
    if type(widget) == QComboBox:
        return widget.currentText()
然后定义检查单个控件输入的函数:
def checkWidget(widget, required: bool) -> bool:
    """
    检查单个控件输入
    :param widget:
    :param required: 是否必填
    :return:
    """
    if not required:
        # 非必填
        return True
    # 检查必填
    filled = False
    if type(widget) == QLineEdit:
        filled = widget.text() != ""
    if type(widget) == QCheckBox:
        filled = widget.isChecked()
    if type(widget) == QComboBox:
        filled = widget.currentText() != ""
    return filled
然后递归遍历控件树,获取并检查用户输入:
def checkInput(widget_tree: dict, data_key: str, input_data: dict):
    """
    获取并检查用户输入
    :param input_data: 存储输入数据
    :param data_key: 数据键,a.b.c
    :param widget_tree: 控件树
    :return:
    """
    for key, value in widget_tree.items():
        if "widget" not in value.keys():
            # value是个树节点
            if data_key != "":
                key = "{}.{}".format(data_key, key)
            input_data = checkInput(value, key, input_data)
            if "widget" in input_data.keys():
                # 出错终止
                return input_data
        else:
            # value是叶
            widget = value["widget"]
            tab_index = value["tab_index"]
            required = value["required"]
            name = value["name"]
            if not checkWidget(widget, required):
                # 边框显示为红色
                widget.setStyleSheet("border:1px solid red;")
                # 检查到输入错误,切换到出错的那个tab
                return {"name": name, "widget": widget, "tab_index": tab_index}
            else:
                # 清空错误样式
                widget.setStyleSheet(QWidget().styleSheet())

            if data_key == "":
                # 顶层数据字段
                input_data[key] = getWidgetInput(widget)
            else:
                # 控件树叶的数据字段
                input_data[data_key] = getWidgetInput(widget)
    return input_data
获取到的用户输入如下:
{
  'name': 'comm名称',
  'he.name': '人名',
  'he.dataObj_B.string': '111111',
  'he.dataObj_B.bool': True,
  'he.dataObj_B.float': 1.0,
  'he.dataObj_B.int': 1,
  'he.dataObj_B.dataObj_C.name': 'C名称',
  'he.dataObj_B.dataObj_C.gender': 'C性别',
  'he.dataObj_B.enum': '1'
}因为python对象有setattr函数可以设置属性,所以这里用户输入不用嵌套成树形结构,可以少用递归,改用循环,提高运行速度,具体见第4节。
3.2 定位并高亮显示错误输入
当发现某个控件存在非法输入时,checkInput函数停止递归并返回出错控件的信息,例如:
{
  'name': '名称',
  'widget': <PySide6.QtWidgets.QLineEdit(0x1b9b2830)at 0x000000001C4A9200>,
  'tab_index': 1
}其中tab_index表示该控件所处的tab索引。高亮显示错误输入位置的函数如下:
def showErrorInputWidget(errorData: dict, tab: QTabWidget):
    """
    显示输入错误的控件
    :param tab: 顶层tab
    :param errorData: 错误数据
    :return:
    """
    # 切换到所处tab
    tab.setCurrentIndex(errorData["tab_index"])
    # 取出对应错误控件
    widget = errorData["widget"]
    if not widget.isVisible():
        # 展开未展开的父节点显示控件
        parent = widget
        while True:
            parent = parent.parent()
            if parent is None:
                break
            # 查找下拉图标按钮和收放控件
            iconBtn = parent.findChild(QPushButton, "iconBtn")
            contentWidget = parent.findChild(QWidget, u"contentWidget")
            if contentWidget is not None and not contentWidget.isVisible():
                #展开
                collapseWidget(iconBtn, contentWidget, hold=True)

    # 滚动到控件所在位置
    tab_page = tab.currentWidget()
    scrollArea = tab_page.findChild(QScrollArea, "scroll")
    pointTab = tab_page.mapToGlobal(QPoint(0, 0))
    # 计算控件是否在滚动区可视范围内
    y1 = pointTab.y()
    h1 = tab_page.height()
    pointW = widget.mapToGlobal(QPoint(0, 0))
    y2 = pointW.y()
    h2 = widget.height()
    cond1 = y2 + h2 < y1 - 4
    cond2 = y1 + h1 < y2 + 4
    dy = 0
    # 计算滚动距离
    if cond1:
        dy = y2 - y1 - 4
    if cond2:
        dy = (y2 + h2) - (y1 + h1) + 4
    # 滚动到错误控件
    verticalScrollBar = scrollArea.verticalScrollBar()
    verticalScrollBar.setValue(verticalScrollBar.value() + dy)
4.将用户输入写入数值模型对象
将用户输入写入数值模型对象的函数如下,由于Python是个解释型语言,可以动态为对象设置属性,所以这里用了循环而不是递归来提高效率。
class Field:
    """
    字段属性
    """


def setField(self, data: dict):
    """
    设置字段
    :param self: 数值模型
    :param data:
    :return:
    """
    for key, value in data.items():
        if "." not in key:
            setattr(self, key, value)
            continue
        # 根据键定位到复合字段类型
        dataObj = self
        sub_keys = str(key).split(".")
        for sub_key in sub_keys[:-1]:
            try:
                dataObj = getattr(dataObj, sub_key)
            except AttributeError:
                # 没有预创建该属性则新建属性
                field = Field()
                setattr(dataObj, sub_key, field)
                dataObj = field
        setattr(dataObj, sub_keys[-1], value)
可以采用如下方式统一为数值模型添加setField方法:
class A:
    def __init__(self):
        self.setField = partial(setField, self)


class B:
    def __init__(self):
        self.setField = partial(setField, self)


class C:
    def __init__(self):
        self.setField = partial(setField, self)


class Model:
    def __init__(self):
        self.setField = partial(setField, self)
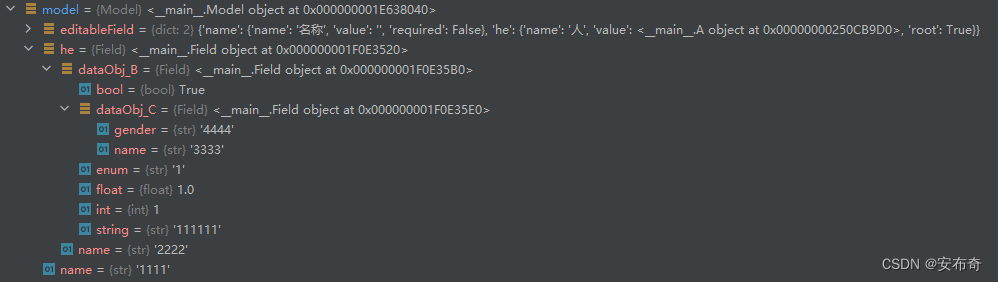
运行结果如下:
|
|


 1768
1768

 被折叠的 条评论
为什么被折叠?
被折叠的 条评论
为什么被折叠?
 到【灌水乐园】发言


