


 本文介绍了如何在Android设备上进行NFC标签的读写操作,包括读取标签内存、转换ASCII码和写入数据。文章强调了读取失败可能是块密码错误,并提示有3种默认密码可供尝试。此外,提供了项目的源码链接和建议使用的Android NFC应用。
2016就这样静悄悄的过去了,最近也是颓废的不行,都没怎么充实自己了,每天练练车,打打游戏和麻将,书都基本没翻个几页,家里完全没有状态。2017,加油吧,为了事业和家庭,Fighting!
关于接触到NFC这东西,是我2年前导师项目中认识到的,当时自己也是刚学Android,由于项目需要,所以自己当时承担了这方面的工作,由此也开启了我Android生涯。想当初我也是翻遍了网上的所有资料,基本上没有一个是完完全全写好的,能直接拿来用的,当时能读出一个标签的id也是乐的不行,所以我当时在想,要是我弄好了,就分享下经验,顺便共享下代码。但是为什么现在才写呢,因为当时做完后也没有继续做这个了,导致这个事情也是一拖再拖,直到最近导师又需要这个,又拿出来把代码改了改,才想起以前说要记录的这事。
NFC(Near Field Communication)近场通信,属于RFID中的一种,它是一种无源、低频、近距离的通信方式。通过扫描方提供的电能,利用电磁感应原理来驱动标签与扫描方进行通信。是一种快速,且安全的通信方式。现在广泛运用于公交卡、地铁票、门禁卡、校园卡等场景。现在应用比较广泛的是MifareClassic 1K卡,属于NfcA型标签,NFC标签共有4种类型的标签,具体类型和用途不一,这里就不说了。而当时我项目中用到的就是NfcA型卡,对NfcA卡进行数据读取和写入。至于NFC标签内部数据存放格式,读写的过程以及标签扇区(sector)和块(block)的概念,也就不说了,相信你可以通过其他途径可以获取到,这里我就只介绍NFC读写的代码了。
完成后整个功能界面如下,由于主要是测试的玩,所以界面什么的就不用太在意了,功能实现就好了。
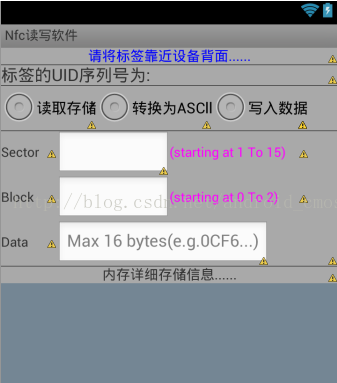
整个应用分为3大功能模块:读取标签内存,将内存数据转为Ascii码,写入数据。
后面的是sector和block是写入数据时,自己要将数据写入的扇区和块,data是要写入的数据。
首先你得拥有NFC标签,相信这个不难,校园卡,地铁票,公交卡什么的,都可以的。其次你得有读写的设备,作为Android开发者,相信你也不会专门买个读写的设备,不然就和Android联系不上了,我们要做的是开发一个简易版的NFC标签读写软件,所以你得有一个NFC读写的手机或Pad。好了,准备好了之后就可以测试玩一玩了。你也可以先从应用市场上下载NFC的应用,来测试你的设备是否支持NFC功能或者你的标签有没有问题。
1).新建Android项目,在res文件夹下新建一个xml的文件夹,里面放的是Android支持的NFC类型的配置数据。nfc_tech_filter.xml如下:
<resources xmlns:xliff="urn:oasis:names:tc:xliff:document:1.2">
    <!-- 可以处理所有Android支持的NFC类型 -->
 <tech-list>
     <tech>android.nfc.tech.IsoDep</tech>
        <tech>android.nfc.tech.NfcA</tech>
        <tech>android.nfc.tech.NfcB</tech>
        <tech>android.nfc.tech.NfcF</tech>
        <tech>android.nfc.tech.NfcV</tech>
        <tech>android.nfc.tech.Ndef</tech>
        <tech>android.nfc.tech.NdefFormatable</tech>
        <tech>android.nfc.tech.MifareUltralight</tech>
     <tech>android.nfc.tech.MifareClassic</tech>
 </tech-list>
</resources>
2)在AndroidManifest中进行权限声明:
<?xml version="1.0" encoding="utf-8"?>
<manifest xmlns:android="http://schemas.android.com/apk/res/android"
    package="com.example.nfc_test3"
    android:versionCode="1"
    android:versionName="1.0" >

    <uses-sdk
        android:minSdkVersion="14"
        android:targetSdkVersion="21" />

    <uses-permission android:name="android.permission.NFC" />

    <uses-feature
        android:name="android.hardware.nfc"
        android:required="true" />

    <application
        android:allowBackup="true"
        android:icon="@drawable/nfc"
        android:label="@string/app_name" >
        <activity
            android:name="com.example.nfc_read_write.NfcRW"
            android:label="@string/app_name" >
            <intent-filter>
                <action android:name="android.intent.action.MAIN" />

                <category android:name="android.intent.category.LAUNCHER" />
            </intent-filter>
            <intent-filter>
                <action android:name="android.nfc.action.NDEF_DISCOVERED" />
            </intent-filter>
            <intent-filter>
                <action android:name="android.nfc.action.TAG_DISCOVERED" >
                </action>

                <category android:name="android.intent.category.DEFAULT" >
                </category>
            </intent-filter>
            <intent-filter>
                <action android:name="android.nfc.action.TECH_DISCOVERED" />
            </intent-filter>

            <meta-data
                android:name="android.nfc.action.TECH_DISCOVERED"
                android:resource="@xml/nfc_tech_filter" />
        </activity>
    </application>

</manifest>
3)布局界面代码如下activity_nfc_main:
<ScrollView xmlns:android="http://schemas.android.com/apk/res/android"
    xmlns:tools="http://schemas.android.com/tools"
    android:layout_width="match_parent"
    android:layout_height="match_parent"
    android:orientation="vertical"
    android:background="#748694"
   >
    <LinearLayout
        android:layout_width="fill_parent"
        android:layout_height="wrap_content"
        android:orientation="vertical"
        android:background="#A9A9A9">
    <TextView
        android:id="@+id/tv1"
        android:layout_width="match_parent"
        android:layout_height="wrap_content"
        android:text="请将标签靠近设备背面......"
        android:textSize="15sp"
        android:gravity="center"
 最低0.47元/天 解锁文章


 2万+
2万+

 被折叠的 条评论
为什么被折叠?
被折叠的 条评论
为什么被折叠?
 到【灌水乐园】发言


