


布局管理器总结:
线性布局(LinearLayout)
1、首先总结一下基础的概念,android中的线性布局是用LinearLayout来表示,它是将放入其中的View子控件按照水平或者垂直方向排列,说白了,就是横着放,或者竖着放。需要注意的事,如果是水平放置的话,每一列只能放一个控件,如果是竖着放置的话,每一行只能放一个控件,再注意的是,线性布局不会换行,剩下的不会显示出来(这也是和javaSE中的流式布局的区别)
2、那么布局方式是怎么样呢,一是java代码进行布局,二是xml布局文件的形式,二者有什么特点呢,一般是使用xml布局文件的方式,因为可以更好的使代码和界面分离,把业务问题集中在代码中,还有一种是使用java代码来布局,它最主要的是可以动态控制控件,比较灵活,在一些特殊情景中,非常实用! 下面我会先介绍xml方式,后介绍java代码方式来进行总结。
Xml布局方式
线性布局的语法:
<LinearLayout xmls:android="http://schemas.android.com/apk/res/android"
    中间为它的属性列表
>
</LinearLayout>
    由于属性列表太多,我就主要介绍很常用和一些实用的属性标签,望谅解
    在介绍之前,给大家看一下,布局的关系类图,只用从关系类图继承关系中总结把握,才可以更好的认识,
    布局管理器的各个属性及各个布局管理器之间的相同点和不同点
这个布局管理器的类图(android studio快捷键:ctrl + H)
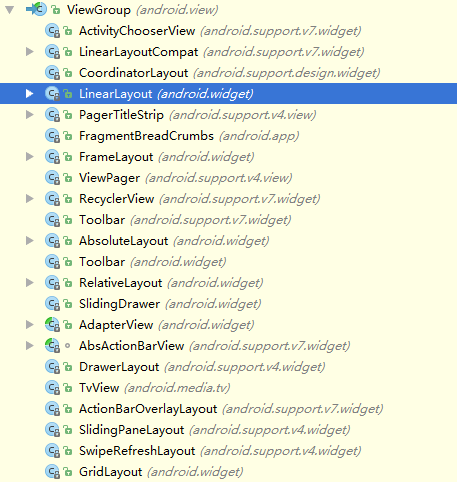
android 布局类有很多,我只总结4个,将在下面一一详解,今天主要是说明线性布局的知识和问题。
线性布局的常见属性
android:baseLineAligned:
由于android中的对齐方式基础基线的,所以这个属性的意思是:是否允许用户调整它内容的基线,注意是内容的基线,这个在weigth属性中常常使用到。
android:baseAlignedChildIndex:
由于当一个线性布局与另一个布局是按基线对齐的一部分,它可以指定其内容的基线的对齐方式。
android:gravity
这个是如何在对象中放置这个对象的内容,也可以说,是自己的内容,要放置在自己的什么位置,这个有Layout_gravity区别
android:orientation
设置控件的对齐方式,这个是最重要的属性,有水平和垂直两个
重要属性详解
1.android:layout_gravity 和android:gravity的区别
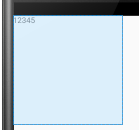
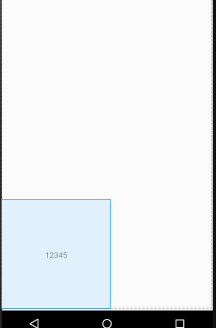
首先从名字上看,android:gravity是对控件本身来说的,默认是在左上侧的
<LinearLayout
    android:layout_height="match_parent"
    android:layout_width="match_parent"
    android:orientation="vertical"
    xmlns:android="http://schemas.android.com/apk/res/android">
    <TextView
        android:layout_width="200dp"
        android:text="12345"
        android:layout_height="200dp" />
</LinearLayout>
效果是默认是左侧
gravity有很多属性
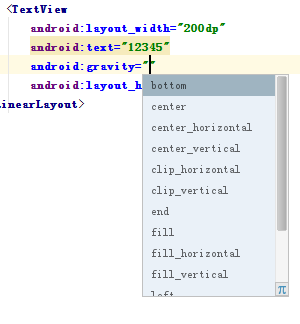
这是只说明一个,其它都是类似
<LinearLayout
    android:layout_height="match_parent"
    android:layout_width="match_parent"
    android:orientation="vertical"
    xmlns:android="http://schemas.android.com/apk/res/android">
    <TextView
        android:layout_width="200dp"
        android:text="12345"
        android:gravity="bottom|center"
        android:layout_height="200dp" />
</LinearLayout>
效果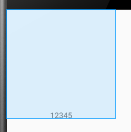
这里要注意的是多个属性一起用的时候,是采用 |符号
如上面的底部居中 bottom|center
android:layout_gravity
它表示是子控件相对父控件的位置,而不是自己相对于自己(这个是gravity)
<LinearLayout
    android:layout_height="match_parent"
    android:layout_width="match_parent"
    android:orientation="horizontal"
    xmlns:android="http://schemas.android.com/apk/res/android">
    <TextView
        android:layout_gravity="bottom"
        android:layout_width="200dp"
        android:text="12345"
        android:gravity="center"
        android:layout_height="200dp" />
</LinearLayout>
这里子控件TextView使用gravity是相对于自己是center居中对齐,而使用layout_gravity是相对于父控件(LineayLayout)的位置是底部
效果如下
weight属性
这个也是很重要的属性,也是别人看着很懂,其实不是很清楚的一个属性,明天,我将重新写一篇,来详解它,谢谢大家
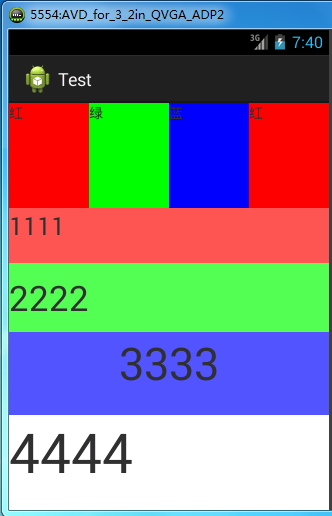
这个小的Demo,是综合了几个线性常用的属性,中间有gravity, layout_gravity, weight 等等, 下次我把代码发到github,写的不好,希望多多指教
<LinearLayout xmlns:android="http://schemas.android.com/apk/res/android"
    xmlns:tools="http://schemas.android.com/tools"
    android:layout_width="match_parent"
    android:layout_height="match_parent"
    android:orientation="vertical"
    tools:context=".MainActivity" >

    <!--
这是三个线性布局,最外层的是父布局,它是垂直布局,
它有二个子布局,都是线性布局,第一个是水平对齐,第二个是垂直对齐
-->

    <LinearLayout
        android:layout_width="match_parent"
        android:layout_height="wrap_content"
        android:layout_weight="1"
        android:orientation="horizontal" >

        <TextView
            android:layout_width="wrap_content"
            android:layout_height="match_parent"
            android:layout_weight="1"
            android:background="#ff0000"
            android:text="红" />

        <TextView
            android:layout_width="wrap_content"
            android:layout_height="match_parent"
            android:layout_weight="1"
            android:background="#00ff00"
            android:text="绿" />

        <TextView
            android:layout_width="wrap_content"
            android:layout_height="match_parent"
            android:layout_weight="1"
            android:background="#0000ff"
            android:text="蓝" />

        <TextView
            android:layout_width="wrap_content"
            android:layout_height="match_parent"
            android:layout_weight="1"
            android:background="#ff0000"
            android:text="红" />
    </LinearLayout>

    <LinearLayout
        android:layout_width="match_parent"
        android:layout_height="wrap_content"
        android:layout_weight="1"
        android:orientation="vertical" >

        <TextView
            android:layout_width="match_parent"
            android:layout_height="wrap_content"
            android:layout_weight="1"
            android:background="#aaff0000"
            android:text="1111"
            android:textSize="25px" />

        <TextView
            android:layout_width="match_parent"
            android:layout_height="wrap_content"
            android:layout_weight="1"
            android:background="#aa00ff00"
            android:gravity="center_vertical"
            android:text="2222"
            android:textSize="35px" />

        <TextView
            android:layout_width="match_parent"
            android:layout_height="wrap_content"
            android:layout_weight="1"
            android:background="#aa0000ff"
            android:gravity="center_horizontal"
            android:text="3333"
            android:textSize="45px" />

        <TextView
            android:layout_width="match_parent"
            android:layout_height="wrap_content"
            android:layout_weight="1"
            android:gravity="top"
            android:text="4444"
            android:textSize="55px" />
    </LinearLayout>

</LinearLayout>
效果如下:


 973
973


 被折叠的 条评论
为什么被折叠?
被折叠的 条评论
为什么被折叠?
 到【灌水乐园】发言


