


原文地址
http://tech.vg.no/2015/07/17/android-databinding-goodbye-presenter-hello-viewmodel/
1、Android DataBinding:再见MVP,你好MVVM
当我们谈到android应用程序的架构模式时,MVP一直是占主流的地位。就像 Ted Mosby, Nucleus and Mortar 框架都是用Presenters 架构,使我们的app结构变得非常清晰,还帮助我们解决一个凑名昭着的问题:android设备的旋转和状态持久。当然这不是直接的MVP概念,但事实上这一架构模型,使我们的代码解耦。
数据绑定,是在Google I/O 2015提出并且Android M预览版是的支持库。声称改变一切。根据Wikipedia 是介绍的MVP,Presenter 有以下作用:
Presenter 根据模型和视图。它从存储库(模型)中检索数据,并将其格式化为在视图中显示的数据。
问题是,数据绑定框架将代替Presenter 的主要职责(作用在模型和视图),而其余的功能则是留给增强模型–ViewModel(检索数据库和并格式处理)。视图模型是ViewModel是一个标准的java类,其唯一的责任是代表在一个View中的数据。它可以合并来自多个源(模型)的数据,并展示数据。我以前有一篇在ViewModel的短文章,它主要讲述了Data Model 和Transport Model的不同。
构建我们最终的MVVM–模型视图ViewModel,MVVM概念最初是由微软在2005年(不要让它吓到你了)。下面我说明MVP到MVVM的变化,引用Hanne Dorfmann介绍他的 Ted Mosby framework中使用的图片

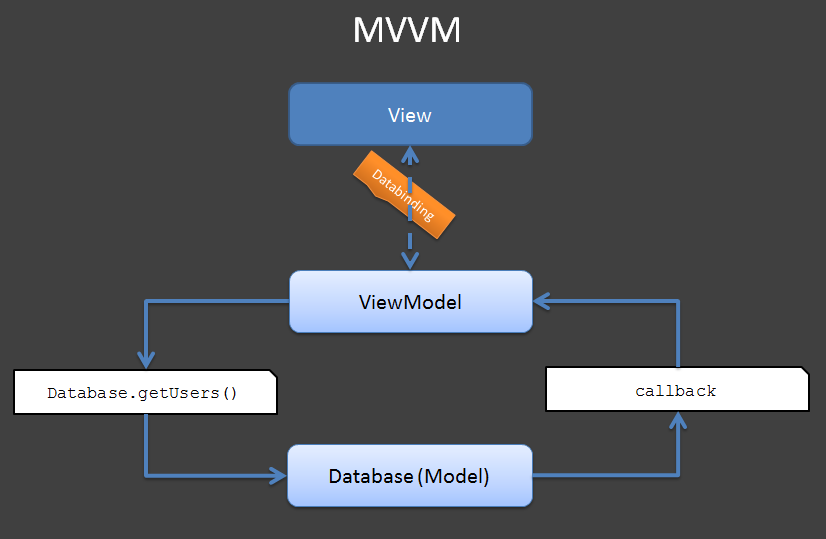
所有的数据的绑定和更新都是通过数据绑定框架(Data Binding Framework)来完成的。Observablefield类允许视图对模型的变化做出反应,而XML引用字段改变时也会改变ViewModel 。当作用在视图上时,你也可以通过程序订阅变化,比如一个CheckBox点击时,让TextView时禁用。如果有一个标准的java类能够表示View的状态,这样的好处显而易见。并且我们可以很容易的单元测试。
注意在MVP上图有一个方法调用 Presenter.loadUsers()的方法。在MVVM模式中这所有的方法都定义在 ViewMode。从维基百科文章:
The view model is an abstraction of the view that exposes public properties and commands
在MVP模式很中,你的模型很可能是“简单”的类,它只保存数据。不要害怕把业务逻辑放在你的模型或视图模型中。这是面向对象编程的一个核心原则。回到 Presenter.loadUsers()这个方法,我们没有在ViewModel中调用这个方法,视图是通过绑定在xml文件中。如果我们不把数据绑定,我们仍然必须使用以前的android语法:onclick语法,或手动添加监听代码。
2、处理系统调用
仍然有一系列的工作在View中去做,比如初始化系统的回调,打开dialog或者涉及Context的对象。不要这些代码放到ViewModel。如果你把像这种Context放入到ViewModel中,这是错误的。
我还没有找到最好的解决办法,但有一些可以尝试。一种方式是在View的ViewModel保持一个presenter 一个接口的引用。这样你就不会降低可测试性。但是没有一个单独的presenter 的类在我们程序中,我坚持认为,只要保持它的简单接口的具体实现。另一种方式就像event bus或者Square Otto初始化方式 ShowToastMessage(“hello world”)(具体参见eventbus 或者otto的使用)。这将产生一个更大的分离View和ViewModel –但那是好事情吗?
3、我们是否需要框架呢?
因此,Data Binding框架代替其他的框架吗?只有部分。我希望看到的是这些框架进化为MVVM风格框架,使我们可以利用最好的数据绑定同时依赖第三方的框架到最小,并保持框架小而简单。而Presenter 的时代就要结束了,这个Presenter仅仅做一些重要的工作比如生命周期管理和视图状态(ViewModel)持久性。不幸的是,这并没有改变。
我最近了解到Android ViewModel框架,这实际上可能是一个很好的适合MVVM和Android的数据绑定。
4、总结
当我第一听说Android M 所有工作是为了改进sdk和关注开发者们。我是多么的兴奋。当接受到数据绑定的时候,我是如此的吃惊,我已经和其他平台上的数据绑定工作多年:WinForms,WPF,Silverlight和Windows手机。我知道这将有助于我们写更清洁的架构和更少的耦合代码。这个框架与我们一起工作,而不是反对我们,现在,它终于要来了。
但是,它仍然有一些缺点。事实上你定义的xml文件,它没有编译,也就是没办法进行单元测试。这样你会了现许多错误在运行期间,而不是在编译期间。不幸的是,如果你经常忘记绑定view呢?
这就是为什么我希望谷歌能够让Android Studio支持数据绑定到最大的语法和编译期间检查的XML,自动完成。支持重命名在xml字段中。从我用的Android Studdio1.3测试版-中思考这样的问题。有些东西是支持的,很也有许多不支持,但是我看到了很大的希望。
5、Code example
下面分别使用mvp和mvvm的代码示例

MVP – VIEW – XML
<RelativeLayout xmlns:android="http://schemas.android.com/apk/res/android"
                xmlns:tools="http://schemas.android.com/tools"
                android:layout_width="match_parent"
                android:layout_height="match_parent"
                android:paddingLeft="@dimen/activity_horizontal_margin"
                android:paddingRight="@dimen/activity_horizontal_margin"
                android:paddingTop="@dimen/activity_vertical_margin"
                android:paddingBottom="@dimen/activity_vertical_margin"
                tools:context=".MainActivityFragment">

    <TextView
        android:text="..."
        android:layout_width="wrap_content"
        android:layout_height="wrap_content"
        android:layout_alignParentEnd="true"
        android:id="@+id/loggedInUserCount"/>

    <TextView
        android:text="# logged in users:"
        android:layout_width="wrap_content"
        android:layout_height="wrap_content"
        android:layout_alignParentEnd="false"
        android:layout_toLeftOf="@+id/loggedInUserCount"/>

    <RadioGroup
        android:layout_marginTop="40dp"
        android:id="@+id/existingOrNewUser"
        android:gravity="center"
        android:layout_width="wrap_content"
        android:layout_height="wrap_content"
        android:layout_centerHorizontal="true"
        android:orientation="horizontal">

        <RadioButton
            android:layout_width="wrap_content"
            android:layout_height="wrap_content"
            android:text="Returning user"
            android:id="@+id/returningUserRb"/>

        <RadioButton
            android:layout_width="wrap_content"
            android:layout_height="wrap_content"
            android:text="New user"
            android:id="@+id/newUserRb"
            />

    </RadioGroup>

    <LinearLayout
        android:orientation="horizontal"
        android:layout_width="match_parent"
        android:layout_height="wrap_content"
        android:id="@+id/username_block"
        android:layout_below="@+id/existingOrNewUser">

        <TextView
            android:layout_width="wrap_content"
            android:layout_height="wrap_content"
            android:textAppearance="?android:attr/textAppearanceMedium"
            android:text="Username:"
            android:id="@+id/textView"
            android:minWidth="100dp"/>

        <EditText
            android:layout_width="wrap_content"
            android:layout_height="wrap_content"
            android:id="@+id/username"
            android:minWidth="200dp"/>
    </LinearLayout>

    <LinearLayout
        android:orientation="horizontal"
        android:layout_width="match_parent"
        android:layout_height="wrap_content"
        android:layout_alignParentStart="false"
        android:id="@+id/password_block"
        android:layout_below="@+id/username_block">

        <TextView
            android:layout_width="wrap_content"
            android:layout_height="wrap_content"
            android:textAppearance="?android:attr/textAppearanceMedium"
            android:text="Password:"
            android:minWidth="100dp"/>

        <EditText
            android:layout_width="wrap_content"
            android:layout_height="wrap_content"
            android:inputType="textPassword"
            android:ems="10"
            android:id="@+id/password"/>

    </LinearLayout>

    <LinearLayout
        android:orientation="horizontal"
        android:layout_width="match_parent"
        android:layout_height="wrap_content"
        android:layout_below="@+id/password_block"
        android:id="@+id/email_block">

        <TextView
            android:layout_width="wrap_content"
            android:layout_height="wrap_content"
            android:textAppearance="?android:attr/textAppearanceMedium"
            android:text="Email:"
            android:minWidth="100dp"/>

        <EditText
            android:layout_width="wrap_content"
            android:layout_height="wrap_content"
            android:inputType="textEmailAddress"
            android:ems="10"
            android:id="@+id/email"/>
    </LinearLayout>

    <Button
        android:layout_width="wrap_content"
        android:layout_height="wrap_content"
        android:text="Log in"
        android:id="@+id/loginOrCreateButton"
        android:layout_below="@+id/email_block"
        android:layout_centerHorizontal="true"/>
</RelativeLayout>
MVP – VIEW – JAVA
package com.nilzor.presenterexample;

import android.os.Bundle;
import android.view.LayoutInflater;
import android.view.View;
import android.view.ViewGroup;
import android.widget.Button;
import android.widget.CompoundButton;
import android.widget.RadioButton;
import android.widget.TextView;
import android.widget.Toast;
import com.hannesdorfmann.mosby.mvp.MvpFragment;
import com.hannesdorfmann.mosby.mvp.MvpView;
import butterknife.InjectView;
import butterknife.OnClick;

public class MainActivityFragment extends MvpFragment implements MvpView {
    @InjectView(R.id.username)
    TextView mUsername;

    @InjectView(R.id.password)
    TextView mPassword;

    @InjectView(R.id.newUserRb)
    RadioButton mNewUserRb;

    @InjectView(R.id.returningUserRb)
    RadioButton mReturningUserRb;

    @InjectView(R.id.loginOrCreateButton)
    Button mLoginOrCreateButton;

    @InjectView(R.id.email_block)
    ViewGroup mEmailBlock;

    @InjectView(R.id.loggedInUserCount)
    TextView mLoggedInUserCount;

    public MainActivityFragment() {
    }

    @Override
    public MainPresenter createPresenter() {
        return new MainPresenter();
    }

    @Override
    public View onCreateView(LayoutInflater inflater, ViewGroup container, Bundle savedInstanceState) {
        return inflater.inflate(R.layout.fragment_main, container, false);
    }

    @Override
    public void onViewCreated(View view, Bundle savedInstanceState) {
        super.onViewCreated(view, savedInstanceState);
        attachEventListeners();
    }

    private void attachEventListeners() {
        mNewUserRb.setOnCheckedChangeListener(new CompoundButton.OnCheckedChangeListener() {
            @Override
            public void onCheckedChanged(CompoundButton buttonView, boolean isChecked) {
                updateDependentViews();
            }
        });
        mReturningUserRb.setOnCheckedChangeListener(new CompoundButton.OnCheckedChangeListener() {
            @Override
            public void onCheckedChanged(CompoundButton buttonView, boolean isChecked) {
                updateDependentViews();
            }
        });
    }

    /** Prepares the initial state of the view upon startup */
    public void setInitialState() {
        mReturningUserRb.setChecked(true);
        updateDependentViews();
    }

    /** Shows/hides email field and sets correct text of login button depending on state of radio buttons */
    public void updateDependentViews() {
        if (mReturningUserRb.isChecked()) {
            mEmailBlock.setVisibility(View.GONE);
            mLoginOrCreateButton.setText(R.string.log_in);
        }
        else {
            mEmailBlock.setVisibility(View.VISIBLE);
            mLoginOrCreateButton.setText(R.string.create_user);
        }
    }

    public void setNumberOfLoggedIn(int numberOfLoggedIn) {
        mLoggedInUserCount.setText(""  + numberOfLoggedIn);
    }

    @OnClick(R.id.loginOrCreateButton)
    public void loginOrCreate() {
        if (mNewUserRb.isChecked()) {
            Toast.makeText(getActivity(), "Please enter a valid email address", Toast.LENGTH_SHORT).show();
        } else {
            Toast.makeText(getActivity(), "Invalid username or password", Toast.LENGTH_SHORT).show();
        }
    }
}
MVP – PRESENTER
package com.nilzor.presenterexample;

import android.os.Handler;
import android.os.Message;
import com.hannesdorfmann.mosby.mvp.MvpPresenter;

public class MainPresenter implements MvpPresenter {
    MainModel mModel;
    private MainActivityFragment mView;

    public MainPresenter() {
        mModel = new MainModel();
    }

    @Override
    public void attachView(MainActivityFragment view) {
        mView = view;
        view.setInitialState();
        updateViewFromModel();
        ensureModelDataIsLoaded();
    }

    @Override
    public void detachView(boolean retainInstance) {
        mView = null;
    }

    private void ensureModelDataIsLoaded() {
        if (!mModel.isLoaded()) {
            mModel.loadAsync(new Handler.Callback() {
                @Override
                public boolean handleMessage(Message msg) {
                    updateViewFromModel();
                    return true;
                }
            });
        }
    }

    /** Notifies the views of the current value of "numberOfUsersLoggedIn", if any */
    private void updateViewFromModel() {
        if (mView != null && mModel.isLoaded()) {
            mView.setNumberOfLoggedIn(mModel.numberOfUsersLoggedIn);
        }
    }
}
MVP – MODEL
package com.nilzor.presenterexample;

import android.os.AsyncTask;
import android.os.Handler;
import java.util.Random;

public class MainModel {
    public Integer numberOfUsersLoggedIn;
    private boolean mIsLoaded;
    public boolean isLoaded() {
        return mIsLoaded;
    }

    public void loadAsync(final Handler.Callback onDoneCallback) {
        new AsyncTask() {
            @Override
            protected Void doInBackground(Void... params) {
                // Simulating some asynchronous task fetching data from a remote server
                try {Thread.sleep(2000);} catch (Exception ex) {};
                numberOfUsersLoggedIn = new Random().nextInt(1000);
                mIsLoaded = true;
                return null;
            }

            @Override
            protected void onPostExecute(Void aVoid) {
                onDoneCallback.handleMessage(null);
            }
        }.execute((Void) null);
    }
}
用mvvm代码如下
MVVM – VIEW – XML
<layout xmlns:android="http://schemas.android.com/apk/res/android"
    xmlns:tools="http://schemas.android.com/tools">
    <data>
        <variable name="data" type="com.nilzor.presenterexample.MainModel"/>
    </data>
    <RelativeLayout
        android:layout_width="match_parent"
        android:layout_height="match_parent"
        android:paddingLeft="@dimen/activity_horizontal_margin"
        android:paddingRight="@dimen/activity_horizontal_margin"
        android:paddingTop="@dimen/activity_vertical_margin"
        android:paddingBottom="@dimen/activity_vertical_margin"
        tools:context=".MainActivityFragment">

        <TextView
            android:text="@{data.numberOfUsersLoggedIn}"
            android:layout_width="wrap_content"
            android:layout_height="wrap_content"
            android:layout_alignParentEnd="true"
            android:id="@+id/loggedInUserCount"/>

        <TextView
            android:text="# logged in users:"
            android:layout_width="wrap_content"
            android:layout_height="wrap_content"
            android:layout_alignParentEnd="false"
            android:layout_toLeftOf="@+id/loggedInUserCount"/>

        <RadioGroup
            android:layout_marginTop="40dp"
            android:id="@+id/existingOrNewUser"
            android:gravity="center"
            android:layout_width="wrap_content"
            android:layout_height="wrap_content"
            android:layout_centerHorizontal="true"
            android:orientation="horizontal">

            <RadioButton
                android:layout_width="wrap_content"
                android:layout_height="wrap_content"
                android:text="Returning user"
                android:checked="@{data.isExistingUserChecked}"
                android:id="@+id/returningUserRb"/>

            <RadioButton
                android:layout_width="wrap_content"
                android:layout_height="wrap_content"
                android:text="New user"
                android:id="@+id/newUserRb"
                />

        </RadioGroup>

        <LinearLayout
            android:orientation="horizontal"
            android:layout_width="match_parent"
            android:layout_height="wrap_content"
            android:id="@+id/username_block"
            android:layout_below="@+id/existingOrNewUser">

            <TextView
                android:layout_width="wrap_content"
                android:layout_height="wrap_content"
                android:textAppearance="?android:attr/textAppearanceMedium"
                android:text="Username:"
                android:id="@+id/textView"
                android:minWidth="100dp"/>

            <EditText
                android:layout_width="wrap_content"
                android:layout_height="wrap_content"
                android:id="@+id/username"
                android:minWidth="200dp"/>
        </LinearLayout>

        <LinearLayout
            android:orientation="horizontal"
            android:layout_width="match_parent"
            android:layout_height="wrap_content"
            android:layout_alignParentStart="false"
            android:id="@+id/password_block"
            android:layout_below="@+id/username_block">

            <TextView
                android:layout_width="wrap_content"
                android:layout_height="wrap_content"
                android:textAppearance="?android:attr/textAppearanceMedium"
                android:text="Password:"
                android:minWidth="100dp"/>

            <EditText
                android:layout_width="wrap_content"
                android:layout_height="wrap_content"
                android:inputType="textPassword"
                android:ems="10"
                android:id="@+id/password"/>

        </LinearLayout>

        <LinearLayout
            android:orientation="horizontal"
            android:layout_width="match_parent"
            android:layout_height="wrap_content"
            android:layout_below="@+id/password_block"
            android:id="@+id/email_block"
            android:visibility="@{data.emailBlockVisibility}">

            <TextView
                android:layout_width="wrap_content"
                android:layout_height="wrap_content"
                android:textAppearance="?android:attr/textAppearanceMedium"
                android:text="Email:"
                android:minWidth="100dp"/>

            <EditText
                android:layout_width="wrap_content"
                android:layout_height="wrap_content"
                android:inputType="textEmailAddress"
                android:ems="10"
                android:id="@+id/email"/>
        </LinearLayout>

        <Button
            android:layout_width="wrap_content"
            android:layout_height="wrap_content"
            android:text="@{data.loginOrCreateButtonText}"
            android:id="@+id/loginOrCreateButton"
            android:layout_below="@+id/email_block"
            android:layout_centerHorizontal="true"/>
    </RelativeLayout>
</layout>
MVVM – VIEW – JAVA
package com.nilzor.presenterexample;

import android.app.Fragment;
import android.os.Bundle;
import android.view.LayoutInflater;
import android.view.View;
import android.view.ViewGroup;
import android.widget.CompoundButton;
import android.widget.Toast;

import com.nilzor.presenterexample.databinding.FragmentMainBinding;

public class MainActivityFragment extends Fragment {
    private FragmentMainBinding mBinding;
    private MainModel mViewModel;

    public MainActivityFragment() {
    }

    @Override
    public View onCreateView(LayoutInflater inflater, ViewGroup container, Bundle savedInstanceState) {
        View view = inflater.inflate(R.layout.fragment_main, container, false);
        mBinding = FragmentMainBinding.bind(view);
        mViewModel = new MainModel(this, getResources());
        mBinding.setData(mViewModel);
        attachButtonListener();
        return view;
    }

    private void attachButtonListener() {
        mBinding.loginOrCreateButton.setOnClickListener(new View.OnClickListener() {
            @Override
            public void onClick(View v) {
                mViewModel.logInClicked();
            }
        });
    }

    @Override
    public void onViewCreated(View view, Bundle savedInstanceState) {
        ensureModelDataIsLodaded();
    }

    private void ensureModelDataIsLodaded() {
        if (!mViewModel.isLoaded()) {
            mViewModel.loadAsync();
        }
    }

    public void showShortToast(String text) {
        Toast.makeText(getActivity(), text, Toast.LENGTH_SHORT).show();
    }
}
MVVM – VIEWMODEL
package com.nilzor.presenterexample;

import android.content.res.Resources;
import android.databinding.ObservableField;
import android.os.AsyncTask;
import android.view.View;

import java.util.Random;

public class MainModel {
    public ObservableField numberOfUsersLoggedIn = new ObservableField();
    public ObservableField isExistingUserChecked = new ObservableField();
    public ObservableField emailBlockVisibility = new ObservableField();
    public ObservableField loginOrCreateButtonText = new ObservableField();
    private boolean mIsLoaded;
    private MainActivityFragment mView;
    private Resources mResources;

    public MainModel(MainActivityFragment view, Resources resources) {
        mView = view;
        mResources = resources; // You might want to abstract this for testability
        setInitialState();
        updateDependentViews();
        hookUpDependencies();
    }
    public boolean isLoaded() {
        return mIsLoaded;
    }

    private void setInitialState() {
        numberOfUsersLoggedIn.set("...");
        isExistingUserChecked.set(true);
    }

    private void hookUpDependencies() {
        isExistingUserChecked.addOnPropertyChangedCallback(new android.databinding.Observable.OnPropertyChangedCallback() {
            @Override
            public void onPropertyChanged(android.databinding.Observable sender, int propertyId) {
                updateDependentViews();
            }
        });
    }

    public void updateDependentViews() {
        if (isExistingUserChecked.get()) {
            emailBlockVisibility.set(View.GONE);
            loginOrCreateButtonText.set(mResources.getString(R.string.log_in));
        }
        else {
            emailBlockVisibility.set(View.VISIBLE);
            loginOrCreateButtonText.set(mResources.getString(R.string.create_user));
        }
    }

    public void loadAsync() {
        new AsyncTask() {
            @Override
            protected Void doInBackground(Void... params) {
                // Simulating some asynchronous task fetching data from a remote server
                try {Thread.sleep(2000);} catch (Exception ex) {};
                numberOfUsersLoggedIn.set("" + new Random().nextInt(1000));
                mIsLoaded = true;
                return null;
            }
        }.execute((Void) null);
    }

    public void logInClicked() {
        // Illustrating the need for calling back to the view though testable interfaces.
        if (isExistingUserChecked.get()) {
            mView.showShortToast("Invalid username or password");
        }
        else {
            mView.showShortToast("Please enter a valid email address");
        }
    }
}
更多连接
http://willowtreeapps.com/blog/mvvm-on-android-what-you-need-to-know/


 1万+
1万+


 被折叠的 条评论
为什么被折叠?
被折叠的 条评论
为什么被折叠?
 到【灌水乐园】发言


