


android自定义View一(基础和原理)
http://blog.csdn.net/androidxiaogang/article/details/51849136
1、自定义View的种类
自定义View的种类比较多,选择比较合适的自定义方式,能够减少一定的工作量。
在开发中一般可以使用下面4种方式实现自定义View:
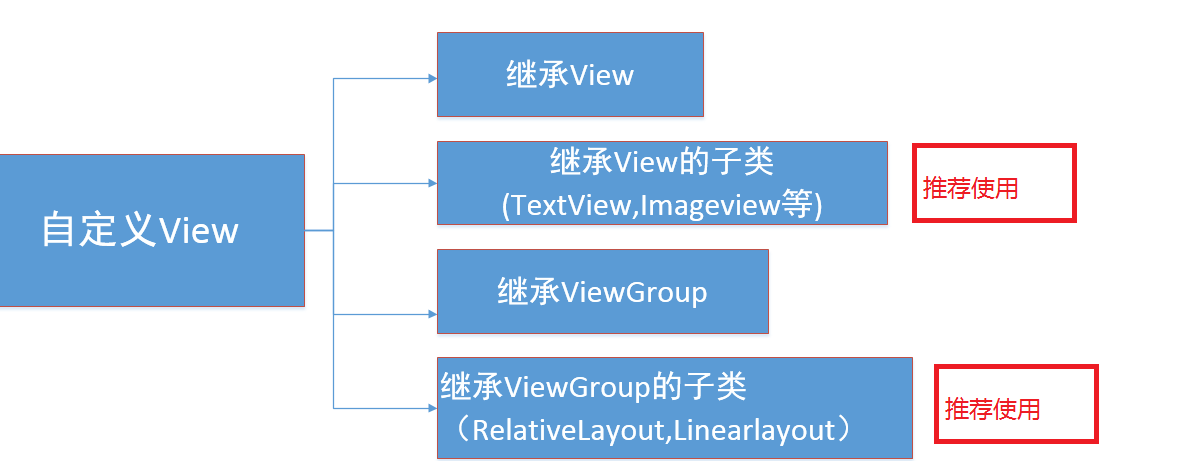
第一种方式:继承View,View是android中界中最基础的元素,也就是说是基类,所有控件或者布局都是view的子类。用这种方式实现自定义控件或者View,工作量比较大,我们必须处理一此额外的工作:比如在onMeasure()方法中,必须自已处理wrap_content和match_parent还有处理在自已相对的父布局位置,margin之类的。
第二种方式:继承View的子类,比如说TextView,ImageView,Button之类的。用这种方式实现自定义View,工作量少了很多,但如果View中元素种类比较少或者单一还行,如果View中有其他的比如有TextView,ImageView,Button之类的,就不合适了。
第三种方式:继承ViewGroup,这种实现方式也比较复杂,与继承View相信,如果使用用这种方式,我们必须在onMeasure()和onLayout中处理margin,padding之类的工作。
第四种方式:继承ViewGroup的子类(Linearlayout,Relativelayout),ViewGroup是View的子类,而ViewGroup又是所有layout的基类。通过这种方式自定义View我们可以通过xml布局填充View,也不用管onMeasure(),或者onLayout()中关于padding,margins之类的。
总结:开发中,尽量使用View的子类和ViewGroup的子类实现自定义View,根据不同的情况选择是View的子类,还是ViewGroup的子类,如果实现的功能比较单一(控件个数)可以用View的子类,如果是组合式布局(包含许多不同的控件种类)可以使用ViewGroup的子类实现。
2、onMeasure()分析
通过上面四种方式自定义View,如果直接继承View,和ViewGroup要在onMeasure()中考虑match_parent,padding之类的,那么可以通过onMeasure()方法得出结论。
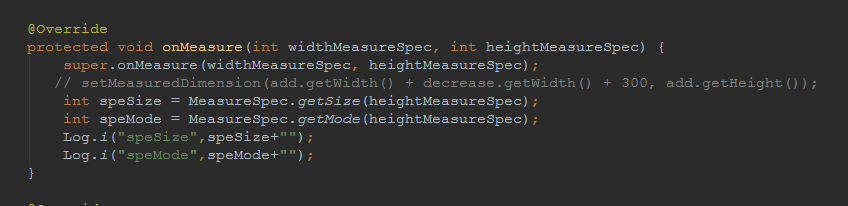
首先通过重写onMeasure()方法
点击进入父类onMeasure()方法中
setMeasuredDimension(getDefaultSize(getSuggestedMinimumWidth(), widthMeasureSpec),
getDefaultSize(getSuggestedMinimumHeight(), heightMeasureSpec));
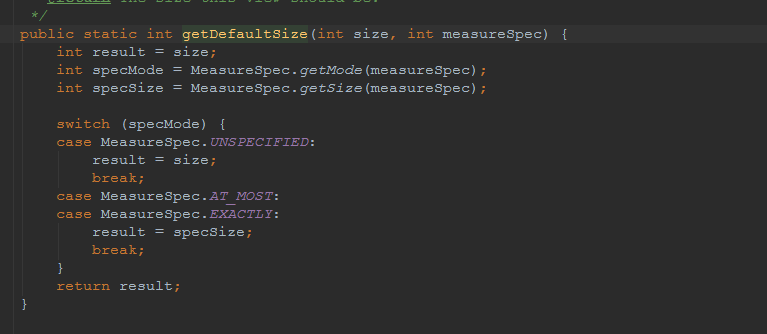
也就是调用了 getDefaultSize()方法。

最终调用的是这个方法
两个参数,并且这个两参数是调用MeasureSpec类中的一个getMode(),和getSize()方法
int specMode = MeasureSpec.getMode(measureSpec);
int specSize = MeasureSpec.getSize(measureSpec);
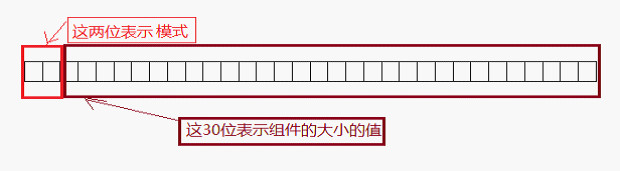
进入到MeasureSpec类中:
1、specSize 很容易理解,就是我们传给view的像素值,比如300,500.
2、specMode 有三个参数:我们称之为测量规格模式
UNSPECIFIED,EXACTLY,AT_MOST
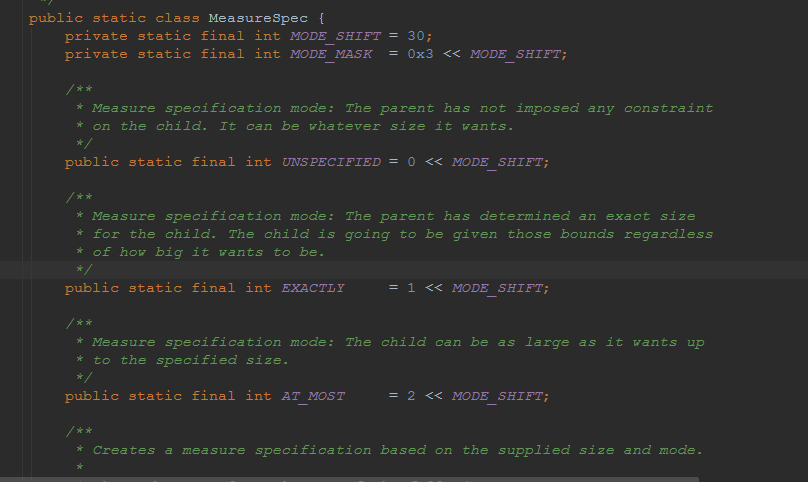
- UNSPECIFIED:对于控件尺寸来说,没有任何参考意义。
- EXACTLY:父View已经检测到子View的大小,它的大小在父View的限制内。
- AT_MOST:子View想要多大就多大。
从传入方法两个getDefaultSize(int size, int measureSpec)这两个值,最终返回的是一个result。因此如果这个是widthMeasureSpec的宽的话,它由这两个值最终决定。
是match_parent还是warp_content最终是这样形成的

从上面可以看出onMeasure()方法的实质:测量在父View中的位置:
EXACTLY——–match_parent
AT_MOST——-wrap_content
这是match_parent,wrap_content在内部代码中设置的原理。实际中这情况也要考虑父View的EXACTLY,AT_MOST的情况。实际中见表格。
2、onLayout()分析
onLayout()方法具体在继承View和ViewGroup中是有区别的
首先看在View中源码:
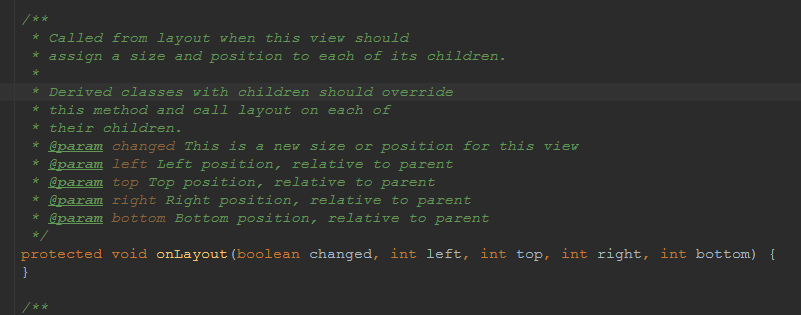
可以看出在继承View时,源码中onlayout()是一个空的方法。
而再看看ViewGroup中的源码:
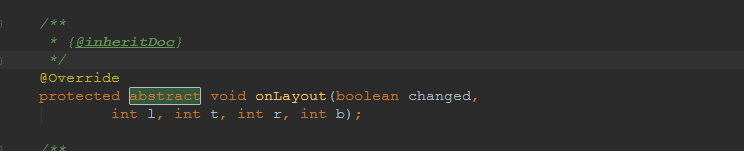
一个抽象类:
这下都明白了,因为ViewGruop本身作为容器的作用。它一定有自已的子类,要求子类必须指定在父类中的具体位置。继承ViewGroup时,要求我们必须重写onlayout()方法,也就是Linearlayout,RelativeLayout也都重写这个方法了。
下面是Linearlayout中onlayout()方法中的代码
  @Override
    protected void onLayout(boolean changed, int l, int t, int r, int b) {
        if (mOrientation == VERTICAL) {
            layoutVertical(l, t, r, b);
        } else {
            layoutHorizontal(l, t, r, b);
        }
    }
进入 layoutVertical(l, t, r, b)中
 void layoutVertical(int left, int top, int right, int bottom) {
        final int paddingLeft = mPaddingLeft;

        int childTop;
        int childLeft;

        // Where right end of child should go
        final int width = right - left;
        int childRight = width - mPaddingRight;

        // Space available for child
        int childSpace = width - paddingLeft - mPaddingRight;

        final int count = getVirtualChildCount();

        final int majorGravity = mGravity & Gravity.VERTICAL_GRAVITY_MASK;
        final int minorGravity = mGravity & Gravity.RELATIVE_HORIZONTAL_GRAVITY_MASK;

        switch (majorGravity) {
           case Gravity.BOTTOM:
               // mTotalLength contains the padding already
               childTop = mPaddingTop + bottom - top - mTotalLength;
               break;

               // mTotalLength contains the padding already
           case Gravity.CENTER_VERTICAL:
               childTop = mPaddingTop + (bottom - top - mTotalLength) / 2;
               break;

           case Gravity.TOP:
           default:
               childTop = mPaddingTop;
               break;
        }

        for (int i = 0; i < count; i++) {
            final View child = getVirtualChildAt(i);
            if (child == null) {
                childTop += measureNullChild(i);
            } else if (child.getVisibility() != GONE) {
                final int childWidth = child.getMeasuredWidth();
                final int childHeight = child.getMeasuredHeight();

                final LinearLayout.LayoutParams lp =
                        (LinearLayout.LayoutParams) child.getLayoutParams();

                int gravity = lp.gravity;
                if (gravity < 0) {
                    gravity = minorGravity;
                }
                final int layoutDirection = getLayoutDirection();
                final int absoluteGravity = Gravity.getAbsoluteGravity(gravity, layoutDirection);
                switch (absoluteGravity & Gravity.HORIZONTAL_GRAVITY_MASK) {
                    case Gravity.CENTER_HORIZONTAL:
                        childLeft = paddingLeft + ((childSpace - childWidth) / 2)
                                + lp.leftMargin - lp.rightMargin;
                        break;

                    case Gravity.RIGHT:
                        childLeft = childRight - childWidth - lp.rightMargin;
                        break;

                    case Gravity.LEFT:
                    default:
                        childLeft = paddingLeft + lp.leftMargin;
                        break;
                }

                if (hasDividerBeforeChildAt(i)) {
                    childTop += mDividerHeight;
                }

                childTop += lp.topMargin;
                setChildFrame(child, childLeft, childTop + getLocationOffset(child),
                        childWidth, childHeight);
                childTop += childHeight + lp.bottomMargin + getNextLocationOffset(child);

                i += getChildrenSkipCount(child, i);
            }
        }
    }
在这个方法中它计算出自已的能给viewchild剩余空间,然后得到每个viewchild,再给他们摆放真正的位置。这就是onLayout()方法的作用。
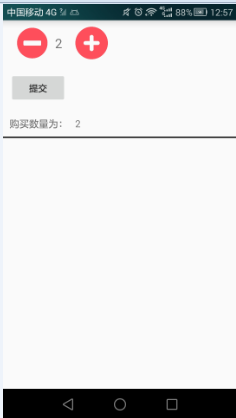
3、继承LinearLayout示例
在view中代码
public class MyView extends LinearLayout implements View.OnClickListener {
    private TextView textValue;
    private ImageView iv_add;
    private ImageView iv_decrease;

    private int minValue;
    private int maxValue;

    private int value;


    private Context context;

    public int getValue() {
        return Integer.valueOf(textValue.getText().toString());
    }

    public void setValue(int value) {
        this.value = value;
    }
    public int getMinValue() {
        return minValue;
    }

    public void setMinValue(int minValue) {
        this.minValue = minValue;
    }

    public int getMaxValue() {
        return maxValue;
    }

    public void setMaxValue(int maxValue) {
        this.maxValue = maxValue;
    }


    public MyView(Context context) {
        super(context);
        this.context = context;
        initView();
    }

    public MyView(Context context, AttributeSet attrs) {
        super(context, attrs);
        this.context = context;
        initView();
    }

    public MyView(Context context, AttributeSet attrs, int defStyleAttr) {
        super(context, attrs, defStyleAttr);
        this.context = context;
        initView();
    }

    private void initView() {
        View view = inflate(context, R.layout.myview, this);
        textValue= (TextView)view.findViewById(R.id.textValue);
        iv_decrease = (ImageView) view.findViewById(R.id.decrease);
        iv_add = (ImageView) view.findViewById(R.id.add);

        iv_decrease.setOnClickListener(this);
        iv_add.setOnClickListener(this);
    }

    @Override
    public void onClick(View v) {
        switch (v.getId()) {
            case R.id.decrease:
                decrease();
                break;
            case R.id.add:
                add();
                break;
        }
    }

    private void add() {
       int currentValue=Integer.valueOf(textValue.getText().toString());
        if(currentValue<getMaxValue()){
           textValue.setText(String.valueOf(currentValue+1));
        }
        if(currentValue==getMaxValue()){
            Toast.makeText(context,"不能超过库存 ",Toast.LENGTH_SHORT).show();
       }
    }

    private void decrease() {
        int currentValue=Integer.valueOf(textValue.getText().toString());
        if(currentValue>getMinValue()){
            textValue.setText(String.valueOf(currentValue - 1));
        }
        if(currentValue==getMinValue()){
            Toast.makeText(context,"不能小于0 ",Toast.LENGTH_SHORT).show();
        }
    }
}
清单文件中引入
<?xml version="1.0" encoding="utf-8"?>
<LinearLayout xmlns:android="http://schemas.android.com/apk/res/android"
    xmlns:tools="http://schemas.android.com/tools"
    android:layout_width="match_parent"
    android:layout_height="match_parent"
    android:fitsSystemWindows="true"
    android:orientation="vertical"
    tools:context="com.example.yu.customview.MainActivity">

    <view.MyView
        android:id="@+id/addAndDecButton"
        android:layout_width="wrap_content"
        android:layout_height="wrap_content"></view.MyView>

    <Button
        android:layout_margin="10dp"
        android:id="@+id/button"
        android:layout_width="wrap_content"
        android:layout_height="wrap_content"
        android:layout_marginTop="10dp"
        android:text="提交" />

    <TextView
        android:layout_margin="10dp"
        android:textSize="15dp"
        android:id="@+id/text"
        android:layout_width="wrap_content"
        android:layout_height="wrap_content"
        android:text="购买数量   " />
    <View
        android:background="#000000"
        android:layout_width="match_parent"
        android:layout_height="2dp"></View>
    <view.MyView2
        android:layout_width="wrap_content"
        android:layout_height="wrap_content" />
</LinearLayout>
在activity中调用
package com.example.yu.customview;

import android.os.Bundle;
import android.support.v7.app.AppCompatActivity;
import android.view.View;
import android.widget.Button;
import android.widget.RelativeLayout;
import android.widget.TextView;

import view.MyView;

public class MainActivity extends AppCompatActivity implements View.OnClickListener {

    private MyView myView;

    private TextView text;

    private Button btn;

    RelativeLayout rl;

    @Override
    protected void onCreate(Bundle savedInstanceState) {
        super.onCreate(savedInstanceState);
        setContentView(R.layout.activity_main);
        myView= (MyView) findViewById(R.id.addAndDecButton);
        myView.setMinValue(0);
        myView.setMaxValue(10);
        text=(TextView)findViewById(R.id.text);
        btn= (Button) findViewById(R.id.button);
        btn.setOnClickListener(this);
    }


    @Override
    public void onClick(View v) {
        text.setText("购买数量为:   "+myView.getValue());
    }
}
代码下载地址
http://download.csdn.net/detail/androidxiaogang/9592557


 1014
1014

 被折叠的 条评论
为什么被折叠?
被折叠的 条评论
为什么被折叠?
 到【灌水乐园】发言


