


简介及基本用法
1.简介
什么时候用插槽?
插槽的使用过程其实是抽取共性、预留不同;
我们会将共同的元素、内容依然在组件进行封装;
同时会将不同的元素使用slot作为占位,让外部决定到底显示什么样的元素;
如何定义插槽?
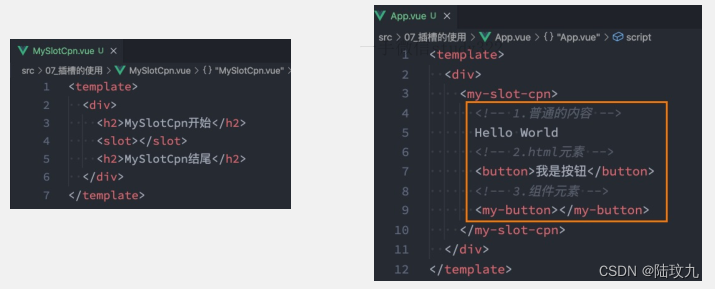
在封装组件中,使用特殊的元素<slot>就可以为封装组件开启一个插槽;
该插槽插入什么内容取决于父组件如何使用;
2.基本使用(匿名插槽)
1.基本用法
2.插槽默认内容
有时候我们希望在使用插槽时,如果没有插入对应的内容,那么我们需要显示一个默认的内容:当然这个默认内容只会在没有提供插入的内容时,才显示。
子组件
<template>
    <div>
        <my-slot1>
        <!--     <h4>我是填充内容1</h4>
            <a href="#">我是填充内容2</a>
            <h4>我是填充内容3</h4> -->
        </my-slot1>
    </div>
</template>
父组件
<template>
    <div>
        <my-slot1>
        <!--     <h4>我是填充内容1</h4>
            <a href="#">我是填充内容2</a>
            <h4>我是填充内容3</h4> -->
        </my-slot1>
    </div>
</template>
具名插槽
1.背景
我们希望达到一个插槽对应一块内容的显示,这个时候我们就可以使用具名插槽。
2.基本用法
具名插槽顾名思义就是给插槽起一个名字,<slot>元素有一个特殊的attribute:name属性;个不带name的slot,会带有隐含的名字default;
父组件在调用的时候,可以使用v-slot绑定名称从而实现对应,v-slot也可以缩写为#。
子组件
<template>
    <div class="nav-bar">
        <!-- <slot name="default"></slot> -->
        <div class="left">
            <slot name="left1"></slot>
        </div>
        <div class="center">
            <slot name="center1"></slot>
        </div>
        <div class="right">
            <slot name="right1"></slot>
        </div>
    </div>
</template>
父组件
<template>
    <div>
        <my-slot-cpn1>
            <template v-slot:left1>
                <button>左边按钮</button>
            </template>
            <template #center1>
                <button>我是中间按钮</button>
            </template>
            <template #right1>
                <button>右边按钮</button>
            </template>
        </my-slot-cpn1>
    </div>
</template>
3.动态插槽名
可以通过v-slot:[dynamicSlotName]方式动态绑定一个名称。
子组件
<template>
    <div class="nav-bar">
        <div class="addition">
            <slot :name="name"></slot>
        </div>
    </div>
</template>

<script>
    export default {
        data() {
            return {
                name:'ypf'
            };
        }
    }
</script>
父组件
<template>
    <div>
        <my-slot-cpn1>
            <template #[name]>
                <button>ypf内容</button>
            </template>
        </my-slot-cpn1>
    </div>
</template>

<script>
    import MySlotCpn1 from './MySlotCpn1.vue';
    export default {
        components: {
            MySlotCpn1
        },
        data() {
            return {
                name:'ypf'
            };
        }
    }
</script>
作用域插槽
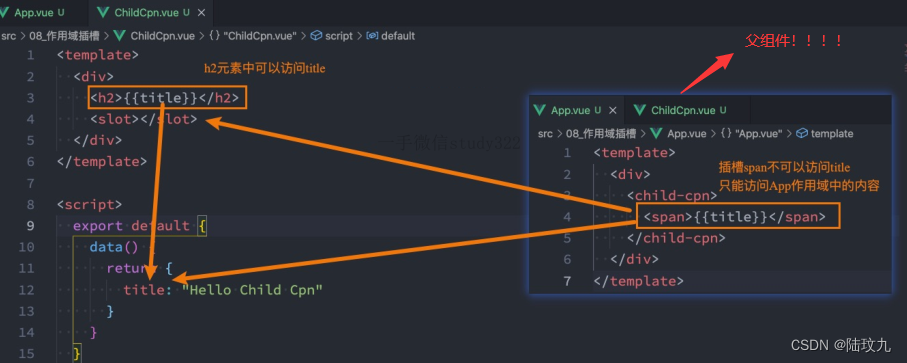
1.背景
我们希望组件中 插槽位置 可以访问到子组件中的内容。默认情况下,如下图,是无法访问的。
2.如何解决?
插槽prop(子组件)
通过绑定在<slot>元素上的attribute 向外传递,这个attribute被称为插槽prop。
<template>
    <div>
        <template v-for="(item,index) in myList" :key="index">
            <slot :item="item" :index="index">{{index}}</slot>
        </template>
    </div>
</template>

<script>
    export default {
        props: {
            myList: {
                type: Array,
                default: () => []
            }
        },
        data() {
            return {};
        }
    }
</script>
父组件中,可以使用带值的v-slot 来定义我们提供的插槽prop的名字,从而获取插槽中的属性。
<template>
    <div>
        <!-- 2. 作用域插槽-->
        <!-- 2.1 通过v-slot:default声明调用 -->
        <show-names2 :myList="myList">
            <template v-slot:default="myInfo">
                <button>{{myInfo.item}}----{{myInfo.index}}</button>
            </template>
        </show-names2>
        <!-- 2.2 独占默认插槽的缩写语法  省略template -->
        <show-names2 :myList="myList">
            <template v-slot="myInfo">
                <button>{{myInfo.item}}----{{myInfo.index}}</button>
            </template>
        </show-names2>
        <!-- 2.3 可以直接加在组件上 -->
        <show-names2 :myList="myList" v-slot="myInfo">
            <button>{{myInfo.item}}----{{myInfo.index}}</button>
        </show-names2>
    </div>
</template>

<script>
    export default {
        data() {
            return {
                myList: ["ypf1", "ypf2", "ypf3", "ypf4"],
            };
        }
    }
</script>
独占默认插槽缩写
如果我们的插槽是默认插槽default,那么在使用的时候v-slot:default="mylnfo"可以简写为v-slot=”mylnfo”;
并且如果我们的插槽只有默认插槽时,组件的标签可以被当做插槽的模板来使用,这样,我们就可以将v-slot直接用在组件上;
<template>
    <div>
        <!-- 2. 作用域插槽-->
        <!-- 2.2 独占默认插槽的缩写语法  省略template -->
        <show-names2 :myList="myList">
            <template v-slot="myInfo">
                <button>{{myInfo.item}}----{{myInfo.index}}</button>
            </template>
        </show-names2>
        <!-- 2.3 可以直接加在组件上 -->
        <show-names2 :myList="myList" v-slot="myInfo">
            <button>{{myInfo.item}}----{{myInfo.index}}</button>
        </show-names2>
    </div>
</template>

<script>
    export default {
        data() {
            return {
                myList: ["ypf1", "ypf2", "ypf3", "ypf4"],
            };
        }
    }
</script>
默认插槽和具名插槽混合
如果我们有默认插槽和具名插槽,那么按照完整的template来编写。
子组件
<template>
    <div>
        <template v-for="(item,index) in myList" :key="index">
            <!-- 插槽prop -->
            <slot :item="item" :index="index">{{index}}</slot>
            <!-- 具名插糟 -->
            <slot name="ypf"></slot>
        </template>
    </div>
</template>
父组件
<!-- 3. 多个插槽需要使用完整的template-->
        <show-names3  :myList="myList">
            <template v-slot="myInfo">
                <button>{{myInfo.item}}-{{myInfo.index}}</button>
            </template>
            <!-- 具名插糟 -->
            <template v-slot:ypf>
                <h2>我是ypf的插入内容</h2>
            </template>
        </show-names3>


 852
852


 被折叠的 条评论
为什么被折叠?
被折叠的 条评论
为什么被折叠?
 到【灌水乐园】发言


