


在上一篇文章中我们讲解了OAuth2的一些基本概念,对OAuth2有了基本的认识。这一节内容我们就讲解一下OAuth2实战,围绕OAuth2的基本类型进行实战讲解。
- 授权码模式(authorization code)
- 简化模式(implicit)
- 密码模式(resource owner password credentials)
- 客户端模式(client credentials)
相对于实现OAuth2,更加优雅的方式是通过Spring Security和OAuth2相结合来做。本节也将基于Spring Security来进行实战。当然我们还是结合Spring Boot更加简洁配置来实现我们的代码。
一、授权码模式
首先我们创建一个maven工程,引入核心依赖。如下:
    <dependencies>
        <dependency>
            <groupId>org.springframework.security.oauth</groupId>
            <artifactId>spring-security-oauth2</artifactId>
        </dependency>

        <dependency>
            <groupId>org.springframework.boot</groupId>
            <artifactId>spring-boot-starter-security</artifactId>
        </dependency>

        <dependency>
            <groupId>org.springframework.boot</groupId>
            <artifactId>spring-boot-starter-web</artifactId>
        </dependency>
    </dependencies>
在前面的文章中我们介绍过OAuth2中比较重要的概念,主要包含四个角色。
- Resource Owner(资源所有者)
- Resource Server(资源服务器)
- Authorization server(授权(认证)服务器)
- Client(客户端(第三方应用))
而这里我们在Spring中需要进行配置的主要是认证服务和资源服务相关的设置。
因此我们在config包下新建OAuth2AuthorizationServer类和OAuth2ResourceServer类分别用于配置认证服务和资源服务。
OAuth2AuthorizationServer需要继承AuthorizationServerConfigurerAdapter,如下:
package net.anumbrella.oauth2.config;

import org.springframework.context.annotation.Configuration;
import org.springframework.security.oauth2.config.annotation.configurers.ClientDetailsServiceConfigurer;
import org.springframework.security.oauth2.config.annotation.web.configuration.AuthorizationServerConfigurerAdapter;
import org.springframework.security.oauth2.config.annotation.web.configuration.EnableAuthorizationServer;

/**
 * @auther anumbrella
 * 授权服务器配置
 */
@Configuration
@EnableAuthorizationServer
public class OAuth2AuthorizationServer extends AuthorizationServerConfigurerAdapter {

    @Override
    public void configure(ClientDetailsServiceConfigurer clients)
            throws Exception {
        // 这里配置数据在内存当中
        clients.inMemory()
                .withClient("client_id")
                .secret("123456")
                .redirectUris("http://localhost:8080/callback")
                // 授权码模式
                .authorizedGrantTypes("authorization_code")
                .scopes("read_userinfo", "read_contacts");
    }
}
这里我们配置了一个客户端ID和密匙,然后设置跳转地址并且设置模式为授权码模式。这里我们使用的方式是简单的内存存储模式,但一般在实际应用中我们是实现持久化的,使用Redis、MySQL等来进行存储,后面我们会讲到其他方式的实现。
接着我们设置OAuth2ResourceServer,它继承ResourceServerConfigurerAdapter类,如下:
package net.anumbrella.oauth2.config;

import org.springframework.context.annotation.Configuration;
import org.springframework.security.config.annotation.web.builders.HttpSecurity;
import org.springframework.security.oauth2.config.annotation.web.configuration.EnableResourceServer;
import org.springframework.security.oauth2.config.annotation.web.configuration.ResourceServerConfigurerAdapter;

/**
 * @auther anumbrella
 * 资源服务配置
 */
@Configuration
@EnableResourceServer
public class OAuth2ResourceServer extends ResourceServerConfigurerAdapter {

    @Override
    public void configure(HttpSecurity http) throws Exception {
        http.authorizeRequests()
                .anyRequest()
                .authenticated()
                .and()
                .requestMatchers()
                //配置api访问控制,必须认证过后才可以访问
                .antMatchers("/api/**");
    }
}
这里我们配置访问资源的地址(/api/**)需要进行验证才能访问。
接着我们在rest包下,建立OAuth2Controller用于访问测试,如下:
package net.anumbrella.oauth2.rest;

import net.anumbrella.oauth2.entity.UserInfo;
import org.springframework.http.ResponseEntity;
import org.springframework.security.core.context.SecurityContextHolder;
import org.springframework.security.core.userdetails.User;
import org.springframework.stereotype.Controller;
import org.springframework.web.bind.annotation.RequestMapping;

/**
 * @auther anumbrella
 */
@Controller
public class OAuth2Controller {

    /**
     * 资源API
     *
     * @return
     */
    @RequestMapping("/api/userinfo")
    public ResponseEntity<UserInfo> getUserInfo() {
        User user = (User) SecurityContextHolder.getContext()
                .getAuthentication().getPrincipal();
        String email = user.getUsername() + "@anumbrella.net";

        UserInfo userInfo = new UserInfo();
        userInfo.setName(user.getUsername());
        userInfo.setEmail(email);

        return ResponseEntity.ok(userInfo);
    }
}
至此,最简单的OAuth2基本配置就完成了。但是我们知道在Spring Security中默认访问时会有Web登录页面让输入用户名和密码,这是因为SecurityAutoConfiguration,也就org.springframework.boot.autoconfigure.security.servlet.SecurityAutoConfiguration这个类在会进行配置,如果不想使用可以在启动类加上如下配置:
@EnableAutoConfiguration(exclude = {
org.springframework.boot.autoconfigure.security.servlet.SecurityAutoConfiguration.class
})
这样就可以关闭掉默认输入用户名和密码,或者在application.properties中配置相应的用户名和密码,如下:
# Spring Security Setting
security.user.name=anumbrella
security.user.password=123
当然我们也可以通过继承WebSecurityConfigurerAdapter类进行一些配置扩展,比如在对用户信息进行数据库校验等逻辑。
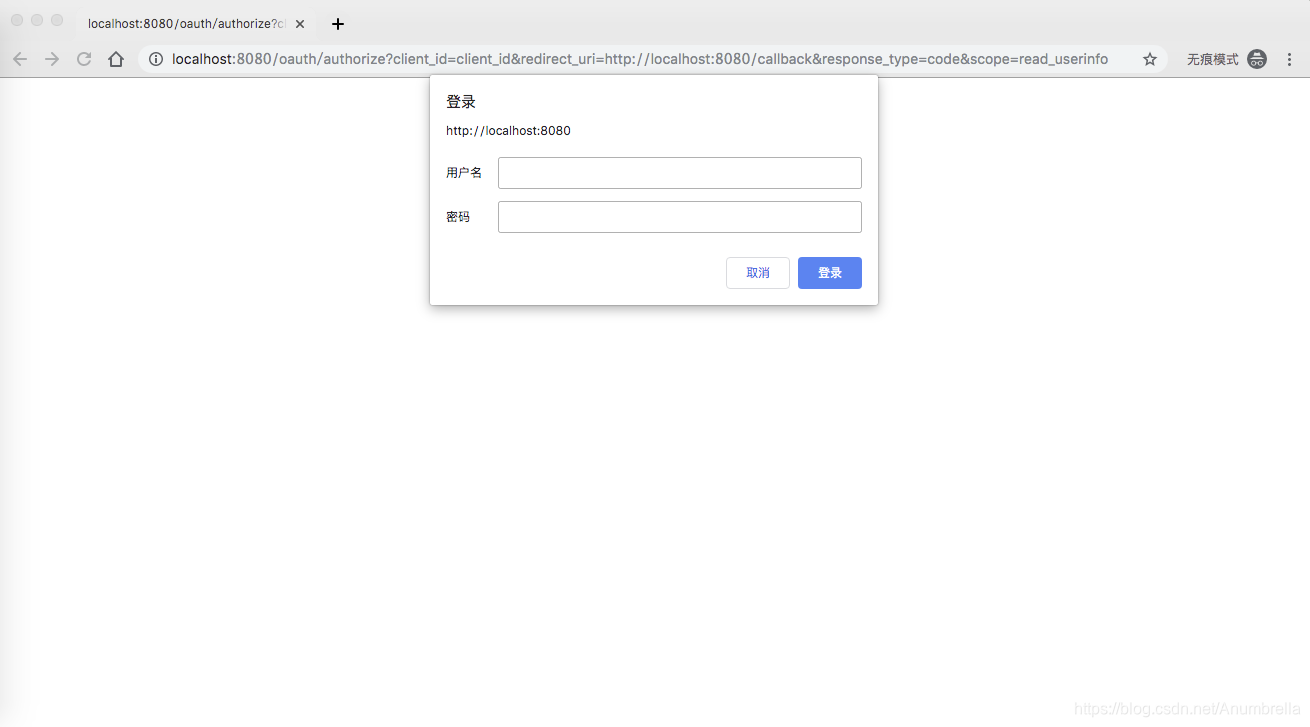
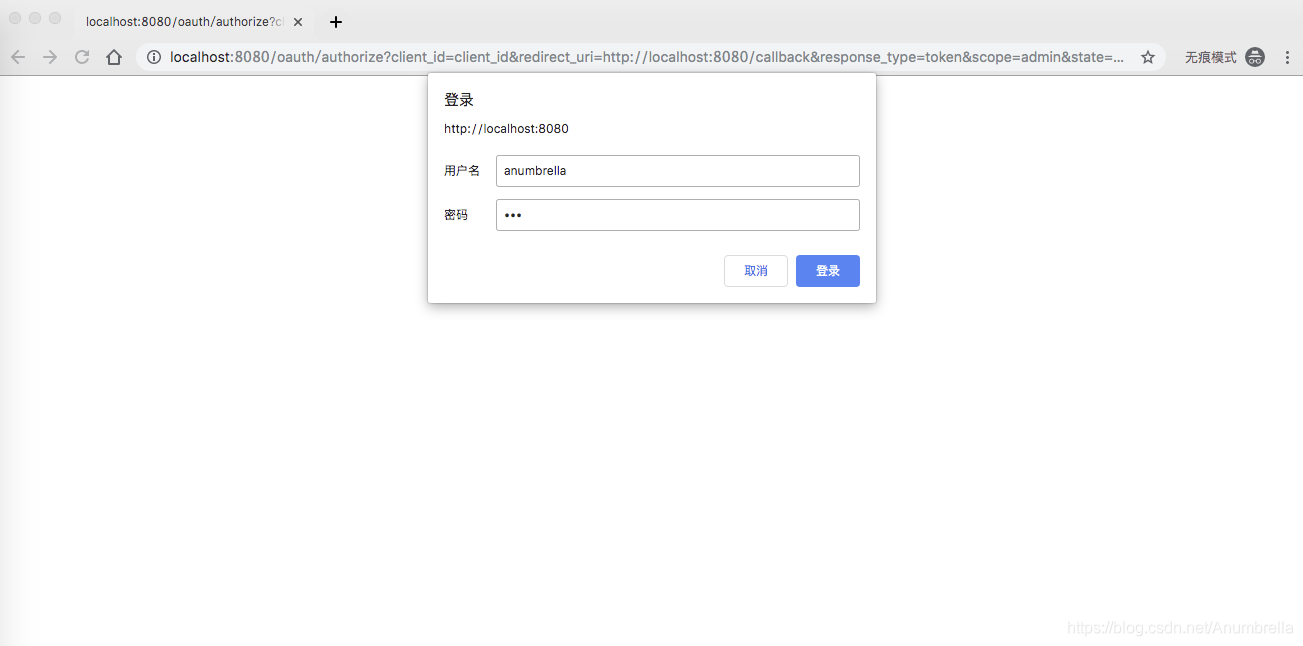
这里我就简单使用application.properties中的方式。在配置完成后我们启动应用,接着在浏览器中输入地址http://localhost:8080/oauth/authorize?client_id=client_id&redirect_uri=http://localhost:8080/callback&response_type=code&scope=read_userinfo进行访问,会弹出Spring Security的验证界面,接着我们输入application.properties配置好的用户名信息即可。
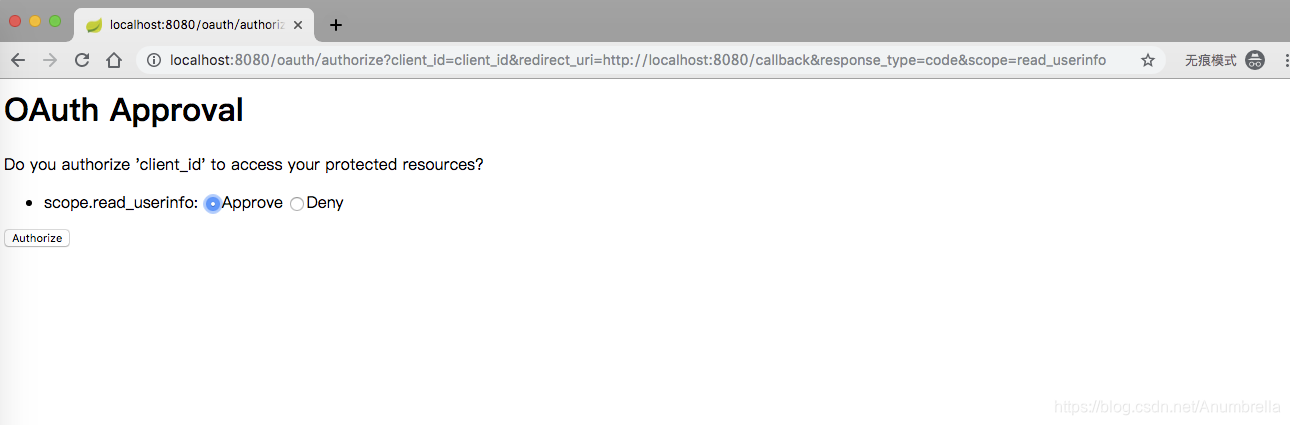
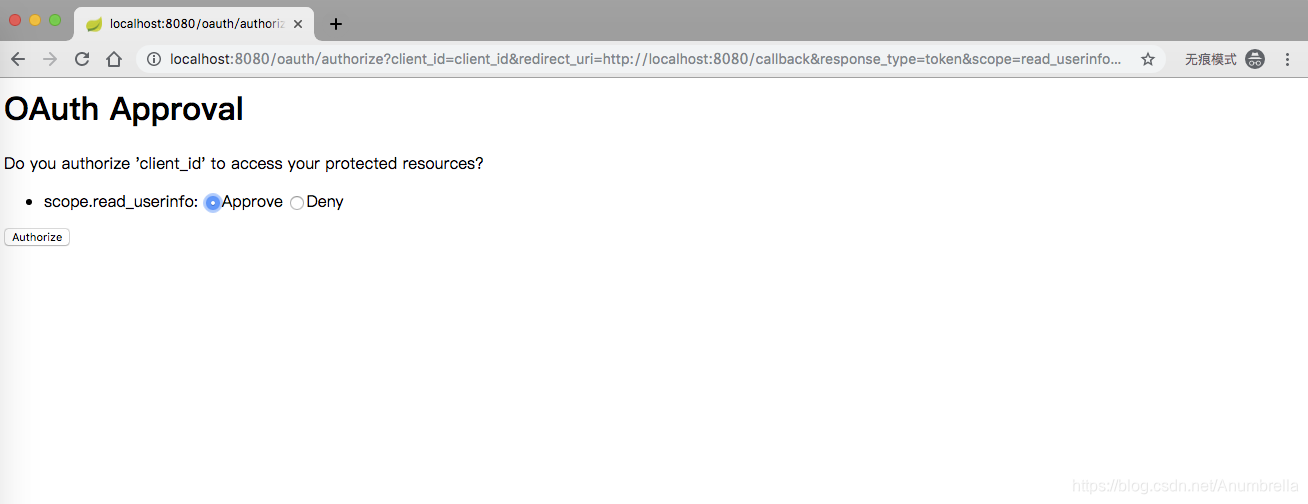
输入正确然后点击登录,接着我们就会进入授权页面,在这里我们选择Approve,然后点击Authorize。
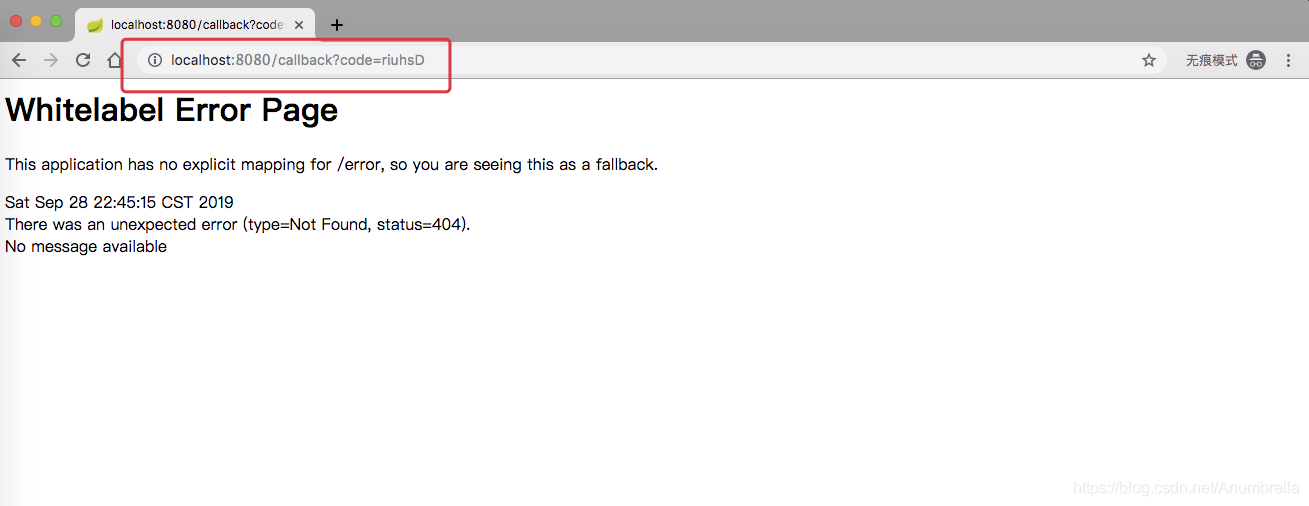
接着会跳转到我们先前配置的回调地址并把授权码传递过去。比如这个地址:http://localhost:8080/callback?code=riuhsD。在应用中可能会提示404,因为本地这个应用地址并没有,在实际应用中可以将授权码发送给具体应用的地址即可,然后再在具体应用中获取授权码。
到此我们就拿到授权码后,然后我们再去访问http://localhost:8080/oauth/token?code=riuhsD&grant_type=authorization_code&redirect_uri=http://localhost:8080/callback&scope=read_userinfo地址,去获取token。
注意:获取token需要POST请求,并且在header中需要验证信息,就是我们先前配置的client_id和密匙。
这里我使用POSTMAN客户端来进行发起POST请求。
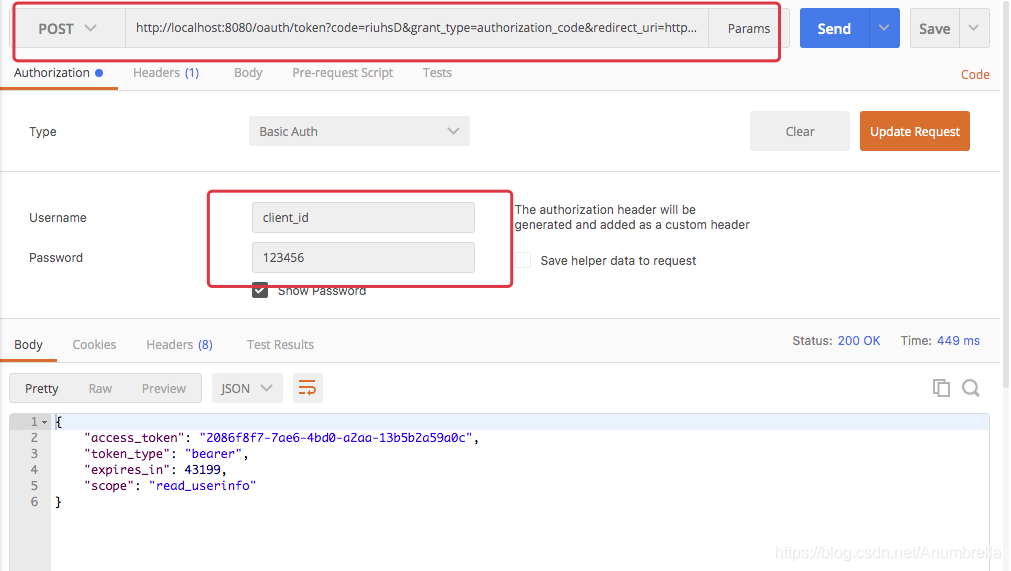
最后我们就拿到了token如下:
{
    "access_token": "2086f8f7-7ae6-4bd0-a2aa-13b5b2a59a0c",
    "token_type": "bearer",
    "expires_in": 43199,
    "scope": "read_userinfo"
}
接着我们拿到token去访问受保护的资源接口/api/userinfo,访问地址为:http://localhost:8080/api/userinfo?access_token=2086f8f7-7ae6-4bd0-a2aa-13b5b2a59a0c,如下:
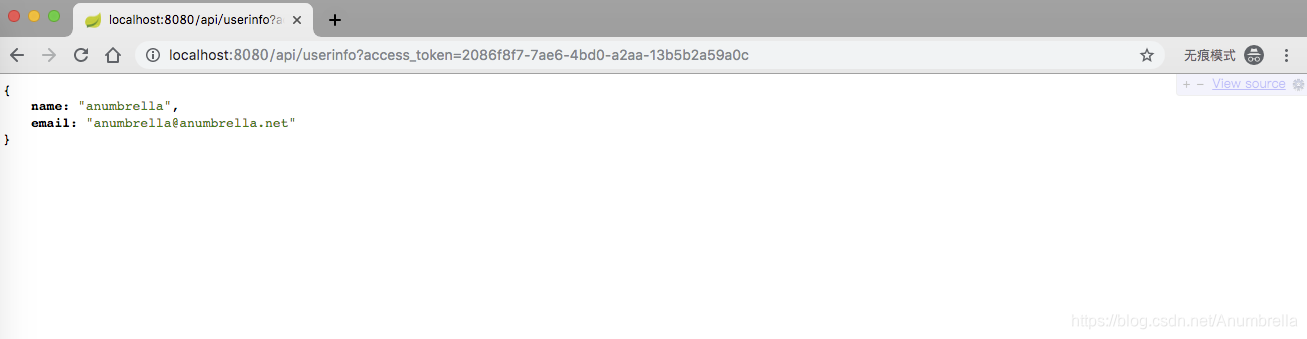
最后我们拿到了用户信息。当然我们也可以试一下,如果不带token直接访问会是什么情况。

到这里OAuth2授权码的基本流程走完。然而上面我们的OAuth2是基于内存的,但是在实际应用中通常使用Redis和数据库存储OAuth2相关的信息,比如token,client_id和密匙等。后面的博客我们将改装一下通过MySQL来进行实战。
二、简化模式
简化模式其实和授权码模式基本类似,我们更改OAuth2AuthorizationServer类中的authorizedGrantTypes为“implicit”,这里我们添加了access_token的有效时间。如下:
package net.anumbrella.oauth2.config;

import org.springframework.context.annotation.Configuration;
import org.springframework.security.oauth2.config.annotation.configurers.ClientDetailsServiceConfigurer;
import org.springframework.security.oauth2.config.annotation.web.configuration.AuthorizationServerConfigurerAdapter;
import org.springframework.security.oauth2.config.annotation.web.configuration.EnableAuthorizationServer;

/**
 * @auther anumbrella
 * 授权服务器配置
 */
@Configuration
@EnableAuthorizationServer
public class OAuth2AuthorizationServer extends AuthorizationServerConfigurerAdapter {

    @Override
    public void configure(ClientDetailsServiceConfigurer clients)
            throws Exception {

        // 这里配置数据在内存当中
        clients.inMemory()
                .withClient("client_id")
                .secret("123456")
                .redirectUris("http://localhost:8080/callback")
                // 简化模式
                .authorizedGrantTypes("implicit")
                .accessTokenValiditySeconds(120)
                .scopes("read_userinfo", "read_contacts");
    }
}
然后我们启动应用,接着我们访问http://localhost:8080/oauth/authorize?client_id=client_id&redirect_uri=http://localhost:8080/callback&response_type=token&scope=read_userinfo&state=abc。
这里与前面的授权码模式不同的地方在于这里我们直接申请授权token,参数和申请授权码类似,client_id,redirect_uri回调地址,response_type有变动,改为直接获取token,scope权限,state用于认证标记,传过去什么回调时传回来什么。
同授权码模式一样,需要输入用户名和密码,如下:
一样的输入正确然后点击登录,接着我们就会进入授权页面,在这里我们选择Approve,然后点击Authorize。
最后就会给我们返回access_token,state也是原样返回。
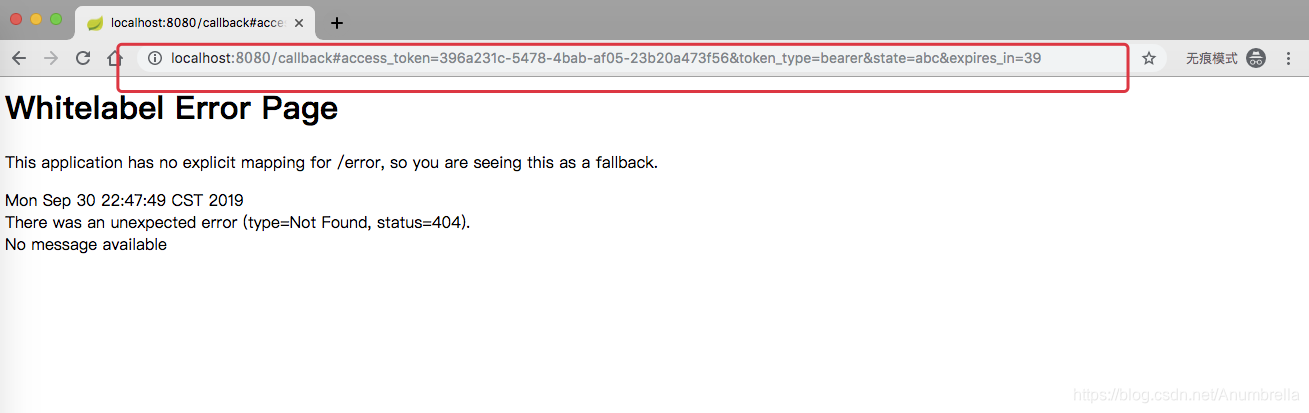
http://localhost:8080/callback#access_token=396a231c-5478-4bab-af05-23b20a473f56&token_type=bearer&state=abc&expires_in=39
拿到access_token后,我们就可以带着token去访问接口了。
三、密码模式
同理密码模式更改OAuth2AuthorizationServer类中的authorizedGrantTypes为“password”,并且需要添加用户认证管理端点authenticationManager。如下:
package net.anumbrella.oauth2.config;

import org.springframework.beans.factory.annotation.Autowired;
import org.springframework.context.annotation.Configuration;
import org.springframework.security.authentication.AuthenticationManager;
import org.springframework.security.oauth2.config.annotation.configurers.ClientDetailsServiceConfigurer;
import org.springframework.security.oauth2.config.annotation.web.configuration.AuthorizationServerConfigurerAdapter;
import org.springframework.security.oauth2.config.annotation.web.configuration.EnableAuthorizationServer;
import org.springframework.security.oauth2.config.annotation.web.configurers.AuthorizationServerEndpointsConfigurer;

/**
 * @auther anumbrella
 * 授权服务器配置
 */
@Configuration
@EnableAuthorizationServer
public class OAuth2AuthorizationServer extends AuthorizationServerConfigurerAdapter {


    /**
     * 用户认证
     */
    @Autowired
    private AuthenticationManager authenticationManager;

    @Override
    public void configure(AuthorizationServerEndpointsConfigurer endpoints)
            throws Exception {
        endpoints.authenticationManager(authenticationManager);
    }

    @Override
    public void configure(ClientDetailsServiceConfigurer clients)
            throws Exception {

        // 这里配置数据在内存当中
        clients.inMemory()
                .withClient("client_id")
                .secret("123456")
                .redirectUris("http://localhost:8080/callback")
                // 密码模式
                .authorizedGrantTypes("password")
                .scopes("read_userinfo", "read_contacts");
    }
}
密码模式我们直接去请求token,访问http://localhost:8080/oauth/token?password=123&grant_type=password&username=anumbrella&scope=read_userinfo地址。
注意:这里需要使用POST请求,请求头中要有认证client_id和密匙信息。
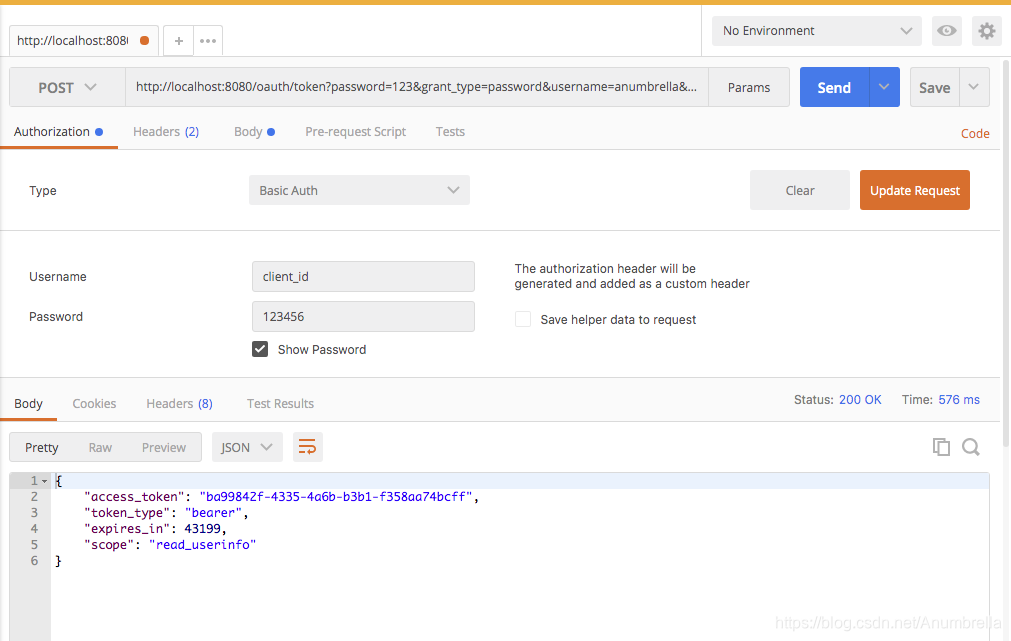
这种模式也适用于用户对应用程序高度信任的情况,因为用户和密码信息我们都提交给服务器了。
拿到token就可以去获取受保护的资源信息了。
四、客户端模式
最后一个是客户端模式,也是更改授权类型,更改authorizedGrantTypes类型为“client_credentials”。OAuth2AuthorizationServer如下:
package net.anumbrella.oauth2.config;

import org.springframework.context.annotation.Configuration;
import org.springframework.security.oauth2.config.annotation.configurers.ClientDetailsServiceConfigurer;
import org.springframework.security.oauth2.config.annotation.web.configuration.AuthorizationServerConfigurerAdapter;
import org.springframework.security.oauth2.config.annotation.web.configuration.EnableAuthorizationServer;

/**
 * @auther anumbrella
 * 授权服务器配置
 */
@Configuration
@EnableAuthorizationServer
public class OAuth2AuthorizationServer extends AuthorizationServerConfigurerAdapter {

    @Override
    public void configure(ClientDetailsServiceConfigurer clients)
            throws Exception {

        // 这里配置数据在内存当中
        clients.inMemory()
                .withClient("client_id")
                .secret("123456")
                // 客户端模式
                .authorizedGrantTypes("client_credentials")
                .scopes("read_userinfo", "read_contacts");
    }
}
客户端模式的访问和密码模式有些类似,直接去POST请求去获取token,只是参数中没有用户名和密码,grant_type值为client_credentials。如下:
http://localhost:8080/oauth/token?grant_type=client_credentials&scope=read_userinfo
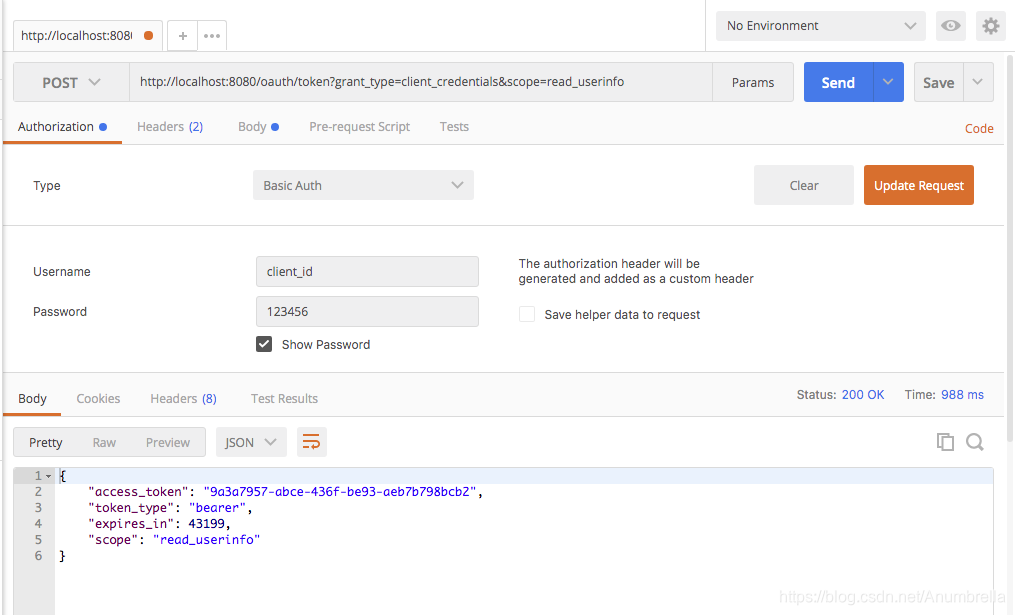
最后我们拿到了token,客户端模式应用于应用程序想要以自己的名义与授权服务器以及资源服务器进行互动。
至此,本篇OAuth2的简单实战就基本完成,后面会讲解一下OAuth2实际应用中持久化存储,JWT结合等知识,请持续关注!
代码实例:Chapter1


 5577
5577


 被折叠的 条评论
为什么被折叠?
被折叠的 条评论
为什么被折叠?
 到【灌水乐园】发言


