


在前面我们讲解了在CAS中关于如何自定义验证码以及自定义错误信息的配置,对于CAS的自定义有了更进一步的了解,如果忘记了,可以去复习一下CAS单点登录(七)——自定义验证码以及自定义错误信息。
今天我们讲解一下在CAS中的多属性返回使用。
关于CAS多属性的返回,其实在前面CAS单点登录(四)——自定义认证登录策略有大致的讲解,在那里我们使用了JDBC认证中自定义返回信息的策略。但是当时我们讲解的知识比较少,只是大致提了一下,今天我们来更详细探讨一下在CAS中如何返回多属性。
我们知道CAS中有多种的认证方式,所以在多属性返回这里也有多种不同的方式,在官方文档中我们也可以查看到,文档。具体如下:
但是我们常用的主要有这三种:
- JDBC(直接查询数据库)
- JSON(静态文件配置属性)
- REST(通过接口获取属性,若SSO不能直接访问数据库考虑该策略)
除了这个获取常用属性基本的方式外,在CAS服务配置中,还有有关于服务的属性发布的配置方案。
在配置方案里面,我们这里主要使用 限制属性政策。比如由于接入服务端会有些不同要求,如A系统要求返回用户名,B系统不允许返回用户名,所以我们需要望批准限制属性政策。
属性返回策略,主要有以下这几种模式:
- Return All (所有配置返回的都返回)
- Deny All (配置拒绝的出现则报错)
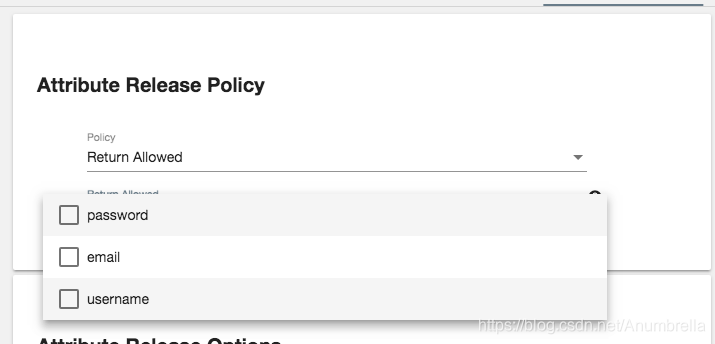
- Return Allowed(只返回允许的主要属性)
- 自定义Filter(自定义过滤策略)
而我们常用的主要是Return All、Return Allowed。
我们要讲解的也是这三种配置和这两种限制政策,其实大致都一样。
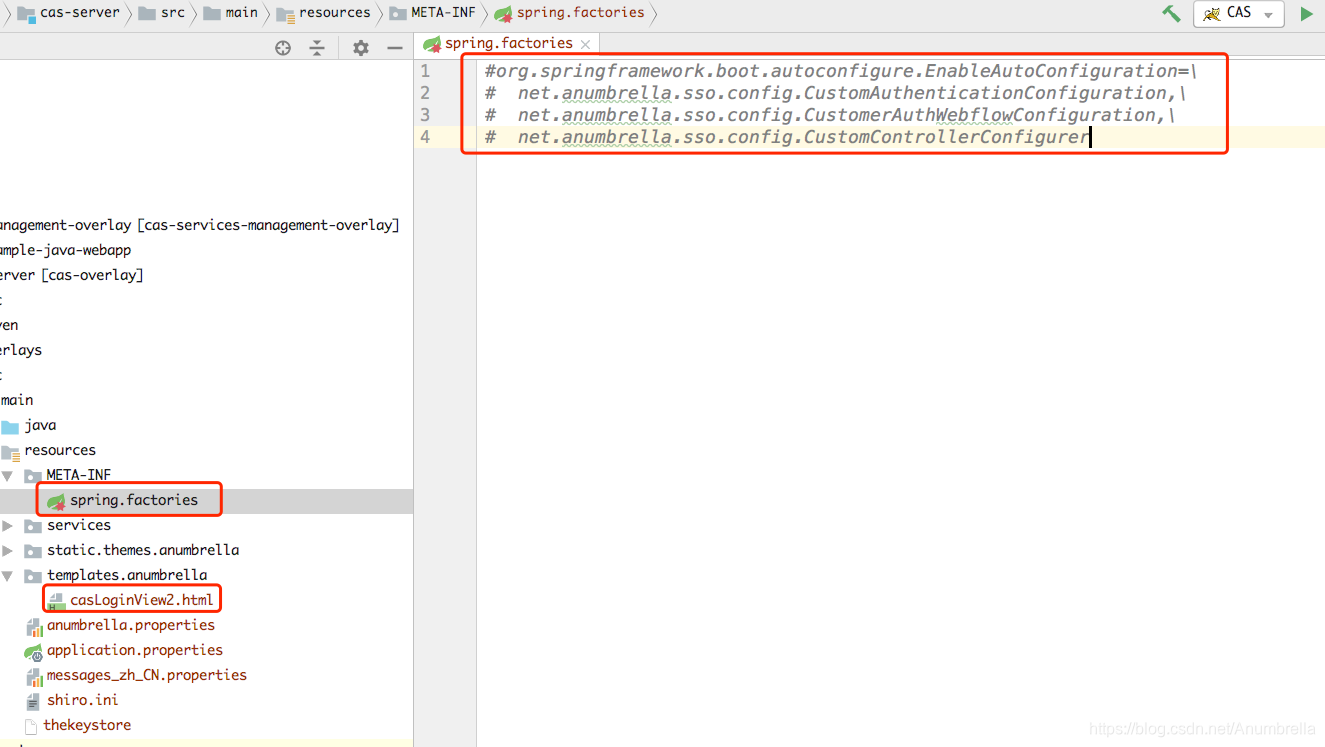
在开始之前,因为我们前面使用了自定义验证,所以在使用JDBC验证时,我们关闭掉原来Demo代码里面的配置,在resources下面的META-INF下的spring.factories中的配置注释掉。
然后把模板templates.anumbrella下的casLoginView.html重命名为casLoginView2.html,防止配置覆盖。
当然如果重新建构建一个CAS服务端,不用这么麻烦,这里我是继续使用上一节的代码来讲解。如果不熟悉JDBC认证可以去查看一下原来的教程,CAS单点登录(三)——多种认证方式。
一、JDBC
首先我们在resources下面application.properties中开启服务配置,这里以Json配置为例。
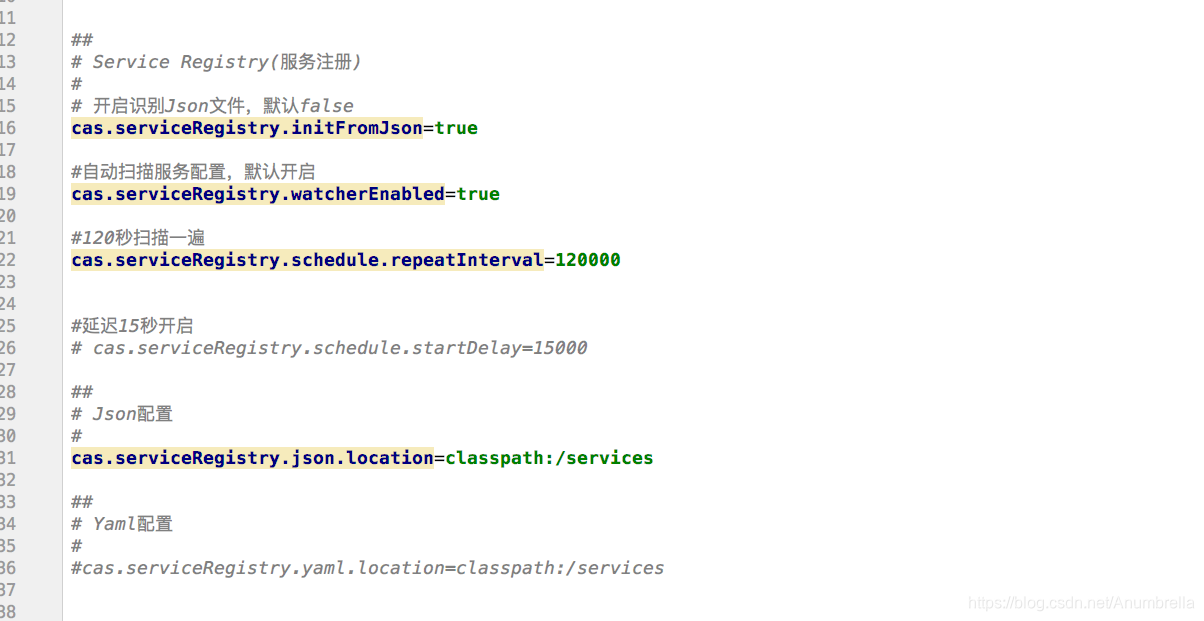
然后再在pom.xml文件中开启Json依赖包和属性返回依赖包,同时注释掉无关的包。
<!-- Json Service Registry -->
 <dependency>
      <groupId>org.apereo.cas</groupId>
      <artifactId>cas-server-support-json-service-registry</artifactId>
      <version>${cas.version}</version>
</dependency>

 <!-- Authentication Attributes -->
<dependency>
      <groupId>org.apereo.cas</groupId>
      <artifactId>cas-server-core-authentication-attributes</artifactId>
      <version>${cas.version}</version>
</dependency>
<dependentWarExcludes>
   <!-- 让war包下的json不初始化 -->
     **/services/*.json
</dependentWarExcludes>
具体的Json配置文件如下:
{
  "@class" : "org.apereo.cas.services.RegexRegisteredService",
  "serviceId" : "^(https|imaps|http)://.*",
  "name" : "web",
  "id" : 10000001,
  "evaluationOrder" : 10,
  "accessStrategy" : {
    "@class" : "org.apereo.cas.services.DefaultRegisteredServiceAccessStrategy",
    "enabled" : true,
    "ssoEnabled" : true
  },
  "attributeReleasePolicy": {
    "@class": "org.apereo.cas.services.ReturnAllAttributeReleasePolicy"
  },
  "theme": "anumbrella"
}
在这里我们添加如下的配置:
  "attributeReleasePolicy": {
    "@class": "org.apereo.cas.services.ReturnAllAttributeReleasePolicy"
  }
这个配置就是前面Return All模式,返回所有的相关配置了的属性。如果我们要限制某些属性的返回,可以配置如下:
  "attributeReleasePolicy" : {
  	"@class" : "org.apereo.cas.services.ReturnAllowedAttributeReleasePolicy",
 	"allowedAttributes" : [ "java.util.ArrayList", [ "username", "mail" ] ]
  }
这里的意思就是只让username和email进行返回。
接着我们开启JDBC认证和JDBC多属性返回情况,如下:
JDBC认证配置:
##
# JDBC配置
#
#查询账号密码SQL,必须包含密码字段
cas.authn.jdbc.query[0].sql=select * from user where username=?

#指定上面的SQL查询字段名(必须)
cas.authn.jdbc.query[0].fieldPassword=password

#指定过期字段,1为过期,若过期不可用
cas.authn.jdbc.query[0].fieldExpired=expired

#为不可用字段段,1为不可用,需要修改密码
cas.authn.jdbc.query[0].fieldDisabled=disabled

#数据库连接
cas.authn.jdbc.query[0].url=jdbc:mysql://127.0.0.1:3306/cas?useUnicode=true&characterEncoding=UTF-8&autoReconnect=true&useSSL=false

#数据库dialect配置
cas.authn.jdbc.query[0].dialect=org.hibernate.dialect.MySQLDialect

#数据库用户名
cas.authn.jdbc.query[0].user=root

#数据库用户密码
cas.authn.jdbc.query[0].password=123

#数据库事务自动提交
cas.authn.jdbc.query[0].autocommit=false

#数据库驱动
cas.authn.jdbc.query[0].driverClass=com.mysql.jdbc.Driver

#超时配置
cas.authn.jdbc.query[0].idleTimeout=5000
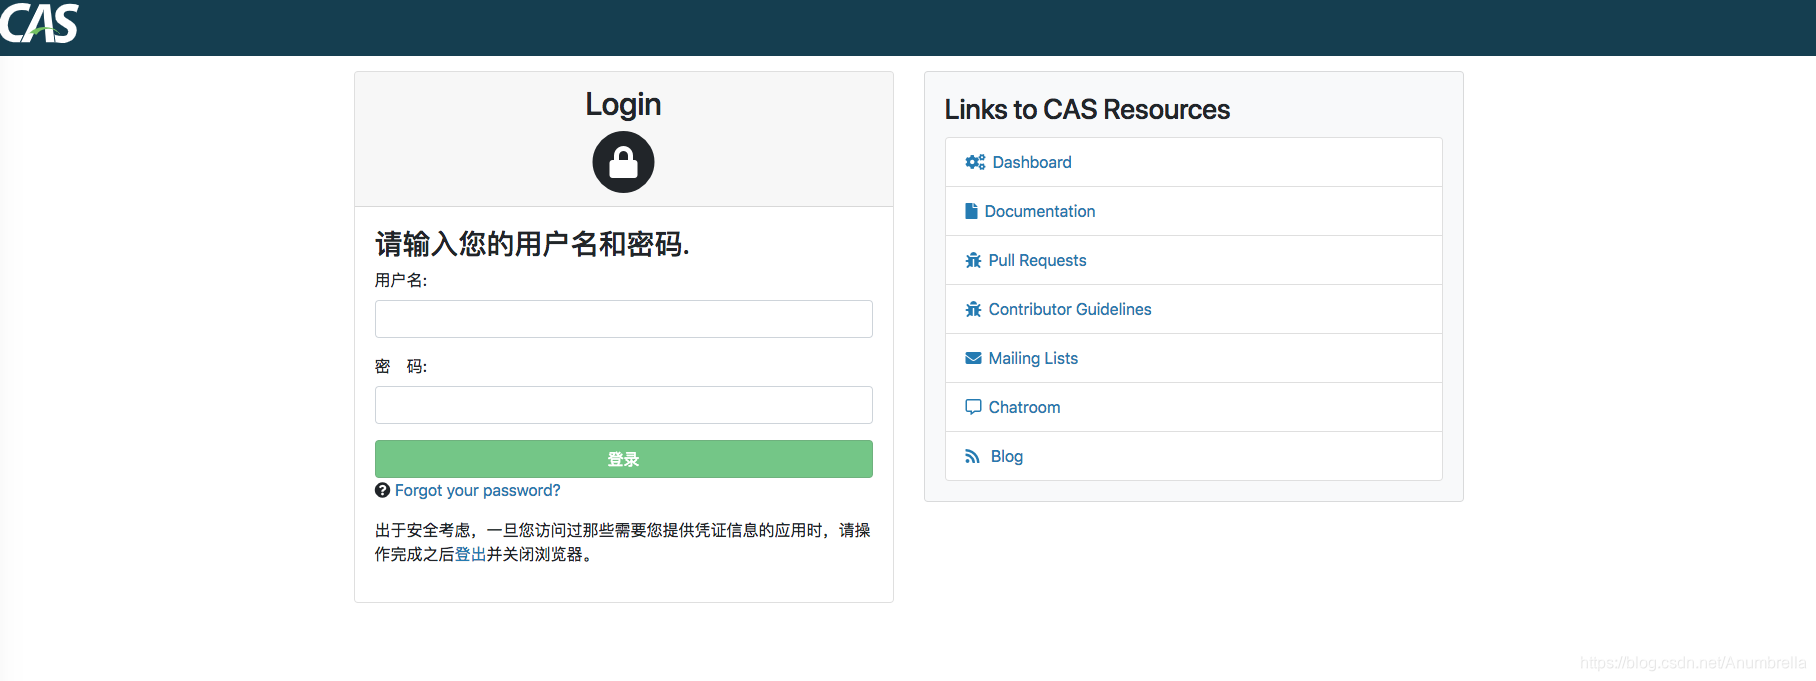
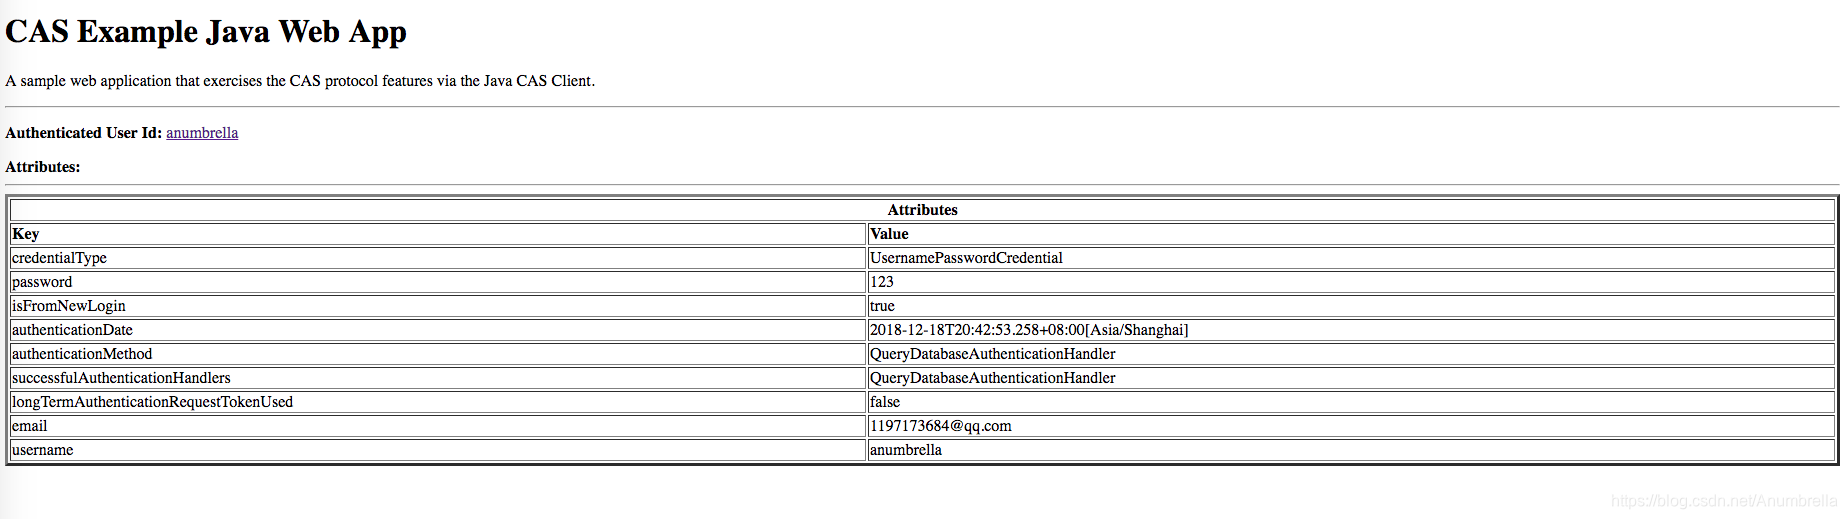
重启CAS服务,CAS使用原来代码的模板登录,并且使用JDBC认证。
JDBC多属性配置:
单行属性配置
#单行属性
cas.authn.attributeRepository.jdbc[0].attributes.username=username
cas.authn.attributeRepository.jdbc[0].attributes.password=password
cas.authn.attributeRepository.jdbc[0].attributes.email=email

cas.authn.attributeRepository.jdbc[0].singleRow=true
cas.authn.attributeRepository.jdbc[0].order=0
cas.authn.attributeRepository.jdbc[0].requireAllAttributes=true
# cas.authn.attributeRepository.jdbc[0].caseCanonicalization=NONE|LOWER|UPPER
# cas.authn.attributeRepository.jdbc[0].queryType=OR|AND

cas.authn.attributeRepository.jdbc[0].sql=SELECT * FROM user WHERE {0}
cas.authn.attributeRepository.jdbc[0].username=username

#数据库连接
cas.authn.attributeRepository.jdbc[0].url=jdbc:mysql://127.0.0.1:3306/cas?useUnicode=true&characterEncoding=UTF-8&autoReconnect=true&useSSL=false

#数据库dialect配置
cas.authn.attributeRepository.jdbc[0].dialect=org.hibernate.dialect.MySQLDialect

#数据库用户名
cas.authn.attributeRepository.jdbc[0].user=root

#数据库用户密码
cas.authn.attributeRepository.jdbc[0].password=123

#数据库事务自动提交
cas.authn.attributeRepository.jdbc[0].autocommit=false

#数据库驱动
cas.authn.attributeRepository.jdbc[0].driverClass=com.mysql.jdbc.Driver

#超时配置
cas.authn.attributeRepository.jdbc[0].idleTimeout=5000

cas.authn.attributeRepository.jdbc[0].ddlAuto=none

cas.authn.attributeRepository.jdbc[0].leakThreshold=10
cas.authn.attributeRepository.jdbc[0].batchSize=1
cas.authn.attributeRepository.jdbc[0].dataSourceProxy=false
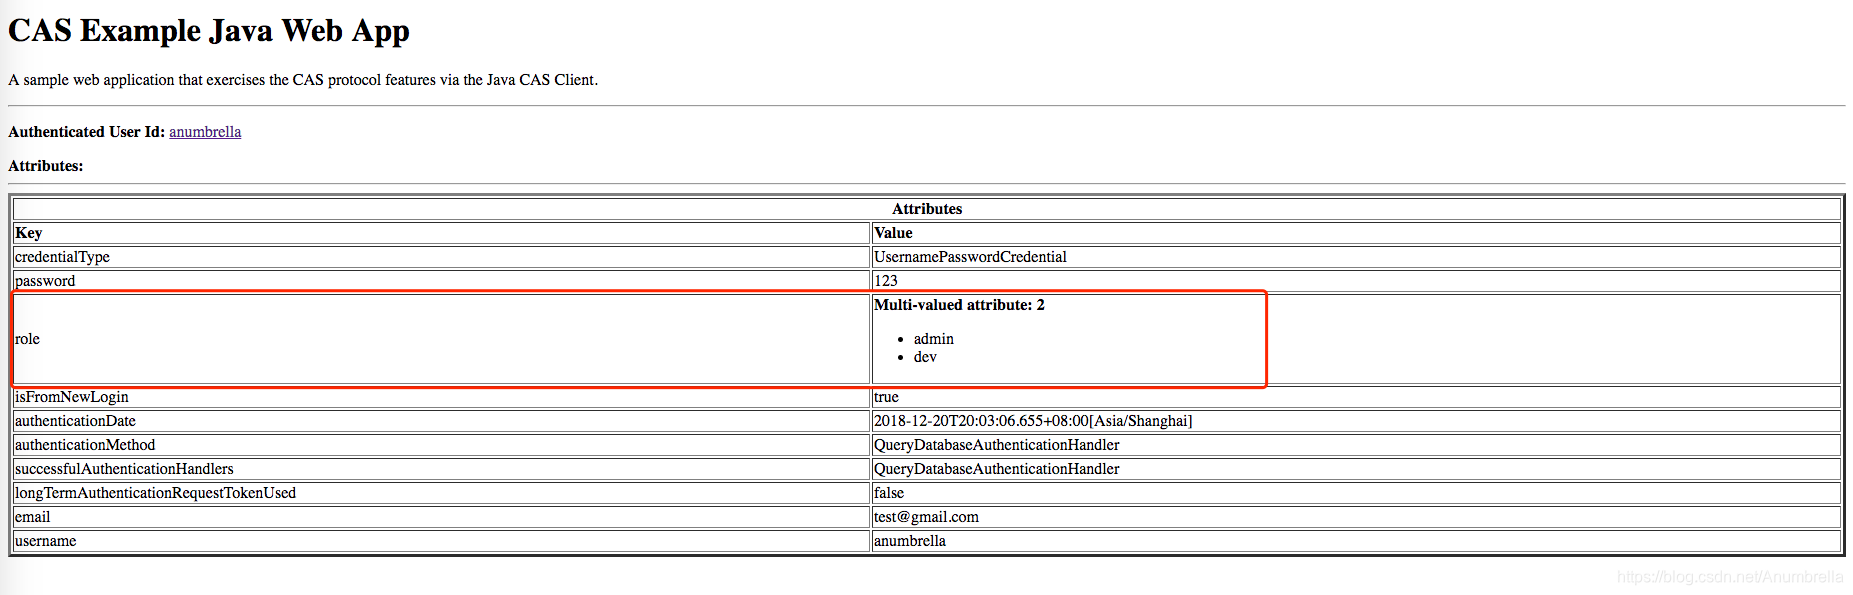
然后启动官方的客户端Demo,在CAS单点登录(五)——Service配置及管理里面有大致的使用方法,可以去看一下,这里不再复述。启动客户端,可以发现我们配置的属性都出来了。
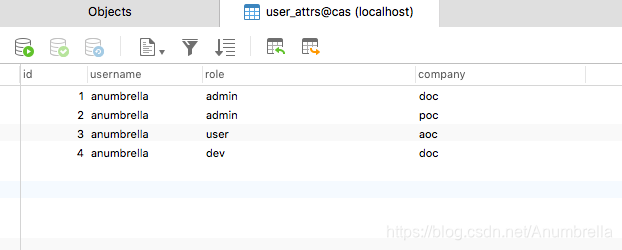
比如现在我有一张user_attrs表,分别是同一个用户不同角色对应在不同公司任职。这里就会使用到多行的属性返回。
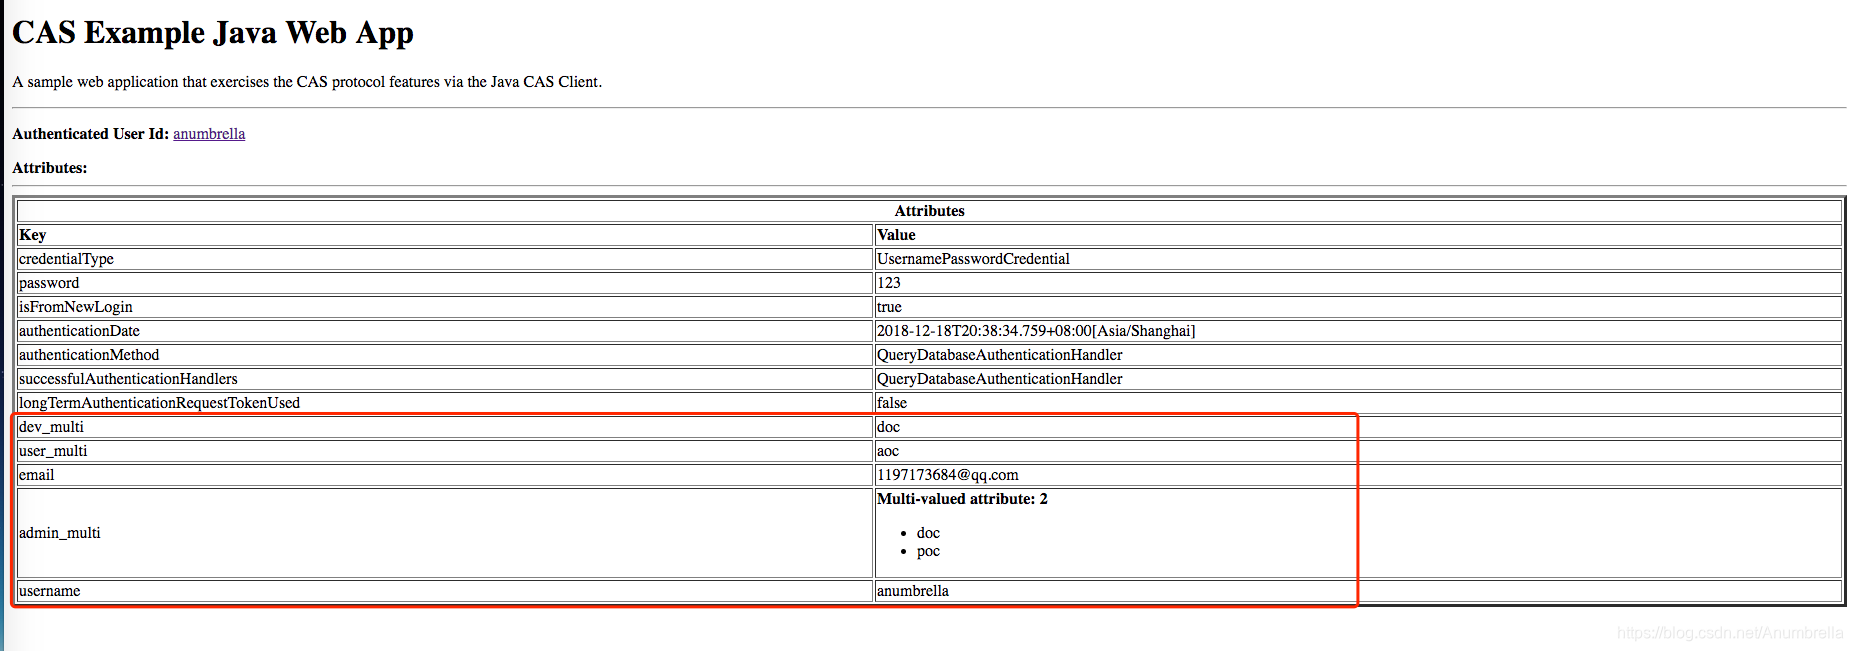
多行属性配置
#多行属性
cas.authn.attributeRepository.jdbc[1].attributes.admin=admin_multi
cas.authn.attributeRepository.jdbc[1].attributes.dev=dev_multi
cas.authn.attributeRepository.jdbc[1].attributes.user=user_multi

cas.authn.attributeRepository.jdbc[1].columnMappings.role=company

cas.authn.attributeRepository.jdbc[1].singleRow=false
cas.authn.attributeRepository.jdbc[1].order=1
cas.authn.attributeRepository.jdbc[1].requireAllAttributes=true
# cas.authn.attributeRepository.jdbc[1].caseCanonicalization=NONE|LOWER|UPPER
# cas.authn.attributeRepository.jdbc[1].queryType=OR|AND

cas.authn.attributeRepository.jdbc[1].sql=SELECT * FROM user_attrs WHERE {0}
cas.authn.attributeRepository.jdbc[1].username=username

#数据库连接
cas.authn.attributeRepository.jdbc[1].url=jdbc:mysql://127.0.0.1:3306/cas?useUnicode=true&characterEncoding=UTF-8&autoReconnect=true&useSSL=false

#数据库dialect配置
cas.authn.attributeRepository.jdbc[1].dialect=org.hibernate.dialect.MySQLDialect

#数据库用户名
cas.authn.attributeRepository.jdbc[1].user=root

#数据库用户密码
cas.authn.attributeRepository.jdbc[1].password=123

#数据库事务自动提交
cas.authn.attributeRepository.jdbc[1].autocommit=false

#数据库驱动
cas.authn.attributeRepository.jdbc[1].driverClass=com.mysql.jdbc.Driver

#超时配置
cas.authn.attributeRepository.jdbc[1].idleTimeout=5000

cas.authn.attributeRepository.jdbc[1].ddlAuto=none

cas.authn.attributeRepository.jdbc[1].leakThreshold=10
cas.authn.attributeRepository.jdbc[1].batchSize=1
cas.authn.attributeRepository.jdbc[1].dataSourceProxy=false
同样的,重新启动我们的CAS服务端,发现达到我们的要求了,返回了多个属性值。
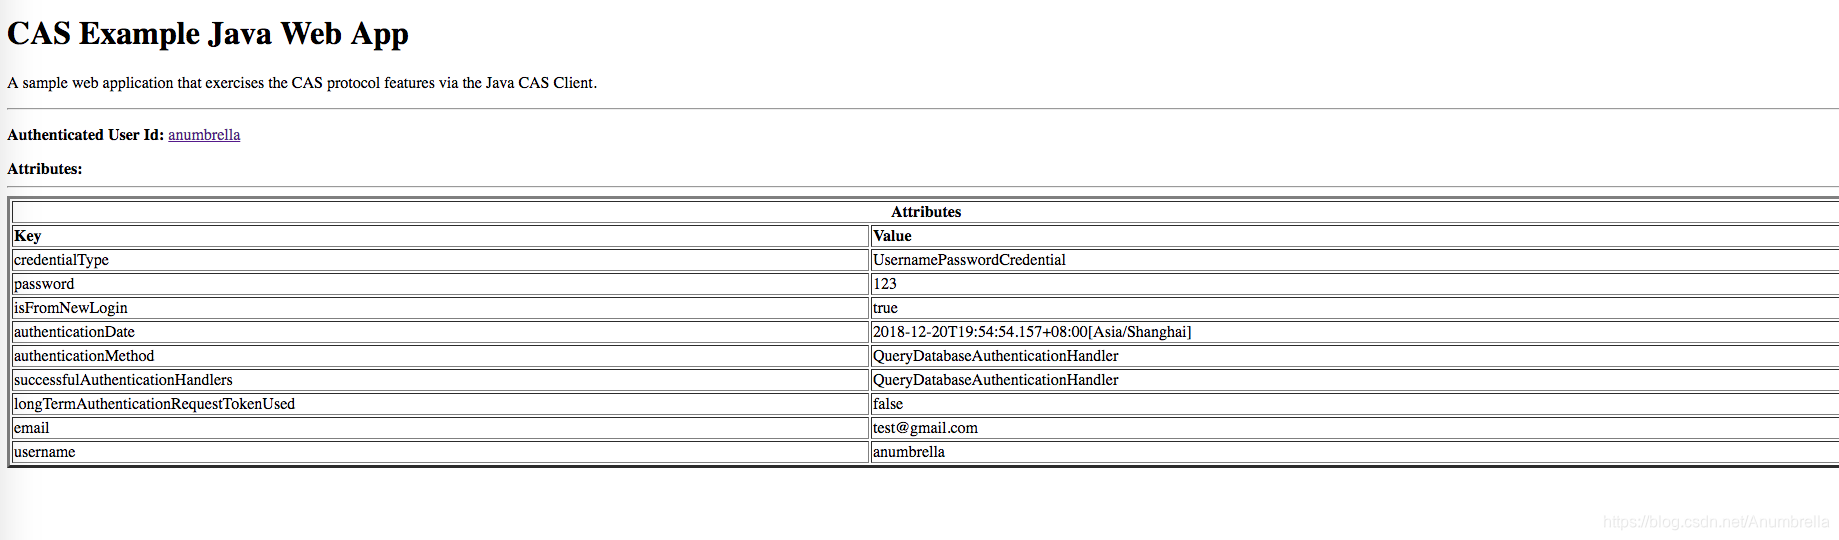
二、JSON
对应JSON的多属性返回,基本是一致的。对于认证依旧使用JDBC认证,因此我们只需要配置一下属性返回的配置即可。
cas.authn.attributeRepository.json[0].location=file:///Users/anumbrella/attribute-repository.json
cas.authn.attributeRepository.json[0].order=0
指定返回属性的文件和返回先后顺序,这里新建一个attribute-repository.json文件,具体内容如下:
{
    "anumbrella": {
        "username":["anumbrella"],
        "email":["test@gmail.com"],
        "password":["123"]
    }
}
重启我们的CAS服务端,然后启动客户端,输入密码登录,我们可以发现返回的属性与我们配置的一致。
关于多属性返回一样,因为配置的JSON为数组,如下role返回为多属性。
{
    "anumbrella": {
        "username":["anumbrella"],
        "email":["test@gmail.com"],
        "password":["123"],
        "role": ["admin", "dev"]
    }
}
最终结果如下:
三、REST
关于REST的返回属性其实也就差不多了,和原来讲解REST认证差不多,这里就不再过多的复述。还是添加配置如下:
##
# REST
#
cas.authn.attributeRepository.rest[0].method=POST
cas.authn.attributeRepository.rest[0].order=0
cas.authn.attributeRepository.rest[0].caseInsensitive=false
cas.authn.attributeRepository.rest[0].basicAuthUsername=uid
cas.authn.attributeRepository.rest[0].basicAuthPassword=password
cas.authn.attributeRepository.rest[0].url=http://localhost:8088/attributes
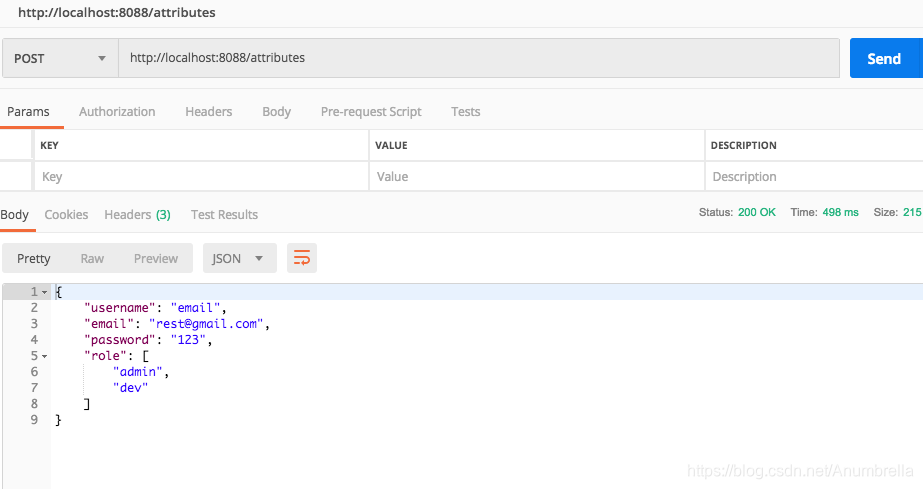
配置中http://localhost:8088/attributes路由是指定请求的REST路由,返回给具体属性即可。
在REST服务中,返回了基本的属性数据,配置如下:
/**
 * @author anumbrella
 */
@RestController
public class RestAttributeController {

    @PostMapping("/attributes")
    public Object getAttributes(@RequestHeader HttpHeaders httpHeaders) {
        SysUser user = new SysUser();
        user.setEmail("rest@gmail.com");
        user.setUsername("email");
        user.setPassword("123");
        List<String> role = new ArrayList<>();
        role.add("admin");
        role.add("dev");
        user.setRole(role);
        //成功返回json
        return user;
    }
}
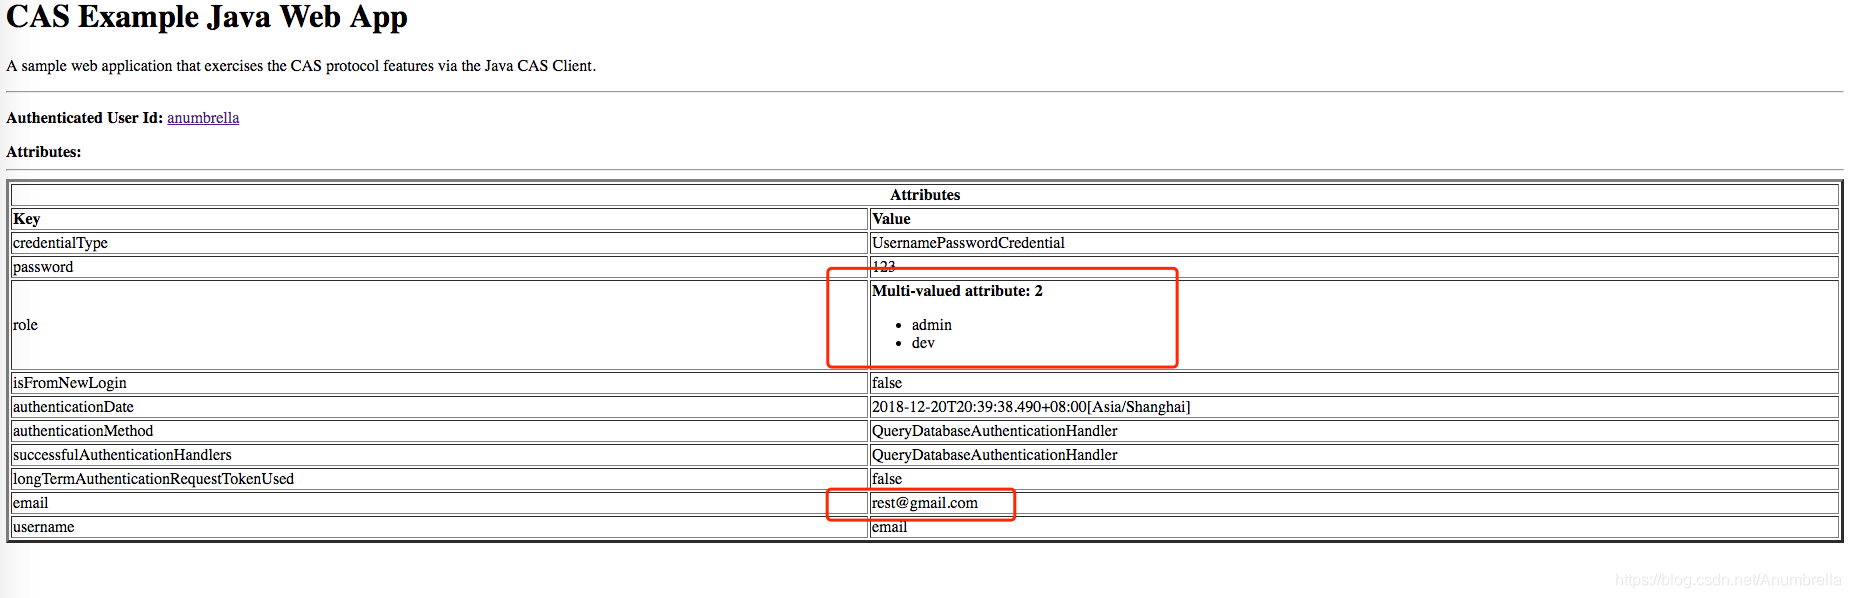
启动REST服务,在POSTMAN中模拟POST请求,可以得到如下数据:
然后重新启动CAS服务端,登录客户端,得到我们的数据。
四、自定义属性返回
上面几种情况主要是CAS服务为我们封装好了代码,我们只需要按要求配置好,就可以得到返回的属性。
更多情况我们使用的是自定义的认证登录,这时候我们要返回属性如何去实现?其实在前面的文章有大致讲解,这里我们再来详细分析一下。
比如我们使用的是JPA注册服务配置,然后使用的是自定义认证策略。
主要是在doAuthentication中配置this.principalFactory.createPrincipal方法进行返回自定义属性,以HashMap的形式进行返回。
final List<MessageDescriptor> list = new ArrayList<>();
 // 可自定义返回给客户端的多个属性信息
HashMap<String, Object> returnInfo = new HashMap<>();
returnInfo.put("expired", info.getDisabled());
returnInfo.put("email", info.getEmail());
returnInfo.put("username", info.getUsername());
returnInfo.put("password", info.getPassword());
returnInfo.put("disabled", info.getDisabled());

return createHandlerResult(customCredential,
                    this.principalFactory.createPrincipal(username, returnInfo), list);
现在我们需要更改我们的代码,取消resources下面的META-INF下的spring.factories中的配置注释掉。
然后把模板templates.anumbrella下的更改为casLoginView.html。开启JPA配置,然后查看返回的自定义属性。
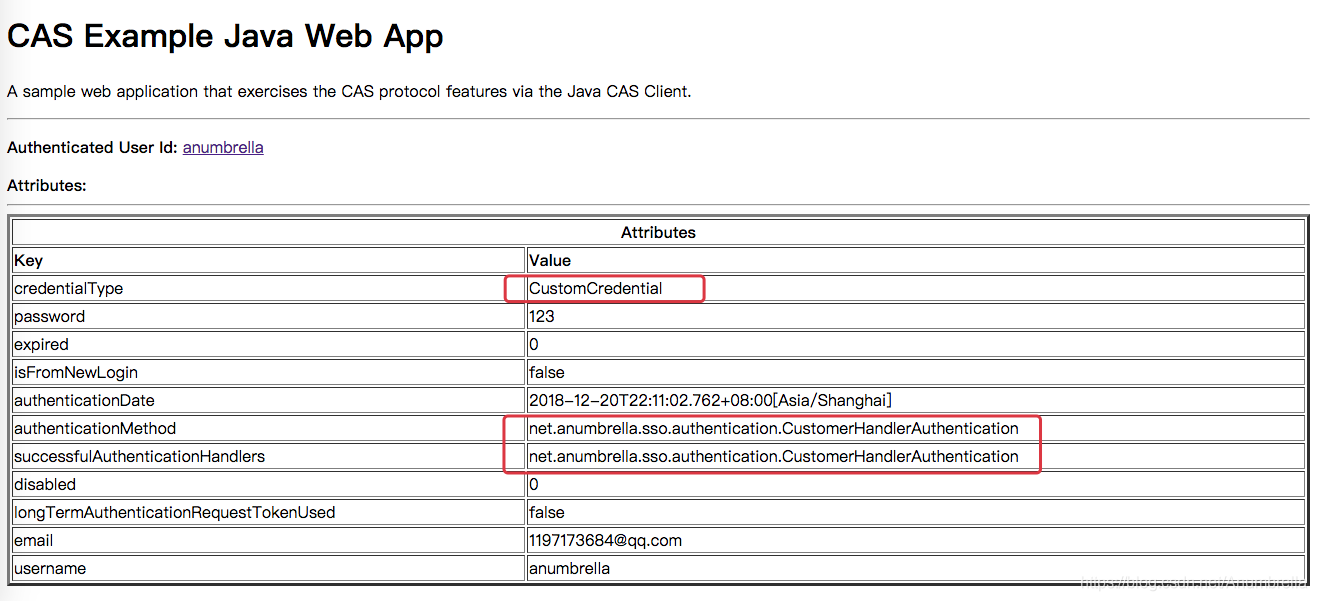
重启CAS服务,登录客户端,我们可以发现竟然什么都没返回!!
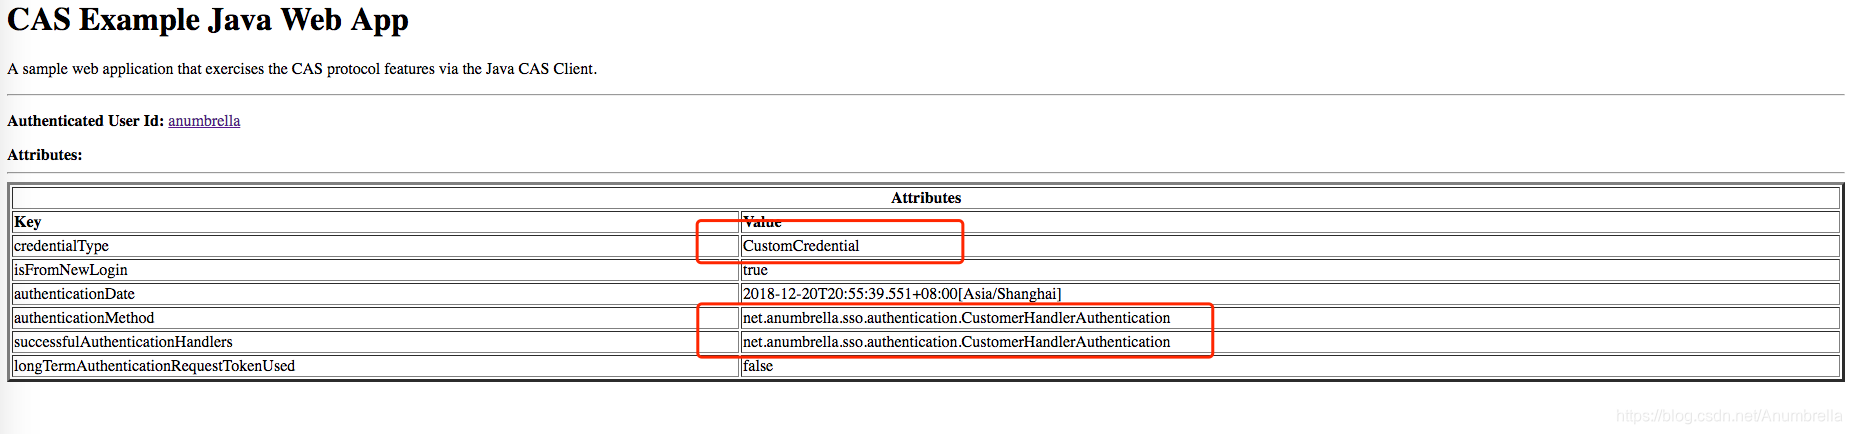
这是为啥?因为默认返回策略是没有配置的。这时候可以使用我们第五节讲解的Service配置及管理,对我们的返回客户端进行配置。
两种方法:
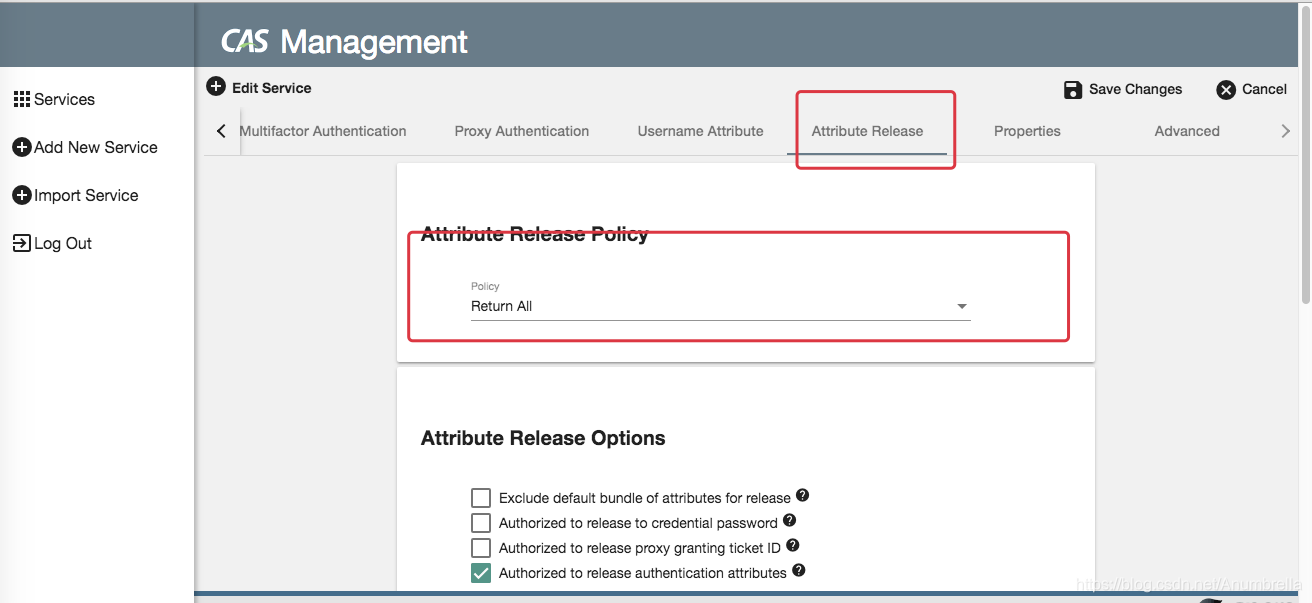
1、服务管理Web应用程序
启动CAS Management后,我们可以在配置中看到有关Attribute Release的相关配置,更改配置Return All即可返回所有的属性。
在application.properties中我们可以配置具体可以返回的那些属性。
##
# CAS Authentication Attributes
#
cas.authn.attributeRepository.stub.attributes.username=username
cas.authn.attributeRepository.stub.attributes.email=email
cas.authn.attributeRepository.stub.attributes.password=password
再次登录客户端,可以发现我们需要的属性都已经返回了。
2、自定义接口管理服务
除了上面官方提供的服务管理程序,我们还可以使用自定义的添加接口。
如下:
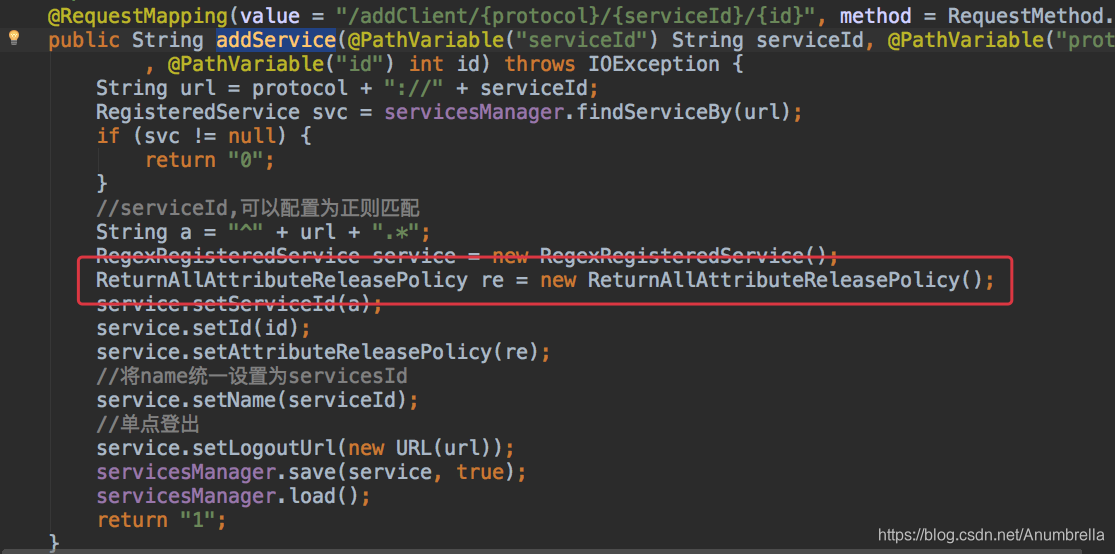
这里的ReturnAllAttributeReleasePolicy就是返回所有属性,当然还有ReturnAllowedAttributeReleasePolicy等类,可以根据具体业务情况选择返回。
好了,多属性返回就到这里,下一篇文章会详细讲解一下CAS客户端接入。
代码实例:Chapter7


 3927
3927


 被折叠的 条评论
为什么被折叠?
被折叠的 条评论
为什么被折叠?
 到【灌水乐园】发言


