


Gitlab安装指南
Gitlab安装教程参考:
https://doc.gitlab.cc/ce/administration/high_availability/README.html
1、 下载gitlab包https://about.gitlab.com/downloads/
查看os版本,并下载对应的包,这里我们下载的是https://about.gitlab.com/downloads/#centos6
2、 安装依赖包
sudo yum install curl openssh-server openssh-clients postfix cronie
sudo service postfix start
sudo chkconfig postfix on
sudo lokkit -s http -s ssh
3、 安装gitlab
rpm -i gitlab-ce-XXX.rpm
启动:gitlab-ctl start
重新启动:gitlab-ctl restart
停止:gitlab-ctl stop
查看状态:gitlab-ctl status
实时日志查看:gitlab-ctl tail
检查报错:gitlab-rake gitlab:check
4、 设置环境变量
export GEM_PATH=/opt/gitlab/embedded
export PATH=$GEM_PATH/bin:$PATH
export BUNDLE_HOME=/opt/gitlab/embedded/lib/ruby/gems/2.3.0/gems/bundler-1.13.7
export PATH=$BUNDLE_HOME:$PATH
export ROTP_HOME=/opt/gitlab/embedded/service/gem/ruby/2.3.0/gems/rotp-2.1.2
export PATH=$ROTP_HOME:$PATH
5、 修改配置
修改配置后重新启动
Gitlab-ctl reconfigure
Vim /etc/gitlab/gitlab.rb
1) Gitlab访问url修改:external_url 'http://git.cnsuning.com'
2) 数据库修改:
postgresql['enable'] = false
gitlab_rails['db_adapter'] = "postgresql"
# gitlab_rails['db_encoding'] = "unicode"
# gitlab_rails['db_collation'] = nil
gitlab_rails['db_database'] = "gitlabhq_production"
# gitlab_rails['db_pool'] = 10
gitlab_rails['db_username'] = "postgres"
gitlab_rails['db_password'] = "gitlab"
gitlab_rails['db_host'] = "xxxxx"
gitlab_rails['db_port'] = 5432
# gitlab_rails['db_socket'] = nil
# gitlab_rails['db_sslmode'] = nil
# gitlab_rails['db_sslrootcert'] = nil
3) Redis修改
## Redis TCP connection
gitlab_rails['redis_host'] = "xxxx"
gitlab_rails['redis_port'] = 6379
gitlab_rails['redis_password'] = "xxxx"
# gitlab_rails['redis_database'] = 0
4) Gitlab user修改
user['username'] = "git"
user['group'] = "git"
#user['uid'] = 0
#user['gid'] = 0
# # The shell for the git user
user['shell'] = "/bin/sh"
# # The home directory for the git user
#user['home'] = "/var/opt/gitlab"
user['git_user_name'] = "git"
# user['git_user_email'] = "gitlab@#{node['fqdn']}"
增加git用户和git组
Groupadd git –g 501
Useradd git –u 501 –g 501
5) 高可用配置、ldap配置
增加ldap配置
# For omnibus packages
gitlab_rails['ldap_enabled'] = true
gitlab_rails['ldap_servers'] = YAML.load <<-EOS # remember to close this block with 'EOS' below
main: # 'main' is the GitLab 'provider ID' of this LDAP server
label: 'LDAP'
host: 'xxxx'
port: 389
uid: 'uid'
method: 'plain' # "tls" or "ssl" or "plain"
allow_username_or_email_login: true
bind_dn: 'cn=xxx,dc=xx,dc=com'
password: 'xxx'
active_directory: true
base: 'ou=xxx,dc=xxx,dc=com'
user_filter: ''
EOS
6) 修改email
先找到 config/environments/production.rb,默认设置为sendemail
config.action_mailer.delivery_method= :smtp
设置/etc/gitlab/gitlab.rb
gitlab_rails['smtp_enable'] = true
gitlab_rails['smtp_address'] = "mail.cnsuning.com"
gitlab_rails['smtp_openssl_verify_mode'] = 'none'
gitlab_rails['smtp_port'] = 25
gitlab_rails['smtp_user_name'] = "xxxxx"
gitlab_rails['smtp_password'] = "xxxx"
gitlab_rails['smtp_authentication'] = "login"
gitlab_rails['smtp_domain'] = "xxxxx"
gitlab_rails['smtp_enable_starttls_auto'] = true
gitlab_rails['gitlab_email_from'] = 'xxxx'
gitlab_rails['gitlab_email_reply_to'] = 'xxxxx'
过程中报错;
OpenSSL::SSL::SSLError: hostname was not match with the server certificate
增加gitlab_rails['smtp_openssl_verify_mode'] = 'none'
6、 搭建nfs服务器
1) 新增用户git
增加git用户和git组
Groupadd git –g 501
Useradd git –u 501 –g 501
2) 安装软件:
rpcbind
nfs-utils
nfs-utils-lib

3) 创建nfs目录
mkdir -p /var/opt/gitlab/.ssh /var/opt/gitlab/gitlab-rails/uploads /var/opt/gitlab/gitlab-rails/shared /var/opt/gitlab/gitlab-ci/builds /var/opt/gitlab/git-data
4) 修改配置,
[root@gitppreapp02 ~]# vim /etc/exports
/var/opt/gitlab/.ssh xxx(rw,all_squash,anonuid=501,anongid=501) xxxx(rw,all_squash,anonuid=501,anongid=501,sync)
/var/opt/gitlab/gitlab-rails/uploads xxxx(rw,all_squash,anonuid=501,anongid=501) xxxx(rw,all_squash,anonuid=501,anongid=501,sync)
/var/opt/gitlab/gitlab-rails/shared xxxx(rw,all_squash,anonuid=501,anongid=501) xxxx(rw,all_squash,anonuid=501,anongid=501,sync)
/var/opt/gitlab/gitlab-ci/builds xxxxx(rw,all_squash,anonuid=501,anongid=501) xxxxx(rw,all_squash,anonuid=501,anongid=501,sync)
/var/opt/gitlab/git-data xxxxx(rw,all_squash,anonuid=501,anongid=501) xxxxx(rw,all_squash,anonuid=501,anongid=501,sync)
Exportfs –r使其生效
5) 在gitlab应用服务器上挂载nfs目录
方式一:
xxxx:/var/opt/gitlab/.ssh /var/opt/gitlab/.ssh nfs defaults,soft,rsize=1048576,wsize=1048576,noatime,nobootwait,lookupcache=positive 0 2
xxxxx:/var/opt/gitlab/gitlab-rails/uploads /var/opt/gitlab/gitlab-rails/uploads nfs defaults,soft,rsize=1048576,wsize=1048576,noatime,nobootwait,lookupcache=positive 0 2
xxxx:/var/opt/gitlab/gitlab-rails/shared /var/opt/gitlab/gitlab-rails/shared nfs defaults,soft,rsize=1048576,wsize=1048576,noatime,nobootwait,lookupcache=positive 0 2
xxxxx:/var/opt/gitlab/gitlab-ci/builds /var/opt/gitlab/gitlab-ci/builds nfs defaults,soft,rsize=1048576,wsize=1048576,noatime,nobootwait,lookupcache=positive 0 2
xxxx:/var/opt/gitlab/git-data /var/opt/gitlab/git-data nfs defaults,soft,rsize=1048576,wsize=1048576,noatime,nobootwait,lookupcache=positive 0 2
方式二:
命令格式
# mount NFS服务器IP:共享目录 本地挂载点目录
mkdir jenkins
mount xxxx:/var/opt/gitlab/.ssh /var/opt/gitlab/.ssh
查看:[root@gitppreweb02 ~]# mount | grep nfs
sunrpc on /var/lib/nfs/rpc_pipefs type rpc_pipefs (rw)
xxx:/var/opt/gitlab/.ssh/ on /var/opt/gitlab/.ssh type nfs (rw,vers=3,addr=10.37.77.186)
xxxx:/var/opt/gitlab/gitlab-rails/uploads/ on /var/opt/gitlab/gitlab-rails/uploads type nfs (rw,vers=3,addr=xxxxx)
xxxx:/var/opt/gitlab/gitlab-rails/shared/ on /var/opt/gitlab/gitlab-rails/shared type nfs (rw,vers=3,addr=xxxx)
xxxx:/var/opt/gitlab/gitlab-ci/builds/ on /var/opt/gitlab/gitlab-ci/builds type nfs (rw,vers=3,addr=xxxxx)
xxxxx:/var/opt/gitlab/git-data/ on /var/opt/gitlab/git-data type nfs (rw,vers=3,addr=xxxx)
过程中可能出现目录的所属用户为nobody可使用如下解决
mount -t nfs -o vers=3 xxxx:/opt/gitlab /var/opt/gitlab
6) 开机自启动:
[root@jenkissitweb210 ~]# chkconfig rpcbind on
[root@jenkissitweb210 ~]# chkconfig nfs on
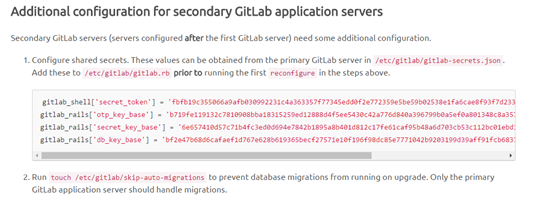
7、 共享秘钥
8、 nfs目录备份,使用rsync备份
备机器上安装rsync服务
查看:rpm -qa |grep rsync
Vim /etc/rsyncd.conf
[root@gitppreapp01 ~]# vim /etc/rsyncd.conf
#gid = nobody
uid = root
gid = root
use chroot = yes
read only = no
#limit access to private LANs
hosts allow=xxxx
#hosts deny=*
max connections = 5
motd file = /etc/rsyncd.motd
#This will give you a separate log file
log file = /var/log/rsyncd.log
#This will log every file transferred - up to 85,000+ per user, per sync
#transfer logging = yes
log format = %t %a %m %f %b
syslog facility = local3
timeout = 300
[module_gitlab]
path = /var/opt/gitlab/
list = yes
ignore errors
auth users = gitlab
secrets file = /etc/rsyncd.secrets
comment = This is RHEL 186/var/opt data
exclude = workspace/
[test]
path=/var/opt/gitlab/test
list = yes
ignore errors
auth users = gitlab
secrets file = /etc/rsyncd.secrets
comment = This is RHEL186 test
创建,编辑 /etc/rsyncd.secrets
Chomod 600 /etc/rsyncd.secrets
[root@sitjenkins CI]# ll /etc/rsyncd.secrets
-rw------- 1 root root 9 Oct 25 14:55 /etc/rsyncd.secrets
[root@sitjenkins CI]# cat /etc/rsyncd.secrets
Gitlab:gitlab
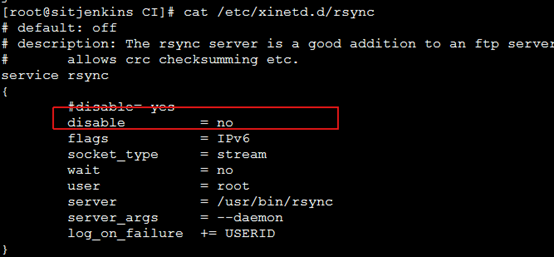
配置/etc/xinetd.d/rsync 开启rsync服务
启动
[root@sitjenkins CI]# /usr/bin/rsync --daemon

也可以安装yum insall xinetd
通过service xinetd start来启动或者重启rsync服务
设置开机自启动 chkconfig xinetd on
测试
在主机器上执行同步到备份机器
rsync -avz /opt/backup root@xxxxx::test
下图为从27机器从不到本机
至此rsync 搭建成功!

在主NFS上面
创建/etc/rsync_client.pwd,权限为600 内容为rsync账户的密码
执行同步:/usr/bin/rsync -avz --delete --progress --password-file=/etc/rsync_client.pwd /var/opt/gitlab/ gitlab@xxxxx::module_gitlab
后台自动检测执行设置如下:
(1)在nfs Server主上面安装inotify-tools-3.14-1.el6.x86_64.rpm
把软件拖到nfs server上面随便一个目录
执行安装:
[root@jenkissitweb210 software]# yum install inotify-tools-3.14-1.el6.x86_64.rpm
增加后台脚本:
[root@gitppreapp02 CI]# vim rsync.sh
#rsync auto sync script with inotify
#2014-12-11 Sean
#variables
current_date=$(date +%Y%m%d_%H%M%S)
source_path=/var/opt/gitlab/
log_file=/opt/log/rsync_client.log
#rsync
rsync_server=xxxx
rsync_user=gitlab
rsync_pwd=/etc/rsync_client.pwd
#rsync_module=module_test
rsync_module=module_gitlab
#INOTIFY_EXCLUDE='(.*/*\.swp)$|^/var/opt/gitlab/'
RSYNC_EXCLUDE='/etc/rsyncd.d/rsync_exclude.lst'
#rsync client pwd check
if [ ! -e ${rsync_pwd} ];then
echo -e "rsync client passwod file ${rsync_pwd} does not exist!"
exit 0
fi
#inotify_function
inotify_fun(){
/usr/bin/inotifywait -mrq --timefmt '%Y/%m/%d-%H:%M:%S' --format '%T %w %f' \
-e modify,delete,create,move,attrib ${source_path} \
| while read file
do
/usr/bin/rsync -avz --delete --progress --password-file=${rsync_pwd} ${source_path} ${rsync_user}@${rsync_server}::${rsync_module}
#/usr/bin/rsync -avz --delete --progress --password-file=/etc/rsync_client.pwd /var/opt/gitlab/ gitlab@xxxxx::module_gitlab
done
}
#inotify log
inotify_fun >> ${log_file} 2>&1 &
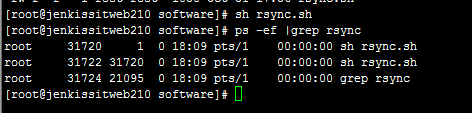
执行:sh rsync.sh 发现没有进程
遇到报错:
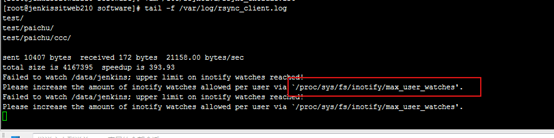
修改:[root@jenkissitweb210 jenkins]# sysctl -w fs.inotify.max_user_watches="99999999"
启动:成功
9、 安装postgresql
安装参考:
http://www.cnblogs.com/mchina/archive/2012/06/06/2539003.html
1) 下载postgresql
2) 安装
安装PostgreSQL,注意安装顺序
a) # rpm -ivh postgresql92-libs-9.2.4-1PGDG.rhel6.i686.rpm
b) # rpm -ivh postgresql92-9.2.4-1PGDG.rhel6.i686.rpm
c) # rpm -ivh postgresql92-server-9.2.4-1PGDG.rhel6.i686.rpm
d) # rpm -ivh postgresql92-contrib-9.2.4-1PGDG.rhel6.i686.rpm
3) 执行4. 初始化PostgreSQL 数据库
PostgreSQL 服务初次启动的时候会提示初始化。

4) 初始化数据库
# service postgresql-9.2 initdb

5) 启动服务
# service postgresql-9.2 start

6) 把PostgreSQL 服务加入到启动列表
# chkconfig postgresql-9.2 on
# chkconfig --list|grep postgres

7) 修改PostgreSQL 数据库用户postgres的密码(注意不是linux系统帐号)
8) PostgreSQL 数据库默认会创建一个postgres的数据库用户作为数据库的管理员,默认密码为空,我们需要修改为指定的密码,这里设定为’postgres’。
# su - postgres
$ psql
# ALTER USER postgres WITH PASSWORD 'postgres';
# select * from pg_shadow ;

9) 测试数据库
创建测试数据库
# create database david;
安装扩展包:contrib如有报错resource libxslt.so.1()(64bit) 找不到下载
libxslt-1.1.26-2.el6_3.1.x86_64.htmlLibrary providing the Gnome XSLT engineCentOS 6.9 for x86_64libxslt-1.1.26-2.el6_3.1.x86_64.rpm
git汉化
汉化下载
https://gitlab.com/xhang/gitlab 下载中文包
cp -r /opt/gitlab/embedded/service/gitlab-rails{,.ori}


 607
607

 被折叠的 条评论
为什么被折叠?
被折叠的 条评论
为什么被折叠?
 到【灌水乐园】发言


