//
// ViewController.swift
// UIButton
//
// Created by hong wang on 2017/6/1.
// Copyright © 2017年 appio. All rights reserved.
//
import UIKit
class ViewController: UIViewController {
override func viewDidLoad() {
super.viewDidLoad()
// Do any additional setup after loading the view, typically from a nib.
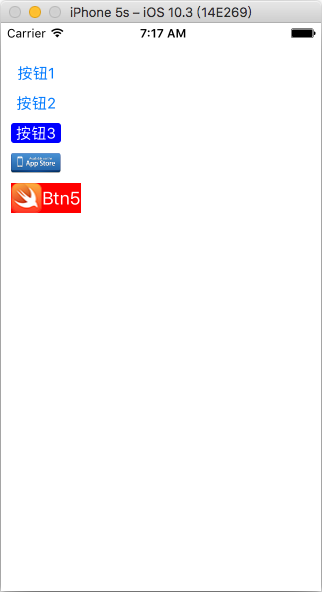
//按钮Demo1
let btn1:UIButton = UIButton(type: UIButtonType.system)
//设置框架
btn1.frame = CGRect(x: 10, y: 40, width: 50, height: 20)
//按钮标题
btn1.setTitle("按钮1", for: UIControlState.normal)
//添加按钮到当前视图
self.view.addSubview(btn1)
//添加响应
//btn1.addTarget(<#T##target: Any?##Any?#>, action: <#T##Selector#>, for: <#T##UIControlEvents#>)
btn1.addTarget(self, action: #selector(ViewController.btn1Click), for: UIControlEvents.touchUpInside)
//按钮Demo2
let btn2:UIButton = UIButton(type: UIButtonType.system)
btn2.frame = CGRect(x: 10, y: 70, width: 50, height: 20)
btn2.setTitle("按钮2", for: UIControlState.normal)
self.view.addSubview(btn2)
btn2.addTarget(self, action: #selector(ViewController.btn2Click), for: UIControlEvents.touchUpInside)
//按钮Demo3
let btn3:UIButton = UIButton(type: UIButtonType.system )
btn3.frame = CGRect(x: 10, y: 100, width: 50, height: 20)
btn3.setTitle("按钮3", for: UIControlState.normal)
btn3.setTitleColor(UIColor.white, for: UIControlState.normal )
//btn3.layer.borderColor = UIColor.blue.cgColor;
btn3.layer.backgroundColor = UIColor.blue.cgColor;
//btn3.layer.borderWidth = 1;
btn3.layer.cornerRadius = 3;
self.view.addSubview(btn3)
btn3.addTarget(self, action: #selector(ViewController.btn3Click), for: UIControlEvents.touchUpInside)
//按钮Demo4
let btn4:UIButton = UIButton(type: .system)
btn4.frame = CGRect(x: 10, y: 130, width: 50, height: 20)
btn4.setBackgroundImage(UIImage(named: "download.png"), for: .normal )
self.view.addSubview(btn4)
btn4.addTarget(self, action: #selector(ViewController.btn4Click), for: .touchUpInside)
//按钮Demo5 type类型必须是custom不能是system,否则无法显示
let btn5:UIButton = UIButton(type: .custom)
btn5.frame = CGRect(x: 10, y: 160, width: 70, height: 30)
btn5.setTitle("Btn5", for: .normal)
btn5.setImage(UIImage(named: "s.png"), for: .normal)
btn5.backgroundColor = UIColor.red
self.view.addSubview(btn5)
btn5.addTarget(self, action: #selector(ViewController.btn5Click), for: .touchUpInside)
}
override func didReceiveMemoryWarning() {
super.didReceiveMemoryWarning()
// Dispose of any resources that can be recreated.
}
/*
1. 随机函数 arc4random 返回类型为整形, 从0开始, 如果需要1-X之间的随机数: arc4random() % X + 1
2. 随机生成指定范围内整形 arc4random_uniform( X ) 等同于 arc4random() % X
*/
func btn1Click(){
let iKey = arc4random() % 2
print( iKey, "Btn1 Clicked!")
}
//带对象的函数响应
func btn2Click(btn:UIButton){
btn.backgroundColor = UIColor(colorLiteralRed: (Float)(arc4random() % 256) / 256, green: (Float)(arc4random() % 256 ) / 256, blue: (Float)(arc4random() % 256 ) / 256, alpha: 1)
}
func btn3Click(){
print( "Btn3 Clicked!")
}
func btn4Click(){
print( "Btn4 Clicked!")
}
func btn5Click(){
print( "Btn5 Clicked!")
}
}


 1270
1270

 被折叠的 条评论
为什么被折叠?


