


目录
一、Profile功能
为了方便多环境适配,springboot简化了profile功能。
1.1、application-profile功能
- 默认配置文件
application.yml任何时候都会加载 - 指定环境配置文件
application-{env}.yml - 激活指定环境(命令行激活优先)
- 配置文件激活:
spring.profiles.active={env} - 命令行激活:
java -jar xxx.jar --spring.profiles.active={env} --server.port=8888(可选项配置 - 如指定激活并覆盖激活里的端口号 )
- 配置文件激活:
- 默认配置与环境配置同时生效
- 同名配置项如端口号,
profile配置优先
1、application.yml
spring:
  profiles:
    active: test
2、application-test.yml
person:
  name: test-laptoy
3、application-prod.yml
person:
  name: prod-laptoy
4、HelloController
@RestController
public class HelloController {

    @Value("${person.name:defaultName}")
    private String name;

    @GetMapping("/")
    public String hello() {
        return "hello: " + name;
    }
}
5、访问 - http://localhost:8080/ - hello: test-laptoy
1.2、@Profile条件装配功能
1、业务
public class Color {
}

@Configuration
public class MyConfig {

    @Profile("prod")
    @Bean
    public Color red(){
        return new Color();
    }

    @Profile("test")
    @Bean
    public Color green(){
        return new Color();
    }
}
2、application.yml
spring:
  profiles:
    active: test
3、主启动类
@SpringBootApplication
public class Boot09FeaturesProfileApplication {
    public static void main(String[] args) {
        ConfigurableApplicationContext run = SpringApplication.run(Boot09FeaturesProfileApplication.class, args);

        for (String beanDefinitionName : run.getBeanDefinitionNames()) {
            System.out.println(beanDefinitionName);
        }
    }

}

1.3、分组激活
application.properties
spring.profiles.active=myprod

spring.profiles.group.myprod[0]=proddb
spring.profiles.group.myprod[1]=prodport

spring.profiles.group.mytest[0]=testdb
spring.profiles.group.mytest[1]=testport
二、外部化配置
2.1、简介
Spring Boot 允许您将配置外部化,以便您可以在不同的环境中使用相同的应用程序代码。您可以使用各种外部配置源,包括 Java 属性文件、YAML 文件、环境变量和命令行参数。
属性值可以通过使用注解直接注入到你的 bean 中@Value,通过 Spring 的抽象Environment访问,或者通过.@ConfigurationProperties
Spring Boot 使用一种非常特殊的PropertySource顺序,旨在允许明智地覆盖值。属性按以下顺序考虑(较低项目的值覆盖较早的项目):
- 默认属性(由设置指定SpringApplication.setDefaultProperties)。
- @PropertySource@Configuration您的课程上的注释。请注意,Environment在刷新应用程序上下文之前,不会将此类属性源添加到 中。配置某些属性(例如在刷新开始之前读取的logging.和)为时已晚。spring.main.
- 配置数据(例如application.properties文件)。
- 仅在中RandomValuePropertySource具有属性的 A。random.*
- 操作系统环境变量。
- Java 系统属性 ( System.getProperties())。
- JNDI 属性来自java:comp/env.
- ServletContext初始化参数。
- ServletConfig初始化参数。
- 来自SPRING_APPLICATION_JSON(嵌入在环境变量或系统属性中的内联 JSON)的属性。
- 命令行参数。
- properties属性在你的测试。可用于测试应用程序的特定部分@SpringBootTest的测试注释。
- @TestPropertySource测试上的注释。
- $HOME/.config/spring-boot当 devtools 处于活动状态时,目录中的Devtools 全局设置属性。
2.1、外部配置源
常用:Java属性文件、YAML文件、环境变量、命令行参数;
2.2、查找位置
配置文件查找位置(优先级从上到下递增 - 最后一个最优先加载 - 越外部越优先)
- classpath 根路径
- classpath 根路径下config目录
- jar包当前目录
- jar包当前目录的config目录
- /config子目录的直接子目录
2.3、加载顺序
配置数据文件按以下顺序考虑(优先级从上到下递减 - 第一最优先 - 指定环境优先)
- 当前jar包内部的 application.properties 和 application.yml
- 当前jar包内部的 application-{profile}.properties 和 application-{profile}.yml
- 外部jar包的 application.properties 和 application.yml
- 外部jar包的 application-{profile}.properties 和 application-{profile}.yml
举一个具体的例子,假设你开发了一个@Component使用name属性的,如下例所示:
@Component
public class MyBean {

    @Value("${name}")
    private String name;
}
在您的应用程序类路径(例如,在您的 jar 中)上,您可以有一个application.properties文件,该文件为 name. 在新环境中运行时,application.properties可以在 jar 之外提供一个文件,该文件覆盖name. 对于一次性测试,您可以使用特定的命令行开关(例如,java -jar xxx.jar --name="Laptoy")启动。
2.4、总结
指定环境优先,外部优先,后面的可以覆盖前面的同名配置项
三、自定义 Starter
3.1、starter启动原理
-
starter-pom引入 autoconfigurer 包

-
autoconfigure包中配置使用 META-INF/spring.factories 中 EnableAutoConfiguration 的值,使得项目启动加载指定的自动配置类
-
编写自动配置类 xxxAutoConfiguration -> xxxxProperties
- @Configuration
- @Conditional
- @EnableConfigurationProperties
- @Bean
引入starter — xxxAutoConfiguration — 容器中放入组件 ---- 绑定xxxProperties ---- 配置项
3.2、自定义starter
- 新建空项目 -
diy-starter- 新建maven工程 -
laptoy-spring-boot-starter(启动器) - 新建springboot工程 -
laptoy-spring-boot-starter-autoconfigure(自动配置包)
- 新建maven工程 -
效果:

1、启动器模块
引入自动配置包模块
<dependency>
    <groupId>com.laptoy</groupId>
    <artifactId>laptoy-spring-boot-starter-autoconfigure</artifactId>
    <version>0.0.1-SNAPSHOT</version>
</dependency>
2、自动配置包模块
1、删除其他文件
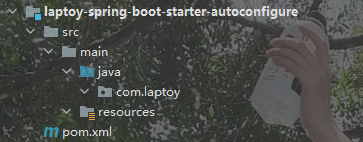
2、pom文件删除其他依赖及插件只留下
<dependency>
    <groupId>org.springframework.boot</groupId>
    <artifactId>spring-boot-starter</artifactId>
</dependency>
3、实体类
@ConfigurationProperties("laptoy.hello")
public class HelloProperties {

    private String prefix;
    private String suffix;

	// Getter Setter
}
4、业务层
public class HelloService {

    @Autowired
    HelloProperties helloProperties;

    public String sayHello(String username) {
        return helloProperties.getPrefix() + ": " + username + " " + helloProperties.getSuffix();
    }

}
5、配置类
@Configuration
@EnableConfigurationProperties(HelloProperties.class)
public class HelloServiceAutoConfiguration {

	@ConditionalOnMissingBean(HelloService.class)
    @Bean
    public HelloService helloService() {
        return new HelloService();
    }
}

6、resources目录新建META-INF/spring.factories
# Auto configure
org.springframework.boot.autoconfigure.EnableAutoConfiguration=\
com.laptoy.auto.HelloServiceAutoConfiguration
7、安装到本地库


3、用户模块
1、新建springboot模块 - boot-laptoy-study
2、POM - 引入自己的starter
<dependency>
    <groupId>org.springframework.boot</groupId>
    <artifactId>spring-boot-starter-web</artifactId>
</dependency>
<dependency>
    <groupId>com.laptoy</groupId>
    <artifactId>laptoy-spring-boot-starter</artifactId>
    <version>1.0-SNAPSHOT</version>
</dependency>
3、YML
laptoy.hello.prefix=Hello
laptoy.hello.suffix=Bye
4、控制层
@RestController
public class HelloController {

    @Autowired
    HelloService helloService;

    @GetMapping("/")
    public String hello() {
        return helloService.sayHello("laptoy");
    }

}
5、访问 localhost:8080 - Hello: laptoy Bye
6、如果自己新建config并新建bean,那么会加载我们自己新建的bean


 1万+
1万+


 被折叠的 条评论
为什么被折叠?
被折叠的 条评论
为什么被折叠?
 到【灌水乐园】发言


