


一、前端组件抽取
src/views/modules创建文件夹common存放公共组件
1、在common文件夹添加公用组件category.vue(简单展示分类数据)
<template>
  <el-tree :data="menus" :props="defaultProps" node-key="catId" ref="menuTree">
  </el-tree>
</template>

<script>
export default {
  data() {
    return {
      menus: [],
      defaultProps: {
        children: 'children',
        label: 'name'
      },
      expandedKey: [],
    }
  },
  methods: {
    getMenus() {
      this.$http({
        url: this.$http.adornUrl('/product/category/list/tree'),
        method: 'get',
      })
        .then(({ data }) => {
          // success
          console.log('成功获取到菜单', data.data)
          this.menus = data.data
        })
        .catch(() => {
        })
    },
  },
  //生命周期 - 创建完成(可以访问当前this实例)
  created() {
    this.getMenus();
  },
}
</script>
<style scoped>
</style>
2、将逆向生成的如下属性分组vue及添加修改功能vue放到前端工程


3、attrgroup.vue进行修改页面布局,左边展示三级分类(上面定义的公用组件category.vue),右边展示属性分组(原本是全部页面都展示属性分组)
参考element-ui

代码实现
<template>
  <el-row :gutter="20">
    <!-- 三级分类子组件布局,占6个 -->
    <el-col :span="6">
      <category></category>
    </el-col>

    <!-- 属性分组页面主要布局,占18个-->
    <el-col :span="18">
      <div class="mod-config">
        <el-form :inline="true" :model="dataForm" @keyup.enter.native="getDataList()">
          <el-form-item>
            <el-input v-model="dataForm.key" placeholder="参数名" clearable></el-input>
          </el-form-item>
          <el-form-item>
            <el-button @click="getDataList()">查询</el-button>
            <el-button v-if="isAuth('product:attrgroup:save')" type="primary" @click="addOrUpdateHandle()">新增</el-button>
            <el-button v-if="isAuth('product:attrgroup:delete')" type="danger" @click="deleteHandle()" :disabled="dataListSelections.length <= 0">批量删除</el-button>
          </el-form-item>
        </el-form>
        <el-table :data="dataList" border v-loading="dataListLoading" @selection-change="selectionChangeHandle" style="width: 100%;">
          <el-table-column type="selection" header-align="center" align="center" width="50">
          </el-table-column>
          <el-table-column prop="attrGroupId" header-align="center" align="center" label="分组id">
          </el-table-column>
          <el-table-column prop="attrGroupName" header-align="center" align="center" label="组名">
          </el-table-column>
          <el-table-column prop="sort" header-align="center" align="center" label="排序">
          </el-table-column>
          <el-table-column prop="descript" header-align="center" align="center" label="描述">
          </el-table-column>
          <el-table-column prop="icon" header-align="center" align="center" label="组图标">
          </el-table-column>
          <el-table-column prop="catelogId" header-align="center" align="center" label="所属分类id">
          </el-table-column>
          <el-table-column fixed="right" header-align="center" align="center" width="150" label="操作">
            <template slot-scope="scope">
              <el-button type="text" size="small" @click="addOrUpdateHandle(scope.row.attrGroupId)">修改</el-button>
              <el-button type="text" size="small" @click="deleteHandle(scope.row.attrGroupId)">删除</el-button>
            </template>
          </el-table-column>
        </el-table>
        <el-pagination @size-change="sizeChangeHandle" @current-change="currentChangeHandle" :current-page="pageIndex" :page-sizes="[10, 20, 50, 100]" :page-size="pageSize" :total="totalPage" layout="total, sizes, prev, pager, next, jumper">
        </el-pagination>

        <!-- 弹窗, 新增 / 修改 子组件 -->
        <add-or-update v-if="addOrUpdateVisible" ref="addOrUpdate" @refreshDataList="getDataList"></add-or-update>
      </div>
    </el-col>
  </el-row>
</template>

<script>

// 导入子组件
import Category from '../common/category.vue'
import AddOrUpdate from './attrgroup-add-or-update'
export default {
  // import引入的组件需要注入到对象中才能使用
  components: { Category, AddOrUpdate },

  ...

}
</script>
<style scoped>
</style>
4、效果展示

二、父子组件交互
实现子组件点击三级分类具体三级分类,父组件感知子组件点击并做出反应的过程
- 子组件
category.vue给父组件发送一个事件并携带数据this.$emit("事件名", 数据)
<el-tree :data="menus" :props="defaultProps" node-key="catId" ref="menuTree" @node-click="nodeclick"></el-tree>

<script>
methods: {
  nodeclick(data, node, component) {
    console.log("子组件category的节点被点击:", data, node, component)
    // 向父组件发送事件
    this.$emit("tree-node-click", data, node, component)
  }
}
</script>
- 父组件
attrgroup.vue感知并做出反应<category @事件名="反应方法" ></category>
<category @tree-node-click="treenodeclick"></category>

<script>
methods: {
  // 感知到子组件树节点被点击
  treenodeclick(data, node, component) {
    console.log("感知到子组件树节点被点击", data, node, component)
  },
}
</script>
三、获取分类属性分组
编写API - API参考地址 - /product/attrgroup/list/{catelogId}
1、控制层
@RestController
@RequestMapping("product/attrgroup")
public class AttrGroupController {

    @Autowired
    private AttrGroupService attrGroupService;

	/**
	 * 获取分类属性分组
	 */
	@RequestMapping("/list/{catelogId}")
	public R listAttrGroup(@RequestParam Map<String, Object> params, @PathVariable("catelogId") Long catelogId){
	    PageUtils page = attrGroupService.queryPage(params,catelogId);
	    return R.ok().put("page", page);
	}
}
2、业务层
@Service("attrGroupService")
public class AttrGroupServiceImpl extends ServiceImpl<AttrGroupDao, AttrGroupEntity> implements AttrGroupService {

	/**
	 * 分页展示及检索
	 */
	@Override
	public PageUtils queryPage(Map<String, Object> params, Long catelogId) {
	    QueryWrapper<AttrGroupEntity> wrapper = new QueryWrapper<>();

		// 通过传入的查询条件进行查询
		String key = (String) params.get("key");
		if (!StringUtils.isEmpty(key)) {
		    wrapper.and(i -> {
		        i.eq("attr_group_id", key).or().like("attr_group_name", key);
		    });
		}
		if (catelogId != 0) {
		    wrapper.eq("catelog_id", catelogId);
		}

		IPage<AttrGroupEntity> page = this.page(
		        new Query<AttrGroupEntity>().getPage(params),
		        wrapper);
		return new PageUtils(page);

}
前台代码:
将请求转为动态根据 catId 查询,并默认赋值 catId:0 ,也就是查询所有
url: this.$http.adornUrl(`/product/attrgroup/list/${this.catId}`),
当父节点感知到子节点的第三级分类节点被点击后,将 被点击的节点catId 赋值给 catId
data() {
  return {
    // 初始值为0,查询所有
    catId: 0,
  }
},
methods: {
  // 感知到子组件树节点被点击
  treenodeclick(data, node, component) {
    console.log("感知到子组件树节点被点击", data, node, component)
      // 只有第三级分类才需要查询属性分组
      if(node.level == 3){
          // 将被点击的分类id动态绑定给查询的路径id
          this.catId = data.catId;
          // 重新查询
          this.getDataList();
      }
  },
  // 获取数据列表
  getDataList() {
    this.dataListLoading = true
    this.$http({
      url: this.$http.adornUrl(`/product/attrgroup/list/${this.catId}`),
      ...
}
四、分组新增&级联选择器
新增分类时将表单的选择分类id转变为级联选择器选择分类名(不应该通过手动输入catId,应该通过级联选择器的形式供用户选择)
1、表单设置级联选择器
<el-form-item label="所属分类id" prop="catelogId">
	<el-cascader v-model="dataForm.catelogId" :options="categorys" :props="props"></el-cascader>
</el-form-item>

<script>
	data() {
	  return {
	    categorys: [],
	    props: {
	      // 真实提交的数据
	      value: "catId",
	      // 级联选择器展示的数据
	      label: "name",
	      // 子分类
	      children: "children"
	    },
	},
	methods: {
	  // 获取所有三级分类菜单
	  getCategorys() {
	    this.$http({
	      url: this.$http.adornUrl('/product/category/list/tree'),
	      method: 'get',
	    }).then(({ data }) => {
	      this.categorys = data.data
	    });
	  },
	},
	created() {
	   this.getCategorys();
	}
</script>
2、经测试可以看到有四层,因为默认第三次分类的children返回 [],级联选择器默认继续渲染空分类

3、设置 CategoryEntity属性
// 当该属性不为空时才进行填充
@JsonInclude(JsonInclude.Include.NON_EMPTY)
@TableField(exist = false)
private List<CategoryEntity> children;
4、其实只需要提交第三级的分类数据,但是默认提交的 dataForm.catelogId 是数组,下面修改一下,增加 catelogIdPath 作为临时存储的数据数组,实际还是要提交catelogId 第三级分类数据
<el-form-item label="所属分类id" prop="catelogId">
	<el-cascader v-model="dataForm.catelogIds" :options="categorys" :props="props"></el-cascader>
</el-form-item>

<script>
	data() {
	  return {
	    categorys: [],
	    props: {
	      // 真实提交的数据
	      value: "catId",
	      // 级联选择器展示的数据
	      label: "name",
	      // 子分类
	      children: "children"
	    },
	    dataForm: {
	      // 选中第三级分类时其实需要将全部的保存,但只取最后一个
		  catelogPath: [],
		  catelogId: 0
		},
	},
	methods: {
	  // 获取所有三级分类菜单
	  getCategorys() {
	    this.$http({
	      url: this.$http.adornUrl('/product/category/list/tree'),
	      method: 'get',
	    }).then(({ data }) => {
	      this.categorys = data.data
	    });
	  },

	  init(id) {
	    // 实际上需要提交的catelogId是最后一个,也就是第三级分类
	    this.dataForm.catelogId = data.attrGroup.catelogPath[this.dataForm.catelogPath.length - 1]
	  },

	},
	created() {
	   this.getCategorys();
	}
</script>
五、分组修改&级联选择器回显
1、点击修改属性分组按钮时回显分类完整路径 attrgroup-add-or-update.vue
init(id) {
	// 查出 catelogId 的完整路径
	this.dataForm.catelogPath = data.attrGroup.catelogPath
}
2、AttrGroupEntity 新增属性用于存放分类完整路径
// 分类完整路径
@TableField(exist = false)
private Long[] catelogPath;
3、查询完整路径
控制层
@RestController
@RequestMapping("product/attrgroup")
public class AttrGroupController {

    @Autowired
    private CategoryService categoryService;

	@RequestMapping("/info/{attrGroupId}")
	public R info(@PathVariable("attrGroupId") Long attrGroupId) {
	    AttrGroupEntity attrGroup = attrGroupService.getById(attrGroupId);

	    Long catelogId = attrGroup.getCatelogId();
	    // 根据三级分类id查出分类路径
	    Long[] catelogPath = categoryService.findCatelogPath(catelogId);
	    attrGroup.setCatelogPath(catelogPath);

	    return R.ok().put("attrGroup", attrGroup);
	}

}
业务层
@Service("categoryService")
public class CategoryServiceImpl extends ServiceImpl<CategoryDao, CategoryEntity> implements CategoryService {

	// 目标:[2,25,225]
	@Override
	public Long[] findCatelogPath(Long catelogId) {
	    List<Long> paths = new ArrayList<>();
	    List<Long> parentPath = findParentPath(catelogId, paths);
	    // 反转路径为需要的形式
	    Collections.reverse(parentPath);
	    // 将链表转为数组并强制转为Long[]
	    return parentPath.toArray(new Long[parentPath.size()]);
	}
	// 递归查询父id [225,25,2]
	private List<Long> findParentPath(Long catelogId, List<Long> paths) {
	    // 1、收集当前节点id
	    paths.add(catelogId);
	    CategoryEntity category = this.getById(catelogId);
	    if (category.getParentCid() != 0) {
	        // 2、递归搜索父节点id并存放进 paths
	        findParentPath(category.getParentCid(), paths);
	    }
	    return paths;
	}
}
4、其余优化
每次关闭弹出框后清除表单信息
<el-dialog :title="!dataForm.attrGroupId ? '新增' : '修改'" :close-on-click-modal="false" :visible.sync="visible" @closed="dialogClose">
methods: {
	// 对话框关闭时清除信息
	dialogClose() {
	  this.dataForm.catelogPath = []
	},
}
分类可搜索
<el-cascader filterable placeholder="试试搜索:手机" v-model="dataForm.catelogPath" :options="categorys" :props="props"></el-cascader>
六、品牌分类与级联更新
1、新增MBP分页插件配置
@EnableTransactionManagement
@MapperScan("com.laptoy.gulimall.product.dao")
@Configuration
public class MyBatisConfig {

    @Bean
    public PaginationInterceptor paginationInterceptor() {
        PaginationInterceptor paginationInterceptor = new PaginationInterceptor();
        // 设置请求的页面大于最大页后操作, true调回到首页,false 继续请求  默认false
        paginationInterceptor.setOverflow(true);
        // 设置最大单页限制数量,默认 500 条,-1 不受限制
        paginationInterceptor.setLimit(1000);
        return paginationInterceptor;
    }

}
2、将资料的 common product 全部复制到自己的前端项目
3、编写接口 分类与品牌的关系
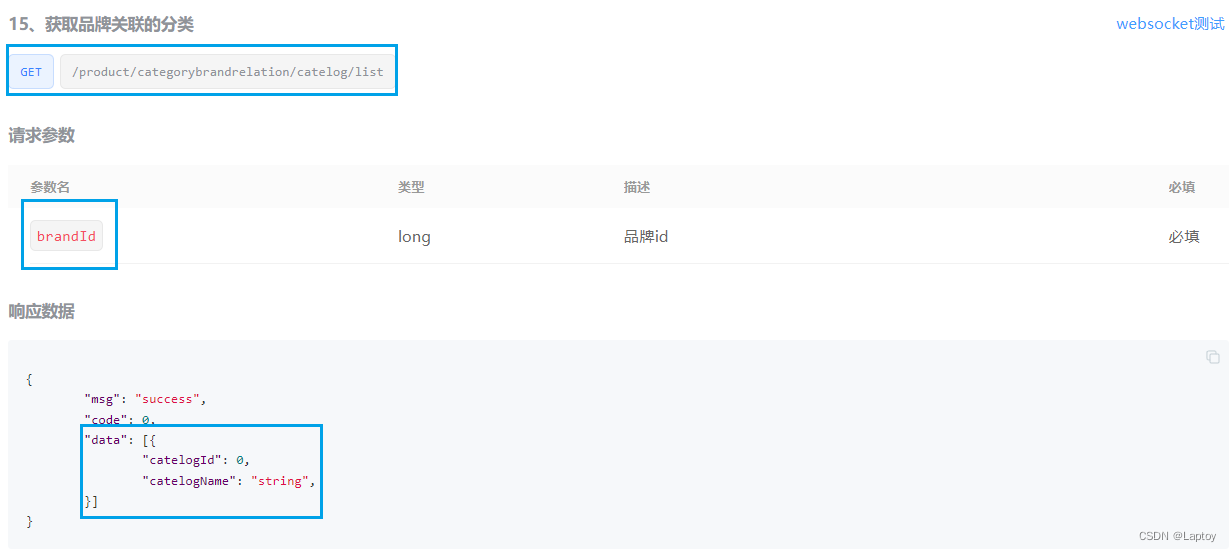
@RestController
@RequestMapping("product/categorybrandrelation")
public class CategoryBrandRelationController {
	/**
	 * 获取品牌关联的分类
	 */
	@GetMapping("/catelog/list")
	public R catelogList(@RequestParam("brandId") Long brandId) {
	    List<CategoryBrandRelationEntity> data = categoryBrandRelationService.list(
	            new QueryWrapper<CategoryBrandRelationEntity>().eq("brand_id", brandId));
	    return R.ok().put("data", data);
	}
}
4、编写接口 新增品牌与分类关联关系
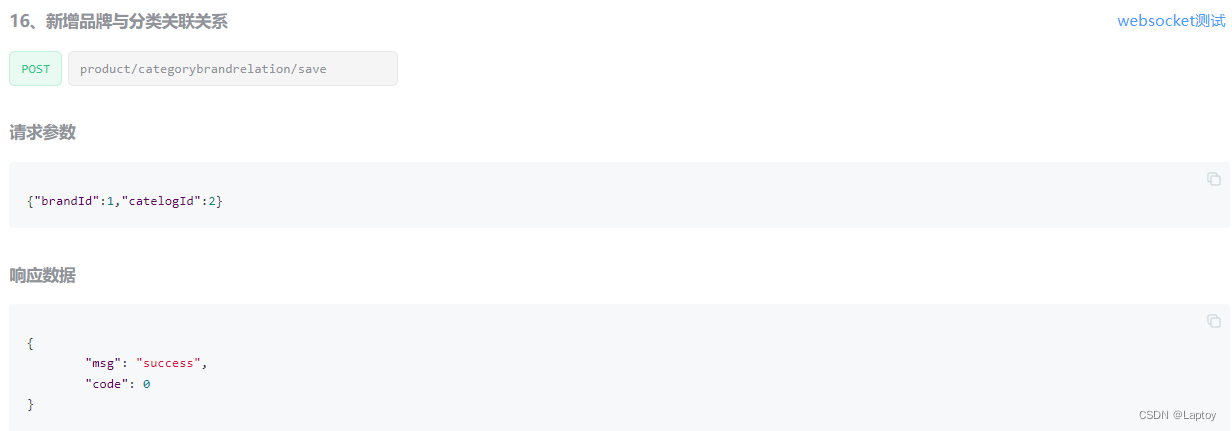
控制层
@RestController
@RequestMapping("product/categorybrandrelation")
public class CategoryBrandRelationController {

	@RequestMapping("/save")
	public R save(@RequestBody CategoryBrandRelationEntity categoryBrandRelation) {
	    categoryBrandRelationService.saveDetail(categoryBrandRelation);
	    return R.ok();
	}
}
业务层
@Override
public void saveDetail(CategoryBrandRelationEntity categoryBrandRelation) {
    Long brandId = categoryBrandRelation.getBrandId();
    Long catelogId = categoryBrandRelation.getCatelogId();
    // 查询对应实体类
    CategoryEntity categoryEntity = categoryService.getById(catelogId);
    BrandEntity brandEntity = brandService.getById(brandId);
    // 查询详细名字
    categoryBrandRelation.setCatelogName(categoryEntity.getName());
    categoryBrandRelation.setBrandName(brandEntity.getName());
    // 保存
    this.save(categoryBrandRelation);
}
5、实际开发使用关联表进行存储需要考虑主表的修改情况,因此在修改主表信息(如修改品牌表的品牌名称时所有关联表必须同时修改)
优化品牌修改功能
@RestController
@RequestMapping("product/brand")
public class BrandController {

	@RequestMapping("/update")
	public R update(@Validated(UpdateGroup.class) @RequestBody BrandEntity brand) {
	    brandService.updateDetail(brand);
	    return R.ok();
	}
}
@Service("brandService")
public class BrandServiceImpl extends ServiceImpl<BrandDao, BrandEntity> implements BrandService {

	@Override
	@Transactional
	public void updateDetail(BrandEntity brand) {
	    // 保证冗余字段的数据一致
	    this.updateById(brand);
	    if (!StringUtils.isEmpty(brand.getName())) {
	        // 同步更新其他关联表信息
	        categoryBrandRelationService.updateBrand(brand.getBrandId(), brand.getName());
	    }
	}

}
@Service("categoryBrandRelationService")
public class CategoryBrandRelationServiceImpl extends ServiceImpl<CategoryBrandRelationDao, CategoryBrandRelationEntity> implements CategoryBrandRelationService {

	public void updateBrand(Long brandId, String name) {
	    CategoryBrandRelationEntity entity = new CategoryBrandRelationEntity();
	    entity.setBrandId(brandId);
	    entity.setBrandName(name);
	    this.update(entity, new UpdateWrapper<CategoryBrandRelationEntity>().eq("brand_id", brandId));
	}
}
优化分类修改功能·
@RestController
@RequestMapping("product/category")
public class CategoryController {

	@RequestMapping("/update")
	public R update(@RequestBody CategoryEntity category) {
	    categoryService.updateCascade(category);
	    return R.ok();
	}

}
@Service("categoryService")
public class CategoryServiceImpl extends ServiceImpl<CategoryDao, CategoryEntity> implements CategoryService {

	// 级联更新所有关联的数据
	@Transactional
	@Override
	public void updateCascade(CategoryEntity category) {
	    // 更新当前数据
	    this.updateById(category);
	    // 更新其余冗余表数据
	    categoryBrandRelationService.updateCategory(category.getCatId(), category.getName());
	}

}
@Service("categoryBrandRelationService")
public class CategoryBrandRelationServiceImpl extends ServiceImpl<CategoryBrandRelationDao, CategoryBrandRelationEntity> implements CategoryBrandRelationService {

	@Override
	public void updateCategory(Long catId, String name) {
	    CategoryBrandRelationEntity e = new CategoryBrandRelationEntity();
	    e.setCatelogId(catId);
	    e.setCatelogName(name);
	    this.update(e, new UpdateWrapper<CategoryBrandRelationEntity>().eq("catelog_id", catId));
	}
}


 2422
2422


 被折叠的 条评论
为什么被折叠?
被折叠的 条评论
为什么被折叠?
 到【灌水乐园】发言


