


 本文介绍了如何在Spring Security OAuth2环境中,通过自定义UserDetailsService和AuthenticationProvider实现数据库认证,并扩展登录接口,不再使用默认的/oauth/token。重点在于数据库查询用户信息、密码验证及自定义登录流程。
一、背景介绍
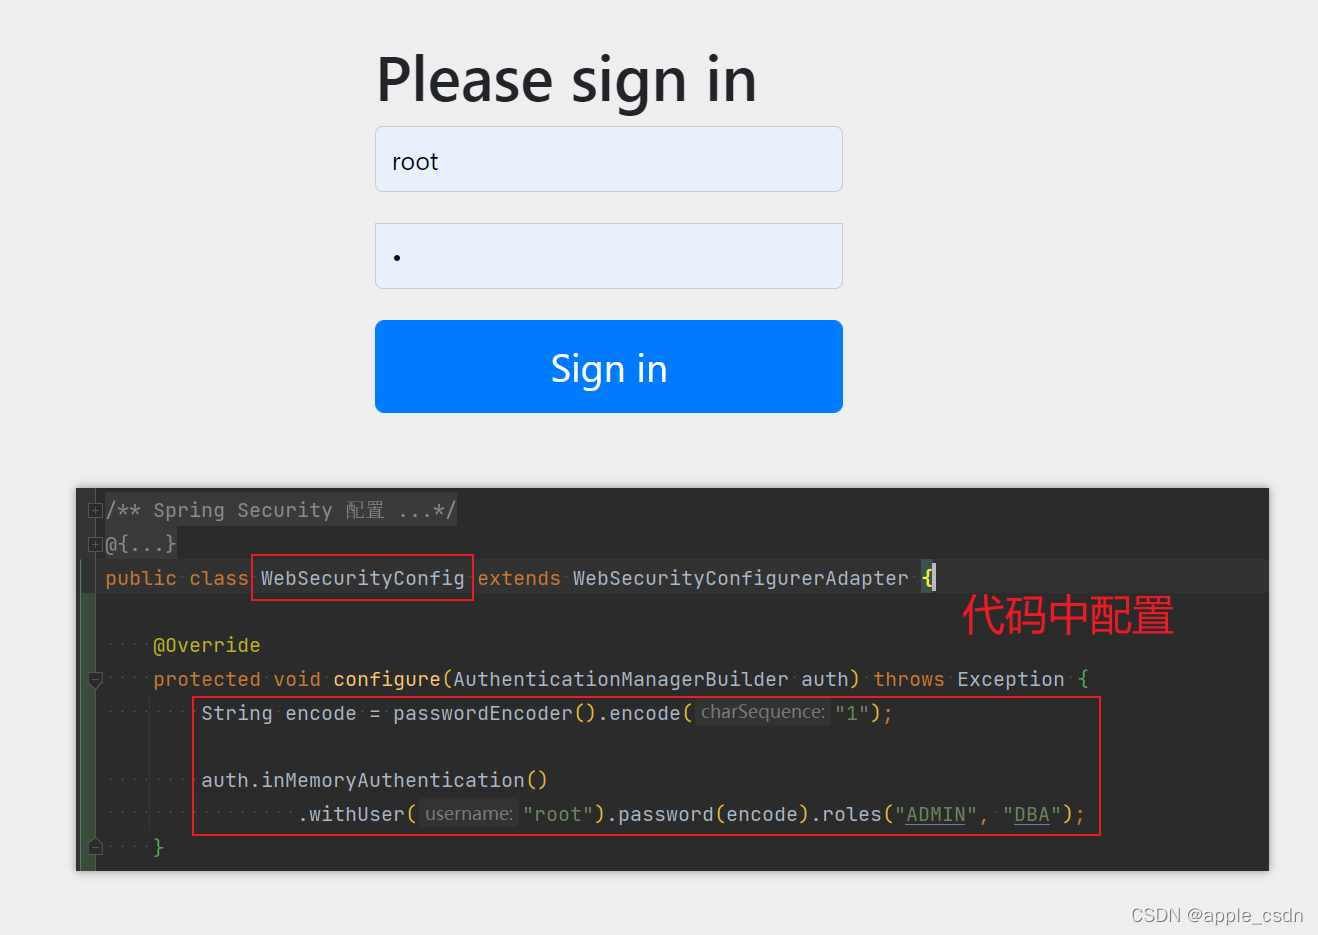
1、通过之前的文章搭建授权服务器时,使用的登录账号和密码是在代码中写入的。而业务都是取数据库中的用户信息进行认证。
二、环境准备
【Spring Security Oauth2】构建授权服务器(一):内存模式
三、自定义(登录)认证策略
1、创建AccountDetailsServiceImpl类继承UserDetailsService类,用于查询数据库中用户信息。文章就简单化了,具体数据库操作需自己接入。
package com.cyun.security.oauth2.config.security.provider;

import org.springframework.beans.factory.annotation.Autowired;
import org.springframework.security.authentication.DisabledException;
import org.springframework.security.authentication.InternalAuthenticationServiceException;
import org.springframework.security.authentication.LockedException;
import org.springframework.security.core.GrantedAuthority;
import org.springframework.security.core.authority.AuthorityUtils;
import org.springframework.security.core.userdetails.User;
import org.springframework.security.core.userdetails.UserDetails;
import org.springframework.security.core.userdetails.UserDetailsService;
import org.springframework.security.core.userdetails.UsernameNotFoundException;
import org.springframework.security.crypto.bcrypt.BCryptPasswordEncoder;
import org.springframework.security.crypto.password.PasswordEncoder;
import org.springframework.stereotype.Service;

import java.util.List;

/**
 * 账号服务
 *
 * @author He PanFu
 * @date 2021-12-07 20:36:15
 */
@Service("accountDetailsServiceImpl")
public class AccountDetailsServiceImpl implements UserDetailsService {

    @Autowired
    private PasswordEncoder passwordEncoder;

    /**
     * 获取用户信息
     * @param username 用户名
     * @return
     * @throws UsernameNotFoundException
     */
    @Override
    public UserDetails loadUserByUsername(String username) throws UsernameNotFoundException {
    	// 假设是数据库查询出的数据
        List<GrantedAuthority> dba = AuthorityUtils.commaSeparatedStringToAuthorityList("ROLE_DBA,ROLE_USER,ROLE_ADMIN,SELECT,INSERT,UPDATE,DELETE");
        // 假设这是数据库查询出的数据。参数顺序:用户名、加密后的密码、权限
        return new User("root", passwordEncoder.encode("1"), dba);
    }

}
2、创建AdminPwdAuthenticationProvider类继承AuthenticationProvider类,自定义认证(登录)策略。
package com.cyun.security.oauth2.config.security.provider;

import org.springframework.beans.factory.annotation.Autowired;
import org.springframework.beans.factory.annotation.Qualifier;
import org.springframework.security.authentication.AuthenticationProvider;
import org.springframework.security.authentication.BadCredentialsException;
import org.springframework.security.authentication.UsernamePasswordAuthenticationToken;
import org.springframework.security.core.Authentication;
import org.springframework.security.core.AuthenticationException;
import org.springframework.security.core.userdetails.UserDetails;
import org.springframework.security.core.userdetails.UserDetailsService;
import org.springframework.security.crypto.password.PasswordEncoder;
import org.springframework.stereotype.Component;

/**
 * 账号密码登录策略
 *
 * @author He PanFu
 * @date 2021-12-07 20:36:15
 */
@Component
public class AdminPwdAuthenticationProvider implements AuthenticationProvider {

    @Autowired
    @Qualifier("accountDetailsServiceImpl")
    private UserDetailsService adminUserDetailsService;
    @Autowired
    private PasswordEncoder passwordEncoder;

    /**
     * 认证逻辑
     * @param authentication 认证信息
     * @return
     * @throws AuthenticationException
     */
    @Override
    public Authentication authenticate(Authentication authentication) throws AuthenticationException {
        UsernamePasswordAuthenticationToken token = (UsernamePasswordAuthenticationToken) authentication;
        // 查询数据库中用户信息
        UserDetails userDetails = adminUserDetailsService.loadUserByUsername(token.getName());
        // 密码验证
        if(passwordEncoder.matches(authentication.getCredentials().toString(),userDetails.getPassword())){
            return  new UsernamePasswordAuthenticationToken(userDetails, userDetails.getPassword(), userDetails.getAuthorities());
        }
        throw  new BadCredentialsException("用户名密码不正确");
    }

    /**
     * 验证授权token类型
     * @param authentication token类型
     * @return
     */
    @Override
    public boolean supports(Class<?> authentication) {
        return UsernamePasswordAuthenticationToken.class.isAssignableFrom(authentication);
    }
}
3、修改configure(AuthenticationManagerBuilder auth)方法
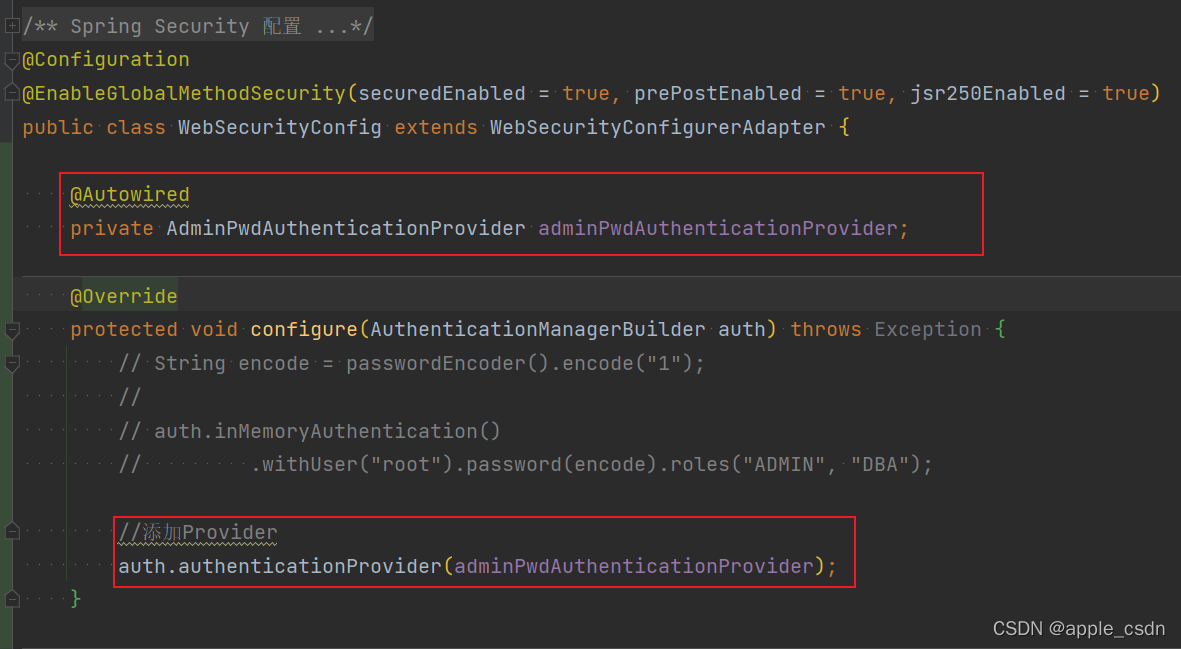
@Autowired
private AdminPwdAuthenticationProvider adminPwdAuthenticationProvider;
@Override
protected void configure(AuthenticationManagerBuilder auth) throws Exception {
// String encode = passwordEncoder().encode("1");
//
// auth.inMemoryAuthentication()
// .withUser("root").password(encode).roles("ADMIN", "DBA");
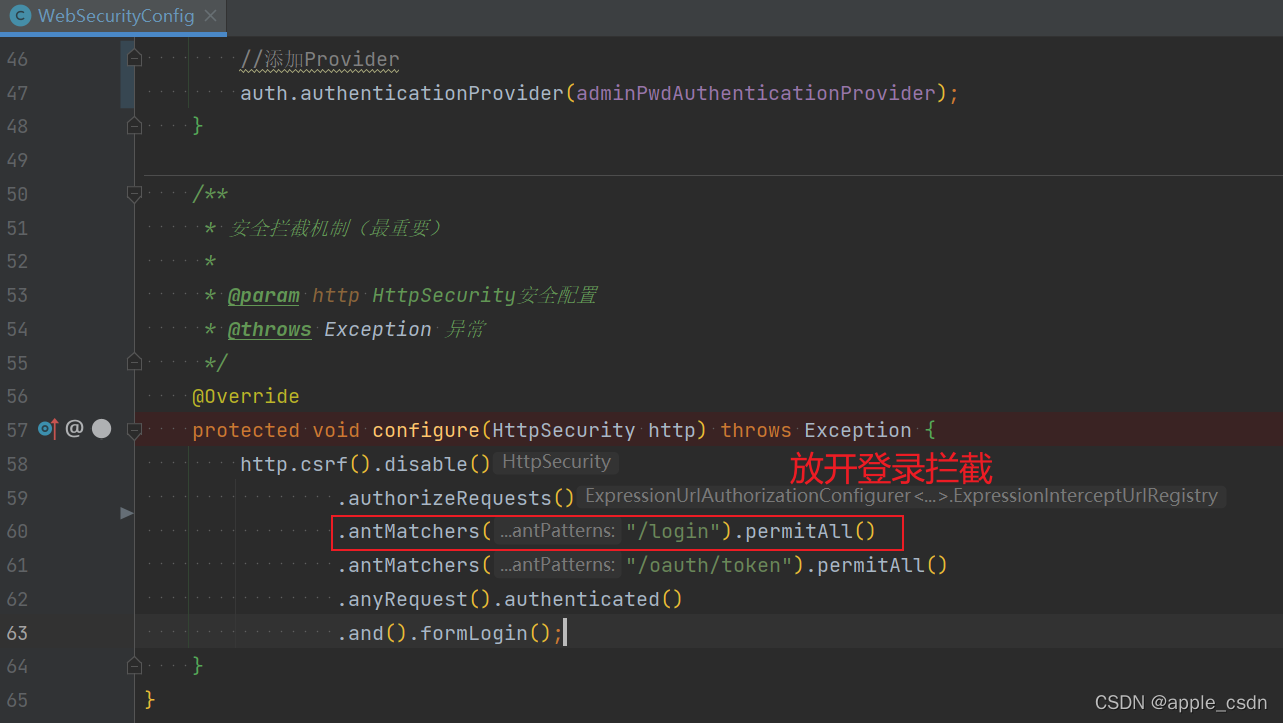
//添加Provider
auth.authenticationProvider(adminPwdAuthenticationProvider);
}
4、通过以上配置,就能使用数据库中的用户名、密码进行登录了。
四、拓展
1、自定义登录接口,不使用默认的“/oauth/token”接口
方案:
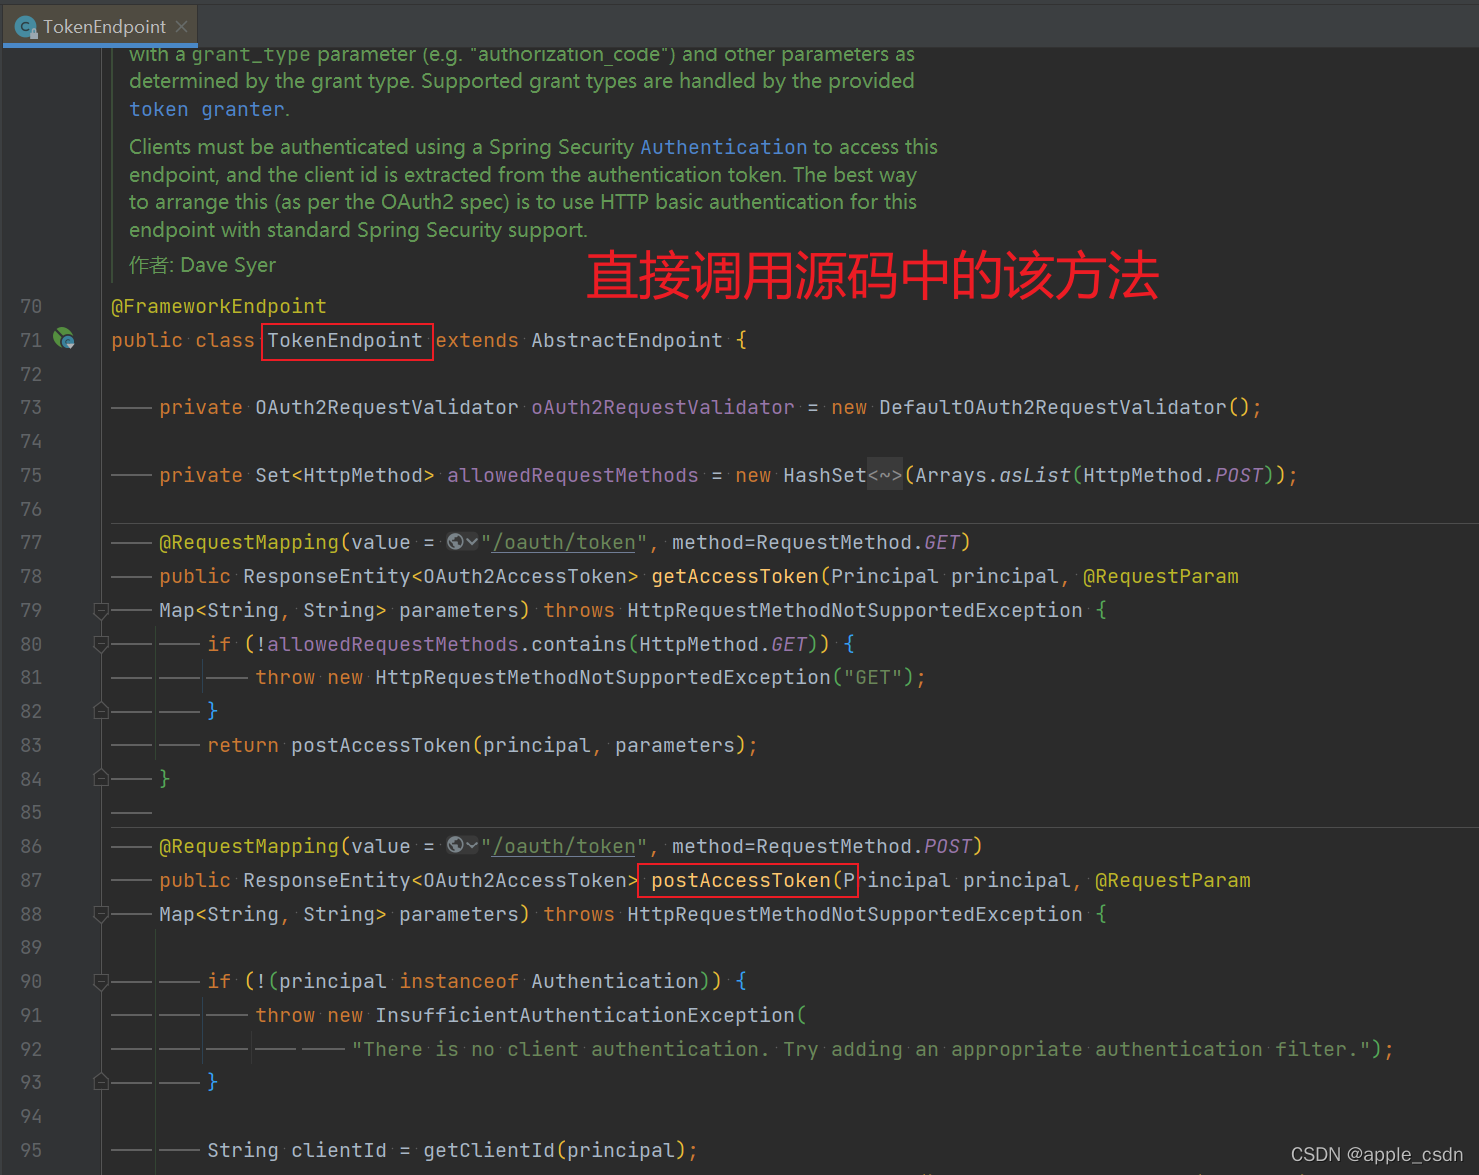
代码:
@Autowired
    private TokenEndpoint tokenEndpoint;


    @GetMapping(value = "/login")
    public String register(@RequestParam Map<String, String> parameters) {
        // client_id 客户端标识、密码(目前未发现其具体作用)、具体权限。此处可添加客户端标识和客户端秘钥认证。
        User clientUser= new User(parameters.get("client_id"),"", new ArrayList<>());

        //生成已经认证的client
        UsernamePasswordAuthenticationToken token = new UsernamePasswordAuthenticationToken(clientUser,null, new ArrayList<>());
        //调用自带的获取token方法。
        OAuth2AccessToken oAuth2AccessToken = null;
        try {
            oAuth2AccessToken = tokenEndpoint.postAccessToken(token, parameters).getBody();
        } catch (HttpRequestMethodNotSupportedException e) {
            e.printStackTrace();
        }
        System.out.println(oAuth2AccessToken);
        return oAuth2AccessToken.toString();
    }
注意事项:
- 调用“/login”接口提示需要登录,需放开拦截控制。
- 使用该方式之后,对应的客户端秘钥就会失去价值,代码中不会去验证是否跟客户端标识对应,需手动编写相应逻辑。“/oauth/token”接口是在请求在Controller前就经过了一系列的过滤器链进行客户端标识和密码认证。具体可自行查看源码逻辑。
参考他人文章:
1、Spring Security Oauth2关于自定义登录的几种解决方案


 2140
2140

 被折叠的 条评论
为什么被折叠?
被折叠的 条评论
为什么被折叠?
 到【灌水乐园】发言


