


 本文介绍了如何在SpringSecurityOAuth2中自定义认证对象、TokenGranter和AuthenticationProvider,以实现基于手机验证码的授权模式,包括自定义认证类、授权过程和配置步骤。
目录
前言
在Oauth2中,提供了几种基本的认证模式,有密码模式、客户端模式、授权码模式和简易模式。但很多时候,我们有自己的认证授权逻辑,比如手机验证码等,这就需要我们自定义认证授权模式
在看该文章之前,最好先看下面这个文章先了解下Spring Security Oauth2的授权认证流程
一文弄懂Spring Security oauth2授权认证流程
下面我就以手机验证码为例,自定义一个授权模式
1、自定义认证对象
我们的认证对象是通过Authentication对象进行传递的,Authentication只是一个接口,它的基类是AbstractAuthenticationToken抽象类,AbstractAuthenticationToken是Spring Security中用于表示身份验证令牌的抽象类。一般我们自定义认证对象,都是继承自AbstractAuthenticationToken
AbstractAuthenticationToken类的主要属性包括:
principal:表示认证主体,通常是用户对象(UserDetails)。
credentials:存储了与主体关联的认证信息,例如密码。
authorities:表示主体所拥有的权限集合。
authenticated:表示是否已经通过认证,true为已认证,false为未认证
details:用于存储与认证令牌相关的附加信息。该属性的类型是Object,因此可以存储任何类型的数据。
例如,在基于表单的认证中,可以将表单提交的用户名和密码存储在credentials属性中,并将其他与认证相关的详细信息(例如,用户名和密码的来源、表单提交的IP地址等)存储在details属性中。
下面是我自定义的一个认证对象类
@Getter
@Setter
public class PhoneAuthenticationToken  extends AbstractAuthenticationToken {

    private final Object principal;

    private Object credentials;

    /**
     * 可以自定义属性
     */
    private String phone;


    /**
     * 创建一个未认证的对象
     * @param principal
     * @param credentials
     */
    public PhoneAuthenticationToken(Object principal, Object credentials) {
        super(null);
        this.principal = principal;
        this.credentials = credentials;
        setAuthenticated(false);
    }

    /**
     * 创建一个已认证对象
     * @param authorities
     * @param principal
     * @param credentials
     */
    public PhoneAuthenticationToken(Collection<? extends GrantedAuthority> authorities, Object principal, Object credentials) {
        super(authorities);
        this.principal = principal;
        this.credentials = credentials;
        // 必须使用super,因为我们要重写
        super.setAuthenticated(true);
    }

    /**
     * 不能暴露Authenticated的设置方法,防止直接设置
     * @param isAuthenticated
     * @throws IllegalArgumentException
     */
    @Override
    public void setAuthenticated(boolean isAuthenticated) throws IllegalArgumentException {
        Assert.isTrue(!isAuthenticated,
                "Cannot set this token to trusted - use constructor which takes a GrantedAuthority list instead");
        super.setAuthenticated(false);
    }

    /**
     * 用户凭证,如密码
     * @return
     */
    @Override
    public Object getCredentials() {
        return credentials;
    }

    /**
     * 被认证主体的身份,如果是用户名/密码登录,就是用户名
     * @return
     */
    @Override
    public Object getPrincipal() {
        return principal;
    }
}
2、自定义TokenGranter
TokenGranter是我们授权模式接口,而它的基类是AbstractTokenGranter抽象类,通过继承AbstractTokenGranter类并实现其抽象方法,就可以实现我们自定义的授权模式了
下面我参考ResourceOwnerPasswordTokenGranter,来实现我们的手机验证码授权模式
/**
 * 手机验证码授权模式
 */
public class PhoneCodeTokenGranter extends AbstractTokenGranter {

    //授权类型名称
    private static final String GRANT_TYPE = "phonecode";

    private final AuthenticationManager authenticationManager;

    /**
     * 构造函数
     * @param tokenServices
     * @param clientDetailsService
     * @param requestFactory
     * @param authenticationManager
     */
    public PhoneCodeTokenGranter(AuthorizationServerTokenServices tokenServices, ClientDetailsService clientDetailsService, OAuth2RequestFactory requestFactory,  AuthenticationManager authenticationManager) {
        this(tokenServices, clientDetailsService, requestFactory, GRANT_TYPE,authenticationManager);
    }

    public PhoneCodeTokenGranter(AuthorizationServerTokenServices tokenServices, ClientDetailsService clientDetailsService, OAuth2RequestFactory requestFactory, String grantType, AuthenticationManager authenticationManager) {
        super(tokenServices, clientDetailsService, requestFactory, grantType);
        this.authenticationManager = authenticationManager;
    }

    @Override
    protected OAuth2Authentication getOAuth2Authentication(ClientDetails client, TokenRequest tokenRequest) {

        Map<String, String> parameters = new LinkedHashMap<String, String>(tokenRequest.getRequestParameters());
        //获取参数
        String phone = parameters.get("phone");
        String phonecode = parameters.get("phonecode");
        //创建未认证对象
        Authentication userAuth = new PhoneAuthenticationToken(phone, phonecode);
        ((AbstractAuthenticationToken) userAuth).setDetails(parameters);
        try {
            //进行身份认证
            userAuth = authenticationManager.authenticate(userAuth);
        }
        catch (AccountStatusException ase) {
            //将过期、锁定、禁用的异常统一转换
            throw new InvalidGrantException(ase.getMessage());
        }
        catch (BadCredentialsException e) {
            // 用户名/密码错误,我们应该发送400/invalid grant
            throw new InvalidGrantException(e.getMessage());
        }
        if (userAuth == null || !userAuth.isAuthenticated()) {
            throw new InvalidGrantException("用户认证失败: " + phone);
        }

        OAuth2Request storedOAuth2Request = getRequestFactory().createOAuth2Request(client, tokenRequest);
        return new OAuth2Authentication(storedOAuth2Request, userAuth);
    }
}
Spring Security Oauth2会根据传入的grant_type,来将请求转发到对应的Granter进行处理。而用户信息合法性的校验是交给authenticationManager处理的
authenticationManager不直接进行认证,而是通过委托模式,将认证任务委托给AuthenticationProvider接口的实现类来完成,一个AuthenticationProvider就对应一个认证方式
3、自定义AuthenticationProvider
因为身份认证是由AuthenticationProvider实现的,所以我们还需要实现一个自定义AuthenticationProvider
如果AuthenticationProvider认证成功,它会返回一个完全有效的Authentication对象,其中authenticated属性为true,已授权的权限列表(GrantedAuthority列表),以及用户凭证,如果认证失败,一般AuthenticationProvider会抛出AuthenticationException异常。
/**
 * 手机验证码认证授权提供者
 */
@Data
public class PhoneAuthenticationProvider  implements AuthenticationProvider {

    private RedisTemplate<String,Object> redisTemplate;

    private PhoneUserDetailsService phoneUserDetailsService;

    public static final String PHONE_CODE_SUFFIX = "phone:code:";

    @Override
    public Authentication authenticate(Authentication authentication) throws AuthenticationException {
        //先将authentication转为我们自定义的Authentication对象
        PhoneAuthenticationToken authenticationToken = (PhoneAuthenticationToken) authentication;
        //校验参数
        Object principal = authentication.getPrincipal();
        Object credentials = authentication.getCredentials();
        if (principal == null || "".equals(principal.toString()) || credentials == null || "".equals(credentials.toString())){
            throw new InternalAuthenticationServiceException("手机/手机验证码为空!");
        }
        //获取手机号和验证码
        String phone = (String) authenticationToken.getPrincipal();
        String code = (String) authenticationToken.getCredentials();
        //查找手机用户信息,验证用户是否存在
        UserDetails userDetails = phoneUserDetailsService.loadUserByUsername(phone);
        if (userDetails == null){
            throw new InternalAuthenticationServiceException("用户手机不存在!");
        }
        String codeKey =  PHONE_CODE_SUFFIX+phone;
        //手机用户存在,验证手机验证码是否正确
        if (!redisTemplate.hasKey(codeKey)){
            throw new InternalAuthenticationServiceException("验证码不存在或已失效!");
        }
        String realCode = (String) redisTemplate.opsForValue().get(codeKey);
        if (StringUtils.isBlank(realCode) || !realCode.equals(code)){
            throw new InternalAuthenticationServiceException("验证码错误!");
        }
        //返回认证成功的对象
        PhoneAuthenticationToken phoneAuthenticationToken = new PhoneAuthenticationToken(userDetails.getAuthorities(),phone,code);
        phoneAuthenticationToken.setPhone(phone);
        //details是一个泛型属性,用于存储关于认证令牌的额外信息。其类型是 Object,所以你可以存储任何类型的数据。这个属性通常用于存储与认证相关的详细信息,比如用户的角色、IP地址、时间戳等。
        phoneAuthenticationToken.setDetails(userDetails);
        return phoneAuthenticationToken;
    }


    /**
     * ProviderManager 选择具体Provider时根据此方法判断
     * 判断 authentication 是不是 SmsCodeAuthenticationToken 的子类或子接口
     */
    @Override
    public boolean supports(Class<?> authentication) {
        //isAssignableFrom方法如果比较类和被比较类类型相同,或者是其子类、实现类,返回true
        return PhoneAuthenticationToken.class.isAssignableFrom(authentication);
    }

}
4、配置自定义AuthenticationProvider、自定义TokenGranter
自定义AuthenticationProvider需要在WebSecurityConfigurerAdapter 配置类进行配置
@Configuration
@EnableWebSecurity
public class OAuth2SecurityConfig  extends WebSecurityConfigurerAdapter {

    @Autowired
    private PasswordEncoder passwordEncoder;

    @Autowired
    private RedisTemplate<String, Object> redisTemplate;

    @Autowired
    private PhoneUserDetailsService phoneUserDetailsService;

    @Override
    protected void configure(AuthenticationManagerBuilder auth) throws Exception {
        //创建一个登录用户
        auth.inMemoryAuthentication()
                .withUser("admin")
                .password(passwordEncoder.encode("123123"))
                .authorities("admin_role");
        //添加自定义认证提供者
        auth.authenticationProvider(phoneAuthenticationProvider());
    }

    /**
     * 手机验证码登录的认证提供者
     * @return
     */
    @Bean
    public PhoneAuthenticationProvider phoneAuthenticationProvider(){
        //实例化provider,把需要的属性set进去
        PhoneAuthenticationProvider phoneAuthenticationProvider = new PhoneAuthenticationProvider();
        phoneAuthenticationProvider.setRedisTemplate(redisTemplate);
        phoneAuthenticationProvider.setPhoneUserDetailsService(phoneUserDetailsService);
        return phoneAuthenticationProvider;
    }

     ...省略其他配置
}
自定义Granter配置需要在AuthorizationServerConfigurerAdapter配置类进行配置
@Configuration
@EnableAuthorizationServer
public class AuthorizationServerConfig extends AuthorizationServerConfigurerAdapter {

    @Autowired
    AuthenticationManager authenticationManager;


    /**
     * 密码模式需要注入authenticationManager
     * @param endpoints
     */
    @Override
    public void configure(AuthorizationServerEndpointsConfigurer endpoints) throws Exception {
        // 获取原有默认授权模式(授权码模式、密码模式、客户端模式、简化模式)的授权者,用于支持原有授权模式
        List<TokenGranter> granterList = new ArrayList<>(Collections.singletonList(endpoints.getTokenGranter()));
        //添加我们的自定义TokenGranter到集合
        granterList.add(new PhoneCodeTokenGranter(endpoints.getTokenServices(), endpoints.getClientDetailsService(),
                endpoints.getOAuth2RequestFactory(), authenticationManager));
        //CompositeTokenGranter是一个TokenGranter组合类
        CompositeTokenGranter compositeTokenGranter = new CompositeTokenGranter(granterList);

        endpoints.authenticationManager(authenticationManager)
            .tokenStore(jwtTokenStore())
            .accessTokenConverter(jwtAccessTokenConverter())
            .tokenGranter(compositeTokenGranter)//将组合类设置进AuthorizationServerEndpointsConfigurer
        ;
    }

     ...省略其他配置
}
主要将原有授权模式类和自定义授权模式类添加到一个集合,然后用该集合为入参创建一个CompositeTokenGranter组合类,最后在tokenGranter设置CompositeTokenGranter进去
CompositeTokenGranter是一个组合类,它可以将多个TokenGranter实现组合起来,以便在处理OAuth2令牌授权请求时使用。
5、配置客户端授权模式
最后我们还需要在AuthorizationServerConfigurerAdapter配置类的configure(ClientDetailsServiceConfigurer clients)方法中配置客户端信息,在客户端支持的授权模式中添加上我们自定义的授权模式,即phonecode
	@Override
    public void configure(ClientDetailsServiceConfigurer clients) throws Exception {
        clients.inMemory().withClient("admin")
                .authorizedGrantTypes("authorization_code", "password", "implicit","client_credentials","refresh_token","phonecode")
         ...省略其他配置
    }
6、测试
在postman,使用手机验证码授权模式获取token
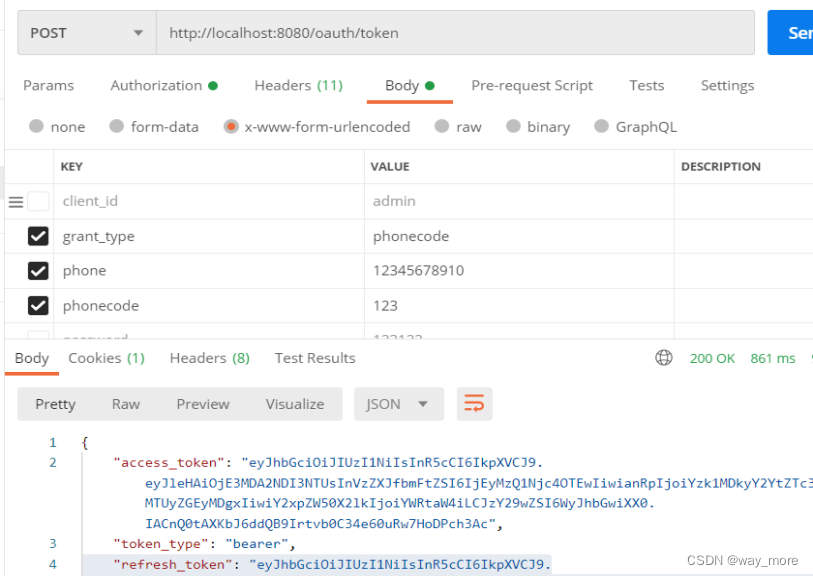
可以看到,我们已经成功使用手机验证码获取token


 3014
3014

 被折叠的 条评论
为什么被折叠?
被折叠的 条评论
为什么被折叠?
 到【灌水乐园】发言


