


1.编写POM
Maven项目的核心就是pom.xml,POM(Project Object Model,项目对象模型)定义了项目的基本信息,用于描述项目如何构建,声明项目依赖,等等。
还记得我们第一章遇到的问题吗?
在开发的过程中,我们需要到各个网站上下载第三方的JAR包,随着项目的慢慢增大,JAR包会变得越来越多,可能出现包之间的版本冲突,项目变得臃肿等问题。
然后Maven提出了坐标来为每一个artifact给定唯一的标识。从此artifact从乱混中解放出来,整个JAR包世界变得有秩序,有标准。
同时Maven自动识别artifact之间的依赖关系,从而自动下载依赖的JAR包,不再需要我们去网站上额外下载。
它还会检测一些未在项目上使用的JAR包,这样方便我们清除不需要包,对项目做一个瘦身。
而实现这些功能,Maven是通过一个pom.xml文件配置来实现的。
1.1 一个简单的pom.xml配置
首先,我们得先为自己定义一个坐标
-------------------------------------------------------------------------------------------
<projectxmlns="http://maven.apache.org/POM/4.0.0"xmlns:xsi="http://www.w3.org/2001/XMLSchema-instance"xsi:schemaLocation="http://maven.apache.org/POM/4.0.0http://maven.apache.org/xsd/maven-4.0.0.xsd">
<modelVersion>4.0.0</modelVersion>
<groupId>com.juvenxu.mvnbook</groupId>
<artifactId>hello-world</artifactId>
<version>0.0.1-SNAPSHOT</version>
<name>MavenHello World Project</name>
<dependencies>
<!-- https://mvnrepository.com/artifact/junit/junit-->
<dependency>
<groupId>junit</groupId>
<artifactId>junit</artifactId>
<version>4.12</version>
<scope>test</scope>
</dependency>
</dependencies>
</project>
-------------------------------------------------------------------------------------------
相关信息说明:
modelVersion:指定了当前POM的模型版本,对于Maven3来说,它只能是4.0.0
groupId, artifactId 和version:三个元素定义了一个项目的基本坐标。 在Maven的世界,任何的Jar,pom 或war都是以基于这些基本的坐标进行区分的。
groupId, 定义了项目属于哪个组,这个组往往和项目所在的组织或公司存在关联。
如:googlecode创建一个名为myapp的项目,则groupId为com.googlecode.myapp
artifactId, 定义了当前Maven项目在组中唯一的ID。
如:这个项目是myapp的一个模块,service层,则为myapp-service,为了区分,识别这个service是哪个组的,会使用 组名-模块 这样的命名方式,这里 组名为 myapp,模块名 service,所以artifactId为myapp-service
version:指定项目的当前版本。
name:声明一个对于用户更为友好的项目名称。
1.2 编写主代码
项目主代码会被打包到最终的构件中(如jar),而测试代码只在运行测试时用到,不会被打包。
Maven的约定目录结构:
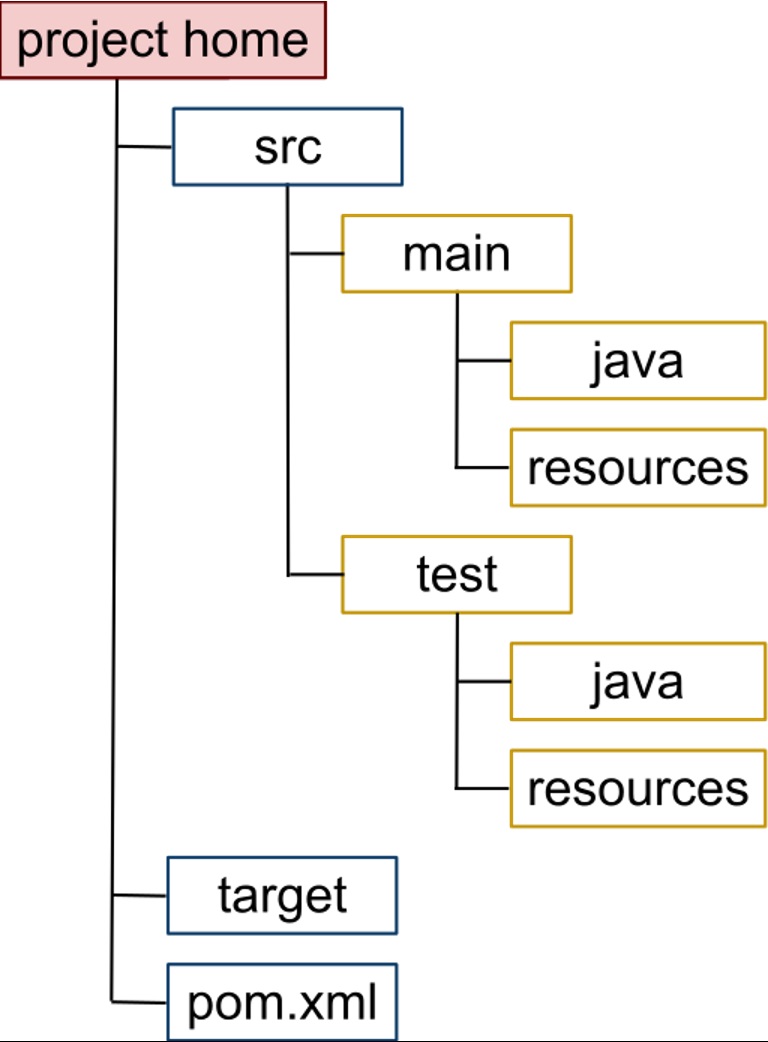
其中:
项目主代码:src/main/java
项目主资源:src/main/resources
测试代码:src/test/java
测试资源:src/test/resources
helloWorld.java
----------------------------------------------------
packagecom.juvenxu.mvnbook.helloWorld;
publicclass HelloWorld{
public String sayHello(){
return "Hello World!";
}
public static void main(String []args){
System.out.println(new HelloWorld().sayHello());
}
}
----------------------------------------------------
目录结构如下:
E:\maven\workspace\HelloWorld>tree
FolderPATH listing
Volumeserial number is 000000E0 C4F5:2D3F
E:.
└─src
├─main
│ └─java
│ └─com
│ └─juvenxu
│ └─mvnbook
│ └─helloWorld
└─test
└─java
└─com
└─java1234
└─helloWorld
使用Maven进行编译
clean:告诉Maven清理输出目录target/
compile:告诉Maven编译项目主代码。
E:\maven\workspace\HelloWorld>mvn clean compile
[INFO]Scanning for projects...
[INFO]
[INFO]------------------------------------------------------------------------
[INFO]Building Maven Hello World Project 0.0.1-SNAPSHOT
[INFO]------------------------------------------------------------------------
[INFO]
[INFO]--- maven-clean-plugin:2.5:clean (default-clean) @ hello-world ---
[INFO]
[INFO]--- maven-resources-plugin:2.6:resources (default-resources) @ hello-world ---
[WARNING]Using platform encoding (GBK actually) to copy filtered resources, i.e. buildis platform dependent!
[INFO]skip non existing resourceDirectoryE:\maven\workspace\HelloWorld\src\main\resources
[INFO]
[INFO]--- maven-compiler-plugin:3.1:compile (default-compile) @ hello-world ---
[INFO]Changes detected - recompiling the module!
[WARNING]File encoding has not been set, using platform encoding GBK, i.e. build isplatform dependent!
[INFO] Compiling 1 source file toE:\maven\workspace\HelloWorld\target\classes
[INFO]------------------------------------------------------------------------
[INFO]BUILD SUCCESS
[INFO]------------------------------------------------------------------------
[INFO]Total time: 4.476 s
[INFO]Finished at: 2017-10-25T22:49:40+08:00
[INFO]Final Memory: 13M/243M
[INFO]------------------------------------------------------------------------
编译后目录结构,target产生编译代码:
E:\maven\workspace\HelloWorld>tree
FolderPATH listing
Volumeserial number is 00000027 C4F5:2D3F
E:.
├─src
│ ├─main
│ │ └─java
│ │ └─com
│ │ └─juvenxu
│ │ └─mvnbook
│ │ └─helloWorld
│ └─test
│ └─java
│ └─com
└─target
├─classes
│ └─com
│ └─juvenxu
│ └─mvnbook
│ └─helloWorld
└─maven-status
└─maven-compiler-plugin
└─compile
└─default-compile
清理target目录
E:\maven\workspace\HelloWorld>mvn clean
[INFO]Scanning for projects...
[INFO]
[INFO]------------------------------------------------------------------------
[INFO]Building Maven Hello World Project 0.0.1-SNAPSHOT
[INFO]------------------------------------------------------------------------
[INFO]
[INFO]--- maven-clean-plugin:2.5:clean (default-clean) @ hello-world ---
[INFO] Deleting E:\maven\workspace\HelloWorld\target
[INFO]------------------------------------------------------------------------
[INFO]BUILD SUCCESS
[INFO]------------------------------------------------------------------------
[INFO]Total time: 0.226 s
[INFO]Finished at: 2017-10-25T22:52:41+08:00
[INFO]Final Memory: 7M/243M
[INFO]------------------------------------------------------------------------
E:\maven\workspace\HelloWorld>tree
FolderPATH listing
Volumeserial number is 000000E0 C4F5:2D3F
E:.
└─src
├─main
│ └─java
│ └─com
│ └─juvenxu
│ └─mvnbook
│ └─helloWorld
└─test
└─java
└─com
1.3 编写测试代码
Maven为了使项目结构保持清晰,主代码与测试代码分别位于独立的目录中。
Test the code:
1.Createtest folder
2.Set theJunit jar into pom.xml
3.codethe test source code
为了测试,我们需要在pom.xml添加一个Junit artifact,好让maven帮我们下载这个jar包。
pom.xml
---------------------------------------------------------------------------------------------------------------
<projectxmlns="http://maven.apache.org/POM/4.0.0"xmlns:xsi="http://www.w3.org/2001/XMLSchema-instance"xsi:schemaLocation="http://maven.apache.org/POM/4.0.0http://maven.apache.org/xsd/maven-4.0.0.xsd">
<modelVersion>4.0.0</modelVersion>
<groupId>com.juvenxu.mvnbook</groupId>
<artifactI
 最低0.47元/天 解锁文章


 4087
4087


 被折叠的 条评论
为什么被折叠?
被折叠的 条评论
为什么被折叠?
 到【灌水乐园】发言


