


各位如果有学习python相关知识及相应算法的同学,推荐关注一下我的朋友:Neptune_yx
---------------------------------------------------------------------------------------------------------------------------------
目录
步骤一:F0/2接口限制能够与PC0连接(直接绑定MAC地址),否则关闭接口
步骤二:F0/3接口限制能够与PC1连接(粘性绑定MAC地址),否则关闭接口
一、前言
该实验包括单臂路由、OSPF、RIP协议及其相互引入、缺省路由引入、VLAN划分、DHCP配置、ACL及SSH配置、端口安全配置,配置较为全面、但偏向基础,适合学习了上述技术一段时间路由与交换的人员参考。
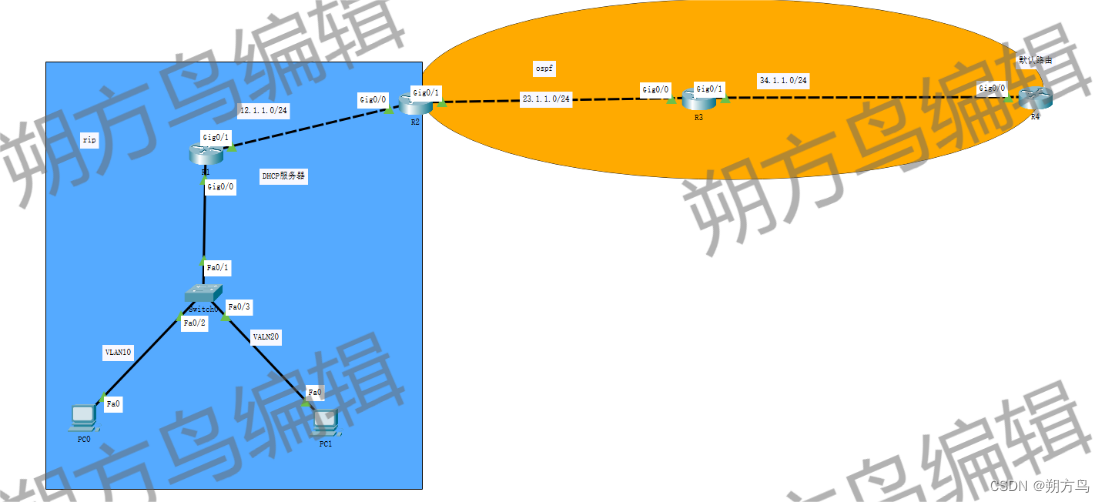
二、实验拓扑
三、实验需求
① 如图分配IP地址;
② 在R1与R2间启用RIP协议,R2和R3间启用OSPF协议并实现互通;
③ 在R3中设置一条指向R4的默认路由,并供内网使用;
④ 配置交换机VLAN,PC0为VLAN10,PC1为VLAN20,并实现VLAN间通信;
⑤ 两台PC均可通过SSH访问R2;
⑥ 交换机端口安全相关配置,交换机接口静态MAC地址绑定及粘性MAC地址绑定。
四、实验配置
(一)IP地址分配
各设备的IP地址分配不再赘述,请自行配置,R1在G0/0使用子接口,配置如下:
R1(config)#int g0/0.1
R1(config-subif)#encapsulation dot1Q 10
R1(config-subif)#ip ad 192.168.10.1 255.255.255.0
R1(config)#int g0/0.2
R1(config-subif)#encapsulation dot1Q 20
R1(config-subif)#ip ad 192.168.20.1 255.255.255.0
R1(config)#int g0/0
R1(config-if)#no shutdown
(二)动态路由协议及双向引入配置
步骤一:RIP协议配置
① R1 配置如下:
R1(config)#router rip
R1(config-router)#version 2
R1(config-router)#network 192.168.10.0
R1(config-router)#network 192.168.20.0
R1(config-router)#network 12.1.1.0
R1(config-router)#no auto-summary
② R2 配置如下:
R2(config)#router rip
R2(config-router)#version 2
R2(config-router)#network 12.1.1.0
R2(config-router)#no auto-summary
步骤二:OSPF协议配置
① R2配置如下:
R2(config)#router ospf 1
R2(config-router)#network 23.1.1.0 0.0.0.255  ar 0
② R3配置如下:
R3(config)#router ospf 1
R3(config-router)#network 23.1.1.0 0.0.0.255 ar 0
R3(config-router)#network 34.1.1.0 0.0.0.255 ar 0
步骤三:双向引入
R2配置如下:
R2(config)#router ospf 1
R2(config-router)#redistribute rip subnets
R2(config-router)#exit
R2(config)#router rip
R2(config-router)#redistribute ospf1 metric 10
(三)指向R4的缺省路由配置,并引入OSPF
R3配置如下:
R3(config)#ip route 0.0.0.0 0.0.0.0 34.1.1.4
R3(config)#router ospf 1
R3(config-router)# default-information originate
(四)VLAN的划分
S0配置如下:
S0(config)#vlan 10
S0(config-vlan)#ex
S0(config)#vlan 20
S0(config-vlan)#int f0/2
S0(config-if)#switchport mode ac
S0(config-if)#switchport access vlan 10
S0(config-if)#int f0/3
S0(config-if)#sw mo ac
S0(config-if)#sw ac vl 20
S0(config-if)#int f0/1
S0(config-if)#sw mo tr
S0(config-if)#sw tr al vl al
(五)DHCP服务器配置
R1配置如下:
R1(config)#ip dhcp pool PC0
R1(dhcp-config)#network 192.168.10.0 255.255.255.0
R1(dhcp-config)#default-router 192.168.10.1
R1(dhcp-config)#dns-server 8.8.8.8
R1(config)#ip dhcp pool PC1
R1(dhcp-config)#network 192.168.20.0 255.255.255.0
R1(dhcp-config)#default-router 192.168.20.1
R1(dhcp-config)#dns-server 114.114.114.114
注: 此时,两台PC分别获取到了192.168.10.0 /24网段和192.168.20.0/24网段的IP地址,且由于R1设备使用了子接口,分别做了VLAN 10和VLAN 20的网关,单臂路由也已经实现。
(六)SSH协议配置
R2配置如下:
R2(config)#ip domain-name ShuoFangNiao.com
R2(config)#username admin privilege 15 secret password
R2(config)#line vty 0 4
R2(config-line)#transport input ssh
R2(config-line)#login local
R2(config-line)#exit
R2(config)#crypto key generate rsa general-keys modulus 1024
(七)交换机端口安全配置
步骤一:F0/2接口限制能够与PC0连接(直接绑定MAC地址),否则关闭接口
S0配置如下:
S0(config)#int f0/2
S0(config-if)#switchport port-security
S0(config-if)#switchport port-security maximum 1
S0(config-if)#switchport port-security mac-address 00E0.8FDC.2218
S0(config-if)#switchport port-security violation shutdown
步骤二:F0/3接口限制能够与PC1连接(粘性绑定MAC地址),否则关闭接口
S0配置如下:
S0(config)#int f0/3
S0(config-if)#switchport port-security
S0(config-if)#switchport port-security maximum 1
S0(config-if)#switchport port-security mac-address sticky
S0(config-if)#switchport port-security violation shutdown


 3698
3698


 被折叠的 条评论
为什么被折叠?
被折叠的 条评论
为什么被折叠?
 到【灌水乐园】发言


