


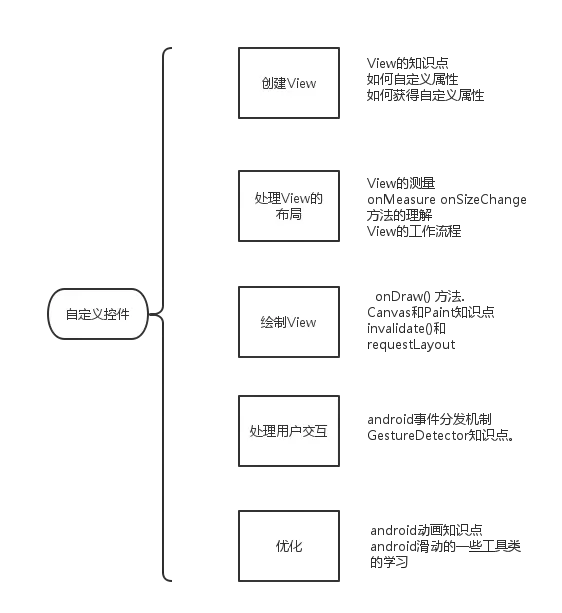
先总结下自定义View的步骤:
1、自定义View的属性
2、在View的构造方法中获得我们自定义的属性
[ 3、重写onMesure,onSizeChange,onLayout]
4、重写onDraw
我把3用[]标出了,所以说3不一定是必须的,当然了大部分情况下还是需要重写的。
1、自定义View的属性,首先在res/values/ 下建立一个attrs.xml , 在里面定义我们的属性和声明我们的整个样式。
- <?xml version="1.0" encoding="utf-8"?>
- <resources>
- <declare-styleable name="CustomTitleView">
- <attr name="titleText" format="string" />
- <attr name="titleTextColor" format="color"/>
- <attr name="titleTextSize" format="dimension"/>
- </declare-styleable>
- </resources>
一共有:string,color,demension,integer,enum,reference,float,boolean,fraction,flag;不清楚的可以google一把。
然后在布局中声明我们的自定义View
- <RelativeLayout xmlns:android="http://schemas.android.com/apk/res/android"
- xmlns:tools="http://schemas.android.com/tools"
- xmlns:custom="http://schemas.android.com/apk/res/com.example.customview01"
- android:layout_width="match_parent"
- android:layout_height="match_parent" >
- <com.example.customview01.view.CustomTitleView
- android:layout_width="200dp"
- android:layout_height="100dp"
- custom:titleText="3712"
- custom:titleTextColor="#ff0000"
- custom:titleTextSize="40sp" />
- </RelativeLayout>
一定要引入 xmlns:custom="http://schemas.android.com/apk/res/com.example.customview01"我们的命名空间,后面的包路径指的是项目的package
也可以用http://schemas.android.com/apk/res/res-auto
2、在View的构造方法中,获得我们的自定义的样式
- /**
- * 文本
- */
- private String mTitleText;
- /**
- * 文本的颜色
- */
- private int mTitleTextColor;
- /**
- * 文本的大小
- */
- private int mTitleTextSize;
- /**
- * 绘制时控制文本绘制的范围
- */
- private Rect mBound;
- private Paint mPaint;
- public CustomTitleView(Context context, AttributeSet attrs)
- {
- this(context, attrs, 0);
- }
- public CustomTitleView(Context context)
- {
- this(context, null);
- }
- /**
- * 获得我自定义的样式属性
- *
- * @param context
- * @param attrs
- * @param defStyle
- */
- public CustomTitleView(Context context, AttributeSet attrs, int defStyle)
- {
- super(context, attrs, defStyle);
- /**
- * 获得我们所定义的自定义样式属性
- */
- TypedArray a = context.getTheme().obtainStyledAttributes(attrs, R.styleable.CustomTitleView, defStyle, 0);
- int n = a.getIndexCount();
- for (int i = 0; i < n; i++)
- {
- int attr = a.getIndex(i);
- switch (attr)
- {
- case R.styleable.CustomTitleView_titleText:
- mTitleText = a.getString(attr);
- break;
- case R.styleable.CustomTitleView_titleTextColor:
- // 默认颜色设置为黑色
- mTitleTextColor = a.getColor(attr, Color.BLACK); //可以设置默认值
- break;
- case R.styleable.CustomTitleView_titleTextSize:
- // 默认设置为16sp,TypeValue也可以把sp转化为px
- mTitleTextSize = a.getDimensionPixelSize(attr, (int) TypedValue.applyDimension(
- TypedValue.COMPLEX_UNIT_SP, 16, getResources().getDisplayMetrics()));
- break;
- }
- }
- a.recycle(); //记得recycle
- /**
- * 获得绘制文本的宽和高
- */
- mPaint = new Paint();
- mPaint.setTextSize(mTitleTextSize);
- // mPaint.setColor(mTitleTextColor);
- mBound = new Rect();
- mPaint.getTextBounds(mTitleText, 0, mTitleText.length(), mBound);
- }
我们重写了3个构造方法,默认的布局文件调用的是两个参数的构造方法,所以记得让所有的构造调用我们的三个参数的构造,我们在三个参数的构造中获得自定义属性。
3、我们重写onDraw,onMesure调用系统提供的:
- @Override
- protected void onMeasure(int widthMeasureSpec, int heightMeasureSpec)
- {
- super.onMeasure(widthMeasureSpec, heightMeasureSpec);
- }
- @Override
- protected void onDraw(Canvas canvas)
- {
- mPaint.setColor(Color.YELLOW);
- canvas.drawRect(0, 0, getMeasuredWidth(), getMeasuredHeight(), mPaint);
- mPaint.setColor(mTitleTextColor);
- canvas.drawText(mTitleText, getWidth() / 2 - mBound.width() / 2, getHeight() / 2 + mBound.height() / 2, mPaint);
- }
注意:drawText()中X,Y其实是在Text的左下角。这与基本画东西在所在的点不同(一般画东西所在的xy点一般都是左上角)
添加设置属性事件
在xml中指定的自定义属性只有在view被初始化的时候能够获取到,有时候我们可能在运行时做一些操作,这种情况就需要我们为自定义属性设置getter和setter方法,以下代码展示了自定义控件暴露的set 和get方法
public boolean getTitleText() {
    return mTitleText ;
}

public void setTitleText(boolean mTitleText ) {
    mTitleText = mTitleText ;
    invalidate();
    requestLayout();
}重点看setTitleText方法,在为mTitlleText赋值之后,调用了invalidate()和requestLayout()方法,我们自定义控件的属性发生改变之后,控件的样子也可能发生改变,在这种情况下就需要调用invalidate()方法让系统去调用view的onDraw()重新绘制。同样的,控件属性的改变可能导致控件所占的大小和形状发生改变,所以我们需要调用requestLayout()来请求测量获取一个新的布局位置。
处理View的布局.
测量
一个View是在展示时总是有它的宽和高,测量View就是为了能够让自定义的控件能够根据各种不同的情况以合适的宽高去展示。提到测量就必须要提到onMeasure方法了。onMeasure方法是一个view确定它的宽高的地方。
@Override
    protected void onMeasure(int widthMeasureSpec, int heightMeasureSpec) {

    }
onMeasure 函数中有 widthMeasureSpec 和 heightMeasureSpec 这两个 int 类型的参数, 毫无疑问他们是和宽高相关的, 但它们其实不是宽和高, 而是由宽、高和各自方向上对应的测量模式来合成的一个值:
测量模式一共有三种, 被定义在 Android 中的 View 类的一个内部类View.MeasureSpec中:
MeasureSpec其实就是承担这种作用:MeasureSpec是父控件提供给子View的一个参数,作为设定自身大小参考,只是个参考,要多大,还是View自己说了算。
在这里你只需要记住它们包含了两个信息:mode和size
mode包括三种,UNSPECIFIED、EXACTLY、AT_MOST,size就是配合mode给出的参考尺寸
eg:父容器的限制与MeasureSpec
先假定,父容器是300dp*300dp的尺寸,如果子View的布局参数是
<!--场景1-->
android:layout_width="match_parent"
android:layout_height="match_parent"
那么按照我们的期望,希望子View的尺寸要是300dp*300dp,如果子View的布局参数是
<!--场景2-->
android:layout_width="100dp"
android:layout_height="100dp"
按照我们的期望,希望子View的尺寸要是100dp*100dp,如果子View的布局参数是
<!--场景3-->
android:layout_width="wrap_content"
android:layout_height="wrap_content"
按照我们的期望,希望子View的尺寸可以按照自己需求的尺寸来确定,但是最好不要超过300dp*300dp。
- UNSPECIFIED(未指定),父控件对子控件不加任何束缚,子元素可以得到任意想要的大小,这种MeasureSpec一般是由父控件自身的特性决定的。比如ScrollView,它的子View可以随意设置大小,无论多高,都能滚动显示,这个时候,size一般就没什么意义。
- EXACTLY(完全),父控件为子View指定确切大小,希望子View完全按照自己给定尺寸来处理,跟上面的场景1跟2比较相似,这时的MeasureSpec一般是父控件根据自身的MeasureSpec跟子View的布局参数来确定的。一般这种情况下size>0,有个确定值。
- AT_MOST(至多),父控件为子元素指定最大参考尺寸,希望子View的尺寸不要超过这个尺寸,跟上面场景3比较相似。这种模式也是父控件根据自身的MeasureSpec跟子View的布局参数来确定的,一般是子View的布局参数采用wrap_content的时候。
注:如果自定义View没有重写onMeasure函数,MeasureSpec.AT_MOST跟MeasureSpec.EXACTLY的表现是一样的,也就是对于场景2跟3的表现其实是一样的,也就是wrap_content就跟match_parent一个效果
MeasureSpec:
重写之前先了解MeasureSpec的specMode,一共三种类型:
EXACTLY:一般是设置了明确的值或者是MATCH_PARENT
AT_MOST:表示子布局限制在一个最大值内,一般为WARP_CONTENT
UNSPECIFIED:表示子布局想要多大就多大,很少使用,比如ScrollView用
UNSPECIFIED=00000000000000000000000000000000
EXACTLY =01000000000000000000000000000000
AT_MOST =10000000000000000000000000000000
由于最前面两位代表模式,所以他们分别对应十进制的0,1,2;
下面是我们重写onMeasure代码:
- @Override
- protected void onMeasure(int widthMeasureSpec, int heightMeasureSpec)
- {
- int widthMode = MeasureSpec.getMode(widthMeasureSpec);
- int widthSize = MeasureSpec.getSize(widthMeasureSpec);
- int heightMode = MeasureSpec.getMode(heightMeasureSpec);
- int heightSize = MeasureSpec.getSize(heightMeasureSpec);
- int width;
- int height ;
- if (widthMode == MeasureSpec.EXACTLY)
- {
- width = widthSize;
- } else
- {
- mPaint.setTextSize(mTitleTextSize);
- mPaint.getTextBounds(mTitle, 0, mTitle.length(), mBounds);
- float textWidth = mBounds.width();
- int desired = (int) (getPaddingLeft() + textWidth + getPaddingRight());
- width = desired;
- }
- if (heightMode == MeasureSpec.EXACTLY)
- {
- height = heightSize;
- } else
- {
- mPaint.setTextSize(mTitleTextSize);
- mPaint.getTextBounds(mTitle, 0, mTitle.length(), mBounds);
- float textHeight = mBounds.height();
- int desired = (int) (getPaddingTop() + textHeight + getPaddingBottom());
- height = desired;
- }
- setMeasuredDimension(width, height); //记得不然会抛异常
- }


参考:http://www.jianshu.com/p/d16ec64181f2
计算一些自定义控件需要的值 onSizeChange()
Q: 在测量完View并使用setMeasuredDimension函数之后View的大小基本上已经确定了,那么为什么还要再次确定View的大小呢?
A: 这是因为View的大小不仅由View本身控制,而且受父控件的影响,所以我们在确定View大小的时候最好使用系统提供的onSizeChanged回调函数。
onSizeChange() 方法在view第一次被指定了大小值、或者view的大小发生改变时会被调用。所以一般用来计算一些位置和与view的size有关的值。
可以看出,它又四个参数,分别为 宽度,高度,上一次宽度,上一次高度。这个函数比较简单,我们只需关注 宽度(w), 高度(h) 即可,这两个参数就是View最终的大小。
确定子View布局位置(onLayout)
确定布局的函数是onLayout,它用于确定子View的位置,在 自定义ViewGroup 中会用到,他调用的是子View的layout函数。//@param changed 该参数指出当前ViewGroup的尺寸或者位置是否发生了改变
//@param left top right bottom 当前ViewGroup相对于其父控件的坐标位置
@Override
protected void onLayout(boolean changed, int left, int top, int right, int bottom) {
    super.onLayout(changed, left, top, right, bottom);
}
四个参数分别为:
| 名称 | 说明 | 对应的函数 |
|---|---|---|
| l | View左侧距父View左侧的距离 | getLeft(); |
| t | View顶部距父View顶部的距离 | getTop(); |
| r | View右侧距父View左侧的距离 | getRight(); |
| b | View底部距父View顶部的距离 | getBottom(); |
3、绘制View(Draw)
一旦自定义控件被创建并且测量代码写好之后,接下来你就可以实现onDraw()来绘制View了,onDraw方法包含了一个Canvas叫做画布的参数,onDraw()简单来说就两点:
Canvas决定要去画什么
Paint决定怎么画
比如,Canvas提供了画线方法,Paint就来决定线的颜色。Canvas提供了画矩形,Paint又可以决定让矩形是空心还是实心。
在onDraw方法中开始绘制之前,你应该让画笔Paint对象的信息初始化完毕。这是因为View的重新绘制是比较频繁的,这就可能多次调用onDraw,所以初始化的代码不应该放在onDraw方法里。
4、与用户进行交互
在android系统中最常见的事件就是触摸事件了,它会调用view的onTouchEvent(android.view.MotionEvent).重写这个方法去处理我们的事件逻辑
  @Override
  public boolean onTouchEvent(MotionEvent event) {
       return super.onTouchEvent(event);
  }
对与onTouchEvent方法相信大家都有一定了解,如果不了解的话,你就先记住这是处理Touch的地方。
现在的触控有了更多的手势,比如轻点,快速滑动等等,所以在支持特殊用户交互的时候你需要用到android提供的GestureDetector.你只需要实现GestureDetector中相对应的接口,并且处理相应的回调方法。
除了手势之外,如果有移动之类的情况我们还需要让滑动的动画显示得比较平滑。动画应该是平滑的开始和结束,而不是突然消失突然开始。在这种情况下,我们需要用到属性动画 property animation framework
由于与用户进行交互中涉及到的知识举例子会比较多,所以我在之后的自定义控件文章中再讲解。
android自定义组合控件onFinishInflate和onSizeChanged的区别
onSizeChanged 当view的大小发生变化时触发
总结
到这里基本上自定义控件的大致步骤和可能涉及到的知识点都说完了。看一张图。
自定义View流程:
| 步骤 | 关键字 | 作用 |
|---|---|---|
| 1 | 构造函数 | View初始化 |
| 2 | onMeasure | 测量View大小 |
| 3 | onSizeChanged | 确定View大小 |
| 4 | onLayout | 确定子View布局(自定义View包含子View时有用) |
| 5 | onDraw | 实际绘制内容 |
| 6 | 提供接口 | 控制View或监听View某些状态。 |
组合控件参考:https://www.jianshu.com/p/ede3a970300c
方法一:mScrollView.setFillViewport(true); 本方法是使子View可以拉伸来填满整个屏幕
方法二:在自定义View类中MobileView(class MobileView extends View)重写onMeasure方法
调用setMeasuredDimension(GlobalFun.BWScreenWidth, GlobalFun.BWScreenHeight);来设置本View的宽和高,这样就会显示。注意宽度和高度必须大于设备的宽和高,此时才会滚动。重写onMeasure方法的有以下几个步骤:
1、获得控件宽度(width)的MODE值
2、根据MODE值获得width的大小
3、获得控件高度(height)的MODE值
4、根据MODE值获得height的大小
5、设置控件大小
@Override
    protected void onMeasure(int widthMeasureSpec, int heightMeasureSpec) {
        // TODO Auto-generated method stub
        int width = 0;
        int height = 0;
        //获得宽度MODE
        int modeW = MeasureSpec.getMode(widthMeasureSpec);
        //获得宽度的值
        if (modeW == MeasureSpec.AT_MOST) {
            width = MeasureSpec.getSize(widthMeasureSpec);
        }
        if (modeW == MeasureSpec.EXACTLY) {
            width = widthMeasureSpec;
        }
        if (modeW == MeasureSpec.UNSPECIFIED) {
            width = 600;
        }
        //获得高度MODE
        int modeH = MeasureSpec.getMode(height);
        //获得高度的值
        if (modeH == MeasureSpec.AT_MOST) {
            height = MeasureSpec.getSize(heightMeasureSpec);
        }
        if (modeH == MeasureSpec.EXACTLY) {
            height = heightMeasureSpec;
        }
        if (modeH == MeasureSpec.UNSPECIFIED) {
            //ScrollView和HorizontalScrollView
            height = 400;
        }
        //设置宽度和高度
        setMeasuredDimension(width, height);
    }
- 1
- 2
- 3
- 4
- 5
- 6
- 7
- 8
- 9
- 10
- 11
- 12
- 13
- 14
- 15
- 16
- 17
- 18
- 19
- 20
- 21
- 22
- 23
- 24
- 25
- 26
- 27
- 28
- 29
- 30
- 31
- 32
- 33
- 34
- 1
- 2
- 3
- 4
- 5
- 6
- 7
- 8
- 9
- 10
- 11
- 12
- 13
- 14
- 15
- 16
- 17
- 18
- 19
- 20
- 21
- 22
- 23
- 24
- 25
- 26
- 27
- 28
- 29
- 30
- 31
- 32
- 33
- 34
很多人在重写onMeasure的时候,容易忽略MODE=MeasureSpec.UNSPECIFIED这个值,而忽略给width和height市值值了,以致控件在放置Scrollview和HorizontalScrollView控件的时候,自定义View就无法显示了,出现这个的原因是,自定义View的控件值一直是0,所以自定义View的大小是0,就理所当然的消失了。
计算出当前绘制出来的字符串有多宽,可以这么来!
方法1:Paint pFont = new Paint();
Rect rect = new Rect();
//返回包围整个字符串的最小的一个Rect区域
pFont.getTextBounds(str, 0, 1, rect);
strwid = rect.width();
strhei = rect.height();
方法2:
//直接返回参数字符串所占用的宽度
strwid = paintHead.measureText(str);
//最新获取文字基准高度
public float getnewTextheight(Paint mPaint) {
    Paint.FontMetrics fontMetrics = mPaint.getFontMetrics();
    float fontHeight = fontMetrics.bottom - fontMetrics.top;
    float baseY = fontHeight / 2 - fontMetrics.bottom;
    return baseY;
}

//获取文字的高
public float getTxtHeight(Paint mPaint) {
    Paint.FontMetrics fm = mPaint.getFontMetrics();
    return (float) Math.ceil(fm.descent - fm.ascent);
}


 398
398

 被折叠的 条评论
为什么被折叠?
被折叠的 条评论
为什么被折叠?
 到【灌水乐园】发言


