


1.前言
ElasticStack由Elasticsearch、Kibana、Logstash、Beat等组成,Logstash可用于采集数据的格式转换,单纯采集可不使用该工具。本文使用Elasticsearch、Kibana、Filebeat实现了简易的日志收集存储及实时展示。ElasticStack自8.0开始,安全配置默认激活,未使用TLS加密传输等情况下,服务将启动失败。安全可配置关闭,本文选择保留了相关安全功能。整体实践Elasticsearch采用的单节点模式,使用Docker的方式进行搭建,版本采用的是ElasticStack8.9.0,在不修改相关配置的情况下可直接通过docker-compose启动试用。
2.部署过程
2.1.创建初始目录结构
-
整体文件及目录结构

-
在elastic_stack目录下进行授权,权限不足的情况下会导致服务启动失败。
chmod g+rwx ./elasticsearch/data && chgrp 0 ./elasticsearch/data && chmod g+rwx ./elasticsearch/plugins && chgrp 0 ./elasticsearch/plugins && chmod g+rwx ./kibana/data && chgrp 0 ./kibana/data
文件及目录结构已上传至CSDN,下载地址:https://download.csdn.net/download/asdasdsaff/88189474
下载并在elastic_stack目录下进行授权操作后,可跳过以下"2.部署过程"的剩余部分,直接进入"3.运行使用"进行启动使用。
2.2.编辑环境配置文件
- 文件:./.env
- 描述:可按需求配置密码,软件版本等信息。注意内存限制单位为bytes,下面的配置的内存限制为2G,设置过小会出现异常退出的情况,错误信息如"ERROR: Elasticsearch exited unexpectedly"。后面可凭elastic用户及配置的密码登录Kibana。
- 内容:
# Password for the 'elastic' user (at least 6 characters)
ELASTIC_PASSWORD=aaaaaa

# Password for the 'kibana_system' user (at least 6 characters)
KIBANA_PASSWORD=aaaaaa

# Version of Elastic products
STACK_VERSION=8.9.0

# Set the cluster name
CLUSTER_NAME=docker-cluster

# Set to 'basic' or 'trial' to automatically start the 30-day trial
LICENSE=basic
#LICENSE=trial

# Port to expose Elasticsearch HTTP API to the host
ES_PORT=9200
#ES_PORT=127.0.0.1:9200

# Port to expose Kibana to the host
KIBANA_PORT=5601
#KIBANA_PORT=80

# Increase or decrease based on the available host memory (in bytes)
MEM_LIMIT=2147483648

# Project namespace (defaults to the current folder name if not set)
#COMPOSE_PROJECT_NAME=myproject
2.3.编辑docker-compose.yml
- 文件:./docker-compose.yml
- 描述:相关变量已在前面的.env文件中配置完成,docker-compose.yml可直接使用如下内容。注意Elasticsearch单节点模式必须加入"discovery.type=single-node"环境参数,否则启动将失败。filebeat的日志挂载路径可根据实际的日志位置进行调整,本次实践的日志位置在./demo下。
- 内容:
version: "2.2"

services:
  setup:
    image: docker.elastic.co/elasticsearch/elasticsearch:${STACK_VERSION}
    volumes:
      - ./certs:/usr/share/elasticsearch/config/certs
    user: "0"
    command: >
      bash -c '
        if [ x${ELASTIC_PASSWORD} == x ]; then
          echo "Set the ELASTIC_PASSWORD environment variable in the .env file";
          exit 1;
        elif [ x${KIBANA_PASSWORD} == x ]; then
          echo "Set the KIBANA_PASSWORD environment variable in the .env file";
          exit 1;
        fi;
        if [ ! -f config/certs/ca.zip ]; then
          echo "Creating CA";
          bin/elasticsearch-certutil ca --silent --pem -out config/certs/ca.zip;
          unzip config/certs/ca.zip -d config/certs;
        fi;
        if [ ! -f config/certs/certs.zip ]; then
          echo "Creating certs";
          echo -ne \
          "instances:\n"\
          "  - name: elasticsearch\n"\
          "    dns:\n"\
          "      - elasticsearch\n"\
          "      - localhost\n"\
          "    ip:\n"\
          "      - 127.0.0.1\n"\
          > config/certs/instances.yml;
          bin/elasticsearch-certutil cert --silent --pem -out config/certs/certs.zip --in config/certs/instances.yml --ca-cert config/certs/ca/ca.crt --ca-key config/certs/ca/ca.key;
          unzip config/certs/certs.zip -d config/certs;
        fi;
        echo "Setting file permissions"
        chown -R root:root config/certs;
        find . -type d -exec chmod 750 \{\} \;;
        find . -type f -exec chmod 640 \{\} \;;
        echo "Waiting for Elasticsearch availability";
        until curl -s --cacert config/certs/ca/ca.crt https://elasticsearch:9200 | grep -q "missing authentication credentials"; do sleep 30; done;
        echo "Setting kibana_system password";
        until curl -s -X POST --cacert config/certs/ca/ca.crt -u "elastic:${ELASTIC_PASSWORD}" -H "Content-Type: application/json" https://elasticsearch:9200/_security/user/kibana_system/_password -d "{\"password\":\"${KIBANA_PASSWORD}\"}" | grep -q "^{}"; do sleep 10; done;
        echo "All done!";
      '
    healthcheck:
      test: ["CMD-SHELL", "[ -f config/certs/elasticsearch/elasticsearch.crt ]"]
      interval: 1s
      timeout: 5s
      retries: 120

  elasticsearch:
    depends_on:
      setup:
        condition: service_healthy
    image: docker.elastic.co/elasticsearch/elasticsearch:${STACK_VERSION}
    restart: always
    container_name: elasticsearch
    volumes:
      - ./certs:/usr/share/elasticsearch/config/certs
      - ./elasticsearch/data:/usr/share/elasticsearch/data
      - ./elasticsearch/plugins:/usr/share/elasticsearch/plugins
    ports:
      - ${ES_PORT}:9200
    environment:
      - node.name=elasticsearch
      - cluster.name=${CLUSTER_NAME}
      - discovery.type=single-node
      - ELASTIC_PASSWORD=${ELASTIC_PASSWORD}
      - bootstrap.memory_lock=true
      - xpack.security.enabled=true
      - xpack.security.http.ssl.enabled=true
      - xpack.security.http.ssl.key=certs/elasticsearch/elasticsearch.key
      - xpack.security.http.ssl.certificate=certs/elasticsearch/elasticsearch.crt
      - xpack.security.http.ssl.certificate_authorities=certs/ca/ca.crt
      - xpack.security.transport.ssl.enabled=true
      - xpack.security.transport.ssl.key=certs/elasticsearch/elasticsearch.key
      - xpack.security.transport.ssl.certificate=certs/elasticsearch/elasticsearch.crt
      - xpack.security.transport.ssl.certificate_authorities=certs/ca/ca.crt
      - xpack.security.transport.ssl.verification_mode=certificate
      - xpack.license.self_generated.type=${LICENSE}
    mem_limit: ${MEM_LIMIT}
    ulimits:
      memlock:
        soft: -1
        hard: -1
    healthcheck:
      test:
        [
          "CMD-SHELL",
          "curl -s --cacert config/certs/ca/ca.crt https://localhost:9200 | grep -q 'missing authentication credentials'",
        ]
      interval: 10s
      timeout: 10s
      retries: 120
  kibana:
    depends_on:
      elasticsearch:
        condition: service_healthy
    image: docker.elastic.co/kibana/kibana:${STACK_VERSION}
    restart: always
    container_name: kibana
    volumes:
      - ./certs:/usr/share/kibana/config/certs
      - ./kibana/data:/usr/share/kibana/data
    ports:
      - ${KIBANA_PORT}:5601
    environment:
      - SERVERNAME=kibana
      - I18N_LOCALE=zh-CN
      - ELASTICSEARCH_HOSTS=https://elasticsearch:9200
      - ELASTICSEARCH_USERNAME=kibana_system
      - ELASTICSEARCH_PASSWORD=${KIBANA_PASSWORD}
      - ELASTICSEARCH_SSL_CERTIFICATEAUTHORITIES=config/certs/ca/ca.crt
    mem_limit: ${MEM_LIMIT}
    healthcheck:
      test:
        [
          "CMD-SHELL",
          "curl -s -I http://localhost:5601 | grep -q 'HTTP/1.1 302 Found'",
        ]
      interval: 10s
      timeout: 10s
      retries: 120
  filebeat:
    depends_on:
      - kibana
    image: docker.elastic.co/beats/filebeat:${STACK_VERSION}
    restart: always
    container_name: filebeat
    volumes:
      - ./certs:/usr/share/filebeat/config/certs
      - ./filebeat/filebeat.yml:/usr/share/filebeat/filebeat.yml:ro
      - ./demo:/var/log/filebeat
2.4.编辑filebeat.yml
- 文件:./filebeat/filebeat.yml
- 描述:日志采集服务Filebeat的配置文件,其中输入的paths部分要与docker-compose.yml中映射的容器内路径一致,文件名为要采集的日志文件。kibana与elasticsearch的用户密码需与.env文件中配置的一致,输出配置中必须配置"ssl.certificate_authorities",否则连接会不成功。证书在宿主机certs目录下,已在docker-compose.yml进行挂载,具体配置路径为挂载的容器内的路径。
- 内容:
# 输入-文件
filebeat.inputs:
- type: filestream
  id: demo-id
  paths:
    # 指定要采集的日志文件名称
    - /var/log/filebeat/demo.log

setup:
  # Index lifecycle management
  ilm:
    # 如果设置为true,setup.template.name和setup.template.pattern将被忽略。
    enabled: false
  # Elasticsearch index template
  template:
    settings:
      index:
        # 索引分片数
        number_of_shards: 1
        # 每个分片副本数
        number_of_replicas: 0
    name: "filebeat-%{[agent.version]}"
    pattern: "filebeat-%{[agent.version]}"
  kibana:
    host: "kibana:5601"
    username: "kibana_system"
    password: "aaaaaa"

# 输出-Elasticsearch
output.elasticsearch:
  hosts: ["https://elasticsearch:9200"]
  username: "elastic"
  password: "aaaaaa"
  # 配置证书
  ssl.certificate_authorities: ["/usr/share/filebeat/config/certs/ca/ca.crt"]
  index: "filebeat-%{[agent.version]}-%{+yyyy.MM.dd}"
2.5.编辑demo.log
- 文件:./demo/demo.log
- 描述:示例日志信息。
- 内容:
log1
log2
log3
3.运行使用
3.1.启动
在elastic_stack目录下执行
docker-compose up -d
3.2.运行情况查看
查看Elasticsearch运行情况
docker logs -f -t --tail 200 elasticsearch
查看Kibana运行情况
docker logs -f -t --tail 200 kibana
Kibana打印信息如下:

查看Filebeat运行情况
docker logs -f -t --tail 200 filebeat
3.3.登录Kibana查看日志采集情况
正确启动后浏览器访问http://部署服务器ip:5601/进入Kibana登录界面。通过.env文件中配置的elastic用户及密码进行登录,本次实践中使用的密码是aaaaaa。

3.4.查看采集的日志信息
进入日志菜单

跟踪日志信息

3.5.执行Elasticsearch查询
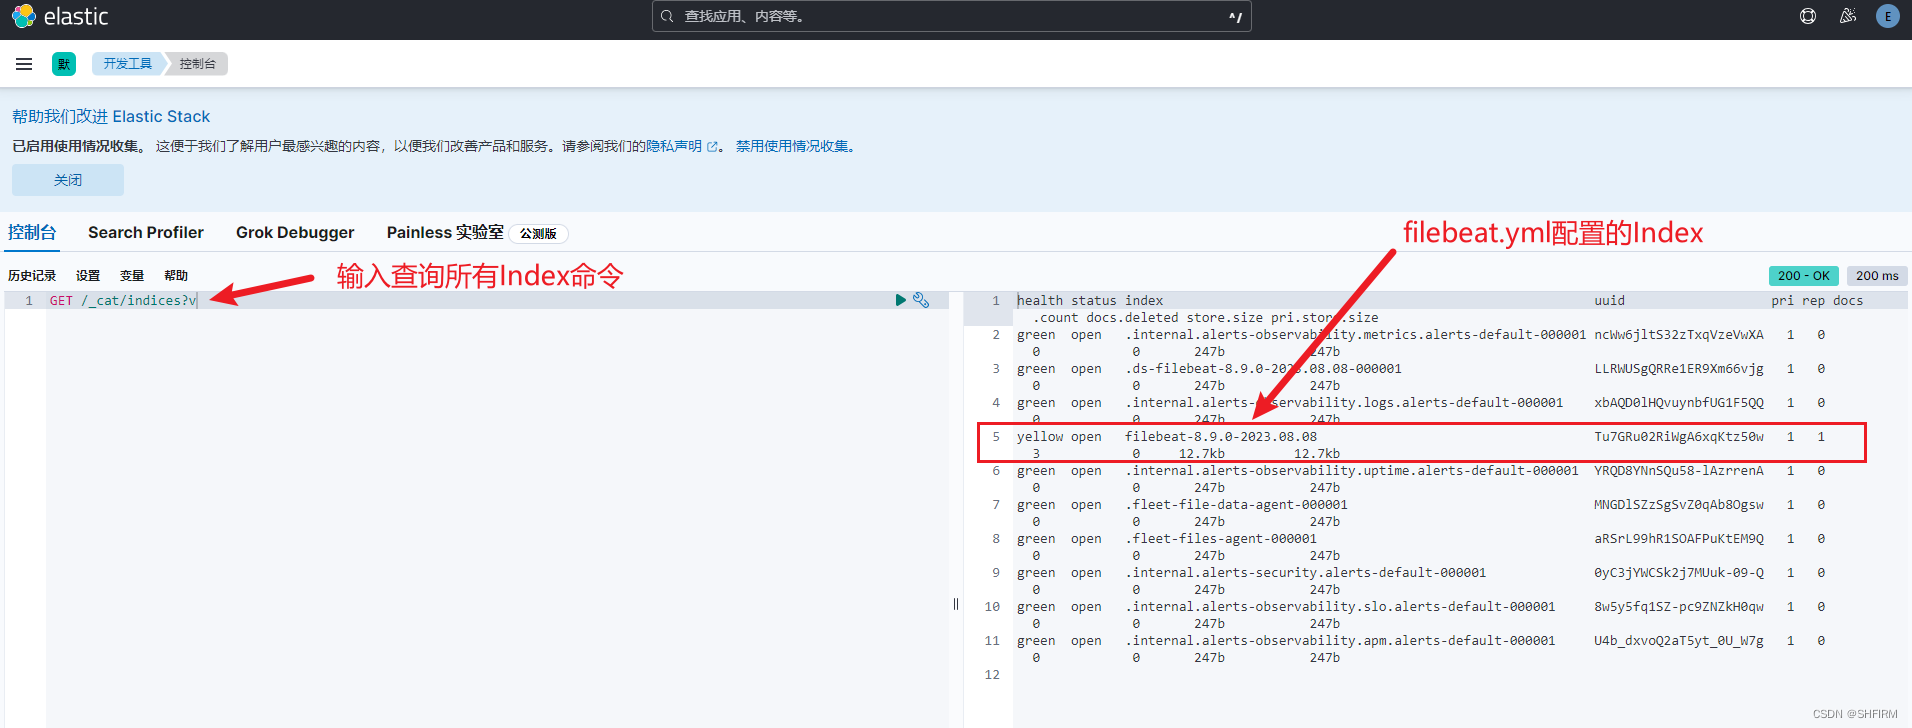
进入开发工具

执行Elasticsearch查询命令,示例中查询的是所有Index信息。
4.参考资料
主要参考文档地址:
- https://www.elastic.co/guide/en/elasticsearch/reference/8.9/docker.html
- https://www.elastic.co/guide/en/kibana/current/docker.html
- https://www.elastic.co/guide/en/beats/filebeat/current/configuration-filebeat-options.html


 681
681


 被折叠的 条评论
为什么被折叠?
被折叠的 条评论
为什么被折叠?
 到【灌水乐园】发言


