


一、Maven
1、下载 Maven
maven官网 Maven – Download Apache Maven


2、Maven的四大特征
(1)仓库:远程仓库、镜像仓库、本地仓库
(2)坐标:jia包下载的地址
(3)依赖:下载一个jar包,会下载和其相关的jar包
(4)命令 mvn cmd
①clean 对项目进行清理,清理的过程中会删除删除target目录下编译的内容。
②install 对本项目进行打包。三种打包方式,pom打包,jar包和war包。打包方式在pom.xml文件中进行指定。jar包就是普通的打包方式,可以是pom工程的子工程。war包的都是web工程,是可以直接放到tomcat下运行的工程。打成pom包和jar包的工程在新建的时候可以不需要制定maven项目的原型,达成war包的项目需要制定maven项目原型,指定的原型通常为maven-archetype-webapp,代表web项目。
③compiler 编译项目源代码。
maven依赖的传递性
说明: maven中的jar包是有依赖的传递性
例如: A项目依赖B.jar包, B.jar依赖C.jar. 在项目中,只需要添加B.jar.则B/C.jar都会自动添加.
maven依赖传递性实现原理
- 当maven开始解析项目的POM.xml文件时,根据依赖的坐标,找到指定的jar包文件.之后添加该依赖.
- 之后扫描当前依赖文件中的 xxx.pom文件,找到该jar包,添加依赖
- 之后重复以上过程
3、配置Maven文件中 settings.xml
镜像仓库配置
  <mirrors>
    <!-- mirror
     | Specifies a repository mirror site to use instead of a given repository. The repository that
     | this mirror serves has an ID that matches the mirrorOf element of this mirror. IDs are used
     | for inheritance and direct lookup purposes, and must be unique across the set of mirrors.
     |
    -->
<!-- 阿里云首选镜像,有不能下的包会在别的镜像源下载 -->
    <mirror>
      <id>nexus-aliyun</id>
      <mirrorOf>central</mirrorOf>
      <name>Nexus aliyun</name>
      <url>https://maven.aliyun.com/nexus/content/groups/public</url>
    </mirror>
<!-- 默认下载源 -->
    <mirror>
      <id>mirrorId</id>
      <mirrorOf>repositoryId</mirrorOf>
      <name>Human Readable Name for this Mirror.</name>
      <url>http://my.repository.com/repo/path</url>
    </mirror>
  </mirrors>
本地仓库地址
<localRepository>E:\apache-maven-3.6.3-bin\repository</localRepository>4、idea配置maven

二、初识springboot
1、什么是SpringBoot
Spring Boot 是所有基于 Spring 开发的项目的起点。Spring Boot 的设计是为了让开发者尽可能快的跑起来 Spring 应用程序并且尽可能减少开发者的配置文件。
特点:
(1) 嵌入的Tomcat(服务器默认端口号8080)
(2)简化Maven配置
(3)提供了大量的自动配置,比如需要持久层数据源连接数据库,只需要提供对应属性就可以。
2、SpringBoot初始化构建
默认地址: https://start.spring.io
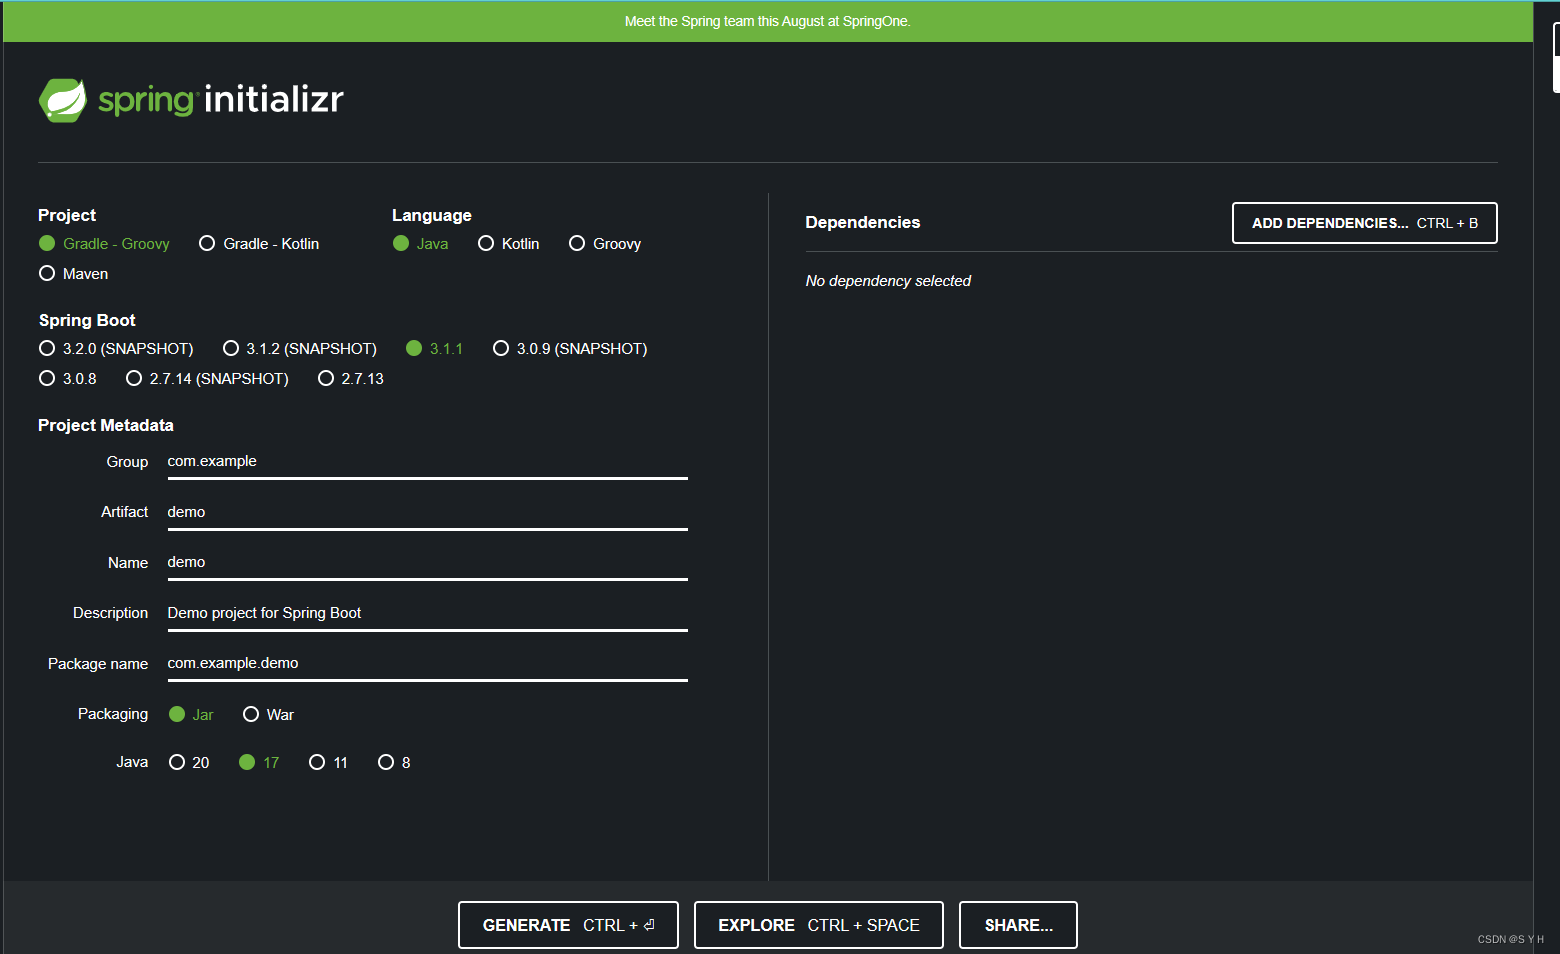
阿里云地址: https://start.aliyun.com
在idea中已经集成,当创建springboot项目时可以看到

3、框架之间的关系

Springboot是一个微服务框架,简化了应用的开发和部署。
Spring其核心就是控制反转(IOC),和面向切面(AOP),整合三方框架
Spring MVC接收用户发来的请求,处理业务,并给出相应
Mybatis与数据库相对接
4、springboot常用注解原文连接
spring和springmvc注解:
Spring和MVC_mvc和spri_S Y H的博客-CSDN博客
mybatis和mp注解:
(8条消息) Mybatis和MP_mybatis 数组查询_S Y H的博客-CSDN博客
5、修改springboot启动图案
第一步:springboot项目中,resources/目录下创建名为banner.txt的文件
第二步:在网站生成图案 Text to ASCII Art Generator (TAAG) (patorjk.com)
第三步:将图案cv,启动springboot项目。新图案就出来了
三、Lombok插件
1、lombok依赖
<dependency>
     <groupId>org.projectlombok</groupId>
     <artifactId>lombok</artifactId>
</dependency>
2、简化实体类代码
lombok常用提供常用注解
@Data  //自动生成get/set方法
@Accessors(chain = true)  // //开启链式加    原理:重写set/get方法
@NoArgsConstructor  //无参构造
@AllArgsConstructor  //全参构造
3、日志打印
import lombok.extern.slf4j.Slf4j;

@Slf4j
public class LoginController {
    public String login(String username, String password) {
        log.trace("日志级别 trace");
        log.debug("日志级别 debug");
        log.info("日志级别 info");
        log.warn("日志级别 warn");
        log.error("日志级别 error");
    }
}
四、事务管理
1、声明式事务(注解方式)
在SpringBoot中声明式事务最常见,就是把需要事务的方法用@Transactional标注一下就行了,这个一般用在Service层。标注后该方法就具备了事务的能力,出错了会自动回滚。但是被标注后的整个方法都在事务中,影响效率
@Transactional作用:
- 默认条件下,只拦截运行时异常
- rollbackFor属性: 指定异常的类型回滚 rollbackFor = RuntimeException.class
- noRollbackFor属性: 指定异常不回滚 noRollbackFor = RuntimeException.class
- 在方法或者类上都可以添加。(如果在类上添加,则此类中的所有方法都会执行事务,不推荐,因为可能后续接手开发的小伙伴添加方法的时候根本不需要执行事务);不建议在接口上添加,因为注解不可被继承。
@Transactional失效场景:
spring事务(注解 @Transactional )失效的12种场景_spring事务失效场景_春天的早晨的博客-CSDN博客
2、编程式事务
在 Spring Boot 中实现编程式事务又有两种实现方法:
- 使用 TransactionTemplate 对象实现编程式事务;
- 使用更加底层的 TransactionManager 对象实现编程式事务;
2.1 使用 TransactionTemplate 对象实现编程式事务
    import org.springframework.transaction.support.TransactionTemplate;

    @Autowired
    private BaiduUserInfoMapper baiduUserInfoMapper;

    @Resource
    private TransactionTemplate transactionTemplate;

    /*
     * 测试编程式事务
     * */
    @GetMapping("/test/{sex}")
    public String test(@PathVariable("sex") String sex) {

        BaiduUserInfo baiduUserInfo = new BaiduUserInfo();
        baiduUserInfo.setIdCard("213216546546");
        baiduUserInfo.setSex(sex);

        Integer execute = transactionTemplate.execute(transactionStatus -> {
            // 进行数据更改操作
            int i = baiduUserInfoMapper.updateBaiduUserInfo(baiduUserInfo);
            // 故意设置一个报错,经过测试,此处使用try...catch捕获依旧生效
            int a = 1 / 0;
            return i;
        });

        return "成功" + execute;
    }
测试:修改性别
五、依赖管理
1、pom.xml 标签
<?xml version="1.0" encoding="UTF-8"?>
<!-- xml的版本和编码-->
<!-- xml 可扩展标记语言(EXtensible Markup Language)-->
<!-- xml 被设计用来传输和存储数据 html 被设计用来显示数据-->
<!-- xmlns-命名空间,类似包名,因为xml的标签可以自定义,所以需要命名空间来区分-->
<!-- xmlns:xsi-xml遵循的标签规范-->
<!-- xsi:schemaLocation-用来定义xmlschema的地址,也就是xml书写时需要遵循的语法,
两部分组成,前面部分就是命名空间的名字,后面是xsd(xmlschema)的地址-->
<project xmlns="http://maven.apache.org/POM/4.0.0" xmlns:xsi="http://www.w3.org/2001/XMLSchema-instance"
xsi:schemaLocation="http://maven.apache.org/POM/4.0.0 https://maven.apache.org/xsd/maven-4.0.0.xsd">
<!-- pom模型的版本-->
<modelVersion>4.0.0</modelVersion>
<!-- 父级项目,parent的引用是固定的;当我们创建一个 Spring Boot 工程时,可以继承自一个 spring-boot-starter-parent;父项目中定义了依赖的版本,我们继承了它,所以依赖dependence可以不写版本号,若不用父项目中的版本号则自己用<version>标签指定-->
<parent>
<groupId>org.springframework.boot</groupId>
<artifactId>spring-boot-starter-parent</artifactId>
<version>2.6.0</version>
<relativePath/>
<!-- lookup parent from repository(从存储库中查找父级项目) -->
</parent>
<!-- groupId主要用来唯一标识一个项目或者一组项目,通常是java包名的全称-->
<groupId>com.upc.pipeline</groupId>
<!-- 用来标识同一groupId下不同的项目,例如spring-boot-starter-thymeleaf,都是这种格式的-->
<artifactId>pdfs</artifactId>
<!-- 版本-->
<version>0.0.1-SNAPSHOT</version>
<!-- 项目的名称,Maven产生的文档用-->
<name>pdfs</name>
<!-- 项目的描述,Maven产生的文档用-->
<description>Demo project for Spring Boot</description>
<!-- 定义变量,版本管理;使用格式:${java.version}-->
<properties>
<java.version>1.8</java.version>
</properties>
<!-- 依赖管理-->
<dependencies>
<!-- lombok能通过注解帮我们消除那些必须要写但是重复的代码,比如setter,getter,构造函数之类的方法-->
<dependency>
<groupId>org.projectlombok</groupId>
<artifactId>lombok</artifactId>
<!-- <optional>-标记依赖是否可以传递,默认值是false,可以用来减少项目之间jar包的冲突-->
<optional>true</optional>
</dependency>
<!-- 单元测试-->
<dependency>
<groupId>org.springframework.boot</groupId>
<artifactId>spring-boot-starter-test</artifactId>
<!-- 用来表示当前的这个依赖(通过pom加载进来的包)所作用的场景,就是说应该把它添加到哪个环境当中,例如只在测试时此jar包生效,取值主要有compile-编译时(若未指定则为该默认值) runtime-运行时 test-测试时 等 -->
<scope>test</scope>
</dependency>
<!-- Mybatis分页插件-->
<dependency>
<groupId>com.github.pagehelper</groupId>
<artifactId>pagehelper</artifactId>
<version>4.1.0</version>
</dependency>
<!-- Oracle11g 连接驱动依赖。这里是个坑,官方提供的不能用 -->
<dependency>
<groupId>cn.easyproject</groupId>
<artifactId>ojdbc6</artifactId>
<version>12.1.0.2.0</version>
</dependency>
<!-- jdbcTemplate -->
<dependency>
<groupId>org.springframework.boot</groupId>
<artifactId>spring-boot-starter-jdbc</artifactId>
</dependency>
</dependencies>
<!-- 编译-->
<build>
<!-- 用于指定使用的插-->
<plugins>
<!-- Maven插件-->
<plugin>
<groupId>org.springframework.boot</groupId>
<artifactId>spring-boot-maven-plugin</artifactId>
<!-- <configuration>-指定插件配置-->
<configuration>
<!-- <excludes>-指定哪些文件将被忽略-->
<excludes>
<exclude>
<groupId>org.projectlombok</groupId>
<artifactId>lombok</artifactId>
</exclude>
</excludes>
</configuration>
</plugin>
</plugins>
</build>
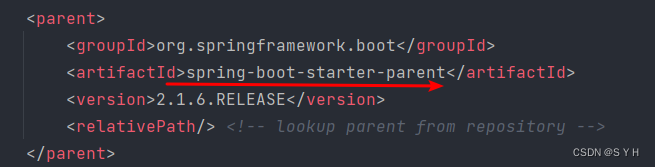
</project>2、导入某些依赖不指定版本原因
首先我们可以在idea中ctrl+右键点开父依赖spring-boot-starter-parent
进入如下文件,接着ctrl+右键点击spring-boot-dependencies

进入如下文件
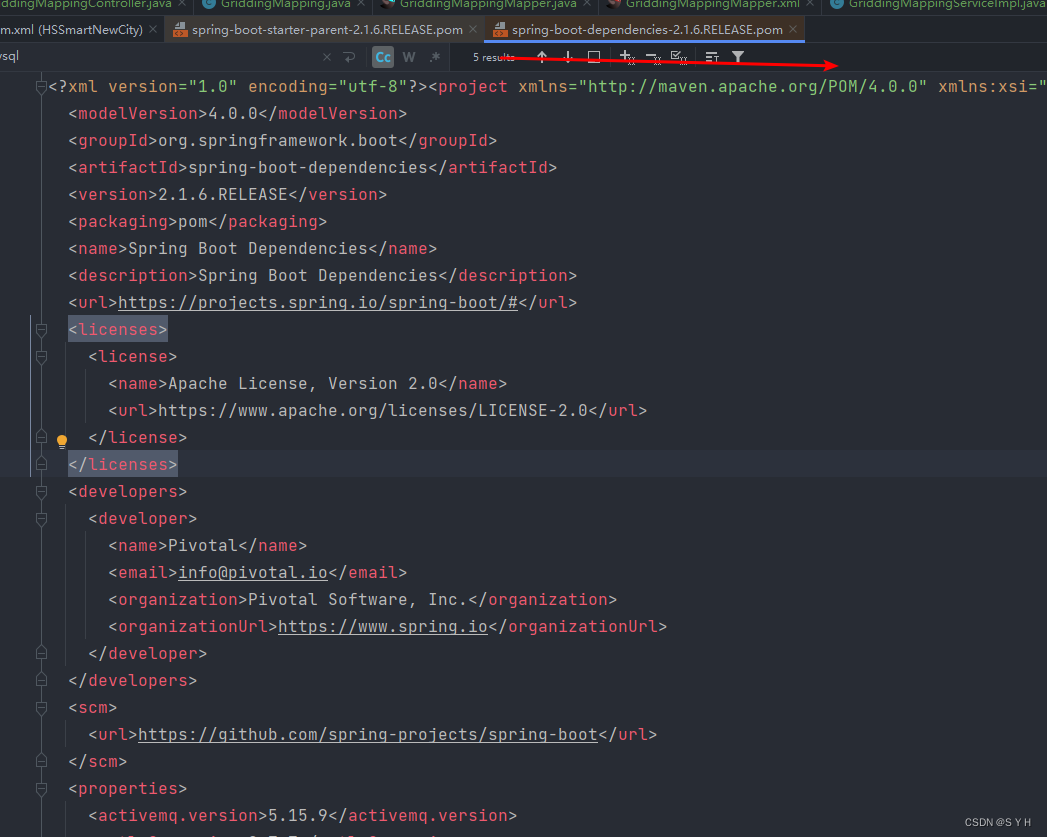
可以看见在spring-boot-dependencies里面看到声明了很多第三方依赖的版本。
那么所有当子项目再次引入此依赖jar包时则无需显式的列出版本号。Maven会沿着父子层级向上寻找拥有dependencyManagement 元素的项目,然后使用它指定的版本号。而这些依赖的版本号,就是第二张图片里面的properties中对应的版本号,也就是被锁定的版本号


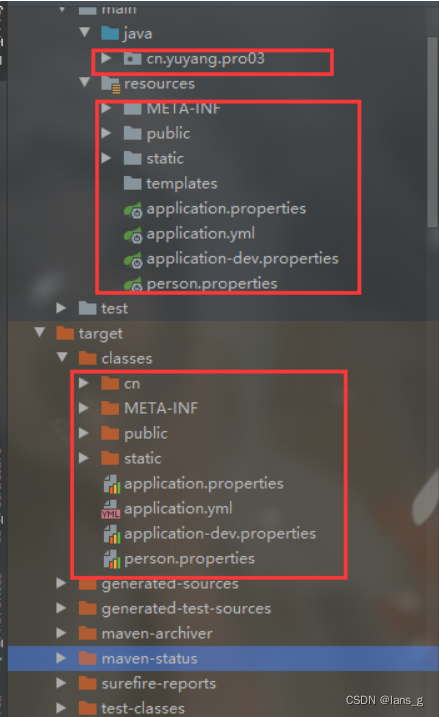
六、配置文件
1.SpringBoot配置文件加载顺序
加载顺序: bootstrap.yml > application.yml > application.properties > application.yaml
由前到后依次读取,也就是说不同配置文件中相同配置后加载的会覆盖先加载的,不同配置文件中不同配置则会全部保留。
2.bootstrap.yml
bootstrap.yml 用来程序引导时执行,应用于更加早期配置信息读取. 可以理解成系统级别的一些参数配置,这些参数一般是不会变动的。
3.application.yml配置文件
yml文件默认字符集采用UTF-8编码 可以写中文
server:
    port: 8080
mysql:
    username: root
    password: root
text: ${mysql.username}  # 获取本文件内的其他属性值
3.1 读取
方式一:使用注解@Autowired注入Environment类
file:
  caseinfo:
    image:
      savepath: /SmartCityFile/Case/Img/
@Autowired
private Environment environment;
@GetMapping("/get")
public String get() {
return environment.getProperty("file.caseinfo.image.savepath");
}局限1:如果要在静态方法中读取配置信息,不能简单的将Environment定义成static就完了
局限2:Environment 无法直接读取自定义的Yml配置文件,需要通过增加一个配置类,将自定义的Yml文件暴露到spring environment中。
局限3:由于加载顺序的原因,使用注解的方法不适用于在静态代码块(static{})中读取配置,即便用了局限1的解决方法也不行,目前还没找出解决方法
方式二: @Value注解直接注入配置信息
@Value("${mysql.password}")
private String password;

@Value("${mysql.password:8080}")//可以直接给默认值
private String password;
同第一个方法一样,key要写完整,有几层就写几层,每一层用点分开;该方法同第一种方法的局限性一样。
方式三:定义一个工具类,使用@Component注解成为配置类,再继承ApplicationRunner 重写run(),再注入Environment 类获取配置,可以做到在任何地方随时随地获取配置信息。
import org.springframework.beans.factory.annotation.Autowired;
import org.springframework.boot.ApplicationArguments;
import org.springframework.boot.ApplicationRunner;
import org.springframework.core.env.Environment;
import org.springframework.stereotype.Component;

@Component
public class BaseConfig implements ApplicationRunner {
    @Autowired
    private Environment environment;

    public static String pro1;
    public static String pro2;

    @Override
    public void run(ApplicationArguments args){
        pro1=environment.getProperty("file.caseinfo.image.savepath");
        pro2=environment.getProperty("file.caseinfo.image.readpath");
    }
}
直接用调用配置类的静态属性即可获取配置信息,不限于常规方法,静态方法,静态代码块,其实相当于时使用一个配置类迂回一下间接获取配置信息。
    @GetMapping("/get")
    public String get() {
        return BaseConfig.pro2;
    }
3.2 环境分割
方式一:同一个配置文件配置多个环境
# 环境分割
spring:
  profiles:
    active: dev    #指定默认配置
---    #环境分割
server:
  port: 8080
spring:
  config:
    activate:
      on-profile: dev   #环境名字
---
server:
  port: 9000
spring:
  config:
    activate:
on-profile: prod #环境名字方式二:不同环境在不同配置文件
创建多个配置文件
application.yml      #主配置文件
application-dev.yml  #开发环境的配置
application-prod.yml #生产环境的配置
application-test.yml #测试环境的配置
applicaiton.yml中指定配置;在application.yml中选择需要使用的配置文件(当选择的文件和application.yml文件存在相同的配置时,application.yml中的配置会被覆盖掉)
spring:
 profiles:
   active: dev #需要使用的配置文件的后缀
3.3 常用配置
spring:
  servlet:
    multipart:
      max-file-size: 3000000MB  # 指定上传文件允许的最大大小。 默认值为1MB
      max-request-size: 3000000MB   # 指定multipart/form-data请求允许的最大大小。 默认值为10MB。
4".properties"文件
数据结构类型: key=value 特别注意不要有空格;字符集编码: 程序读取文件时,默认采用ISO-8859-1编码,写入中文,读取的时候一定会中文乱码。
server.port=8083
person.name=xiaoming
person.age=55
person,.address=wudalu
4.1 读取
方式一:@Value注解直接注入配置信息
// 获取PropertySource配置文件的信息
// @PropertySource("xxxxxx/xxx.properties")   将指定路径的配置文件交给Spring容器管理
@RestController
// value属性指定路径     //  encoding属性指定配置文件编码格式
@PropertySource(value="classpath:/mysql.properties",encoding = "UTF-8")
public class JDBCController {

    @Value("${mysql.username}")
    private String username;

    @Value("${mysql.password}")
    private String password;

    @Value("${mysql.password:8080}")//可以直接给默认值
    private String password;
}方式二:使用@ConfigurationProperties注解读取
import org.springframework.beans.factory.annotation.Value;
import org.springframework.boot.context.properties.ConfigurationProperties;
import org.springframework.stereotype.Component;

@Component
@ConfigurationProperties(prefix = "person")
public class Person {

	private String name;

	private int age;

	private String address;
	public String getName() {
		return name;
	}
	public void setName(String name) {
		this.name = name;
	}
	public int getAge() {
		return age;
	}
	public void setAge(int age) {
		this.age = age;
	}
	public String getAddress() {
		return address;
	}
	public void setAddress(String address) {
		this.address = address;
	}
	public Person(String name, int age, String address) {
		super();
		this.name = name;
		this.age = age;
		this.address = address;
	}
	public Person() {
		super();
		// TODO Auto-generated constructor stub
	}
	@Override
	public String toString() {
		return "Person [name=" + name + ", age=" + age + ", address=" + address + "]";
	}

}
@Component 表示将该类标识为Bean
@ConfigurationProperties(prefix = "person")用于绑定属性,其中prefix表示所绑定的属性的前缀。
将这个前缀下面的对应属性值,直接注入至实体类的属性值中
如果未写前缀,在配置文件中出现多个name时,他可能就无法识别是person下面的name值,所以需要有这个前缀进行区分
这边通过@ConfigurationProperties(prefix = "person")注释完之后,就不需要像@value一样一个个配置过去,他会自动将配置文件中的对应属性值直接一一对应上去
使用时,先使用@Autowired自动装载Person,然后再进行取值,示例如下:
import org.springframework.beans.factory.annotation.Autowired;
import org.springframework.web.bind.annotation.RequestMapping;
import org.springframework.web.bind.annotation.RestController;

import com.cmj.springBootTEST.CmjConfig;
import com.cmj.springBootTEST.Person;

@RestController
@RequestMapping("hello2")
public class OneController {

	 @Autowired
	 private Person person;

	 @GetMapping("/get")
     public String hello() {
		System.out.println(person);
     }
}
5.使用外部配置文件
5.1 方式一:手动指定配置文件位置
// 相对路径绝对路径都可
java -jar myspring.jar --spring.config.location=D:\JavaSite\config\application.properties
5.2 方式二:指定目录下
引用的优先级和下面的顺序是一样的。
1、当前目录下的 /config 子目录

2、与jar包目录同级
3、classpath下的config目录
4、classpath中
- classpath就是指编译或者打包后的classes目录
七、一个接口多个实现类注入
1.相关注解介绍
@AutoWired、@Qualifier、@Resource这3个注解都是基于注解方式进行自动装配,在容器里面将查找到的bean返回
| 注解 | 说明 |
| @AutoWired | spring提供。 @Autowired默认按类型装配,如果发现找到多个bean,则按照name方式比对 |
| @Qualifier | /ˈkwɒ lɪ faɪ ə(r)/ 快 spring提供。 配合@AutoWired使用,当出现两个及以上bean时,根据Bean的名字找Bean |
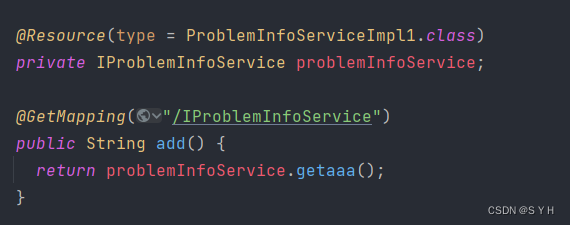
| @Resource | jdk的注解。 1、指定name属性,也不指定type属性,则自动按属性名字查找Bean名字。如果没有找到符合的bean,则根据类型查找 @Resource 2、只是指定了@Resource注解的name,则按name后的名字去bean元素里查找有与之相等的name属性的bean 3、只指定@Resource注解的type属性,则从上下文中找到类型匹配的唯一bean进行装配,找不到或者找到多个,都会抛出异常。type使用实现类的类型 4、既指定了@Resource的name属性又指定了type,则从Spring上下文中找到唯一匹配的bean进行装配,找不到则抛出异常 |
这里补充一下@Server的作用:
标记当前类是一个service类,加上该注解会将当前类自动注入到spring容器中。默认是单例。默认bean的名字是当前类的小驼峰格式
比如下面这个类:
@Service("courseDAO")
public class CourseDAOImpl implements CourseDAO{
    ......
}
其作用就相当于applicationContext.xml文件里面的:
既指定了bean的名字,也记录了bean的类型
    <bean id="courseDAO"
         class="com.hzhi.course.dao.CourseDAOImpl">
         ......
    </bean>
@Resource的type属性使用示例


2.@Autowired和@Resource区别
2.1 来源不同
@Autowired 和 @Resource 来自不同的“父类”,其中 @Autowired 是 Spring 定义的注解,而 @Resource 是 Java 定义的注解,它来自于 JSR-250(Java 250 规范提案)。
2.2 依赖查找顺序不同
@Autowired 是先根据类型(byType)查找,如果存在多个 Bean 再根据名称(byName)进行查找
@Resource 是先根据名称查找,如果(根据名称)查找不到,再根据类型进行查找
2.3 支持的参数不同
二者支持的参数以及参数的个数完全不同,其中 @Autowired 只支持设置一个 required 的参数。而 @Resource 支持 7 个参数,比如给 @Resource 注解设置 name 和 type 参数,实现代码如下:
@Resource(name = "userinfo", type = UserInfo.class)
private UserInfo user;
3.依赖注入示例
问题引入


- 根据上面错误信息再结合代码,可以看出问题就是:
同一个接口 PetInterface 有两个实现类(DogPlays 和 CatPlays),而我们的Spring并不知道应当引用哪个实现类
需要注意的是:
(1)如果实现类里,注解 @Service 没有指定实现类的 bean 名称,则注入的时候默认用该实现类首字母小写的bean的名字
(2)如果用注解 @Service(“dog”) 指定了实现类的 bean 名称,则用注解 @Qualifier(“dog”) 注入的时候,注意名称保持一致
解决方式一:@AutoWired + @Qualifier
/ˈkwɒlɪfaɪə(r)/ kuao 雷 fai 额
@Autowired为Spring提供的注解,需要导入包org.springframework.beans.factory.annotation.Autowired
@Autowired 注释,它可以对类成员变量、方法及构造函数进行标注,让 spring 完成 bean 自动装配的工作。
@Autowired 默认是按照类型去匹配注入,配合 @Qualifier 按照指定的 name 名称去装配 bean
	@Qualifier("dogPlays" )
    @Autowired
    private PetInterface petInterface;

    @Qualifier("catPlays" )
    @Autowired
    private PetInterface petInterface2;
解决方式二:@Resource
用注解 @Resource(name = " ") 或 @Resource(type = ) 替换 @Autowired 、 @Qualifier 这两个组合注解
(1)@Resource后面没有任何内容(既没有指定name,又没有指定type),默认通过 name 属性去匹配 bean 进行装配,如果找不到再按 type 去匹配
(2)如果同时指定了name和type,则从Spring上下文中找到唯一匹配的bean进行装配,找不到则抛出异常。
(3)如果指定了name,则从上下文中查找名称(id)匹配的bean进行装配,不到则抛出异找常。
(4)如果只指定@Resource注解的type属性,则从上下文中找到类似匹配的唯一bean进行装配,找不到或是找到多个,都会抛出异常。
 	@Resource(name = "dogPlays")
    private PetInterface petInterface;

    @Resource(name = "catPlays")
    private PetInterface petInterface2;

    // 或者

    @Resource(name = "dogPlays")
    private PetInterface petInterface;

    @Resource(type = CatPlays.class)
    private PetInterface petInterface2;
八、srpingboot配置多数据源
1.springboot + mybatis使用分包方式整合
1.1 yml配置文件
特别需要注意:
boot1.0 配置数据源的过程中主要是写成:spring.datasource.url 和spring.datasource.driverClassName。而在2.0升级之后需要变更成:spring.datasource.jdbc-url和spring.datasource.driver-class-name
否则会报错找不到这些东西
#整合1.数据源
spring:
  datasource:
    # 数据源1
    cun-chu-guo-cheng:
      driver-class-name: com.mysql.cj.jdbc.Driver
      jdbc-url: jdbc:mysql://41.18.127.27:3306/cun_chu_guo_cheng?serverTimezone=GMT%2B8&useUnicode=true&characterEncoding=utf8&autoReconnect=true&allowMultiQueries=true
      username: root
      password: root
    # 数据源2
    user-infos:
      driver-class-name: com.mysql.cj.jdbc.Driver
      jdbc-url: jdbc:mysql://41.18.127.27:3306/redis?serverTimezone=GMT%2B8&useUnicode=true&characterEncoding=utf8&autoReconnect=true&allowMultiQueries=true
      username: root
      password: root
1.2 项目结构

1.3 连接数据源配置文件
sql日志就不能配置在yml文件中了,需要在代码中设置,其他配置同样如此,比如驼峰映射
数据源1配置
import org.apache.ibatis.logging.stdout.StdOutImpl;
import org.apache.ibatis.session.SqlSessionFactory;
import org.mybatis.spring.SqlSessionFactoryBean;
import org.mybatis.spring.SqlSessionTemplate;
import org.mybatis.spring.annotation.MapperScan;
import org.springframework.beans.factory.annotation.Qualifier;
import org.springframework.boot.context.properties.ConfigurationProperties;
import org.springframework.boot.jdbc.DataSourceBuilder;
import org.springframework.context.annotation.Bean;
import org.springframework.context.annotation.Configuration;
import org.springframework.context.annotation.Primary;
import org.springframework.core.io.support.PathMatchingResourcePatternResolver;
import org.springframework.jdbc.datasource.DataSourceTransactionManager;
import javax.sql.DataSource;
/**
* @Description cun-chu-guo-cheng数据源配置
* @ClassName DataSourceCunChuGuoChengConfig
* @Author syh
* @Date 2023/4/21 15:36
*/
@Configuration
@MapperScan(basePackages = "com.syh.demo.mapper", sqlSessionFactoryRef = "cunChuGuoChengSqlSessionFactorySecondary")
public class DataSourceCunChuGuoChengConfig {
/**
* 创建数据源
* @return DataSource
*/
// @Primary: 用于指定bean的注入优先级。被@Primary修饰的bean对象优先注入
@Primary
@Bean("cunChuGuoChengDataSource")
@ConfigurationProperties(prefix = "spring.datasource.cun-chu-guo-cheng")
public DataSource cunChuGuoChengDataSource() {
return DataSourceBuilder.create().build();
}
/**
* 创建工厂
*@param dataSource
*@throws Exception
*@return SqlSessionFactory
*/
@Primary
@Bean(name = "cunChuGuoChengSqlSessionFactorySecondary")
public SqlSessionFactory sqlSessionFactorySecondary(@Qualifier("cunChuGuoChengDataSource") DataSource dataSource) throws Exception {
SqlSessionFactoryBean bean = new SqlSessionFactoryBean();
bean.setDataSource(dataSource);
bean.setMapperLocations(new PathMatchingResourcePatternResolver().getResources("classpath:mapper/*.xml"));
//此处创建一个Configuration 注意包不要引错了
org.apache.ibatis.session.Configuration configuration=new org.apache.ibatis.session.Configuration();
//配置日志实现
configuration.setLogImpl(StdOutImpl.class);
//此处可以添加其他mybatis配置 例如转驼峰命名
//configuration.setMapUnderscoreToCamelCase(true);
//bena工厂装载上面配置的Configuration
bean.setConfiguration(configuration);
return bean.getObject();
}
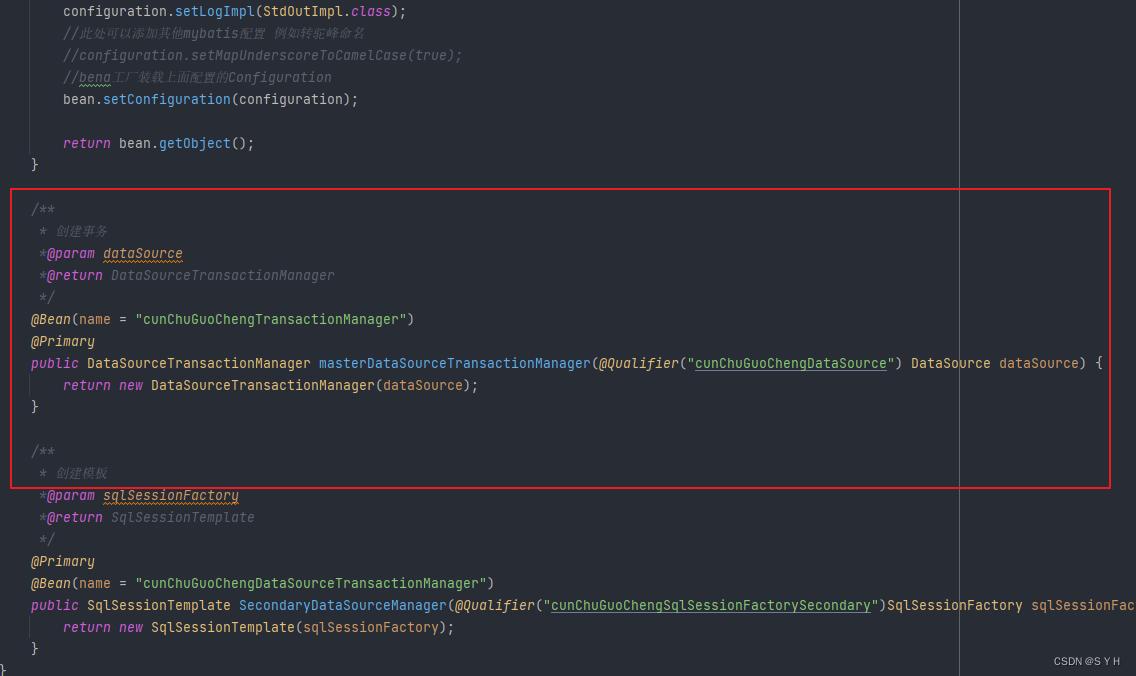
/**
* 创建事务
*@param dataSource
*@return DataSourceTransactionManager
*/
@Bean(name = "cunChuGuoChengTransactionManager")
@Primary
public DataSourceTransactionManager masterDataSourceTransactionManager(@Qualifier("cunChuGuoChengDataSource") DataSource dataSource) {
return new DataSourceTransactionManager(dataSource);
}
/**
* 创建模板
*@param sqlSessionFactory
*@return SqlSessionTemplate
*/
@Primary
@Bean(name = "cunChuGuoChengDataSourceTransactionManager")
public SqlSessionTemplate SecondaryDataSourceManager(@Qualifier("cunChuGuoChengSqlSessionFactorySecondary")SqlSessionFactory sqlSessionFactory) {
return new SqlSessionTemplate(sqlSessionFactory);
}
}
数据源二配置
import org.apache.ibatis.logging.stdout.StdOutImpl;
import org.apache.ibatis.session.SqlSessionFactory;
import org.mybatis.spring.SqlSessionFactoryBean;
import org.mybatis.spring.SqlSessionTemplate;
import org.mybatis.spring.annotation.MapperScan;
import org.springframework.beans.factory.annotation.Qualifier;
import org.springframework.boot.context.properties.ConfigurationProperties;
import org.springframework.boot.jdbc.DataSourceBuilder;
import org.springframework.context.annotation.Bean;
import org.springframework.context.annotation.Configuration;
import org.springframework.core.io.support.PathMatchingResourcePatternResolver;
import org.springframework.jdbc.datasource.DataSourceTransactionManager;

import javax.sql.DataSource;

/**
 * @Description  user-infos数据源配置
 * @ClassName DataSourceRedisConfig
 * @Author syh
 * @Date 2023/4/21 15:41
 */
@Configuration
@MapperScan(basePackages = "com.syh.demo.mapper1", sqlSessionFactoryRef = "userInfosSqlSessionFactorySecondary")
public class DataSourceUserInfosConfig {

    /**
     * 创建数据源
     * @return DataSource
     * @Primary: 用于指定bean的注入优先级。被@Primary修饰的bean对象优先注入
     */
    @Bean("userInfosDataSource")
    @ConfigurationProperties(prefix = "spring.datasource.user-infos")
    public DataSource userInfosDataSource() {
        return DataSourceBuilder.create().build();
    }

    /**
     * 创建工厂
     *@param dataSource
     *@throws Exception
     *@return SqlSessionFactory
     */
    @Bean(name = "userInfosSqlSessionFactorySecondary")
    public SqlSessionFactory sqlSessionFactorySecondary(@Qualifier("userInfosDataSource") DataSource dataSource) throws Exception {
        SqlSessionFactoryBean bean = new SqlSessionFactoryBean();
        bean.setDataSource(dataSource);
        bean.setMapperLocations(new PathMatchingResourcePatternResolver().getResources("classpath:mapper1/*.xml"));

        //此处创建一个Configuration 注意包不要引错了
        org.apache.ibatis.session.Configuration configuration=new org.apache.ibatis.session.Configuration();
        //配置日志实现
        configuration.setLogImpl(StdOutImpl.class);
        //bena工厂装载上面配置的Configuration
        bean.setConfiguration(configuration);

        return bean.getObject();
    }

    /**
     * 创建事务
     *@param dataSource
     *@return DataSourceTransactionManager
     */
    @Bean(name = "userInfosTransactionManager")
    public DataSourceTransactionManager masterDataSourceTransactionManager(@Qualifier("userInfosDataSource") DataSource dataSource) {
        return new DataSourceTransactionManager(dataSource);
    }

    /**
     * 创建模板
     *@param sqlSessionFactory
     *@return SqlSessionTemplate
     */
    @Bean(name = "userInfosDataSourceTransactionManager")
    public SqlSessionTemplate SecondaryDataSourceManager(@Qualifier("userInfosSqlSessionFactorySecondary") SqlSessionFactory sqlSessionFactory) {
        return new SqlSessionTemplate(sqlSessionFactory);
    }
}
1.4 多数据源@Transactional注解进行事务管理
为每个数据源添加事务

进行测试

九、nohup运行jar包
no hang pu
第一步:查询nohup是否安装
which nohup
第二步:下载nohup
yum install coreutils第三步:查看下载的nohup位置
which nohup
![]()
第四步:配置nohup路径,全局使用
vi ~/.bash_profile 在PATH= $PATH: $HOME/bin后面添加:/usr/bin

第五步:是配置的nohup立即生效
source ~/.bash_profile
第六步:测试
nohup --version
第七步:使用示例
日志输出

nohup java -jar HsMenQianSiBao-0.0.1.jar >HsMenQianSiBao.log 2>&1 a

不输出日志

nohup java -jar HsMenQianSiBao-0.0.1-SNAPSHOT.jar &>/dev/null &
十、SpringBoot创建定时任务
1. 首先在启动类加 @EnableScheduling 注解/ˈʃedjuːlɪŋ/,开启定时任务
@EnableScheduling
public class HSSmartCityApplication {
public static void main(String[] args) {
SpringApplication.run(HSSmartCityApplication.class, args);
}
}2.在需要开启定会任务的类和方法上添加注解
import org.springframework.scheduling.annotation.Scheduled;
//服务实现类
@Service
public class 类名 extends ServiceImpl<泛型> implements XXXService {
	//定时任务,每15分钟执行一次  /ˈʃedjuːld/
    @Scheduled(cron = "0 0/15 * * * ?")
    public void timingTask(){
       // 定时执行的任务具体内容
    }
}
3. @Scheduled 常用时间
// 每小时0分0秒执行一次
@Scheduled(cron = "0 0 * * * ?")

// 每两个小时执行一次
@Scheduled(cron = "0 0 */2 * * ?")

// 每天凌晨两点执行
@Scheduled(cron = "0 0 2 * * ?")
十一、springboot异步
异步easyPoi实现导入功能模板
1、启动类加注解
@EnableAsync
public class Starter {
    public static void main(String[] args) throws Exception {
        ConfigurableApplicationContext configurableApplicationContext = SpringApplication.run(Starter.class);
    }

}
2、controller调用异步方法
注意:不能向异步传入MultipartFile 类,步执行的时候,主线程结束,临时文件就会被清空了,就会报错,转换成流的形式传入
public ResponseJson<String> exportWellLid(MultipartFile multipartFile) {
if (multipartFile == null) {
return ResponseBuilder.error("30001", "导入数据为空!");
}
// 数据的获取需要放到异步之外
byte [] byteArr= new byte[0];
try {
byteArr = multipartFile.getBytes();
} catch (IOException e) {
e.printStackTrace();
}
InputStream inputStream = new ByteArrayInputStream(byteArr);
// 开启异步操作
lidInfoService.exportWellLid(inputStream);
return ResponseBuilder.success(null,null,"模板后台导入中!");
}3、异步方法加注解
@Override
@Async
public void exportWellLid(InputStream inputStream) {
ImportParams params = new ImportParams();
// 设置大标题占几行
params.setTitleRows(1);
// 设置小标题占几行
params.setHeadRows(1);
List<LidInfoSelectPageEntity> excelList = null;
try {
// 参数一:导入的文件流 参数二:导入的类型 参数三:导入的配置对象
excelList = ExcelImportUtil.importExcel(inputStream, LidInfoSelectPageEntity.class, params);
} catch (Exception e) {
e.printStackTrace();
}
// 数据入库
for (int i = 0; i < excelList.size(); i++) {
LidInfoSelectPageEntity lidInfoSelectPageEntity = new LidInfoSelectPageEntity();
// BeanUtils.copyProperties(excelList.get(i), lidInfoSelectPageEntity);
// System.out.println(lidInfoSelectPageEntity.getLidNum());
System.out.println(i + "" + excelList.get(i));
}
}十二、全局异常处理
定义全局异常处理的类
@ControllerAdvice
public class GlobalExceptionHandler {

    /**
     * 全局异常捕捉处理
     * @param ex
     * @return
     */
    @ResponseBody
    @ExceptionHandler(value = Exception.class)
    public Result javaExceptionHandler(Exception ex){
        return ResultUtil.error(ResultEnum.SYS_EXCEPTION.getCode(),ex.getMessage());
    }


    /**
     * 拦截捕捉自定义异常 MyException.class
     * @param ex
     * @return
     */
    @ResponseBody
    @ExceptionHandler(value = UnauthorizedException.class)
    public Result UnauthorizedException(UnauthorizedException ex) {
        return ResultUtil.error(ResultEnum.UNAUTHOR_ERROR);
    }
}
十三、springboot中日期格式化问题
1、jackson的@JsonFormat注解
springboot默认使用jackson作为默认的json解析器
当前端传来的时间格式为字符串,后端使用date。使用这个注解自动转换
当后端将date格式返回给前端,使用注解,可以返回前端时间格式化字符串
// pattern:你想要其转换的日期格式
// timezone:是时间设置为东八区,避免时间在转换中差8个钟
// 评优开始时间
@JsonFormat(pattern="yyyy-MM-dd",timezone="GMT+8")
private Date startTime;
2、springboot配置全局日期格式化
在配置文件中添加如下配置
spring:
  jackson:
    # 全局json时间格式化  date 转 String
    date-format: yyyy-MM-dd HH:mm:ss
    time-zone: GMT+8
  mvc:
    # 表单接收date   String 转 date
    format:
      date: yyyy-MM-dd HH:mm:ss
十四、日志配置
1、日志等级
- trace:最低等级
- debug:调试用,通常用于跟踪程序进展
- info: 记录用,通常用于记录程序行为
- warn:警告
- error:错误
- fatal:灾难性错误,最高等级
2、控制台日志输出
# 日志配置
logging:
  level:
    com.mzz.example: warn  # 配置example包下的日志级别为waen
3、日志打印
上述提到过 lombok 可以实现,这里介绍其他的
import org.slf4j.Logger;
import org.slf4j.LoggerFactory;
import org.springframework.beans.factory.annotation.Autowired;

public class MakeLoggerDemo {
    private static Logger logger = LoggerFactory.getLogger(MakeLoggerDemo.class);

    public static void main(String[] args) {
        logger.error("error");
        logger.info("info");
        logger.debug("debug");
    }
}
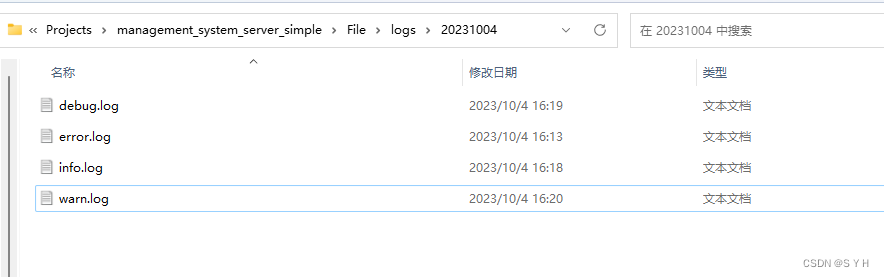
4、日志持久化
默认情况下,SpringBoot内部使用logback作为系统日志实现的框架,将日志输出到控制台,不会写到日志文。
4.1 使用logback.xml自定义配置
如果在application.properties或application.yml配置,这样只能配置简单的场景,保存路径、日志格式等。复杂的场景(区分 info 和 error 的日志、每天产生一个日志文件等)满足不了
优势:
- 区分 debug、info、error 等类型的日志,并分别输出到不同的日志文件。
- 对日志文件进行维护,如每天产生一个日志文件,并设置日志文件的大小和保留天数等。

<?xml version="1.0" encoding="UTF-8"?>
<configuration>
    <include resource="org/springframework/boot/logging/logback/base.xml"/>
<!--    <include resource="org/springframework/boot/logging/logback/defaults.xml"/>-->
    <logger name="org.springframework.web" level="debug"/>

    <!-- 定义日志文件 输入位置 -->
    <property name="logDir" value="./logs" />
<!--    <property name="logDir" value="D:/logs" />-->
    <!-- 日志最大的历史 30天 -->
    <property name="maxHistory" value="30"/>

    <!-- 控制台输出日志 -->
    <appender name="STDOUT" class="ch.qos.logback.core.ConsoleAppender">
        <encoder>
            <pattern>%d{yyyy-MM-dd HH:mm:ss.SSS} [%thread] %-5level %logger -%msg%n</pattern>
            <charset class="java.nio.charset.Charset">UTF-8</charset>
<!--            <pattern>${CONSOLE_LOG_PATTERN}</pattern>-->
        </encoder>
    </appender>

    <!-- ERROR级别日志 -->
    <appender name="ERROR" class="ch.qos.logback.core.rolling.RollingFileAppender">
        <filter class="ch.qos.logback.classic.filter.LevelFilter">
            <level>ERROR</level>
            <onMatch>ACCEPT</onMatch>
            <onMismatch>DENY</onMismatch>
        </filter>
        <rollingPolicy class="ch.qos.logback.core.rolling.TimeBasedRollingPolicy">
            <fileNamePattern>${logDir}\%d{yyyy-MM-dd}\error.log</fileNamePattern>
            <maxHistory>${maxHistory}</maxHistory>
        </rollingPolicy>
        <encoder>
            <pattern>%d{yyyy-MM-dd HH:mm:ss.SSS} [%thread] %-5level %logger - %msg%n</pattern>
            <charset class="java.nio.charset.Charset">UTF-8</charset>
<!--            <pattern>${CONSOLE_LOG_PATTERN}</pattern>-->
        </encoder>
        <append>false</append>
        <prudent>false</prudent>
    </appender>

    <!-- WARN级别日志 -->
    <appender name="WARN" class="ch.qos.logback.core.rolling.RollingFileAppender">
        <filter class="ch.qos.logback.classic.filter.LevelFilter">
            <level>WARN</level>
            <onMatch>ACCEPT</onMatch>
            <onMismatch>DENY</onMismatch>
        </filter>
        <rollingPolicy class="ch.qos.logback.core.rolling.TimeBasedRollingPolicy">
            <fileNamePattern>${logDir}\%d{yyyy-MM-dd}\warn.log</fileNamePattern>
            <maxHistory>${maxHistory}</maxHistory>
        </rollingPolicy>
        <encoder>
            <pattern>%d{yyyy-MM-dd HH:mm:ss.SSS} [%thread] %-5level %logger - %msg%n</pattern>
            <charset class="java.nio.charset.Charset">UTF-8</charset>
<!--            <pattern>${CONSOLE_LOG_PATTERN}</pattern>-->
        </encoder>
        <append>false</append>
        <prudent>false</prudent>
    </appender>

    <!-- INFO级别日志 -->
    <appender name="INFO" class="ch.qos.logback.core.rolling.RollingFileAppender">
        <filter class="ch.qos.logback.classic.filter.LevelFilter">
            <level>INFO</level>
            <onMatch>ACCEPT</onMatch>
            <onMismatch>DENY</onMismatch>
        </filter>
        <rollingPolicy class="ch.qos.logback.core.rolling.TimeBasedRollingPolicy">
            <fileNamePattern>${logDir}\%d{yyyy-MM-dd}\info.log</fileNamePattern>
            <maxHistory>${maxHistory}</maxHistory>
        </rollingPolicy>
        <encoder>
            <pattern>%d{yyyy-MM-dd HH:mm:ss.SSS} [%thread] %-5level %logger - %msg%n</pattern>
            <charset class="java.nio.charset.Charset">UTF-8</charset>
<!--            <pattern>${CONSOLE_LOG_PATTERN}</pattern>-->
        </encoder>
        <append>false</append>
        <prudent>false</prudent>
    </appender>

    <!-- DEBUG级别日志 -->
    <appender name="DEBUG" class="ch.qos.logback.core.rolling.RollingFileAppender">
        <filter class="ch.qos.logback.classic.filter.LevelFilter">
            <level>DEBUG</level>
            <onMatch>ACCEPT</onMatch>
            <onMismatch>DENY</onMismatch>
        </filter>
        <rollingPolicy class="ch.qos.logback.core.rolling.TimeBasedRollingPolicy">
            <fileNamePattern>${logDir}\%d{yyyy-MM-dd}\debug.log</fileNamePattern>
            <maxHistory>${maxHistory}</maxHistory>
        </rollingPolicy>
        <encoder>
            <pattern>%d{yyyy-MM-dd HH:mm:ss.SSS} [%thread] %-5level %logger - %msg%n</pattern>
            <charset class="java.nio.charset.Charset">UTF-8</charset>
<!--            <pattern>${CONSOLE_LOG_PATTERN}</pattern>-->
        </encoder>
        <append>false</append>
        <prudent>false</prudent>
    </appender>

    <!-- root级别  DEBUG -->
    <root level="INFO">
        <!-- 控制台输出 -->
        <appender-ref ref="STDOUT" />
        <!-- 文件输出 -->
        <appender-ref ref="ERROR" />
        <appender-ref ref="INFO" />
        <appender-ref ref="WARN" />
        <appender-ref ref="DEBUG" />
    </root>
</configuration>
十五、SpringBoot核心注解
1. @SpringBootApplication
是SpringBoot的最核心的注解,在SpringBoot的主类上,标识是SpringBoot应用,用来开启SpringBoot的各项能力。
由@SpringBootConfiguration @EnableAutoConfiguration @ComponentScan 三个注解组成。这三个注解是一起使用,所以SpringBoot提供了一个统一的注解@SpringBootApplication
2. @EnableAutoConfiguration
/kənˌfɪɡəˈreɪʃ(ə)n/
允许SpringBoot自动装配,开启改注解,SpringBoot能根据当前类路径下的包或者类来配置Spring Bean。@EnableAutoConfiguration实现的关键在于引入了AutoConfigurationImportantSelector,其核心逻辑为selectImports方法,从配置文件MATA-INF/spring.factories加载所有可能用到的自动装配类;exclude excludeName 属性携带的类排除;过滤,将满足条件@Conditional的自动配置类返回。
3. @SpringBootConfiguration
/kənˌfɪɡəˈreɪʃ(ə)n/
改注解就是@Configuration注解的变体,用来修改SpringBoot配置。
4. @ComponentScan
常用的注解@Controller @Service @Repository,有一个共同的注解@Component,@ComponentScan 标注的就会扫描这些注解标注的类到Spring容器中
还有其他
十六、配置oracle11g连接
        <!-- Oracle11g 连接驱动依赖。这里是个坑,官方提供的不能用 -->
        <dependency>
            <groupId>cn.easyproject</groupId>
            <artifactId>ojdbc6</artifactId>
            <version>12.1.0.2.0</version>
        </dependency>
server:
port: 7100
spring:
datasource:
driver-class-name: oracle.jdbc.OracleDriver
url: jdbc:oracle:thin:@127.0.0.1:1521:syh
username: SYH
password: syh末尾:遇到的bug
1、打包时:java: 程序包com.sun.org.slf4j.internal不存在
就是用lombok了,同时使用slf4j和lombok的时候会出现这个问题。原因是slf4j和lombok自带的slf4j冲突了
解决:
//把这俩注释掉
import com.sun.org.slf4j.internal.Logger;
import com.sun.org.slf4j.internal.LoggerFactory;
把这俩加上
import org.slf4j.Logger;
import org.slf4j.LoggerFactory;
2、maven执行 package 命令时报错:Cannot create resource output directory: D:\test****\target\classes
原因:
打包失败,找到这个目录显示“拒绝访问”。也删不掉,这个文件夹在被占用的情况下clean了
解决
第一步:打开资源管理器

第二步:选择性能,再选择打开资源监视器

第三步:管理句柄中搜索 target ,将相关资源关闭掉

3、打包时报错:测试方法存在问题
            <!-- 测试方法存在问题,打包时需要设置跳过测试忽略问题,直接打包(不影响jar包的部署使用)。-->
            <plugin>
                <groupId>org.apache.maven.plugins</groupId>
                <artifactId>maven-surefire-plugin</artifactId>
                <configuration>
                    <testFailureIgnore>true</testFailureIgnore>
                </configuration>
            </plugin>


 2312
2312


 被折叠的 条评论
为什么被折叠?
被折叠的 条评论
为什么被折叠?
 到【灌水乐园】发言


