


文章目录
- 1. Java 服务端demo环境
- 2. 在pom文件引入第三包封装的netty框架maven坐标
- 3. 创建服务端,以接口模式调用,方便外部调用
- 4. 启动服务,出现以下信息表示启动成功,暴露端口默认9999
- 5. 创建隧道映射内网端口
- 6. 查看状态->在线隧道,复制所创建隧道的公网地址加端口号
- 7. 以基于go的socket客户端为例,通过公网连接java socket服务端
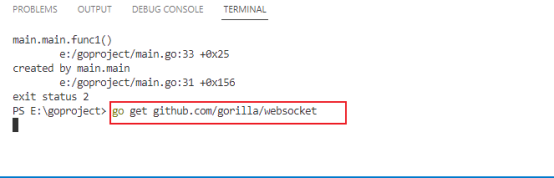
- 8. 通过git下载websocket框架
- 9. 创建客户端, 注意:Host值为上面复制的隧道公网地址!!
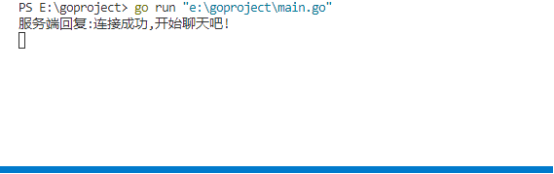
- 10. 接着启动服务,与服务端连接,出现服务端返回的字样表示连接成功
- 11. 客户端在控制台输入信息,回车
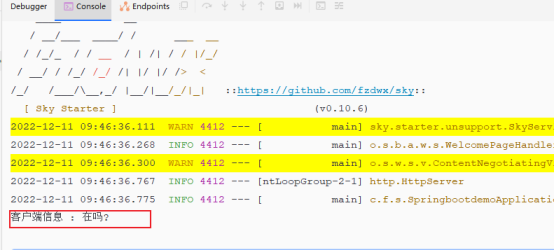
- 12. 服务端出现客户端发送的信息
- 13. 服务端控制台输入消息,回车
- 14. 客户端收到服务端回复的消息,连接成功
1. Java 服务端demo环境
- jdk1.8
- 框架:springboot+maven
- 工具IDEA
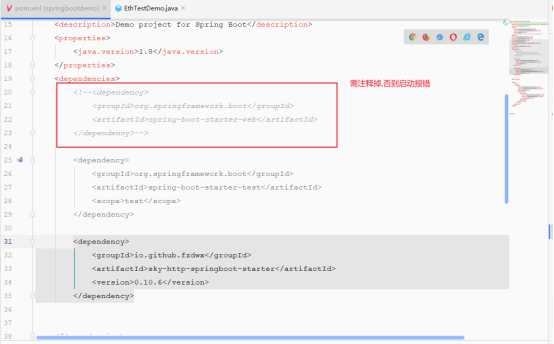
2. 在pom文件引入第三包封装的netty框架maven坐标
<dependency>
   <groupId>io.github.fzdwx</groupId>
   <artifactId>sky-http-springboot-starter</artifactId>
   <version>0.10.6</version>
</dependency>
注意:pom文件里需注释掉springbootweb启动器,web启动器默认是tomcat服务启动,会和netty服务冲突
3. 创建服务端,以接口模式调用,方便外部调用
@GetMapping("/getConnect")
public void getConnect(HttpServerRequest request){

    request.upgradeToWebSocket(ws -> {

    ws.mountOpen(h->{

           ws.send("连接成功,开始聊天吧!");
       });

     ws.mountText(s -> {

         System.out.println(s);

             //对方回复
             System.out.println("客户端回复: "+s);

             //获取控制台输入的值
             Scanner scanner =new Scanner(System.in);

             String next = scanner.next();

             ws.send(next);

     });

    });

}
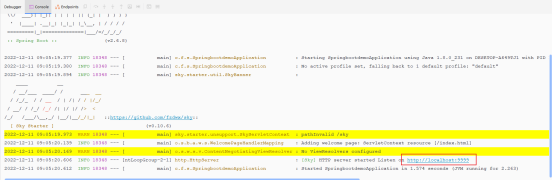
4. 启动服务,出现以下信息表示启动成功,暴露端口默认9999
5. 创建隧道映射内网端口
这里我们用cpolar内网穿透来映射内网端口,它支持http/https/tcp协议,不限制流量,无需公网ip,也不用设置路由器,操作简单。
- cpolar一键安装脚本:(国内用户)
curl -L https://www.cpolar.com/static/downloads/install-release-cpolar.sh | sudo bash
- 或短链接安装方式:(国外用户)
curl -sL https://git.io/cpolar | sudo bash
- 查看cpolar版本信息
cpolar version
如果正常显示,则安装成功
- cpolar进行token认证
cpolar官网:https://www.cpolar.com/
进入cpolar官网,注册一个账号并登录进入后台,点击左侧的验证,可以查看到token码,复制并执行命令进行认证
cpolar authtoken xxxxxxxxxxxxxxxxxx
- 配置cpolar开机自启动
sudo systemctl enable cpolar
- 守护进程方式,启动cpolar
sudo systemctl start cpolar
- 查看cpolar守护进程状态,如正常为active,则为正常启动状态
sudo systemctl status cpolar
cpolar安装成功后,默认会配置两个默认隧道:一个ssh隧道和一个website隧道,可自行删减或者修改。
接着把本地服务通过cpolar暴露到公网,浏览器访问http://127.0.0.1:9200,登录cpolar web ui 界面,创建一个tcp隧道,指向9999端口
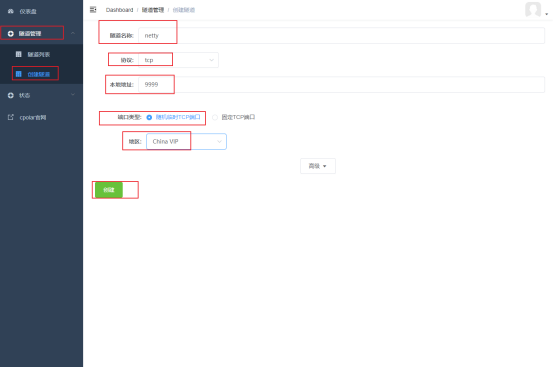
注意:该隧道选择的是临时tcp地址和端口,24小时内会变化,如需固定tcp地址,可升级为专业套餐做tcp地址固定!
6. 查看状态->在线隧道,复制所创建隧道的公网地址加端口号
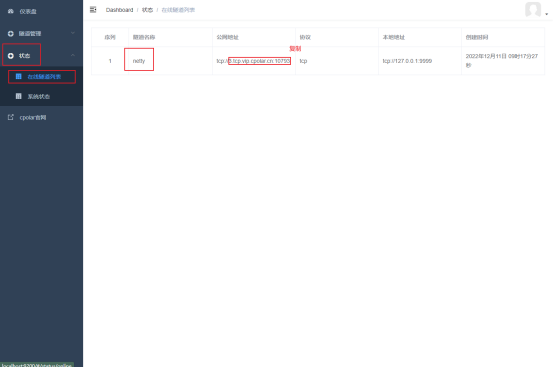
此时,websocket服务端已经从本地localhost暴露至公网,接着我们创建一个客户端测试公网访问socket服务端连接
7. 以基于go的socket客户端为例,通过公网连接java socket服务端
- go版本:1.19
- 工具:vscode
8. 通过git下载websocket框架
go get github.com/gorilla/websocket
9. 创建客户端, 注意:Host值为上面复制的隧道公网地址!!
package main

import (
    "fmt"
    "log"
    "net/url"

    "github.com/gorilla/websocket"
)

func main() {

    // 定义服务端的地址

    u := url.URL{
        Scheme: "ws",
        Host:   "3.tcp.vip.cpolar.cn:10793", //地址为复制隧道的公网地址
        Path:   "/eth/getConnect"} //服务端controller 映射地址

    // 与服务端建立连接
    c, _, err := websocket.DefaultDialer.Dial(u.String(), nil)
    if err != nil {
        log.Fatal("dial:", err)
    }
    defer c.Close()

    // 阻塞主线程
    down := make(chan byte)

    // 启动一个线程,读取从服务端发送过来的数据
    go func() {
        for {
            _, message, _ := c.ReadMessage()
            fmt.Println("服务端回复:" + string(message))
        }
    }()

    //启动一个线程输入消息
    go func() {

        for {
            var input string

            fmt.Scanln(&input)

            c.WriteMessage(websocket.TextMessage, []byte(input))

        }

    }()

    for {
        <-down
    }
}
10. 接着启动服务,与服务端连接,出现服务端返回的字样表示连接成功
11. 客户端在控制台输入信息,回车

12. 服务端出现客户端发送的信息
13. 服务端控制台输入消息,回车
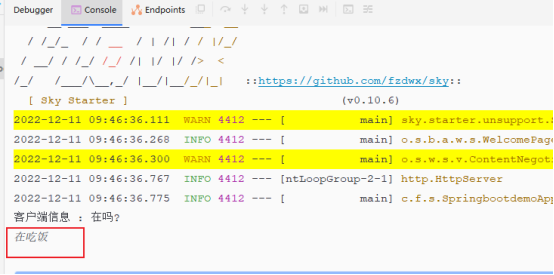
14. 客户端收到服务端回复的消息,连接成功

需要注意,免费使用cpolar所生成的公网地址为随机临时地址,24小时内会发生变化。如果需要长期远程连接,建议为其配置固定的tcp端口地址。即登录cpolar官网后,点击预留,保留一个固定tcp端口地址,然后将其配置到相应的隧道中即可。


 4703
4703


 被折叠的 条评论
为什么被折叠?
被折叠的 条评论
为什么被折叠?
 到【灌水乐园】发言


