


 本文介绍了Transformer模型,核心是self-attention机制,用于葡萄牙语到英语的翻译。模型不受时间/空间限制,能并行计算,适用于长距离依赖的学习。文章通过Python代码展示了数据处理、位置编码、多头注意力等关键步骤,并给出了训练过程。
这里我们将实现一个Transformer模型,将葡萄牙语翻译为英语。Transformer的核心思想是self-attention–通过关注序列不同位置的内容获取句子的表示。
Transformer的一些优点:
不受限于数据的时间/空间关系
可以并行计算
远距离token的相互影响不需要通过很长的时间步或很深的卷积层
可以学习远程依赖
Transformer的缺点:
对于时间序列,输出需要根据整个历史,而不是当前状态和输入,可能造成效率较低
如果想要获取时间空间信息,需要额外的位置编码
from __future__ import absolute_import, division, print_function, unicode_literals
# 安装tfds pip install tfds-nightly==1.0.2.dev201904090105
import tensorflow_datasets as tfds
import tensorflow as tf
import tensorflow.keras.layers as layers
import time
import numpy as np
import matplotlib.pyplot as plt
print(tf.__version__)
2.0.0-alpha0
1.数据输入pipeline
我们将使用到Portugese-English翻译数据集。
该数据集包含大约50000个训练样例,1100个验证示例和2000个测试示例。
examples, metadata = tfds.load('ted_hrlr_translate/pt_to_en', with_info=True,
as_supervised=True)
将数据转化为subwords格式
train_examples, val_examples = examples['train'], examples['validation']
tokenizer_en = tfds.features.text.SubwordTextEncoder.build_from_corpus(
(en.numpy() for pt, en in train_examples), target_vocab_size=2**13)
tokenizer_pt = tfds.features.text.SubwordTextEncoder.build_from_corpus(
(pt.numpy() for pt, en in train_examples), target_vocab_size=2**13)
token转化测试
sample_str = 'hello world, tensorflow 2'
tokenized_str = tokenizer_en.encode(sample_str)
print(tokenized_str)
original_str = tokenizer_en.decode(tokenized_str)
print(original_str)
[3222, 439, 150, 7345, 1378, 2824, 2370, 7881]
hello world, tensorflow 2
添加start、end的token表示
def encode(lang1, lang2):
lang1 = [tokenizer_pt.vocab_size] + tokenizer_pt.encode(
lang1.numpy()) + [tokenizer_pt.vocab_size+1]
lang2 = [tokenizer_en.vocab_size] + tokenizer_en.encode(
lang2.numpy()) + [tokenizer_en.vocab_size+1]
return lang1, lang2
过滤长度超过40的数据
MAX_LENGTH=40
def filter_long_sent(x, y, max_length=MAX_LENGTH):
return tf.logical_and(tf.size(x) <= max_length,
tf.size(y) <= max_length)
将python运算,转换为tensorflow运算节点
def tf_encode(pt, en):
return tf.py_function(encode, [pt, en], [tf.int64, tf.int64])
构造数据集
BUFFER_SIZE = 20000
BATCH_SIZE = 64
# 使用.map()运行相关图操作
train_dataset = train_examples.map(tf_encode)
# 过滤过长的数据
train_dataset = train_dataset.filter(filter_long_sent)
# 使用缓存数据加速读入
train_dataset = train_dataset.cache()
# 打乱并获取批数据
train_dataset = train_dataset.padded_batch(
BATCH_SIZE, padded_shapes=([40], [40])) # 填充为最大长度-90
# 设置预取数据
train_dataset = train_dataset.prefetch(tf.data.experimental.AUTOTUNE)
# 验证集数据
val_dataset = val_examples.map(tf_encode)
val_dataset = val_dataset.filter(filter_long_sent).padded_batch(
BATCH_SIZE, padded_shapes=([40], [40]))
de_batch, en_batch = next(iter(train_dataset))
de_batch, en_batch
(
array([[8214, 116, 84, ..., 0, 0, 0],
[8214, 7, 261, ..., 0, 0, 0],
[8214, 155, 39, ..., 0, 0, 0],
...,
[8214, 639, 590, ..., 0, 0, 0],
[8214, 204, 3441, ..., 0, 0, 0],
[8214, 27, 13, ..., 0, 0, 0]])>,
array([[8087, 83, 145, ..., 0, 0, 0],
[8087, 4670, 1783, ..., 0, 0, 0],
[8087, 169, 56, ..., 0, 0, 0],
...,
[8087, 174, 79, ..., 0, 0, 0],
[8087, 11, 16, ..., 0, 0, 0],
[8087, 4, 12, ..., 0, 0, 0]])>)
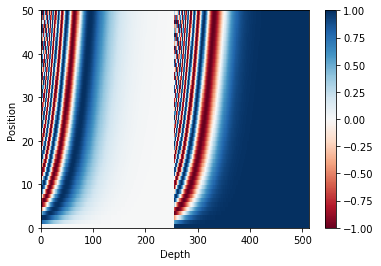
2.位置嵌入
将位置编码矢量添加得到词嵌入,相同位置的词嵌入将会更接近,但并不能直接编码相对位置
基于角度的位置编码方法如下:
PE(pos,2i)=sin(pos/100002i/dmodel)\Large{PE_{(pos, 2i)} = sin(pos / 10000^{2i / d_{model}})} PE(pos,2i)=sin(pos/100002i/dmodel)
PE(pos,2i+1)=cos(pos/100002i/dmodel)\Large{PE_{(pos, 2i+1)} = cos(pos / 10000^{2i / d_{model}})} PE(pos,2i+1)=cos(pos/100002i/dmodel)
def get_angles(pos, i, d_model):
# 这里的i等价与上面公式中的2i和2i+1
angle_rates = 1 / np.power(10000, (2*(i // 2))/ np.float32(d_model))
return pos * angle_rates
def positional_encoding(position, d_model):
angle_rads = get_angles(np.arange(position)[:, np.newaxis],
np.arange(d_model)[np.newaxis,:],
d_model)
# 第2i项使用sin
sines = np.sin(angle_rads[:, 0::2])
# 第2i+1项使用cos
cones = np.cos(angle_rads[:, 1::2])
pos_encoding = np.concatenate([sines, cones], axis=-1)
pos_encoding = pos_encoding[np.newaxis, ...]
return tf.cast(pos_encoding, dtype=tf.float32)
获得位置嵌入编码
pos_encoding = positional_encoding(50, 512)
print(pos_encoding.shape)
plt.pcolormesh(pos_encoding[0], cmap='RdBu')
plt.xlabel('Depth')
plt.xlim((0, 512))
plt.ylabel('Position')
plt.colorbar()
plt.show() # 在这里左右边分别为原来2i 和 2i+1的特征
(1, 50, 512)
3.掩码
为了避免输入中padding的token对句子语义的影响,需要将padding位mark掉,原来为0的padding项的mark输出为1
def create_padding_mark(seq):
# 获取为0的padding项
seq = tf.cast(tf.math.equal(seq, 0), tf.float32)
# 扩充维度以便用于attention矩阵
return seq[:, np.newaxis, np.newaxis, :]
 最低0.47元/天 解锁文章


 8837
8837

 被折叠的 条评论
为什么被折叠?
被折叠的 条评论
为什么被折叠?
 到【灌水乐园】发言


