


文章目录
一.KVM网络管理
分类:
网络:
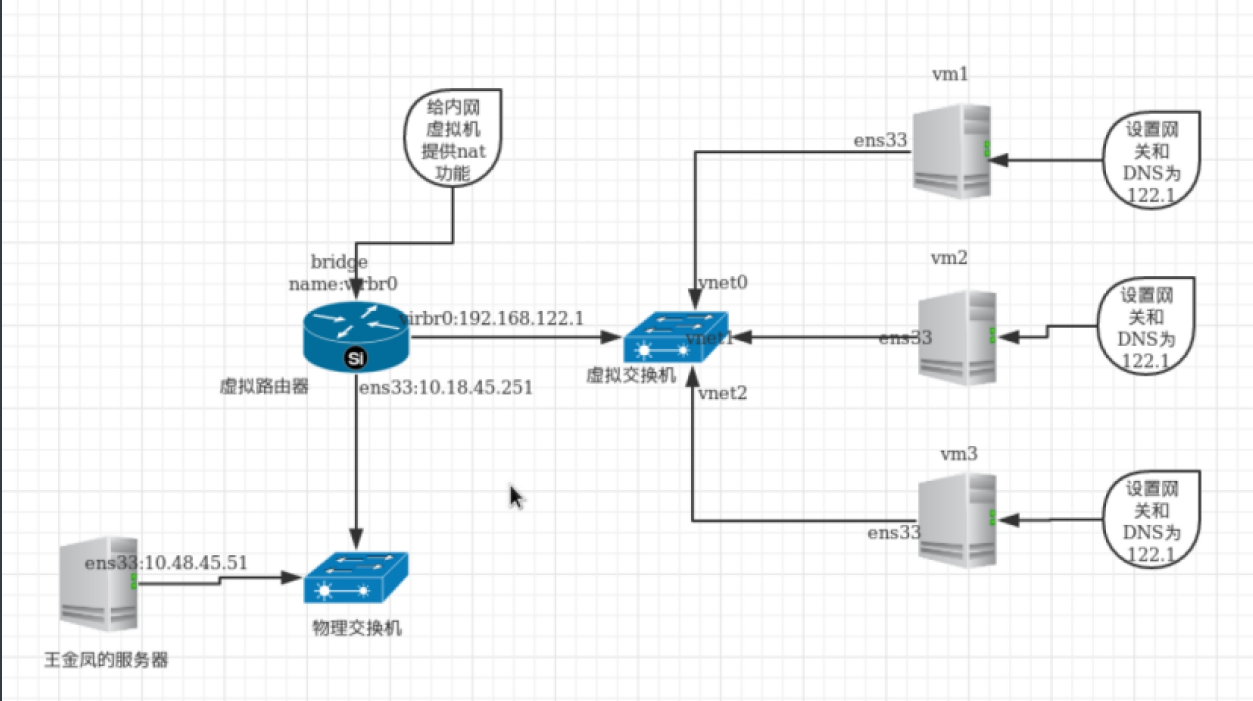
nat
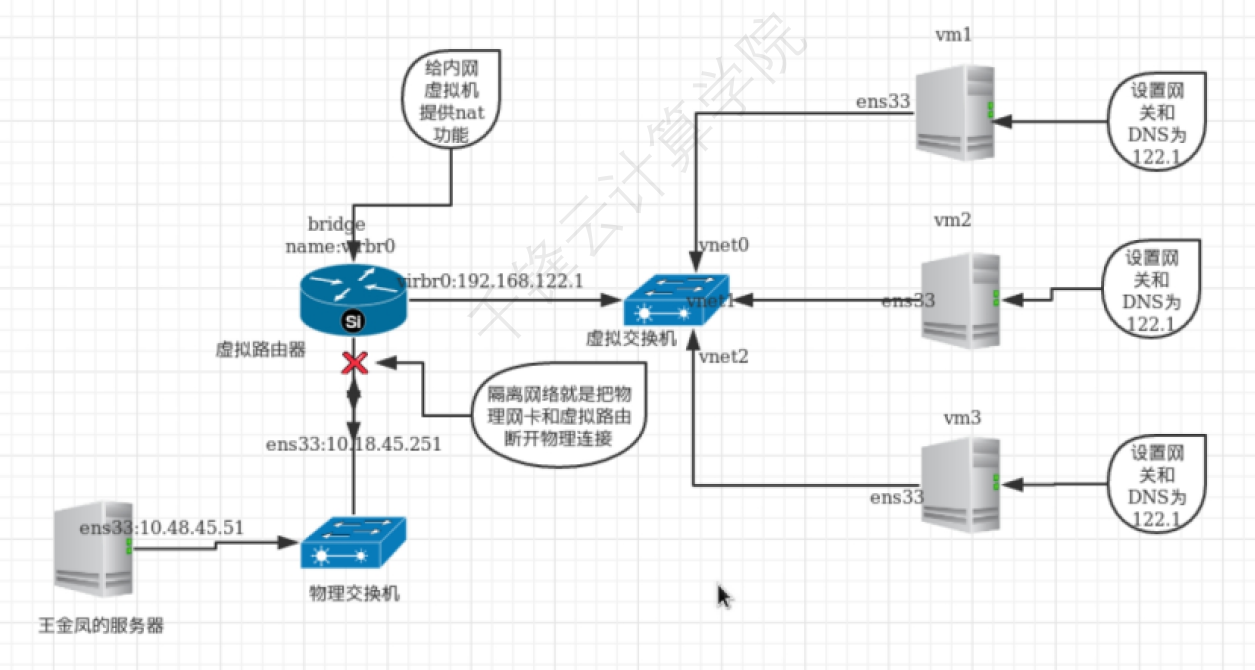
isolated
接口:
bridge
虚拟交换机
linux-bridge(linux自带)
ovs(open-Vswitch)
NAT网络拓扑
隔离网络拓扑
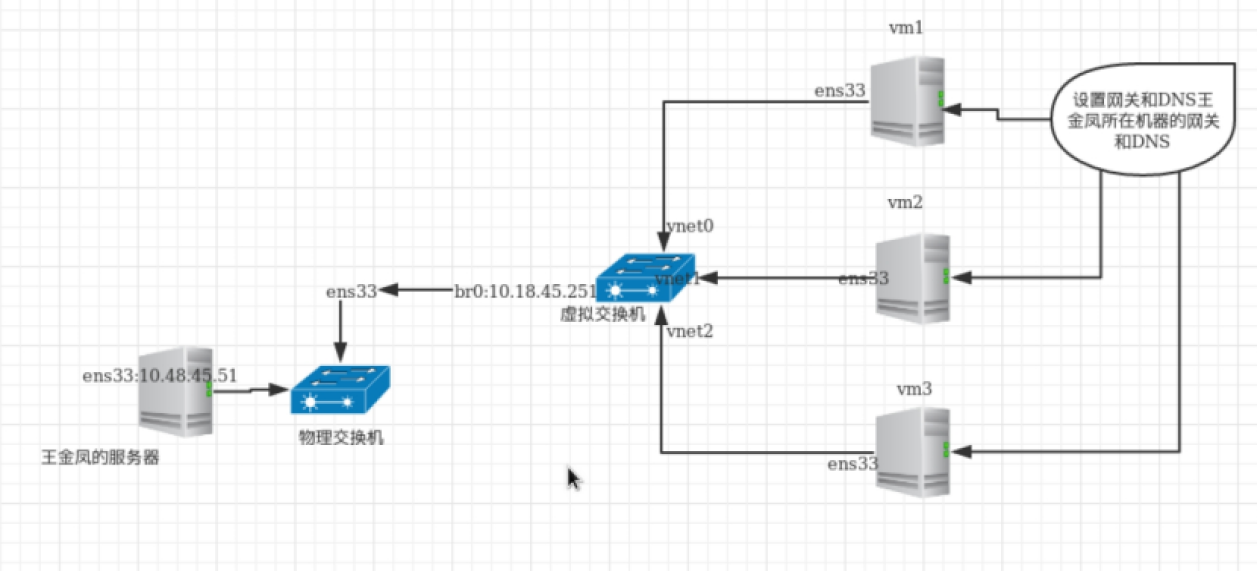
桥接网络拓扑
可以通过查看mac地址是否⼀致来确定是不是⼀根线上的两个接⼝
[root@noviciate ~]# brctl show
bridge name bridge id STP enabled interfaces
virbr0 8000.5254003c2ba7 yes virbr0-nic
 vnet2
 vnet3
从交换机上把vnet⽹卡删除:
[root@noviciate ~]# brctl delif virbr0 vnet0
添加vnet⽹卡到交换机上 :
[root@noviciate ~]# brctl addif virbr0 vnet0
1. 配置⽂件⽅式配置桥
在宿主机上
1.修改配置⽂件
 [root@noviciate ~]# cat ifcfg-br0
 TYPE=Bridge
 NAME=br0
 DEVICE=br0
 ONBOOT="yes"
 BOOTPROTO=static
 IPADDR=10.18.44.251
 GATEWAY=10.18.44.1
 NETMASK=255.255.255.0
 DNS1=10.18.44.100
 DNS2=8.8.8.8
 [root@noviciate ~]# cat ifcfg-enp3s0
 DEVICE="enp3s0"
 ONBOOT="yes"
 BRIDGE=br0

2.重启libvirtd服务
3.重启network服务

删除桥接⽹卡步骤:
 1.删除br0的配置⽂件
 2.修改正常⽹卡的配置⽂件
 3.重启系统
2.配置⽂件⽅式创建nat⽹络
[root@noviciate ~]# cp /etc/libvirt/qemu/networks/nat2.xml
/etc/libvirt/qemu/networks/nat3.xml

[root@noviciate ~]# vim /etc/libvirt/qemu/networks/nat3.xml
<network>
<name>nat3</name>
<uuid>4d8b9b5c-748f-4e16-a509-848202b9c83b</uuid>
<forward mode='nat'/> //和隔离模式的区别
<bridge name='virbr4' stp='on' delay='0'/>
<mac address='52:57:00:62:0c:d4'/>
<domain name='nat3'/>
<ip address='192.168.104.1' netmask='255.255.255.0'>
 <dhcp>
 <range start='192.168.104.128' end='192.168.104.254'/>
 </dhcp>
</ip>
</network>


重启服务:
[root@noviciate ~]# systemctl restart libvirtd
3. 配置⽂件⽅式创建isolated⽹络
<network>
<name>isolate1</name>
<uuid>6341d3a6-7330-4e45-a8fe-164a6a68929a</uuid>
<bridge name='virbr2' stp='on' delay='0'/>
<mac address='52:54:00:6b:39:0c'/>
<domain name='isolate1'/>
<ip address='192.168.101.1' netmask='255.255.255.0'>
 <dhcp>
 <range start='192.168.101.128' end='192.168.101.254'/>
 </dhcp>
</ip>
</network>
查看所有的⽹络:
[root@noviciate ~]# virsh net-list

启动⽹络:
[root@noviciate ~]# virsh net-start isolated200

开机⾃启动:
[root@noviciate ~]# virsh net-autostart isolated200

⽹络相关基本命令
查看⼀个guest主机的⽹络接⼝信息:
[root@noviciate ~]# virsh domiflist vm1
接⼝ 类型 源 型号 MAC
---------------------------------------
vnet0 network default virtio 52:54:00:94:a7:a1
二 脚本管理KVM
1. 批量创建虚机脚本
#!/bin/bash
#KVM batch create vm tool
#version: 0.1
#author: wing
#需要事先准备模板镜像和配置⽂件模板
echo "1.创建⾃定义配置单个虚拟机
2.批量创建⾃定义配置虚拟机
3.批量创建默认配置虚拟机
4.删除虚拟机"
#扩展功能:
[root@noviciate ~]# 查看现在虚拟机
[root@noviciate ~]# 查看某个虚拟机的配置
[root@noviciate ~]# 升配/降配
[root@noviciate ~]# 添加/删除⽹络
read -p "选取你的操作(1/2/3):" op
batch_self_define() {
 KVMname=`openssl rand -hex 5`
 sourceimage=/var/lib/libvirt/images/vmmodel.img
 sourcexml=/etc/libvirt/qemu/vmmodel.xml
 newimg=/var/lib/libvirt/images/${KVMname}.img
 newxml=/etc/libvirt/qemu/${KVMname}.xml
 cp $sourceimage $newimg
 cp $sourcexml $newxml
 KVMuuid=`uuidgen`
 KVMmem=${1}000000
 KVMcpu=$2
 KVMimg=$newimg
 KVMmac=`openssl rand -hex 3 | sed -r 's/..\B/&:/g'`
 sed -i
"s@KVMname@$KVMname@;s@KVMuuid@$KVMuuid@;s@KVMmem@$KVMmem@;s@KVMcpu@$KVMcpu
@;s@KVMimg@$KVMimg@;s@KVMmac@$KVMmac@" $newxml
 virsh define $newxml
 virsh list --all
}
self_define() {
 read -p "请输⼊新虚机名称:" newname
 read -p "请输⼊新虚机内存⼤⼩(G):" newmem
 read -p "请输⼊新虚机cpu个数:" newcpu
 sourceimage=/var/lib/libvirt/images/vmmodel.img
 sourcexml=/etc/libvirt/qemu/vmmodel.xml
 newimg=/var/lib/libvirt/images/${newname}.img
 newxml=/etc/libvirt/qemu/${newname}.xml
 cp $sourceimage $newimg
 cp $sourcexml $newxml
 KVMname=$newname
 KVMuuid=`uuidgen`
 KVMmem=${newmem}000000
 KVMcpu=$newcpu
 KVMimg=$newimg
 KVMmac=`openssl rand -hex 3 | sed -r 's/..\B/&:/g'`
 sed -i
"s@KVMname@$KVMname@;s@KVMuuid@$KVMuuid@;s@KVMmem@$KVMmem@;s@KVMcpu@$KVMcpu
@;s@KVMimg@$KVMimg@;s@KVMmac@$KVMmac@" $newxml
 virsh define $newxml
 virsh list --all
}
case $op in
1)self_define;;
2)
 read -p "请输⼊要创建的虚拟机的个数:" num
 read -p "请输⼊新虚机内存⼤⼩(G):" newmem
 read -p "请输⼊新虚机cpu个数:" newcpu
 for((i=1;i<=$num;i++))
 do
 batch_self_define $newmem $newcpu
 done;;
3)
 read -p "请输⼊要创建的虚拟机的个数:" num
 for((i=1;i<=$num;i++))
 do
 batch_self_define 1 1
 done;;
*)
 echo "输⼊错误,请重新执⾏脚本"
 exit;;
esac
2、配置⽂件模板
[root@noviciate ~]# vim /etc/libvirt/qemu/vmmodel.xml
<domain type='KVM'>
<name>KVMname</name>
<uuid>KVMuuid</uuid>
<memory unit='KiB'>KVMmem</memory>
<currentMemory unit='KiB'>KVMmem</currentMemory>
<vcpu placement='static'>KVMcpu</vcpu>
<os>
 <type arch='x86_64' machine='pc-i440fx-rhel7.0.0'>hvm</type>
 <boot dev='hd'/>
</os>
<features>
<acpi/>
 <apic/>
</features>
<cpu mode='custom' match='exact' check='partial'>
 <model fallback='allow'>Haswell-noTSX</model>
</cpu>
<clock offset='utc'>
 <timer name='rtc' tickpolicy='catchup'/>
 <timer name='pit' tickpolicy='delay'/>
 <timer name='hpet' present='no'/>
</clock>
<on_poweroff>destroy</on_poweroff>
<on_reboot>restart</on_reboot>
<on_crash>destroy</on_crash>
<pm>
 <suspend-to-mem enabled='no'/>
 <suspend-to-disk enabled='no'/>
</pm>
<devices>
 <emulator>/usr/libexec/qemu-KVM</emulator>
 <disk type='file' device='disk'>
 <driver name='qemu' type='qcow2'/>
 <source file='KVMimg'/>
<target dev='vda' bus='virtio'/>
 <address type='pci' domain='0x0000' bus='0x00' slot='0x06'
function='0x0'/>
 </disk>
 <controller type='usb' index='0' model='ich9-ehci1'>
 <address type='pci' domain='0x0000' bus='0x00' slot='0x04'
function='0x7'/>
 </controller>
 <controller type='usb' index='0' model='ich9-uhci1'>
 <master startport='0'/>
 <address type='pci' domain='0x0000' bus='0x00' slot='0x04'
function='0x0' multifunction='on'/>
 </controller>
 <controller type='usb' index='0' model='ich9-uhci2'>
 <master startport='2'/>
 <address type='pci' domain='0x0000' bus='0x00' slot='0x04'
function='0x1'/>
 </controller>
 <controller type='usb' index='0' model='ich9-uhci3'>
 <master startport='4'/>
 <address type='pci' domain='0x0000' bus='0x00' slot='0x04'
function='0x2'/>
 </controller>
 <controller type='pci' index='0' model='pci-root'/>
 <controller type='virtio-serial' index='0'>
<address type='pci' domain='0x0000' bus='0x00' slot='0x05'
function='0x0'/>
 </controller>
 <interface type='network'>
 <mac address='52:54:00:KVMmac'/>
 <source network='default'/>
 <model type='virtio'/>
 <address type='pci' domain='0x0000' bus='0x00' slot='0x03'
function='0x0'/>
 </interface>
 <serial type='pty'>
 <target type='isa-serial' port='0'>
 <model name='isa-serial'/>
 </target>
 </serial>
 <console type='pty'>
 <target type='serial' port='0'/>
 </console>
 <channel type='unix'>
 <target type='virtio' name='org.qemu.guest_agent.0'/>
 <address type='virtio-serial' controller='0' bus='0' port='1'/>
 </channel>
 <input type='mouse' bus='ps2'/>
<input type='keyboard' bus='ps2'/>
 <memballoon model='virtio'>
 <address type='pci' domain='0x0000' bus='0x00' slot='0x07'
function='0x0'/>
 </memballoon>
</devices>
</domain>
3. 随机⽣成mac地址
其中5种⽅式:
[rootnoviciate ~]# echo $[$RANDOM%9]$[$RANDOM%9]:$[$RANDOM%9]$[$RANDOM%9]:$[$RANDOM%9]$[$RANDOM%9]
65:42:31
[root@noviciate ~]# echo `openssl rand -hex 1`:`openssl rand -hex 1`:`openssl rand -hex 1`
99:6e:67
[root@noviciate ~]# openssl rand -hex 3 | sed -r 's/(..)/\1:/g'|sed's/.$//'
e9:b6:12
[root@noviciate ~]# openssl rand -hex 3 | sed -r 's/(..)(..)(..)/\1:\2:\3/g'
94:89:e3
[root@noviciate ~]# openssl rand -hex 3 | sed -r 's/..\B/&:/g'
c5:66:90
\B 表示 ⾮单词边界
\b 表示 单词边界
<a 表示以a开头的单词
b> 表示以b结尾的单词

使⽤UUID:
[root@noviciate ~]# uuidgen | sed -r 's/(..)(..)(..)(.*)/\1:\2:\3/'
使⽤熵池⾥⾯的随机数:
[root@noviciate ~]# echo -n 00:60:2F; dd bs=1 count=3 if=/dev/random
2>/dev/null | hexdump -v -e '/1 ":%02X"'


 1788
1788


 被折叠的 条评论
为什么被折叠?
被折叠的 条评论
为什么被折叠?
 到【灌水乐园】发言


