安装
安装 Docker
烧录完新内核之后,可以开始在设备上安装 Docker (此安装方法同样适用于 PC):
步骤1:快速安装
apt-get update
wget -qO- https://get.docker.com/ | sh
等待安装成功之后应该会看见 Docker 版本信息
步骤2:检查是否安装成功
root@ubuntu18:/home/cc/harddisk# docker -v
Docker version 20.10.18, build b40c2f6
修改默认数据存放位置
检查 docker 存储位置(该步骤仅适用于 PC 安装 docker)
如果你在 Firefly 设备中安装 docker,请跳过步骤2
#执行
docker info | grep -i dir
#执行结果
Docker Root Dir: /var/lib/docker
返回的信息显示了 docker 的默认存储位置,该位置在不同电脑上可能不一样
方法一
# 查看Docker目前存储位置
[root@docker ~]# docker info | grep -i dir
 Docker Root Dir: /var/lib/docker

# 关闭Docker
[root@docker ~]# systemctl stop docker
Warning: Stopping docker.service, but it can still be activated by:
  docker.socket

# 迁移原有数据
[root@docker ~]# mkdir /data/docker
[root@docker ~]# mv /var/lib/docker/* /data/docker/

# 修改docker的systemctl管理文件,使用--graph指定存储位置
[root@docker ~]# cat /usr/lib/systemd/system/docker.service
............................
ExecStart=/usr/bin/dockerd -H fd:// --containerd=/run/containerd/containerd.sock --graph /data/docker
............................
[root@docker ~]# systemctl daemon-reload
[root@docker ~]# systemctl start docker
[root@docker ~]# docker info | grep -i dir
 Docker Root Dir: /data/docker
方法二
# 查看Docker目前存储位置
[root@docker ~]# docker info | grep -i dir
 Docker Root Dir: /var/lib/docker

# 关闭Docker
[root@docker ~]# systemctl stop docker
Warning: Stopping docker.service, but it can still be activated by:
  docker.socket

# 迁移原有数据
[root@docker ~]# mkdir /data/docker
[root@docker ~]# mv /var/lib/docker/* /data/docker/

# 修改配置文件,graph指定docker默认数据存放位置
[root@docker ~]# cat /etc/docker/daemon.json
{
    "graph": "/data/docker"
}

# 启动docker
[root@docker ~]# systemctl start docker
[root@docker ~]# docker info | grep -i dir
 Docker Root Dir: /data/docker
添加用户组
通过将用户添加到docker用户组可以将sudo去掉,命令如下:
sudo groupadd docker #添加docker用户组
sudo gpasswd -a $USER docker #将登陆用户加入到docker用户组中
newgrp docker #更新用户组
测试
firefly@firefly:~# docker run hello-world
Unable to find image 'hello-world:latest' locally
latest: Pulling from library/hello-world
93288797bd35: Pull complete
Digest: sha256:cc15c5b292d8525effc0f89cb299f1804f3a725c8d05e158653a563f15e4f685
Status: Downloaded newer image for hello-world:latest

Hello from Docker!
This message shows that your installation appears to be working correctly.

To generate this message, Docker took the following steps:
 1. The Docker client contacted the Docker daemon.
 2. The Docker daemon pulled the "hello-world" image from the Docker Hub.
    (arm64v8)
 3. The Docker daemon created a new container from that image which runs the
    executable that produces the output you are currently reading.
 4. The Docker daemon streamed that output to the Docker client, which sent it
    to your terminal.

To try something more ambitious, you can run an Ubuntu container with:
 $ docker run -it ubuntu bash

Share images, automate workflows, and more with a free Docker ID:
 https://hub.docker.com/

For more examples and ideas, visit:
 https://docs.docker.com/get-started/
卸载
一、准备工作:
1.杀死docker有关的容器:
docker kill $(docker ps -a -q)
2.删除所有docker容器:
docker rm $(docker ps -a -q)
3.删除所有docker镜像:
docker rmi $(docker images -q)
4.停止 docker 服务:
systemctl stop docker
5.删除docker相关存储目录:(分别进行执行以下四个命令)
1.rm -rf /etc/docker
2.rm -rf /run/docker
3.rm -rf /var/lib/dockershim
4.rm -rf /var/lib/docker
6.如果删除不掉,则先umount:
umount /var/lib/docker/devicemapper
7.然后再重新执行上面那步“删除docker相关存储目录”。
二、卸载工作
经过上面一系列准备后,我们终于到了最后环节,开始删除docker。
1.查看系统已经安装了哪些docker包:
[root@iZ2zecam7745khaizqqjxaZ /]# yum list installed | grep docker
containerd.io.x86_64 1.4.12-3.1.el7 @docker-ce-stable
docker-ce.x86_64 3:20.10.12-3.el7 @docker-ce-stable
docker-ce-cli.x86_64 1:20.10.12-3.el7 @docker-ce-stable
docker-ce-rootless-extras.x86_64 20.10.12-3.el7 @docker-ce-stable
docker-scan-plugin.x86_64 0.12.0-3.el7 @docker-ce-stable
卸载相关包:
[root@localhost ~]# yum remove containerd.io.x86_64 docker-ce.x86_64 docker-ce-cli.x86_64 /
                              docker-ce-rootless-extras.x86_64 docker-scan-plugin.x86_64/
2.接着会出现选择提示,直接输入“y”然后回车就可以。
3.再次查看
yum list installed | grep docker
不再出现相关信息,证明删除成功,
4.再看看docker命令:
[root@iZ2zecam7745khaizqqjxaZ /]# docker version
-bash: /usr/bin/docker: No such file or directory
5.成功卸载docker
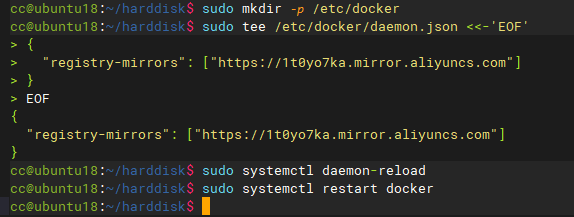
配置镜像加速器
搜索阿里云,登陆并点击控制台,在菜单中搜索镜像,找到容器镜像服务

复制红色框中的命令,直接粘贴到终端运行即可

usr/bin/docker: No such file or directory
### 5.成功卸载docker
# 配置镜像加速器
搜索`阿里云`,登陆并点击控制台,在菜单中搜索镜像,找到容器镜像服务
[外链图片转存中...(img-PzTZme3B-1663158907892)]
复制红色框中的命令,直接粘贴到终端运行即可
[外链图片转存中...(img-d7e7Pc6W-1663158907893)]


 2028
2028

 被折叠的 条评论
为什么被折叠?


