


CEF
CEF全称是Chromium Embedded Framework,它是Chromium的Content API的封装库,基于Google Chromium 的开源项目,而Google Chromium项目主要是为Google Chrome应用开发的,而CEF的目标则是为第三方应用提供可嵌入浏览器支持.
目前CEF分为CEF1,CEF2,CEF3,其中前者使用的是单进程架构,后两者是多进程架构。
在开发使用中一般都是基于CEF3开发。
CEF3是基于Chomuim Content API多进程构架的下一代CEF,拥有下列优势:
1.改进的性能和稳定性(JavaScript和插件在一个独立的进程内执行)。
2.支持Retina显示器。
3.支持WebGL和3D CSS的GPU加速。
4.类似WebRTC和语音输入这样的前卫特性。
5.通过DevTools远程调试协议以及ChromeDriver2提供更好的自动化UI测试。
6.更快获得当前以及未来的Web特性和标准的能力。
QCefView
QCefView是为Qt框架开发的一个封装集成了Chromium Embedded Framework库的Wdiget UI组件,LGPL许可,可以在项目中免费使用,功能类似CEF、QWebEngineView,提供C++和web交互的能力.是一个多进程的机制。
所以qt和js的交互属于进程间的交互,通过QCefView来实现两者的交互。
使用QCefView可以充分发挥CEF丰富强大的Web能力,快速开发混合架构的应用程序。
-
使用Qt开发者熟悉的Forms,signal/slot来开发应用
-
方便直观的Javascript/C++互操作方式
编译出QCefView的dll
-
准备环境
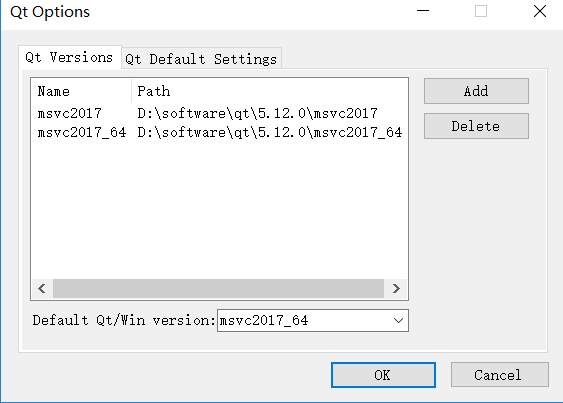
我的编译环境win10、vs2017、Qt5.12.0,本次编译采用x64编译方式,最终生成vs2017的解决方案,因此Qt需要使用msvc2017_64。
-
环境搭建
a.CMake
QCefView通过CMake管理项目构建,所以请先安装CMake.下载路径:Download CMake,选择cmake-3.26.0-windows-x86_64.zip 这个下载安装,安装时注意添加环境变量。
b.qt
QCefView是基于Qt框架的,同时支持Qt 5.x和6.x版本。安装Qt之后请确保设置了QTDIR环境变量,使其指向Qt工具链目录.
Windows平台:
先配置环境变量

后设置VS2017
linux平台:
使用vim /ect/profile 添加
export QTDIR=/usr/share/Qt/6.2.2/gcc_64 //qt的安装目录,具体用到qmake
-
下载代码
QCefView:git clone https://github.com/CefView/QCefView.git
CefViewCore:git clone https://github.com/CefView/CefViewCore.git
QCefView工程里有CefViewCore目录,但是是空的,需要手动clone CefViewCore的代码,然后放到QCefView工程里
cef下载地址:CEF Automated Builds
-
修改CEF配置
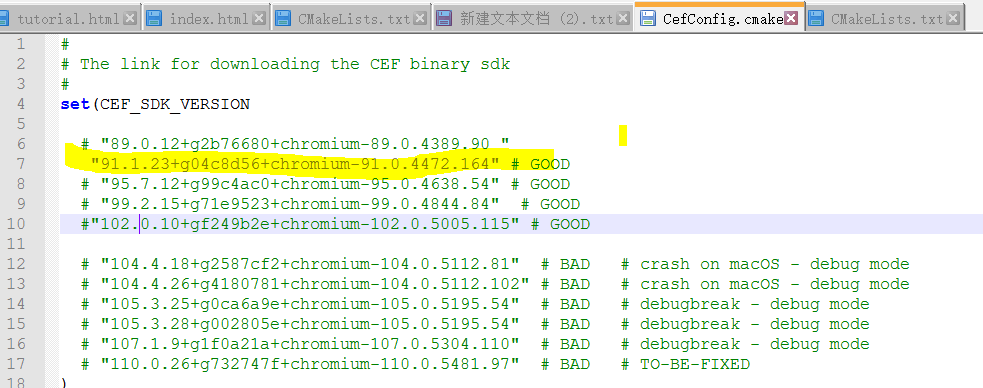
在编译前,需要做些配置修改,由于QCefView依赖于CEF,在用CMake配置项目时,会下载CEF工程。上面下载的代码默认是支持 cef "102.0.10+gf249b2e+chromium-102.0.5005.115"版本,102版本需要vs2019以上才能支持,现在使用vs2017,所以只能降低cef版本,选择cef 91.具体修改CefViewCore文件夹得CefConfig.cmake文件。见
-
运行脚本
运行QCefView文件下的generate-win-x86_64.bat脚本,在当前的目录下会生成.build文件夹,该脚本会联网下载cef相关资源(也可以自己先下载cef(CEF Automated Builds)),并存放到CefViewCore的dep文件夹下cef_binary_91.1.23+g04c8d56+chromium-91.0.4472.164_windows64。同时在.build文件夹下有CMake产生的vs sln解决方案。
-
使用vs2017编译QCefView.sln
编译报错
注释掉
//if (cs->plugins != STATE_DEFAULT)
// qs->d_ptr->plugins_ = cs->plugins == STATE_ENABLED;
QCefView是动态库项目,其它的是静态库,QCefView静态链接其它库。编译成功后,会在lib文件夹生成QCefView.lib。在bin文件夹生成QCefView.dll。
实际应用
初始化QCefContext
使用QCefView的第一步必须初始化一个QCefContext的实例,跟QApplication一样, 在应用程序的生命周期内必须有且仅有一个QCefContext实例
int
main(int argc, char* argv[])
{
  QApplication a(argc, argv);

  // build QCefConfig
  QCefConfig config;
  config.setUserAgent("QCefViewTest");
  config.setLogLevel(QCefConfig::LOGSEVERITY_DEFAULT);
  config.setBridgeObjectName("CallBridge");
  config.setRemoteDebuggingPort(9000);
  config.setBackgroundColor(Qt::lightGray);

  // WindowlessRenderingEnabled is set to true by default, set to false to disable the OSR mode
  // config.setWindowlessRenderingEnabled(false);

  // add command line args
  config.addCommandLineSwitch("use-mock-keychain");

  // initialize QCefContext instance with config
  QCefContext cefContext(&a, argc, argv, &config);

  MainWindow w;
  w.show();

  return a.exec();
}看到初始化QCefContext实例的时候需要传入一个QCefConfig。你可以通过QCefConfig设置一些CEF的配置参数,例如可以设置日志级别,调试端口等。
不要试图主动析构QCefContext实列,该实例跟随Application的生命周期存在和销毁,如果提前销毁则会导致CEF内部状态错误。
创建QCefView实例
一旦初始化QCefContext完成,就可以创建QCefView对象了。
void
MainWindow::createCefView()
{
  // build settings for per QCefView
  QCefSetting setting;

#if CEF_VERSION_MAJOR < 100
  setting.setPlugins(false);
#endif

  setting.setWindowlessFrameRate(60);
  setting.setBackgroundColor(QColor::fromRgba(qRgba(255, 255, 220, 255)));
  // setting.setBackgroundColor(Qt::blue);


  // this site is test for input devices
  QDir dir = QCoreApplication::applicationDirPath();
  QString webResourceDir =  QString("file://")+ QDir::toNativeSeparators(dir.filePath("webres/index.html"));
  m_pLeftCefViewWidget = new CefViewWidget(webResourceDir, &setting);

  m_ui.leftCefViewContainer->layout()->addWidget(m_pLeftCefViewWidget);

  // allow show context menu for both OSR and NCW mode
  m_pLeftCefViewWidget->setContextMenuPolicy(Qt::DefaultContextMenu);

  // connect the invokeMethod to the slot
  connect(m_pLeftCefViewWidget, &QCefView::invokeMethod, this, &MainWindow::onInvokeMethod);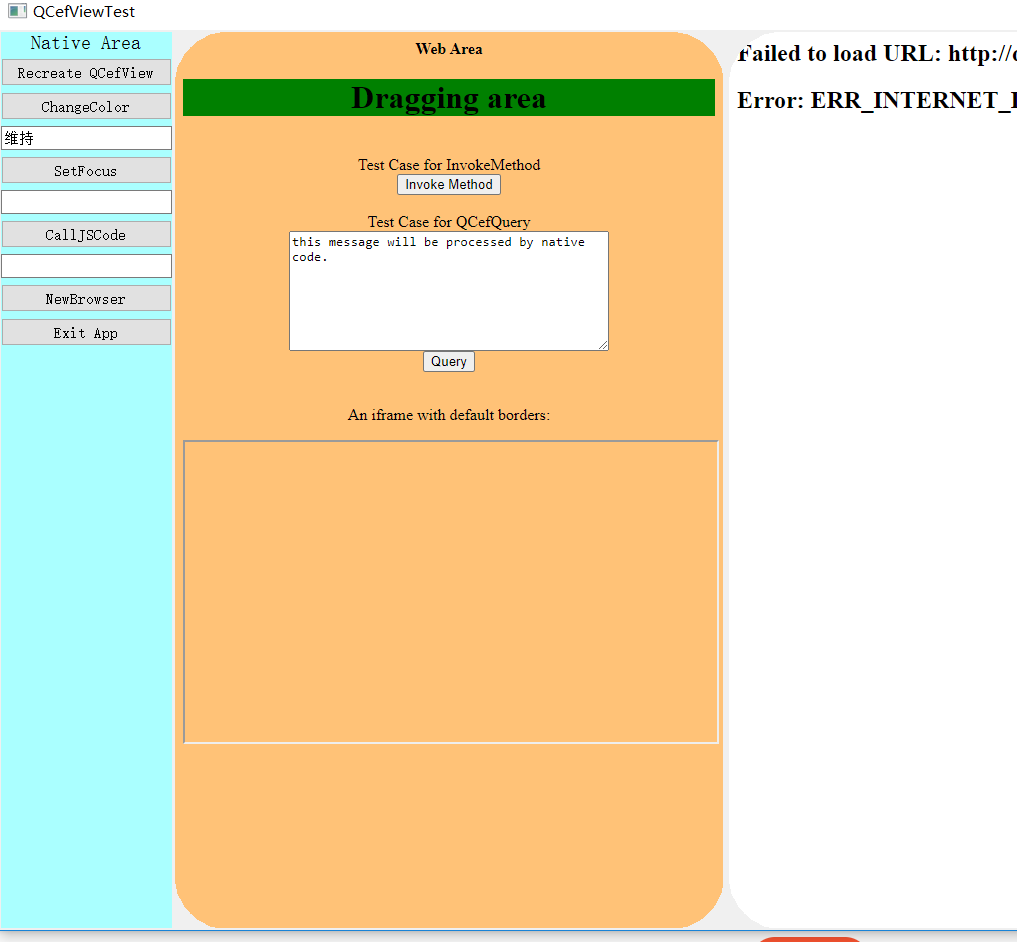
延伸:
QCefView加载Web资源的方式:
-
加载在线Web内容
在QCefView的构造函数中直接传递在线Web内容的URL
void
MainWindow::onBtnNewBrowserClicked()
{
  QMainWindow* w = new QMainWindow(nullptr);
  w->setAttribute(Qt::WA_DeleteOnClose);

  QCefSetting settings;
  QCefView* view = new QCefView("https://www.baidu.com/", &settings, w);

  w->setCentralWidget(view);
  w->resize(1024, 768);
  w->show();
}-
通过本地文件路径加载
在QCefView的构造函数中直接传递本地Web资源文件的全路径,注意路径必须是以file://为schema的格式.
  QCefSetting setting;
  setting.setWindowlessFrameRate(60);
  setting.setBackgroundColor(QColor::fromRgba(qRgba(255, 255, 220, 255)));
  QDir dir = QCoreApplication::applicationDirPath();
  QString webResourceDir =  QString("file://")+ QDir::toNativeSeparators(dir.filePath("webres/index.html"));
  m_pLeftCefViewWidget = new CefViewWidget(webResourceDir, &setting);
  m_ui.leftCefViewContainer->layout()->addWidget(m_pLeftCefViewWidget);
3.添加本地文件目录到URL的映射
如果你的WebApp资源文件较多,并且在一个本地目录中,你可以通过如下方法添加一个本地文件目录到URL的映射:
public void addLocalFolderResource(const QString & path,const QString & url,int priority)
  #define URL_ROOT "http://QCefViewDoc"
 #define INDEX_URL URL_ROOT "/index.html"

  QDir dir = QCoreApplication::applicationDirPath();
  QString webResourceDir = QDir::toNativeSeparators(dir.filePath("webres"));

  // add a local folder to URL map (global)
  QCefContext::instance()->addLocalFolderResource(webResourceDir, URL_ROOT);

  createCefView();

  m_pRightCefViewWidget = new CefViewWidget(INDEX_URL, nullptr, this);
  m_ui.rightCefViewContainer->layout()->addWidget(m_pRightCefViewWidget);
4.添加本地Zip文件到URL的映射
除了添加本地文件目录到URL的映射,还可以添加本地Zip文件到URL的映射,通过以下方法实现:
public void addArchiveResource(const QString & path,const QString & url,const QString & password)
 // add a local zip file to URL map
 QCefContext::instance()->addArchiveResource(
     "full\\path\\to\\webres.zip",
     "https://domainname",
     "password"                 // pass the password of the zip file if needed
     );

  // build settings for per QCefView
  QCefSetting setting;

  // create the QCefView widget and add it to the layout container
  QCefView* cefView = new QCefView(
      "https://domainname/index.html",
      &setting,
      this
      );
Qt与JS通讯
QCefView提供C++/Javascript互操作的能力,因此开发者可以从C++中调用Javascript代码,反之亦然。
-
JS发送消息给Qt
第一种办法:js调用:invokeMethod。
Javascript方法invokeMethod(name, ...args)是 异步操作,这意味着该方法的调用会立即返回,无论对应的C++ Qt slot是否已经执行完毕。 如
      function onInvokeMethodClicked(name, ...arg) {
        CallBridge.invokeMethod(name, ...arg);
      }


      function testInvokeMethod() {
        let d = {
          d1: true,
          d2: 5678,
          d3: "test object",
          d4: [1, "2", false],
          d5: {
            d1: true,
            d2: 5678,
            d3: "nested object",
            d4: [1, "2", true],
          },
        };
        onInvokeMethodClicked("TestMethod", 1, false, "arg3", d);
      }

     <label> Test Case for InvokeMethod </label>
      <br />
      <input type="button" value="Invoke Method" onclick="testInvokeMethod()" />
      <br />
<br />第二种办法:JS调用CefViewQuery
window.CefViewQuery(query)是另一种从Javascript中向C++中通信的机制,这种方式的通信是异步操作
      function onCallBridgeQueryClicked() {
        var query = {
          request: document.getElementById("message").value,
          onSuccess: function (response) {
            alert(response);
          },
          onFailure: function (error_code, error_message) {
            alert(error_message);
          },
        };
        window.CefViewQuery(query);
      }

      <label> Test Case for QCefQuery </label>
      <br />
      <textarea id="message" style="width: 320px; height: 120px">
this message will be processed by native code.</textarea
      >
      <br />
      <input type="button" value="Query" onclick="onCallBridgeQueryClicked()" />
      <br />
<br />-
Qt接收JS消息部分
第一种办法:
在Javascript中调用invokeMethod后,下面的Qt signal将被触发:
void invokeMethod(int browserId,int frameId,const QString & method,const QVariantList & arguments)
connect(m_pLeftCefViewWidget, &QCefView::invokeMethod, this, &MainWindow::onInvokeMethod);


 **const QString& method, method就是js调用invokeMethod函数的第一个参数。通过method我们可以进行消息过滤,在Qt中进行消息分发处理,
 **const QVariantList& arguments,通过变量类型我们可知,这个参数同时可以传递多种
 ** 不同类型的数据到Qt中来,我们可以通过解析消息体,做具体的业务处理。


void MainWindow::onInvokeMethod(int browserId, int64_t frameId, const QString& method, const QVariantList& arguments)
{
  // extract the arguments and dispatch the invocation to corresponding handler
  if (0 == method.compare("TestMethod")) {
    QString title("QCef InvokeMethod Notify");
    QString text = QString("================== Current Thread: QT_UI ==================\r\n"
                           "Frame: %1\r\n"
                           "Method: %2\r\n"
                           "Arguments:\r\n")
                     .arg(frameId)
                     .arg(method);

    for (int i = 0; i < arguments.size(); i++) {
      auto jv = QJsonValue::fromVariant(arguments[i]);

      // clang-format off
          text.append(
              QString("%1 Type:%2, Value:%3\r\n")
              .arg(i).arg(arguments[i].typeName()).arg(arguments[i].toString())
          );
      // clang-format on
    }

    auto jsonValue = QJsonDocument::fromVariant(arguments);
    auto jsonString = QString(jsonValue.toJson());
    text.append(QString("\r\nArguments List in JSON format:\r\n%1").arg(jsonString));

    QMessageBox::information(this->window(), title, text);
  } else {
  }
}第二种办法:cefQueryRequest
当从Javascript中调用CefViewQuery方法时,以下Qt signal会被触发:
public void cefQueryRequest(int browserId,int frameId,const QCefQuery & query)
connect(m_pLeftCefViewWidget, &QCefView::cefQueryRequest, this, &MainWindow::onQCefQueryRequest);

void MainWindow::onQCefQueryRequest(int browserId, int64_t frameId, const QCefQuery& query)
{
  QString title("QCef Query Request");
  QString text = QString("Current Thread: QT_UI\r\n"
                         "Query: %1")
                   .arg(query.request());

  QMessageBox::information(this->window(), title, text);

  QString response = query.request().toUpper();
  query.setResponseResult(true, response);
  m_pLeftCefViewWidget->responseQCefQuery(query); //qt对js发送回应
}
3.QT发送消息给JS
以注册消息事件的方式将消息从Qt发送到JS
-
public bool triggerEvent(const QCefEvent & event)
-
public bool triggerEvent(const QCefEvent & event,int frameId)
-
public bool broadcastEvent(const QCefEvent & event)
以上三个方法的调用全部都是异步操作
void
MainWindow::onBtnChangeColorClicked()
{
  if (m_pLeftCefViewWidget) {
    // create a random color
    QColor color(QRandomGenerator::global()->generate());

    // create the cef event and set the arguments
    QCefEvent event("colorChange");
    event.arguments().append(QVariant::fromValue(color.name(QColor::HexArgb)));

    // broadcast the event to all frames in all browsers created by this QCefView widget
    m_pLeftCefViewWidget->broadcastEvent(event);
  }
}
4.JS接收qt信息
Javascript调用下列函数进行接收:
-
addEventListener(name, listener)
-
removeEventListener(name, listener)
      function onLoad() {
        if (typeof CallBridge == "undefined") {
          alert("Not in CefView context");
          return;
        }

        CallBridge.addEventListener("colorChange", function (color) {
          document.getElementById("main").style.backgroundColor = color;
        });
      }

<body onload="onLoad()" id="main" class="noselect">
在onLoad() 方法中实际上是做了一个事件监听的,对应我们在Qt端注册的 ”colorChange“ ,当Qt端调用changeColor ()方法时,会触发对应的事件,JS端捕获该事件并做处理,实际上就是实现了Qt(发)==》JS(收)的一个通讯过程。
QCefView常用的函数、信号、槽函数
信号
-
void invokeMethod(int browserId, qint64 frameId, const QString& method, const QVariantList& arguments); //qt接收js的数据的信号
-
void cefQueryRequest(int browserId, qint64 frameId, const QCefQuery& query);//qt接收js的数据的信号
-
void onLoadingStateChanged(int browserId, bool isLoading, bool canGoBack, bool canGoForward);
-
void loadStart(int browserId, qint64 frameId, bool isMainFrame, int transition_type);
-
void loadEnd(int browserId, qint64 frameId, bool isMainFrame, int httpStatusCode);
-
void loadError(int browserId, qint64 frameId, bool isMainFrame,int errorCode,const QString& errorMsg,const QString& failedUrl);
这4个函数,都是用来调试创建QCefView对象成功与否的信息。
函数
-
void addLocalFolderResource(const QString& path, const QString& url, int priority = 0);//把本地目录映射到url
-
void addArchiveResource(const QString& path, const QString& url, const QString& password = "", int priority = 0); //把本地目录映射到url
-
bool broadcastEvent(const QCefEvent& event); //qt发送数据到js
QCefEvent 类的主要函数: void setArguments(const QVariantList& args);
-
bool responseQCefQuery(const QCefQuery& query);//qt接收到js通过CefViewQuery发送数据后,做出的回应
QCefQuery 类的主要函数:void setResponseResult(bool success, const QString& response, int error = 0) const;
-
bool executeJavascriptWithResult(qint64 frameId, const QString& code, const QString& url, qint64 context);
//executes javascript code in specified frame and the result will be reported through
reportJavascriptResult signal 所以qt需要对reportJavascriptResult做出信号槽处理
void MainWindow::onBtnCallJSCodeClicked()
{
  int64_t context = 1000;
  QString code = "alert('hello QCefView'); return {k1: 'str', k2: true, k3: 100};";
  m_pLeftCefViewWidget->executeJavascriptWithResult(QCefView::MainFrameID, code, "", context);
}
connect(m_pLeftCefViewWidget, &QCefView::reportJavascriptResult, this, &MainWindow::onJavascriptResult);

void MainWindow::onJavascriptResult(int browserId, int64_t frameId, int64_t context, const QVariant& result)
{
  auto jsonValue = QJsonDocument::fromVariant(result);
  auto jsonString = QString(jsonValue.toJson());

  QString title("Javascript result notification");
  QString text = QString("Context id: %1\r\nResult in JSON format:\r\n%2").arg(context).arg(jsonString);

  QMessageBox::information(this->window(), title, text);
}


 3066
3066

 被折叠的 条评论
为什么被折叠?
被折叠的 条评论
为什么被折叠?
 到【灌水乐园】发言


