


最近看到PHP创建和修改图片的一些知识,感觉比较有趣,所以就跟着书本做了这么一个小demo,大神勿喷
PS:关于PHP对图片的各种处理大家可以参照此博客PHP对图片的各种处理
在这里我要实现的是利用PHP和mysql实现一个简单的投票系统
首先我用一个类封装了生成条形图的方法 vote_create.php:
<?php
//创建投票图像
class Create{
//设置绘画所需要的所有变量
private $width = 500;//背景总宽度
private $left_margin = 50;//左边缘
private $right_margin = 50;//右边缘
private $bar_height = 40;//条形厚度
private $bar_space;//条形间距
private $title_size = 16;//标题大小
private $main_size = 12;
private $small_size = 12;
private $text_indent = 10;//两边距离边框
private $x;//基线离左边的位置
private $y = 50;
private $bar_unit;//在图像上表示一个单元的宽度(显示百分值用)
private $height;//背景总高度
private $bar_count;//条形的数量
private $fontname;//字体
private $title;//标题
private $array = array();//投票对象数组
private $count = 0;//总投票数
/*
*参数列表:
* $array,投票对象数组,形式是array([0]=>array(['tag']=>'lsgo',['nums']=>20))
* $fontname,系统字体,这里要注意window和linux
* $title,投票标题
*/
function __construct($array,$fontname,$title){
$this->bar_count = count($array);
$this->fontname = $fontname;
$this->title = $title;
$this->array = $array;
foreach($array as $a){
$this->count += $a['nums'];
}
$this->bar_space = $this->bar_height/2;
$this->x = $this->left_margin + 60;
$this->bar_unit = ($this->width-($this->x + $this->right_margin))/100;
$this->height = $this->bar_count * ($this->bar_height + $this->bar_space) + 50;
}
function draw(){
//创建一个画布
$im = imagecreatetruecolor($this->width, $this->height);
$white = imagecolorallocate($im, 255, 255, 255);
$blue = imagecolorallocate($im, 0, 64, 128);
$black = imagecolorallocate($im, 0, 0, 0);
$pink = imagecolorallocate($im, 255, 78, 243);
$text_color = $black;//字体
$percent_color = $black;//百分比
$bg_color = $white;//背景
$line_color = $black;//横线
$bar_color = $blue;//条形
$number_color = $pink;//数字
//填充图形的背景色(矩形区域着色)
imagefilledrectangle($im, 0,0,$this->width, $this->height, $bg_color);
//画边框线
imagerectangle($im, 0,0,$this->width-1, $this->height-1, $line_color);
//获取标题所占空间
$title_dimensions = imagettfbbox($this->title_size, 0, $this->fontname, $this->title);
$title_length = $title_dimensions[2] - $title_dimensions[0];
$title_height = abs($title_dimensions[7]-$title_dimensions[1]);
$title_above_line = abs($title_dimensions[7]);
$title_x = ($this->width-$title_length)/2;//将标题x方向居中
$title_y = ($this->y-$title_height)/2 + $title_above_line;
//居中添加标题
imagettftext($im, $this->title_size, 0,$title_x, $title_y, $text_color, $this->fontname, $this->title);
//添加基线
imageline($im,$this->x,$this->y-5,$this->x,$this->height-15,$line_color);
//将实际的数据绘制到该图像上,并结束整个程序
foreach($this->array as $row){
if($this->bar_count > 0){
$percent = intval(($row['nums']/$this->count)*100);
}else{
$percent = 0;
}
$percent_dimensions = imagettfbbox($this->main_size,0,$this->fontname,$percent."%");
$percent_length = $percent_dimensions[2]-$percent_dimensions[0];
imagettftext($im, $this->main_size, 0, $this->width-$percent_length-$this->text_indent, $this->y+($this->bar_height/2), $percent_color, $this->fontname, $percent."%");
$bar_length = $this->x + ($percent * $this->bar_unit);
//画条形中占据的百分比
imagefilledrectangle($im, $this->x, $this->y-2, $bar_length, $this->y+$this->bar_height, $bar_color);
//用户标签
imagettftext($im,$this->main_size, 0, $this->text_indent, $this->y+($this->bar_height/2), $text_color, $this->fontname, $row['tag']);
//画出100%的长度
imagerectangle($im, $bar_length+1, $this->y-2, $this->x+(100*$this->bar_unit), $this->y+$this->bar_height, $line_color);
//数字
imagettftext($im, $this->small_size, 0, $this->x+(100*$this->bar_unit)-50, $this->y+($this->bar_height/2), $number_color, $this->fontname, $row['nums']."/".$this->count);
//移动到下一个条
$this->y = $this->y + ($this->bar_height+$this->bar_space);
}
return $im;
}
}
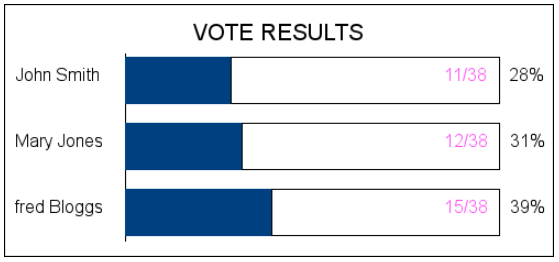
?>现在我们通过这个类并且传入合适的参数,就可以生成一个简单的显示投票结果的图片了。下面我们在另一个文件里面引用它 vote_build.php:
<?php
//先包含刚才我们创建的文件vote_create.php
require_once("./vote_create.php");
$array = array();

@ $conn = new mysqli("localhost","lsgo","lsgoweb","poll");
$query = "SELECT * FROM poll_results";
if(!($result = @$conn->query($query))){
    echo "链接数据库失败";
    exit;
}
$fontname = "C:/Windows/Fonts/Arial.ttf";
$i = 0;

//组装成符合规格的数组
while($row = $result->fetch_assoc()){
    $array[$i]['tag'] = $row['candidate'];
    $array[$i]['nums'] = $row['num_votes'];
    $i++;
}
//生成图片
$picture = new Create($array,$fontname,"VOTE RESULTS");
$im = $picture->draw();
//展示图片
header("Content-type:image/png");
imagepng($im);
//关闭资源
imagedestroy($im);
?>
在这里,我用的数据库是 poll,用户名 lsgo,密码 lsgoweb
为了大家能够测试,我给出数据库 poll和测试数据:
//先创建数据库
CREATE DATABASE poll;

USE poll;

//创建表
CREATE TABLE poll_results(
    candidate varchar(30),
    num_votes int
);

//添加测试数据
INSERT INTO poll_results VALUES
('John Smith',11),
('Mary Jones',12),
('Fred Bloggs',15)
;

//创建针对本应用的数据库用户
CREATE USER lsgo IDENTIFIED BY 'lsgoweb';

//授予用户lsgo对poll数据库的所有操作权限
GRANT ALL PRIVILEGES ON poll.* TO lsgo;

//检测是否授予权限成功
SHOW GRANTS FOR lsgo;
这时候我们在浏览器打开vote_build.php,会发现我们能够生成该图片了。
图片里面的字体、图片颜色和大小都是可以在类里面设置的
最后还有一个问题:由于之前为了输出图片,因此用了这么一行代码:
header("Content-type:image/png");
从而导致后面的其他输出非图片无效,也就是说,这个页面只能显示一个图片了,好单调!怎么办?
方法一:不输出该图片,而是将给图片保存到一个图片文件,然后再调用输出:
//生成图片
$picture = new Create($array,$fontname,"VOTE RESULTS");
$im = $picture->draw();
//展示图片
//header("Content-type:image/png");
//imagepng($im);//给imagepng()添加第二个参数,文件路径
imagepng($im,"../images/test.png");
//关闭资源
imagedestroy($im);
这样的话,html页面中直接在标签里面引用该图片即可。
方法二:在html页面中直接在标签的src中调用vote_build.php文件
例如,我这里写了个 test.html:
<html>
<head>
    <title>test</title>
</head>
<body>
    <h1>投票结果展示板</h1>
    <img src="../php/vote_build.php" alt="vote results">
</body>
</html>
通过这两种办法,就可以在其他页面嵌入我们的投票结果图片了。。。。。
当然,这个系统并不完整,这里没有投票页面,更没有对于每个用户只能投一次的限制,相信大家也会很容易就写出来缺少的页面的,加油 ^_^
本博客参考自《PHP和MYSQL WEB开发》
关于更多php图片库的例子,大家可以参照PHP对图片的各种处理


 554
554

 被折叠的 条评论
为什么被折叠?
被折叠的 条评论
为什么被折叠?
 到【灌水乐园】发言


