


本文参考了Oracle存储过程如何调用java程序并发送Http请求 - 灰信网(软件开发博客聚合)
第一步 创建用户:
create user C##Jo identified by JH;
grant dba to C##JH;
第二步 创建表test
create table test(id number,name varchar(50), value varchar(50));第三步 : 编写客户端代码
import java.io.BufferedReader;
import java.io.IOException;
import java.io.InputStreamReader;
import java.io.OutputStreamWriter;
import java.io.PrintWriter;
import java.net.URL;
import java.net.HttpURLConnection;
import java.net.URLConnection;
import java.util.*;
import java.net.URLEncoder;

public class HttpInvoker
{

     public static String sendRequest(String name, String userId,String orderNum) throws Exception{
         //处理参数


        Map<String,String> p=new HashMap<String,String>();
        //全体发送pushtype为ALL,不写target
        p.put("name",name);
        p.put("userId",userId);
        p.put("orderNum",orderNum);


        String s="";
        for (Map.Entry<String, String> entry : p.entrySet()) {
            s+="&"+entry.getKey()+"="+entry.getValue();
        }
        s=s.substring(1);
        //请求地址
        String url="http://127.0.0.1:8080/HelloWoeld/test";
        //请求参数
        String param=s;
        System.out.println(param);
         //发送post请求代码开始
         PrintWriter out = null;
        BufferedReader in = null;
        String result = "";
        try {
            URL realUrl = new URL(url);
            // 打开和URL之间的连接
            URLConnection conn = realUrl.openConnection();
            // 设置通用的请求属性
            conn.setRequestProperty("accept", "application/json, text/javascript, */*; q=0.01");
            conn.setRequestProperty("Accept-Encoding", "gzip, deflate");
            conn.setRequestProperty("Connection", "keep-alive");
            conn.setRequestProperty("Accept-Language", "zh-CN,zh;q=0.8");
            conn.setRequestProperty("Content-Length", "80");
            conn.setRequestProperty("Content-Type", "application/x-www-form-urlencoded; charset=UTF-8");
            conn.setRequestProperty("User-Agent", "Mozilla/5.0 (Windows NT 6.1; WOW64) AppleWebKit/537.36 (KHTML, like Gecko) Chrome/52.0.2743.116 Safari/537.36");

            conn.setRequestProperty("user-agent",
                    "Mozilla/4.0 (compatible; MSIE 6.0; Windows NT 5.1;SV1)");
            // 发送POST请求必须设置如下两行
            conn.setDoOutput(true);
            conn.setDoInput(true);
            // 获取URLConnection对象对应的输出流
            OutputStreamWriter outWriter = new OutputStreamWriter(conn.getOutputStream(), "utf-8");
            out = new PrintWriter(outWriter);
            // 发送请求参数
            out.print(param);
            // flush输出流的缓冲
            out.flush();
            // 定义BufferedReader输入流来读取URL的响应
            in = new BufferedReader(
                    new InputStreamReader(conn.getInputStream(),"UTF-8"));
            String line;
            while ((line = in.readLine()) != null) {
                result += line;
            }
        } catch (Exception e) {
            System.out.println("发送 POST 请求出现异常!"+e);
            e.printStackTrace();
            result=e.getMessage();
        }
        //使用finally块来关闭输出流、输入流
        finally{
            try{
                if(out!=null){
                    out.close();
                }
                if(in!=null){
                    in.close();
                }
            }
            catch(IOException ex){
                ex.printStackTrace();
            }
        }
        return result;
    }

     public static void main(String[] args) throws Exception {
    	 HttpInvoker ht = new HttpInvoker();
    	 ht.sendRequest("zhangssan", "11323343", "72323");
	}

}
第四步 编写服务器端代码
import java.io.BufferedReader;
import java.io.IOException;
import java.io.InputStreamReader;
import java.io.PrintWriter;
import java.net.URLEncoder;

import javax.servlet.ServletException;
import javax.servlet.annotation.WebServlet;
import javax.servlet.http.HttpServlet;
import javax.servlet.http.HttpServletRequest;
import javax.servlet.http.HttpServletResponse;


/**
 * Servlet implementation class test
 */
@WebServlet("/test")
public class test extends HttpServlet {
	private static final long serialVersionUID = 1L;

    /**
     * @see HttpServlet#HttpServlet()
     */
    public test() {
        super();
        // TODO Auto-generated constructor stub
    }

	/**
	 * @see HttpServlet#doGet(HttpServletRequest request, HttpServletResponse response)
	 */
	protected void doGet(HttpServletRequest request, HttpServletResponse response) throws ServletException, IOException {
		// TODO Auto-generated method stub

		String req =  request.getParameter("uid");
		System.out.println(req);
		response.getWriter().append("Served at: ").append(request.getContextPath());
	}

	/**
	 * @see HttpServlet#doPost(HttpServletRequest request, HttpServletResponse response)
	 */
	protected void doPost(HttpServletRequest request, HttpServletResponse response) throws ServletException, IOException {
		// TODO Auto-generated method stub
//		String req =  request.getParameter("uid");
//		System.out.println(req);
//		response.getWriter().append("Served at: ").append(request.getContextPath());
//		doGet(request, response);

	    	request.setCharacterEncoding("UTF-8");
	    	response.setCharacterEncoding("UTF-8");

	     response.setContentType("text/html;charset=UTF-8");

	        //将此字符串对象输出
	        PrintWriter out=response.getWriter();

	   // 	String req =  request.getParameter("uid");
	   //	System.out.println(req);
	        BufferedReader reader = new BufferedReader(new InputStreamReader(request.getInputStream()));
	        String line = null;
	        while ((line = reader.readLine()) != null) {
		        System.out.println(line);

            }

	}

}
第五步:在cmd将客户端代码通过 loadjava 载入到数据库Java文件夹下,如图所示
loadjava -u C##JH/JH -v -resolve HttpInvoker.java
第六步:创建函数test4 调用HttpInvoker中的sendRequest方法
create or replace function test4(name VARCHAR2, userId VARCHAR2 ,orderNum VARCHAR2) return    VARCHAR2
      as language java name
      'HttpInvoker.sendRequest (java.lang.String,java.lang.String,java.lang.String) return java.lang.String';
第七步:创建触发器:调用函数test4
create or replace TRIGGER trigger_insertJH
        before INSERT ON test
        FOR EACH ROW
DECLARE
v varchar(50);
begin

  dbms_output.put_line('this is a test!');
 dbms_output.put_line(:new.id);
  dbms_output.put_line(:new.name);
   dbms_output.put_line(:new.value);
    v := test4(:new.id,:new.name,:new.value);
end   trigger_insert  ;
第八步:配置acl 授予权限
 begin
	  dbms_network_acl_admin.create_acl (       -- 创建访问控制文件(ACL)
		acl         => 'utl_http25.xml',          -- 文件名称
		description => 'HTTP Access',           -- 描述
		principal   => 'C##JH',             -- 授权或者取消授权账号,大小写敏感
		is_grant    => TRUE,                    -- 授权还是取消授权
		privilege   => 'connect',               -- 授权或者取消授权的权限列表
		start_date  => null,                    -- 起始日期
		end_date    => null                     -- 结束日期
	  );

	  dbms_network_acl_admin.add_privilege (    -- 添加访问权限列表项
		acl        => 'utl_http25.xml',           -- 刚才创建的acl名称
		principal  => 'C##JH',                    -- 授权或取消授权用户
		is_grant   => TRUE,                     -- 与上同
		privilege  => 'resolve',                -- 权限列表
		start_date => null,
		end_date   => null
	  );

	  dbms_network_acl_admin.assign_acl (       -- 该段命令意思是允许访问acl名为utl_http.xml下授权的用户,使用oracle网络访问包,所允许访问的目的主机,及其端口范围。
		acl        => 'utl_http25.xml',
		host       => '127.0.0.1',           -- ip地址或者域名,填写https://localhost:9000/hello与https://localhost:9000/是会报host无效的
												-- 且建议使用ip地址或者使用域名,若用localhost,当oracle不是安装在本机上的情况下,会出现问题
		lower_port => 8080,                     -- 允许访问的起始端口号
		upper_port =>    null                   -- 允许访问的截止端口号
	  );
	  commit;
	end;
第九步:若是遇到以下问题,参考 以下网站,授予权限
https://blog.csdn.net/weixin_39939303/article/details/114231048
https://blog.csdn.net/lianzhang861/article/details/80618382

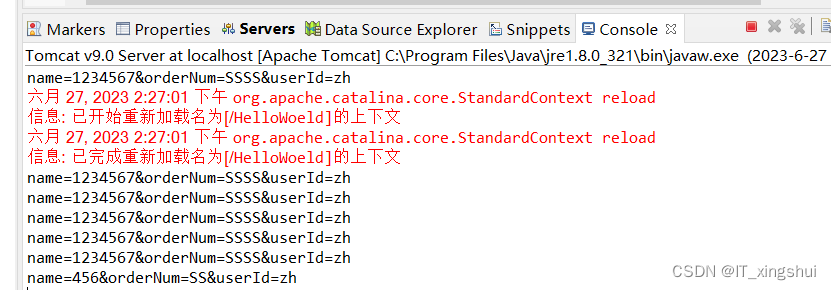
验证: 直接调用test4的时候 服务端收到数据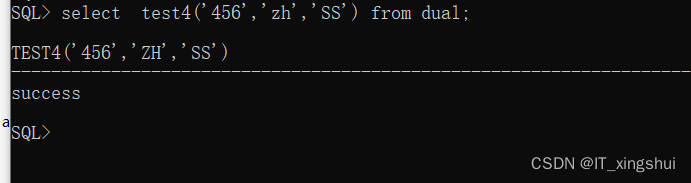
当插入数据的时候,返回成功

服务器端接收到数据


 3925
3925


 被折叠的 条评论
为什么被折叠?
被折叠的 条评论
为什么被折叠?
 到【灌水乐园】发言


