Spring的事件发布机制

一:Spring的事件发布

    ApplicationContext提供了针对Bean的事件传播功能,其中的主角是publishEvent()方法,通过这个方法可以将事件通知给系统内的监听器(需实现ApplicationListener接口)。

    ApplicationContext这个接口,是Spring的上下文,通常获取Bean就需要这个接口,这个接口并不是直接继承于BeanFactory,其中最著名的是直接继承了ApplicationPublisher接口,这个接口查看源码可以发现:只有一个方法,那就是主角 void publishEvent(ApplicationEvent event);

    Spring提供的基于Aware相关的接口有ApplicationContextAware,ResourceloaderAware,ServletContextAware(注意:Struts2也有这个接口,注意区分),最常用的就这三个,而Spring的事件发布机制需要用到ApplicationContextAware接口。

    实现了ApplicationContextAware的Bean,在Bean初始化时将会被注入ApplicationContext实例(因为这个接口里有set(ApplictationContext ctx)方法)

二:有了以上基础,看示例代码:

1.首先创建事件类 TradeEvent

1
2
3
4
5
6
7
8
9
10
11
12
13
14
15
16
17
package   net.wang.test;
 
import   org.springframework.context.ApplicationEvent;
 
/**
  * 事件Event
  * @author LiuRuoWang
  */
public   class   TradeEvent extends   ApplicationEvent{
     
     public   TradeEvent(Object source) {
         super (source);
         System.out.println( "事件:TradeEvent event !!" );
     }
     
}

事件必须继承Spring提供的ApplicationEvent抽象类
2 .然后编写 事件的发布者HelloWorld
1
2
3
4
5
6
7
8
9
10
11
12
13
14
15
16
17
18
19
20
21
22
23
24
25
26
27
28
29
30
package   net.wang.test;
 
import   org.springframework.context.ApplicationEventPublisher;
import   org.springframework.context.ApplicationEventPublisherAware;
 
/**
  * 事件的发布者
  * @author LiuRuoWang
  */
public   class   HelloWorld implements   ApplicationEventPublisherAware{
     
     private   String word;
     
     public   void   setWord(String word) {
         this .word = word;
     }
     
     private   ApplicationEventPublisher tradeEventPublisher;
     
     public   void   setApplicationEventPublisher(ApplicationEventPublisher applicationEventPublisher) {
         this .tradeEventPublisher=applicationEventPublisher;
     }
     
     public   void   say(){
         System.out.println( "say:" + this .word);
         TradeEvent tradeEvent = new   TradeEvent( new   String( "HelloWorld!" ));
         this .tradeEventPublisher.publishEvent(tradeEvent);
     }
     
}
1
其中在say()方法里发布了事件
1
3 .最后编写 事件的接收者EventReceiver:
1
2
3
4
5
6
7
8
9
10
11
12
13
14
package   net.wang.test;
 
import   org.springframework.context.ApplicationListener;
 
/**
  * 事件的接收者
  * @author LiuRuoWang
  */
public   class   EventReceiver implements   ApplicationListener<TradeEvent>{
 
     public   void   onApplicationEvent(TradeEvent event) {
         System.out.println( "监听到的事件:" +event.getSource());
     }
}
1
事件的接收者其实是一个监听器,必须实现ApplicationListener,注意把事件TradeEvent直接写到泛型中

1
4 .applicationContext.xml:
1
2
3
4
5
6
7
8
9
10
11
12
13
14
15
16
17
18
19
20
21
<?xml version= "1.0"   encoding= "GBK" ?>
<beans
     xsi:schemaLocation="http: //www.springframework.org/schema/beans
         http: //www.springframework.org/schema/beans/spring-beans-3.1.xsd
         http: //www.springframework.org/schema/aop
         http: //www.springframework.org/schema/aop/spring-aop-3.1.xsd
         http: //www.springframework.org/schema/tx
         http: //www.springframework.org/schema/tx/spring-tx-3.1.xsd">
     
     <bean name= "helloWrold"   class = "net.wang.test.HelloWorld" >
         <property name= "word"   value= "Word!" />
     </bean>
     
     <bean name= "eventReceiver"   class = "net.wang.test.EventReceiver" />
     
</beans>

注意把事件的接收者写入配置文件中

5.测试Test:

1
2
3
4
5
6
7
8
9
10
11
12
package   net.wang.test;
 
import   org.springframework.context.ApplicationContext;
import   org.springframework.context.support.ClassPathXmlApplicationContext;
 
public   class   Test {
     public   static   void   main(String[] args) {
         ApplicationContext ctx= new   ClassPathXmlApplicationContext( "applicationContext.xml" );
         HelloWorld h = (HelloWorld) ctx.getBean( "helloWrold" );
         h.say();
     }
}

6.结果显示:

image

结果中已经显示监听到的事件,说明成功。


Spring 中的事件监听的实现

这里我们不讨论事件监听的机制的原理,我们只讨论如何在项目中实现时间监听。 
Spring的事件监听是基于观察者模式。设计开发中。如下类与接口是我们必须要使用的。

ApplicationContext

首先我们了解一下ApplicationContext,还记得

ApplicationContext ac=new ClassPathXmlApplicationContext("beans.xml");
 
 
  • 1

ApplicationContext相当于Spring的一个与IOC容器连接的桥梁,通过getBean();方法,我们可以轻松的从IOC容器中获取Bean对象。 
因为ApplicationContext是实现ApplicationEventPublisher的。查看ApplicationEventPublisher的源码,我们发现有一方法publishEvent。此方法便是发布事件的方法,即触发事件的方法,通过调用publishEvent方法,注入事件ApplicationEvent的子类,实现事件的触发。

//这个是ApplicationContext类的声明
public interface ApplicationContext extends EnvironmentCapable,ListableBeanFactory,HierarchicalBeanFactory,MessageSource, ApplicationEventPublisher, ResourcePatternResolver {//...}
 
 
  • 1
  • 2
//ApplicationEventPublisher源码
public interface ApplicationEventPublisher {
    //该类只有这一个方法,用于发布通知,需要事件作为参数
    void publishEvent(ApplicationEvent event);

}
 
 
  • 1
  • 2
  • 3
  • 4
  • 5
  • 6

说了一大堆,就是想说ApplicationContext的

publicEvent(ApplicationEvent event);

方法是可以用来发布通知,相当于触发事件的事件源。

ApplicationContextAware

ApplicationContextAware类似于ServeletRequestAware,通过让Action实现Aware,使得Action初始化之后便可以获得一些资源,这里我们让Action实现ApplicationContext,使得Action拥有ApplicationContext,Action中拥有ApplicationContext之后就可以调用publicEvent方法进行通知

public interface ApplicationContextAware extends Aware {
    void setApplicationContext(ApplicationContext applicationContext) throws BeansException;

}
 
 
  • 1
  • 2
  • 3
  • 4

ApplicationEvent

ApplicationEvent相当于一个事件,所有自定义事件都需要继承这个抽象类。在Eclipse中Ctrl+Shift+H调用类的层次结构列表,可以看到如下 
这里写图片描述 
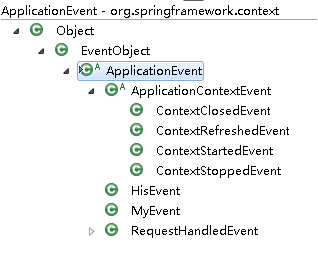
Application下抽象子类ApplicationContextEvent的下面有4个已经实现好的事件 
ContextClosedEvent(容器关闭时) 
ContextRefreshedEvent(容器刷新是) 
ContextStartedEvent(容器启动时候) 
ContextStoppedEvent(容器停止的时候) 
同样,这四个事件都继承了ApplicationEvent,如果我们想自定义事件,也可以通过继承ApplicationEvent来实现 
嗯,同样是一句话总结ApplicationEvent就是一个抽象类,创建时间的时候只需要继承它就可以。

ApplicationListener

从名字可以看出来,这是一个监听器。为什么需要监听器呢?监听器是用于接收事件,并触发事件的操作,这样说起来可能有点费解,简单的说就是,Listener是监听ApplicationContext.publishEvent,方法的调用,一旦调用publishEvent,就会执行ApplicaitonListener中的方法,下面这个是ApplicationContext的源码。

public interface ApplicationListener<E extends ApplicationEvent> extends EventListener {

    /**
     * publishEvent触发该方方法
     * 可以在该方法中写各种业务逻辑
     */
    void onApplicationEvent(E event);

}
 
 
  • 1
  • 2
  • 3
  • 4
  • 5
  • 6
  • 7
  • 8
  • 9

这里是实际代码实现的过程

  1. 新建一个MyEvent的类,继承ApplicationEvent抽象类
package cn.blueboz.elec.event;

import org.springframework.context.ApplicationEvent;

public class MyEvent extends ApplicationEvent {
    //存放构造器送入的值
    private String msg;
    //构造器参数可以随意设置,这里为了方便调试,设置为字符串
    public MyEvent(String msg) {
        super(msg);
        this.msg=msg;
    }
    //自定义一个方法,这个方法也可以随意写,这里也是测试用
    public void myevent(){
        System.out.println("********My event**************");
        System.out.println(msg);
        System.out.println("*******************************");
    }
}
 
 
  • 1
  • 2
  • 3
  • 4
  • 5
  • 6
  • 7
  • 8
  • 9
  • 10
  • 11
  • 12
  • 13
  • 14
  • 15
  • 16
  • 17
  • 18
  • 19

2.新建一个监听器MyListener

package cn.blueboz.elec.listener;

import org.springframework.context.ApplicationEvent;
import org.springframework.context.ApplicationListener;
import org.springframework.context.event.ContextClosedEvent;
import org.springframework.context.event.ContextRefreshedEvent;
import org.springframework.context.event.ContextStartedEvent;
import org.springframework.context.event.ContextStoppedEvent;
import org.springframework.stereotype.Service;

import cn.blueboz.elec.event.HisEvent;
import cn.blueboz.elec.event.MyEvent;

//注入IOC容器中
@Service("myListener")
public class MyListener implements ApplicationListener<ApplicationEvent> {
    //调用ApplicationContext.publishEvent方法时会触发执行该方法
    @Override
    public void onApplicationEvent(ApplicationEvent event) {
        //判断事件为MyEvent时候执行
        if(event instanceof MyEvent){
            //强制转换
            MyEvent evt=(MyEvent) event;
            //执行自定义事件中的自定义方法
            evt.myevent();
        }
        //如果容器关闭时,触发
        if(event instanceof ContextClosedEvent){
            ContextClosedEvent cce=(ContextClosedEvent) event;
            System.out.println("#####################");
            System.out.println("容器关闭");
            System.out.println(cce);
            System.out.println("#####################");
        }
        //容器刷新时候触发
        if(event instanceof ContextRefreshedEvent){
            ContextRefreshedEvent cre=(ContextRefreshedEvent) event;
            System.out.println("#####################");
            System.out.println("容器刷新");
            System.out.println(cre);
            System.out.println("#####################");
        }
        //容器启动的时候触发
        if(event instanceof ContextStartedEvent){
            ContextStartedEvent cse=(ContextStartedEvent) event;
            System.out.println("#####################");
            System.out.println("容器启动");
            System.out.println(cse);
            System.out.println("#####################");
        }
        //容器停止时候触发
        if(event instanceof ContextStoppedEvent){
            ContextStoppedEvent cse=(ContextStoppedEvent) event;
            System.out.println("#####################");
            System.out.println("容器停止");
            System.out.println(cse);
            System.out.println("#####################");
        }
    }

}
 
 
  • 1
  • 2
  • 3
  • 4
  • 5
  • 6
  • 7
  • 8
  • 9
  • 10
  • 11
  • 12
  • 13
  • 14
  • 15
  • 16
  • 17
  • 18
  • 19
  • 20
  • 21
  • 22
  • 23
  • 24
  • 25
  • 26
  • 27
  • 28
  • 29
  • 30
  • 31
  • 32
  • 33
  • 34
  • 35
  • 36
  • 37
  • 38
  • 39
  • 40
  • 41
  • 42
  • 43
  • 44
  • 45
  • 46
  • 47
  • 48
  • 49
  • 50
  • 51
  • 52
  • 53
  • 54
  • 55
  • 56
  • 57
  • 58
  • 59
  • 60
  • 61

3.最后,我们要再Action中发布通知publishEvent;

package cn.blueboz.elec.web.action;

import javax.annotation.Resource;

import org.apache.struts2.interceptor.ServletRequestAware;
import org.springframework.beans.BeansException;
import org.springframework.context.ApplicationContext;
import org.springframework.context.ApplicationContextAware;
import org.springframework.context.annotation.Scope;
import org.springframework.context.support.ClassPathXmlApplicationContext;
import org.springframework.stereotype.Controller;

import cn.blueboz.elec.domain.ElecText;
import cn.blueboz.elec.event.MyEvent;
import cn.blueboz.elec.service.IElecTextService;

//指定为prototype原型,对应每一个请求都会产生一个实例对象
@Controller("elecTextAction")
@Scope(value="prototype")
public class ElecTextAction extends BaseAction<ElecText> implements ApplicationContextAware,ServletRequestAware {
    //首先获得模型驱动对象

    ElecText elecText=getModel();
    protected ApplicationContext applicationContext;
    //注入Service指定从Spring的IOC容器中注入的对象的名称
    @Resource(name=IElecTextService.SERVICE_NAME)
    private IElecTextService elecTextService;

    public String save(){
        //从表单中传送过来的实例对象
        elecTextService.saveElecText(elecText);
        /**
         * 请关注这一行代码,在页面中访问时候调用save方法
         * save方法中执行了publishEvent方法发布通知。
         * 传入参数是自定义事件MyEvent
         */
        applicationContext.publishEvent(new MyEvent("在Action中的save方法Public了Event"));
        return "save";
    }

    @Override
    public void setApplicationContext(ApplicationContext applicationContext)
            throws BeansException {
        this.applicationContext=applicationContext;
    }
}
 
 
  • 1
  • 2
  • 3
  • 4
  • 5
  • 6
  • 7
  • 8
  • 9
  • 10
  • 11
  • 12
  • 13
  • 14
  • 15
  • 16
  • 17
  • 18
  • 19
  • 20
  • 21
  • 22
  • 23
  • 24
  • 25
  • 26
  • 27
  • 28
  • 29
  • 30
  • 31
  • 32
  • 33
  • 34
  • 35
  • 36
  • 37
  • 38
  • 39
  • 40
  • 41
  • 42
  • 43
  • 44
  • 45
  • 46

4.启动Tomcat时候命令行输出

#####################
容器刷新
org.springframework.context.event.ContextRefreshedEvent[source=Root WebApplicationContext: startup date [Fri Nov 20 17:12:47 CST 2015]; root of context hierarchy]
#####################
 
 
  • 1
  • 2
  • 3
  • 4

访问页面的时候,命令行输出,可以看出,触发了MyEvent方法输出。

********My event**************
在Action中的save方法Public了Event
*******************************

  • 0
    点赞
  • 1
    收藏
    觉得还不错? 一键收藏
  • 0
    评论

“相关推荐”对你有帮助么?

  • 非常没帮助
  • 没帮助
  • 一般
  • 有帮助
  • 非常有帮助
提交
评论
添加红包

请填写红包祝福语或标题

红包个数最小为10个

红包金额最低5元

当前余额3.43前往充值 >
需支付:10.00
成就一亿技术人!
领取后你会自动成为博主和红包主的粉丝 规则
hope_wisdom
发出的红包
实付
使用余额支付
点击重新获取
扫码支付
钱包余额 0

抵扣说明:

1.余额是钱包充值的虚拟货币,按照1:1的比例进行支付金额的抵扣。
2.余额无法直接购买下载,可以购买VIP、付费专栏及课程。

余额充值