flask
Flask是一个轻量级的可定制框架,使用Python语言编写,较其他同类型框架更为灵活、轻便、安全且容易上手
flask服务构建
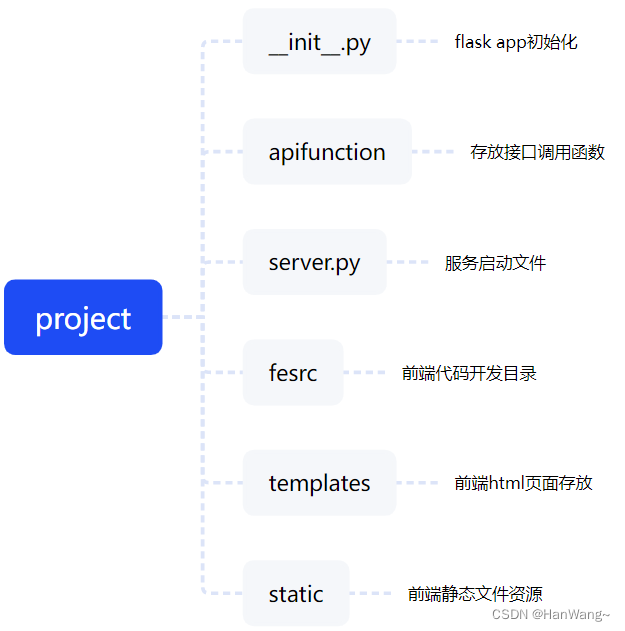
当前使用项目目录结构

基本服务构建
pip安装flask,构建基本服务base.py。
#base.py
from flask import Flask

app = Flask(__name__)#服务命名为app

@app.route('/')
def hello_world():
    return 'Hello World!'

if __name__ == '__main__':
    serverPort = 8080
    app.run(host="0.0.0.0",port=serverPort) #devserver
base.py启动的服务会产生警告
WARNING: This is a development server. Do not use it in a production deployment. Use a production WSGI server instead.
使用gevent的WSGIServer
安装gevent,pip install gevent,gevent启动多进程,
#base.py
from flask import Flask
from gevent import pywsgi
from flask_cors import CORS
from flask_restful import Api

#服务命名为app
app = Flask(__name__)
CORS(app, supports_credentials=True)
app.debug = True
api = Api(app)

@app.route('/')
def hello_world():
    return 'Hello World!'

if __name__ == '__main__':
    serverPort = 8010
    server = pywsgi.WSGIServer(('0.0.0.0', serverPort),app)
    server.serve_forever()
使用gunicron构建服务
gunicron构建服务存在日志管理,多线程构建等便捷功能。
参考1,参考2,参考3,参考4,参考5,参考6
__init__.py
from flask import Flask
from flask_restful import Api
from flask_cors import *

app = Flask(__name__)

CORS(app, supports_credentials=True)

app.debug = True

api = Api(app)
server.py
两种路由与调用函数的关联方式
- @app.route配置路由并下接调用函数。
- 使用flask_restful的Api,Resource关联接口函数。
import os, json
from flask import request
from __init__ import app, api
from flask_restful import Resource
from flask import Flask, request

@app.route("/")
def hello_world():
    return {"success": True, "message": "hello,world"}

class hello(Resource):
    def get(self):
        return {"xpathmsg": "12121", "iframehref": "nice"}


api.add_resource(hello, '/hello')  # 测试接口

if __name__ == "__main__":
    # pyinstaller -F main.py --noconsole
    # gunicorn --workers=6 data_server:app -b 0.0.0.0:8010
    # gunicorn -c pygun.py data_server:app --log-level=debug --preload
    serverPort = 8010
    app.run(host="0.0.0.0",port=serverPort)
pygun.py
bind = '127.0.0.1:8010' #gunicorn监控的接口
workers = 3 #进程数
threads = 2 #每个进程开启的线程数


proc_name = 'app'
#gunicorn进程id,kill掉该文件的id,gunicorn就停止
# pidfile = '/data1/test/app.pid'
loglevel = 'debug' #warining
# logfile = '/data1/test/debug.log'
#错误信息日志
# errorlog = '/data/test/error.log'
timeout = 10

#https://github.com/benoitc/gunicorn/issues/1194
keepalive = 75 # needs to be longer than the ELB idle timeout
worker_class = 'gevent' # 工作模式协程
##about timeout issuses
#https://github.com/benoitc/gunicorn/issues/1440
#https://github.com/globaldigitalheritage/arches-3d/issues/54
#https://github.com/benoitc/gunicorn/issues/588
#https://github.com/benoitc/gunicorn/issues/1194
#https://github.com/benoitc/gunicorn/issues/942
#https://stackoverflow.com/questions/10855197/gunicorn-worker-timeout-error


worker_connections = 100 #最大并发量

#access日志配置,更详细配置请看:https://docs.gunicorn.org/en/stable/settings.html#logging
#`%(a)s`参考示例:'%(a)s "%(b)s" %(c)s' % {'a': 1, 'b' : -2, 'c': 'c'}
#如下配置,将打印ip、请求方式、请求url路径、请求http协议、请求状态、请求的user agent、请求耗时
#示例:[2020-08-19 19:18:19 +0800] [50986]: [INFO] 127.0.0.1 POST /test/v1.0 HTTP/1.1 200 PostmanRuntime/7.26.3 0.088525
access_log_format="%(h)s %(r)s %(s)s %(a)s %(L)s"

#https://github.com/benoitc/gunicorn/issues/2250
logconfig_dict = {
    'version':1,
    'disable_existing_loggers': False,
    #在最新版本必须添加root配置,否则抛出Error: Unable to configure root logger
    "root": {
        "level": "DEBUG",
        "handlers": ["console"] # 对应handlers字典的键(key)
    },
    'loggers':{
        "gunicorn.error": {
            "level": "DEBUG",# 打日志的等级;
            "handlers": ["error_file"], # 对应handlers字典的键(key);
            #是否将日志打印到控制台(console),若为True(或1),将打印在supervisor日志监控文件logfile上,对于测试非常好用;
            "propagate": 0,
            "qualname": "gunicorn_error"
        },

        "gunicorn.access": {
            "level": "DEBUG",
            "handlers": ["access_file"],
            "propagate": 0,
            "qualname": "access"
        }
    },
    'handlers':{
        "error_file": {
            "class": "logging.handlers.RotatingFileHandler",
            "maxBytes": 1024*1024*100,# 打日志的大小(此处限制100mb)
            "backupCount": 1,# 备份数量(若需限制日志大小,必须存在值,且为最小正整数)
            "formatter": "generic",# 对应formatters字典的键(key)
            "filename": "./logs/error.log" #若对配置无特别需求,仅需修改此路径
        },
        "access_file": {
            "class": "logging.handlers.RotatingFileHandler",
            "maxBytes": 1024*1024*100,
            "backupCount": 1,
            "formatter": "generic",
            "filename": "./logs/access.log", #若对配置无特别需求,仅需修改此路径
        },
        'console': {
            'class': 'logging.StreamHandler',
            'level': 'DEBUG',
            'formatter': 'generic',
        },

    },
    'formatters':{
        "generic": {
            "format": "%(asctime)s [%(process)d]: [%(levelname)s] %(message)s", # 打日志的格式
            "datefmt": "[%Y-%m-%d %H:%M:%S %z]",# 时间显示格式
            "class": "logging.Formatter"
        }
    }
}
启动服务
gunicorn -c pygun.py data_server:app --log-level=debug --preload
flask允许跨域
需求场景:使用ajax从百度向flask服务发送数据。www.baidu.com->localhost:5000遇见跨域问题。
解决:
- 安装flask-cors
pip install flask-cors
from flask_cors import *
app = Flask(__name__)
CORS(app, supports_credentials=True)
- 使用ajax发送请求
$.ajax({
	type: 'post',
	dataType: 'json',
	headers: {
	    'Access-Control-Allow-Origin': '*'
	},
	crossDomain: true,
	data: {name:'hanw'},
	url: 'http://127.0.0.1:5000/hello',
	async: false // 默认是true,异步
}).then(function(resolve,reject){
console.log(resolve,reject)
});
request请求的内容
- Form - 它是一个字典对象,包含表单参数及其值的键和值对。
- args - 解析查询字符串的内容,它是问号(?)之后的URL的一部分。
- Cookies - 保存Cookie名称和值的字典对象。 files - 与上传文件有关的数据。
- method - 当前请求方法。
- headers - 请求头信息。
- data - 请求的参数。
- url - 请求的URL地址。
- files - 请求传递的文件。
格式转换
得到的request请求数据一般为ImmutableMultiDict,转换为dict使用to_dict()。
request.form.to_dict() #dict
dev警告
WARNING: This is a development server. Do not use it in a production deployment. Use a production WSGI server instead.
pip install gevent
from gevent import pywsgi
server = pywsgi.WSGIServer(('0.0.0.0', 5000), app)
server.serve_forever()
前端页面配置
flask每个服务接口对应一个SPA页面。
- 访问接口加载html页面
from flask import render_template

@app.route("/")
def toWebRoot():
    return render_template('index.html')
- html页面中引入js及css写法
<!DOCTYPE html><html lang="zh"><head>
  <meta charset="utf-8">
  <title>title</title>
  <base href="./">
  <meta name="viewport" content="width=device-width, initial-scale=1">
  <link rel="icon" type="image/x-icon" href="{{ url_for('static', filename='icon.ico') }}">
<style>@charset "UTF-8";:root{}</style>
<link rel="stylesheet" href="{{ url_for('static', filename='styles.css') }}" media="print" onload="this.media='all'">
<noscript><link rel="stylesheet" href="{{ url_for('static', filename='styles.css') }}"></noscript></head>
<body>
  <app-root></app-root>
  <script src="{{ url_for('static', filename='runtime.js') }}" type="module"></script>
  <script src="{{ url_for('static', filename='polyfills.js') }}" type="module"></script>
  <script src="{{ url_for('static', filename='scripts.js') }}" defer></script>
  <script src="{{ url_for('static', filename='main.js') }}" type="module"></script>
</body></html>


 1932
1932


 被折叠的 条评论
为什么被折叠?


