


K8S 基础
# 获取登录令牌
kubectl create token admin --namespace kubernetes-dashboard
1、 NameSpace
Kubernetes 启动时会创建四个初始名字空间
default:Kubernetes 包含这个名字空间,以便于你无需创建新的名字空间即可开始使用新集群。
kube-node-lease: 该名字空间包含用于与各个节点关联的 Lease(租约)对象。 节点租约允许 kubele发送心跳, 由此控制面能够检测到节点故障。
kube-public:所有的客户端(包括未经身份验证的客户端)都可以读取该名字空间。 该名字空间主要留为集群使用,以便某些资源需要在整个集群中可见可读。 该名字空间的公共属性只是一种约定而非要求。
kube-system:该名字空间用于 Kubernetes 系统创建的对象。
常用命令
#获取命名空间
[root@k8s-master ~]# kubectl get ns
NAME                   STATUS   AGE
default                Active   46h
kube-node-lease        Active   46h
kube-public            Active   46h
kube-system            Active   46h
kubernetes-dashboard   Active   46h

#获取指定命名空间下的pod,不传默认default
 kubectl get -n kube-system pod

#创建命名空间
 kubectl create ns xiaoli
#删除命名空间   这样删除会将命名空间下的服务资源一并删除,属于危险操作
 kubectl delete ns xiaoli
使用yaml创建
 [root@k8s-master ~]# vim xiaoli.yaml
[root@k8s-master ~]# cat xiaoli.yaml
apiVersion: v1
kind: Namespace
metadata:
  name: xiaoli
[root@k8s-master ~]# kubectl apply -f xiaoli.yaml
namespace/xiaoli created
yaml文件概述
#应用yaml文件指定的资源
#区别:使用create创建资源是一次性的,如果使用app1y创建,后期修改yam1文件再次执行apply可以实现更新资源
kubectl create -f xxx.yaml
kubectl apply -f xxx.yaml
#删除yam1文件指定的资源
kubectl delete -f xxx.yaml
#查看资源的yam1格式信息
kubectl get 资源名称 -o yaml
#直接修改资源对应的yam1文件,并用kubectl ap)ly -f xxx.yam] 文件使之生效
# 注意:当apply不生效时,先使用delete清除资源再使用apply创建资源
2、Pod
Pod:运行中的一组容器,Pod是kubenetes中应用的最小单位,也是在k8s上运行容器化应用的资源对象,其他的资源对象都是用来支持或扩展pod对象功能的。
知识了解:
每一个 Pod 都有一个特殊的被称为"根容器”的 Pause容器。Pause容器对应的镜像属于 Kubernetesk8s不会直接处理容器,而是 Pod。
也就导应用程序Pod是多进程设计,运用多个应用程序一个Pod里面有多个容器,而一个容器里面运行一个平台的一部分
Pod的创建和使用
[root@k8s-master ~]# kubectl run nginx01 --image=nginx
pod/nginx01 created
[root@k8s-master ~]# kubectl get pod
NAME      READY   STATUS              RESTARTS   AGE
nginx01   0/1     ContainerCreating   0          18s

[root@k8s-master ~]# kubectl describe pod nginx01
Name:             nginx01
Namespace:        default
Priority:         0
Service Account:  default
Node:             k8s-node2/192.168.13.66
Start Time:       Thu, 11 Apr 2024 15:18:52 +0800
Labels:           run=nginx01
Annotations:      cni.projectcalico.org/containerID: 988a58cf1c04de31abadf12c9440fd8e19857be9a5bd79440b0893a70f153c2b
                  cni.projectcalico.org/podIP: 192.168.169.130/32
                  cni.projectcalico.org/podIPs: 192.168.169.130/32
Status:           Running
IP:               192.168.169.130
IPs:
  IP:  192.168.169.130
Containers:
  nginx01:
    Container ID:   docker://1a3ce0a1b4f470ba78c99bfae7f7558eb8c5aeebc180465011bd47bd36ecc173
    Image:          nginx
    Image ID:       docker-pullable://nginx@sha256:b72dad1d013c5e4c4fb817f884aa163287bf147482562f12c56368ca1c2a3705
    Port:           <none>
    Host Port:      <none>
    State:          Running
      Started:      Thu, 11 Apr 2024 15:20:46 +0800
    Ready:          True
    Restart Count:  0
    Environment:    <none>
    Mounts:
      /var/run/secrets/kubernetes.io/serviceaccount from kube-api-access-qszgb (ro)
Conditions:
  Type              Status
  Initialized       True
  Ready             True
  ContainersReady   True
  PodScheduled      True
Volumes:
  kube-api-access-qszgb:
    Type:                    Projected (a volume that contains injected data from multiple sources)
    TokenExpirationSeconds:  3607
    ConfigMapName:           kube-root-ca.crt
    ConfigMapOptional:       <nil>
    DownwardAPI:             true
QoS Class:                   BestEffort
Node-Selectors:              <none>
Tolerations:                 node.kubernetes.io/not-ready:NoExecute op=Exists for 300s
                             node.kubernetes.io/unreachable:NoExecute op=Exists for 300s
Events:
  Type    Reason     Age   From               Message
  ----    ------     ----  ----               -------
  Normal  Scheduled  3m4s  default-scheduler  Successfully assigned default/nginx01 to k8s-node2
  Normal  Pulling    3m2s  kubelet            Pulling image "nginx"
  Normal  Pulled     70s   kubelet            Successfully pulled image "nginx" in 1m52.287s (1m52.287s including waiting)
  Normal  Created    70s   kubelet            Created container nginx01
  Normal  Started    70s   kubelet            Started container nginx01
[root@k8s-master ~]#
# 也可以在dashboard中,也可以通过界面化的方式查看详细
# 日志
kubectl logs nginx01
yaml 创建
[root@k8s-master ~]# vim nginx-cre.yaml
[root@k8s-master ~]# cat nginx-cre.yaml
apiVersion: v1
kind: Pod
metadata:
  name: nginx02
  labels:
    run: nginx02
spec:
  containers:
  - image: nginx
    name: nginx02
[root@k8s-master ~]# kubectl apply -f nginx-cre.yaml
访问pod中的应用
# kubectl get pod -owide
# 默认馋看default命名空间下的pod -a参数查看所有
[root@k8s-master ~]# kubectl get pod -owide
NAME      READY   STATUS    RESTARTS   AGE    IP                NODE        NOMINATED NODE   READINESS GATES
nginx01   1/1     Running   0          23m    192.168.169.130   k8s-node2   <none>           <none>
nginx02   1/1     Running   0          9m2s   192.168.36.66     k8s-node1   <none>           <none>

[root@k8s-master ~]# curl 192.168.169.130
<!DOCTYPE html>
<html>
<head>
<title>Welcome to nginx!</title>
<style>
html { color-scheme: light dark; }
body { width: 35em; margin: 0 auto;
font-family: Tahoma, Verdana, Arial, sans-serif; }
</style>
</head>
<body>
<h1>Welcome to nginx!</h1>
<p>If you see this page, the nginx web server is successfully installed and
working. Further configuration is required.</p>

<p>For online documentation and support please refer to
<a href="http://nginx.org/">nginx.org</a>.<br/>
Commercial support is available at
<a href="http://nginx.com/">nginx.com</a>.</p>

<p><em>Thank you for using nginx.</em></p>
</body>
</html>
#通过ip+端口查看pod下运行的应用

#进入容器,与docker的命令基本一致
kubectl exec -it nginx01 -- /bin/bash
一个pod中运行多个容器
[root@k8s-master ~]# vim multiServer.yaml
[root@k8s-master ~]# kubectl apply -f multiServer.yaml
pod/web-mul created
[root@k8s-master ~]# cat multiServer.yaml
apiVersion: v1
kind: Pod
metadata:
  name: web-mul
  labels:
    run: web-mul
spec:
  containers:
    - image: nginx
      name: nginx
    - image: tomcat:8.5.92
      name: tomcat
[root@k8s-master ~]# kubectl get pod -owide
NAME      READY   STATUS    RESTARTS      AGE   IP                NODE        NOMINATED NODE   READINESS GATES
nginx01   1/1     Running   0             44m   192.168.169.130   k8s-node2   <none>           <none>
nginx02   1/1     Running   0             29m   192.168.36.66     k8s-node1   <none>           <none>
web-mul   2/2     Running   2 (64s ago)   11m   192.168.169.131   k8s-node2   <none>           <none>

# 192.168.169.131:80 192.168.169.131:8080 可以访问多个服务
Pod就像是一个小型的linux环境
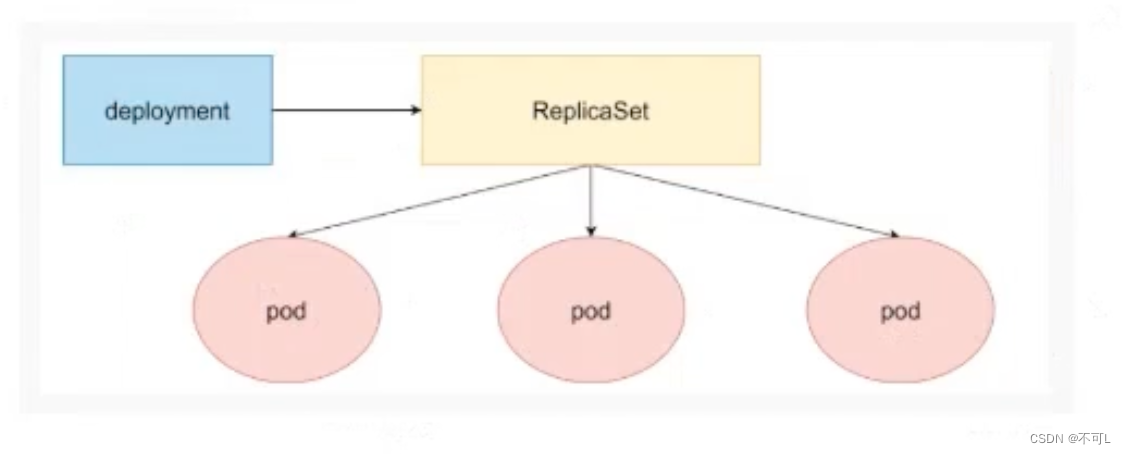
3、Deployment
控制器,用于管理多个Pod
为了更好地解决服务编排的问题,k8s在V1.2版本开始,引入了deployment控制器,值得一提的是,这种控制器并不直接管理pod而是通过管理replicaset来间接管理pod,即:deployment管理replicaset,replicaset管理pod。
所以deployment比replicaset的功能更强大,
通过deployment,使 Pod 拥有多副本、自愈、扩缩容等能力。
自愈能力
# 创建
[root@k8s-master ~]# kubectl create deployment nginx03 --image=nginx
deployment.apps/nginx03 created

#拥有自愈能力, nginx03无法删除,删除后会自启一个新尾缀的服务
[root@k8s-master ~]# kubectl get pod -owide
NAME                       READY   STATUS    RESTARTS      AGE   IP                NODE        NOMINATED NODE   READINESS GATES
nginx03-5c48c5c8cd-mjvqn   1/1     Running   0             32s   192.168.36.67     k8s-node1   <none>           <none>
[root@k8s-master ~]# kubectl delete pod nginx03-5c48c5c8cd-mjvqn
pod "nginx03-5c48c5c8cd-mjvqn" deleted
[root@k8s-master ~]# kubectl get pod -owide
NAME                       READY   STATUS    RESTARTS      AGE    IP                NODE        NOMINATED NODE   READINESS GATES
nginx03-5c48c5c8cd-88tlv   1/1     Running   0             102s   192.168.36.68     k8s-node1   <none>           <none>


#所以要通过deployment删除
[root@k8s-master ~]# kubectl get deploy -n default
NAME      READY   UP-TO-DATE   AVAILABLE   AGE
nginx03   1/1     1            1           6m29s
[root@k8s-master ~]# kubectl delete deploy nginx03 -n default
deployment.apps "nginx03" deleted
多副本能力
[root@k8s-master ~]# kubectl create deployment nginx-rep --image=nginx --replicas=3
deployment.apps/nginx-rep created
[root@k8s-master ~]# kubectl get deploy
NAME        READY   UP-TO-DATE   AVAILABLE   AGE
nginx-rep   3/3     3            3           20s

# 生成的每个pod有各自的ip
[root@k8s-master ~]# kubectl get pod -owide
NAME                         READY   STATUS    RESTARTS      AGE    IP                NODE        NOMINATED NODE   READINESS GATES
nginx-rep-6cc66f8b5f-2d4gl   1/1     Running   0             111s   192.168.36.70     k8s-node1   <none>           <none>
nginx-rep-6cc66f8b5f-7lzfj   1/1     Running   0             111s   192.168.36.69     k8s-node1   <none>           <none>
nginx-rep-6cc66f8b5f-skd92   1/1     Running   0             111s   192.168.169.132   k8s-node2   <none>           <none>

#k8s的deployment和pod之间是如何一一映射的?
#通过LABELS中的hash值映射
[root@k8s-master ~]# kubectl get replicaset --show-labels
NAME                   DESIRED   CURRENT   READY   AGE    LABELS
nginx-rep-6cc66f8b5f   3         3         3       5m8s   app=nginx-rep,pod-template-hash=6cc66f8b5f
[root@k8s-master ~]# kubectl get pod --show-labels
NAME                         READY   STATUS    RESTARTS      AGE     LABELS
nginx-rep-6cc66f8b5f-2d4gl   1/1     Running   0             5m15s   app=nginx-rep,pod-template-hash=6cc66f8b5f
nginx-rep-6cc66f8b5f-7lzfj   1/1     Running   0             5m15s   app=nginx-rep,pod-template-hash=6cc66f8b5f
nginx-rep-6cc66f8b5f-skd92   1/1     Running   0             5m15s   app=nginx-rep,pod-template-hash=6cc66f8b5f
使用yaml创建
apiVersion: apps/v1
kind: Deployment
metadata:
  name: nginx-deployment
  labels:
    run: nginx-deployment
spec:
  replicas: 3
  selector:
    matchLabels :
      app: nginx-deployment
  template:
    metadata:
      labels:
        app: nginx-deployment
    spec:
      containers:
        - image: nginx
          name: nginx
[root@k8s-master ~]# kubectl api-versions
admissionregistration.k8s.io/v1
apiextensions.k8s.io/v1
apiregistration.k8s.io/v1
apps/v1
authentication.k8s.io/v1
authorization.k8s.io/v1
autoscaling/v1
autoscaling/v2
batch/v1
certificates.k8s.io/v1
coordination.k8s.io/v1
crd.projectcalico.org/v1
discovery.k8s.io/v1
events.k8s.io/v1
flowcontrol.apiserver.k8s.io/v1beta2
flowcontrol.apiserver.k8s.io/v1beta3
networking.k8s.io/v1
node.k8s.io/v1
policy/v1
rbac.authorization.k8s.io/v1
scheduling.k8s.io/v1
storage.k8s.io/v1
v1
[root@k8s-master ~]#
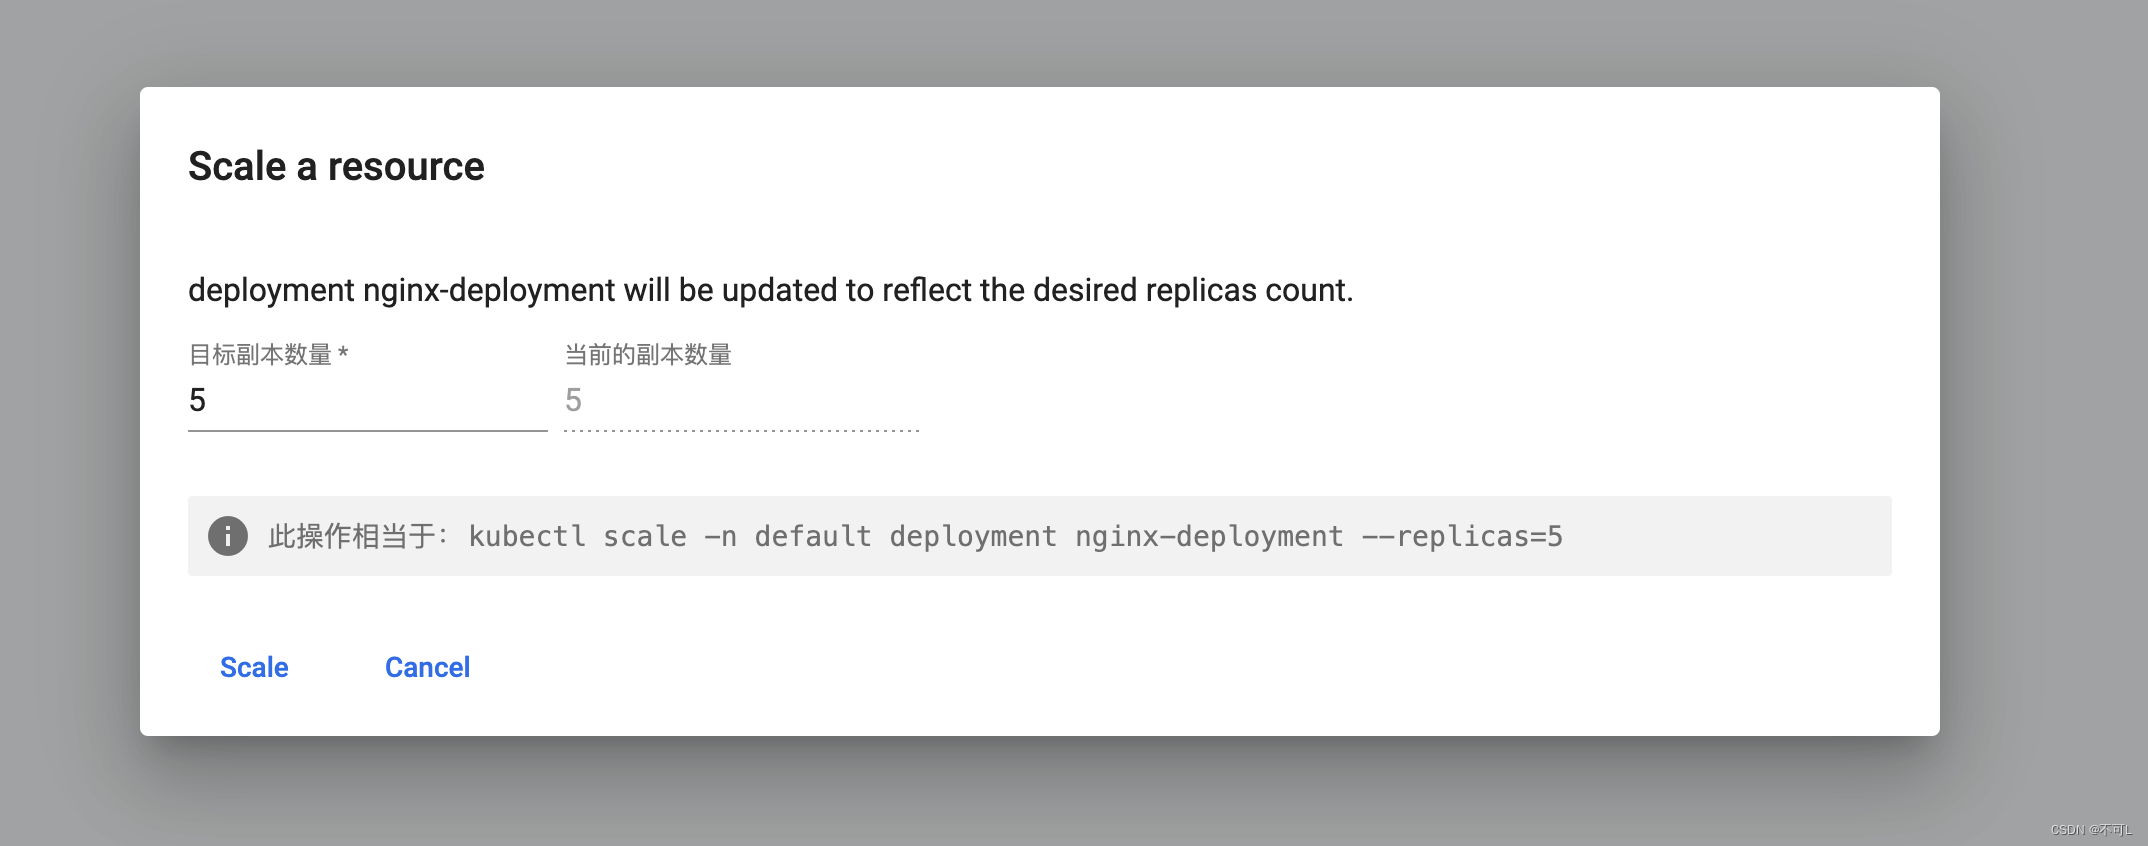
扩缩容
[root@k8s-master ~]# kubectl get deploy
NAME               READY   UP-TO-DATE   AVAILABLE   AGE
nginx-deployment   3/3     3            3           5h11m
[root@k8s-master ~]# kubectl scale deploy/nginx-deployment --replicas=5
deployment.apps/nginx-deployment scaled
[root@k8s-master ~]# kubectl get deploy
NAME               READY   UP-TO-DATE   AVAILABLE   AGE
nginx-deployment   3/5     5            3           5h12m
自愈
如果子节点的机器宕机了,会在其他机器中拉起宕调的服务。
K8s会自动故障转移,5分钟左右
滚动升级,灰度发布 、回滚
# 实时观察
kubectl get pod -w
#升级或者降级
[root@k8s-master ~]# kubectl set image deployment/nginx-deployment nginx=ngin:1.19.2 --record
Flag --record has been deprecated, --record will be removed in the future
deployment.apps/nginx-deployment image updated
[root@k8s-master ~]#

#回滚
#kubectl rollout --help

#查看部署的历史
[root@k8s-master ~]# kubectl rollout history deployment/nginx-deployment
deployment.apps/nginx-deployment
REVISION  CHANGE-CAUSE
1         <none>
2         kubectl set image deployment/nginx-deployment nginx=ngin:1.19.2 --record=true
3         kubectl set image deployment/nginx-deployment nginx=ngin:1.19.10 --record=true
# 查看具体信息
[root@k8s-master ~]# kubectl rollout history deployment/nginx-deployment --revision=2
deployment.apps/nginx-deployment with revision #2
Pod Template:
  Labels:       app=nginx-deployment
        pod-template-hash=6fbbbfffd8
  Annotations:  kubernetes.io/change-cause: kubectl set image deployment/nginx-deployment nginx=ngin:1.19.2 --record=true
  Containers:
   nginx:
    Image:      ngin:1.19.2
    Port:       <none>
    Host Port:  <none>
    Environment:        <none>
    Mounts:     <none>
  Volumes:      <none>

#回滚至上一个版本及回滚至指定版本
[root@k8s-master ~]# kubectl rollout undo deployment/nginx-deployment --revision=2
[root@k8s-master ~]# kubectl rollout history deployment/nginx-deployment --to-revision=2
4、Service
目前为止,我们部署的所有应用目前并不能通过浏览器访问
在前面讲解pod时知道,pod的生命周期比较短,其生命周期可以用朝生夕死来形容,这就造成了提供服务的Pod的IP地址频繁变化。而在访问服务时,我们期望提供服务的lp地址是稳定不变的。由上描述可知,pod的特性和人们的期望就发生了严重的冲突。此冲突就引出了service。
service:pod的服务发现和负载均衡
#创建3个nginx,并修改配置的index文件,用作区分。
[root@k8s-master ~]# kubectl create deployment web-nginx --image=nginx --replicas=3
deployment.apps/web-nginx created
[root@k8s-master ~]# kubectl get pod -owide
NAME                        READY   STATUS    RESTARTS   AGE     IP                NODE        NOMINATED NODE   READINESS GATES
web-nginx-5f989946d-76vll   1/1     Running   0          3m49s   192.168.36.76     k8s-node1   <none>           <none>
web-nginx-5f989946d-pwxk2   1/1     Running   0          3m49s   192.168.169.144   k8s-node2   <none>           <none>
web-nginx-5f989946d-tgk6q   1/1     Running   0          3m49s   192.168.169.145   k8s-node2   <none>           <none>
[root@k8s-master ~]# curl 192.168.36.76
pod 111
[root@k8s-master ~]# curl 192.168.169.144
pod 222
[root@k8s-master ~]# curl 192.168.169.145
pod 333
Expose 暴露服务 kubectl expose --help
[root@k8s-master ~]# kubectl expose deploy web-nginx --port=80 --target-port=80
service/web-nginx exposed
[root@k8s-master ~]# kubectl get service
NAME         TYPE        CLUSTER-IP    EXTERNAL-IP   PORT(S)   AGE
kubernetes   ClusterIP   10.96.0.1     <none>        443/TCP   3d22h
web-nginx    ClusterIP   10.96.31.78   <none>        80/TCP    44s
#service的ip会映射指向deploy对应的3个nginx
[root@k8s-master ~]# curl 10.96.31.78
pod 222
[root@k8s-master ~]# curl 10.96.31.78
pod 222
[root@k8s-master ~]# curl 10.96.31.78
pod 222
[root@k8s-master ~]# curl 10.96.31.78
pod 333
[root@k8s-master ~]# curl 10.96.31.78
pod 111
[root@k8s-master ~]# curl 10.96.31.78
pod 333
[root@k8s-master ~]# curl 10.96.31.78
pod 333
负载均衡的原理. 匹配labels中app参数一致的pod,去做负载均衡
[root@k8s-master ~]# kubectl get pod --show-labels
NAME                        READY   STATUS    RESTARTS   AGE   LABELS
web-nginx-5f989946d-76vll   1/1     Running   0          13m   app=web-nginx,pod-template-hash=5f989946d
web-nginx-5f989946d-pwxk2   1/1     Running   0          13m   app=web-nginx,pod-template-hash=5f989946d
web-nginx-5f989946d-tgk6q   1/1     Running   0          13m   app=web-nginx,pod-template-hash=5f989946d
[root@k8s-master ~]# kubectl get svc
NAME         TYPE        CLUSTER-IP    EXTERNAL-IP   PORT(S)   AGE
kubernetes   ClusterIP   10.96.0.1     <none>        443/TCP   3d22h
web-nginx    ClusterIP   10.96.31.78   <none>        80/TCP    5m36s
[root@k8s-master ~]# kubectl describe svc web-nginx
Name:              web-nginx
Namespace:         default
Labels:            app=web-nginx
Annotations:       <none>
Selector:          app=web-nginx
Type:              ClusterIP
IP Family Policy:  SingleStack
IP Families:       IPv4
IP:                10.96.31.78
IPs:               10.96.31.78
Port:              <unset>  80/TCP
TargetPort:        80/TCP
Endpoints:         192.168.169.144:80,192.168.169.145:80,192.168.36.76:80
Session Affinity:  None
Events:            <none>
kubectl delete svc web-nginx
web服务,需要对外暴露
redis,sql,mq等只想要内部访问
#type 参数 默认只能在k8s内网访问ClusterIP
#--type='':
#        Type for this service: ClusterIP, NodePort, LoadBalancer, or ExternalName. Default is 'ClusterIP'.

#通过NodePort类型 可以暴露给外网,他会随机给一个ip,这个ip无法设置。下一节会介绍ingress,相当于再一层的嵌套,用来做统一的网关
[root@k8s-master ~]# kubectl expose deploy web-nginx --port=80 --target-port=80 --type=NodePort
service/web-nginx exposed
[root@k8s-master ~]# kubectl get svc
NAME         TYPE        CLUSTER-IP     EXTERNAL-IP   PORT(S)        AGE
kubernetes   ClusterIP   10.96.0.1      <none>        443/TCP        3d22h
web-nginx    NodePort    10.96.50.186   <none>        80:31242/TCP   6s

# 宿主机内部容器的访问域名,项目中的微服务,就可以直接在代码中使用域名访问了
# curl web-nginx-default.svc
# service的ip会变,k8s对应的域名不会变


 533
533

 被折叠的 条评论
为什么被折叠?
被折叠的 条评论
为什么被折叠?
 到【灌水乐园】发言


