


一、Spring MVC 自动配置
SpringBoot实现自定义功能,需找到其自动配置类。一般自动配置类功能的实现,会先判断容器中是否存在相关类,如果不存在才是用Spring Boot中默认的自动配置类
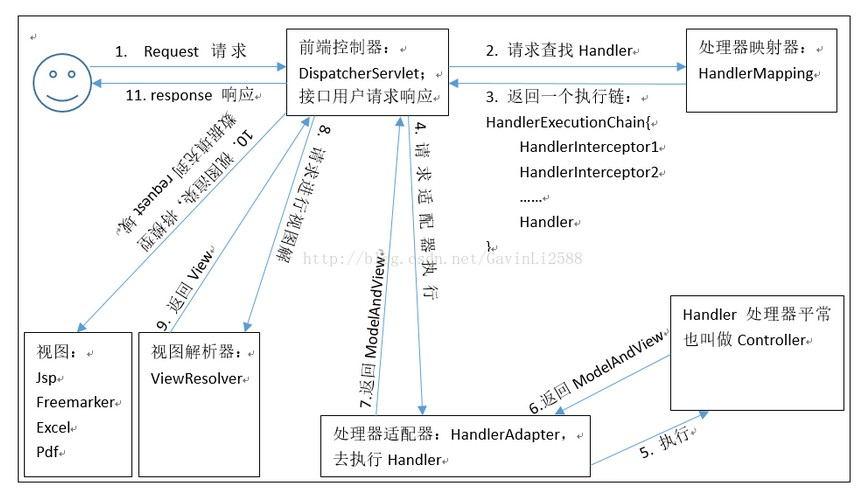
SpringMVC执行流程:
Spring MVC Auto-configuration
Spring Boot 对 Spring MVC 的自动配置
-
Inclusion of
ContentNegotiatingViewResolverandBeanNameViewResolverbeans.- 自动配置了ViewResolver(视图解析器:根据方法的返回值得到视图对象 View,视图对象决定如何渲染(转发?重定向?……))
ContentNegotiatingViewResolver:组合所有的视图解析器的;- 我们可以自己给容器中添加一个视图解析器;
-
Support for serving static resources, including support for WebJars (covered later in this document)). 静态资源文件路径 webjars
-
Static
index.htmlsupport. 静态首页访问 -
Custom
Faviconsupport (covered later in this document). favicon.ico -
自动注册了
Converter,GenericConverter, andFormatterbeans.-
Converter:转换器;前端与后台bean的类型转换问题;
-
Formatter:格式化器(2020/8/5 = Date)
-
spring.mvc.date-format可自行添加格式化器、转换器,需放入容器中
-
-
Support for
HttpMessageConverters(covered later in this document).-
HttpMessageConverters:SpringMVC用来转换Http请求和响应的;User—json;
-
HttpMessageConverters:是从容器中确认,获取所有的 HtpMessageConverter;
可自行添加,需放入容器中
-
-
Automatic registration of
MessageCodesResolver(covered later in this document). -
Automatic use of a
ConfigurableWebBindingInitializerbean (covered later in this document).
If you want to keep Spring Boot MVC features and you want to add additional MVC configuration (interceptors, formatters, view controllers, and other features), you can add your own @Configuration class of type WebMvcConfigurer but without @EnableWebMvc. If you wish to provide custom instances of RequestMappingHandlerMapping, RequestMappingHandlerAdapter, or ExceptionHandlerExceptionResolver, you can declare a WebMvcRegistrationsAdapter instance to provide such components.
If you want to take complete control of Spring MVC, you can add your own @Configuration annotated with @EnableWebMvc.
二、Spring MVC 扩展
SpringBoot 2.x的web开发中,自行添加(扩展)自动配置类,需加@Configuration注解,并需实现接口 WebMvcConfigurer
如果想全面接管SpringMVC(Spring Boot 对Spring MVC 的自动配置不要了) ,在@Configuration注解修饰的配置类加上注解@EnableWebMvc.(神经病啊)
1、改变视图映射地址方法
(重写 addViewControllers() 方法)
 @Configuration
 public class MyMvcConfig implements WebMvcConfigurer {

     @Override
     public void addViewControllers(ViewControllerRegistry registry) {
         // 浏览器访问/yousee,请求来到 success.html 页面
         registry.addViewController("/yousee").setViewName("/success");
 //        // 访问首页,映射
         registry.addViewController("/").setViewName("login");
         registry.addViewController("/index.html").setViewName("login");
         registry.addViewController("/main.html").setViewName("dashboard");
     }
 }
2、国际化,语言解析器
(1). 国际化配置文件
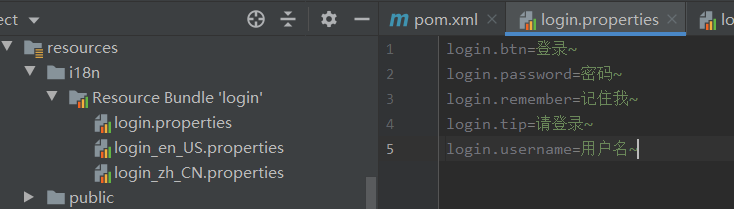
ps:注意properties编码是 ASCII,需要配置为UTF-8(Setting -> File Encoding - > UTF-8 勾选自动)
(2). Spring Boot 自动配置了管理国际化资源文件的组件
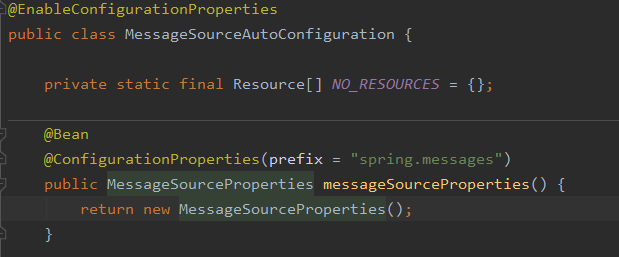
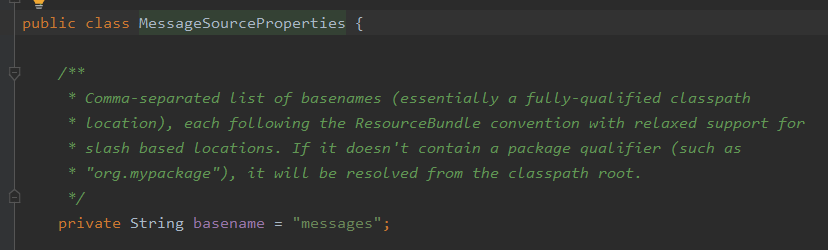
我们可以将国际化配置文件直接放在类路径下叫message.properties(默认的国际化文件,中文为message_zh_CN,英语message_en_US)
同时也可以自定义路径:(为什么用 . 而不是 / 因为是包)
spring.messages.basename=i18n.login
(3). 前端页面,在标签中 <h1 th:text="#{login.tip}"></h1>
 ...
     <h1 class="h3 mb-3 font-weight-normal" th:text="#{login.tip}">Please sign in</h1>
     <label class="sr-only" th:text="#{login.username}">Username</label>
     <input type="text" class="form-control" placeholder="Username" th:placeholder="#{login.username}" required="" autofocus="">
     <label class="sr-only" th:text="#{login.password}">Password</label>
     <input type="password" class="form-control" placeholder="Password" th:placeholder="#{login.password}" required="">
     <div class="checkbox mb-3">
         <label>
             <input type="checkbox" value="remember-me"> [[#{login.remember}]]
         </label>
     </div>
     <button class="btn btn-lg btn-primary btn-block" type="submit" th:text="#{login.btn}">Sign in</button>
     <p class="mt-5 mb-3 text-muted">© 2019-2020</p>
     <a class="btn btn-sm">中文</a>
     <a class="btn btn-sm">English</a>
 ...
(4). 要实现点击 中文/English 按钮实现国际化切换
 <!-- 超链接带上参数 -->
 <a class="btn btn-sm" th:href="@{/index.html(language='zh_CN')}">中文</a>
 <a class="btn btn-sm" th:href="@{/index.html(language='en_US')}">English</a>
手动写LocaleResolver实现类;重写resolveLocale方法
public class MyLocaleResolver implements LocaleResolver {
@Override
public Locale resolveLocale(HttpServletRequest httpServletRequest) {
String language = httpServletRequest.getParameter("language");
Locale locale = Locale.getDefault();
if(!StringUtils.isEmpty(language)){
String[] splits = language.split("_");
locale = new Locale(splits[0],splits[1]);
}
return locale;
}
@Override
public void setLocale(HttpServletRequest httpServletRequest, HttpServletResponse httpServletResponse, Locale locale) {
}
}
===================
// 方法名一定要与返回值一致
@Configuration
public class MyMvcConfig implements WebMvcConfigurer {
@Bean
public LocaleResolver localeResolver(){
return new MyLocaleResolver();
}
}
3、登录提交、拦截器
(1). 登录表单
 <body class="text-center">
     <form class="form-signin" action="dashboard.html" th:action="@{/user/login}" method="post">
(2). LoginController
防止表单重复提交,使用重定向页面;
重定向的页面可以通过视图映射,也可以直接指定;
直接指定重定向的html文件,需放在静态资源文件夹下(static、public)
@Controller
public class LoginController {
// @RequestMapping(value = "/user/login",method = RequestMethod.POST)
@PostMapping("/user/login")
public String login(String username,
String password,
Map<String,Object> errorInfo,
HttpSession session){
if(!StringUtils.isEmpty(username) && password.equals("123456")){
// 登录成功,将用户存入 session
session.setAttribute("loginUser",username);
// 防止表单重复提交,需要重定向页面
return "redirect:/main.html";
} else{
errorInfo.put("message","用户名或密码错误!");
return "login";
}
}
}
 @Configuration
 public class MyMvcConfig implements WebMvcConfigurer {
     @Override
     public void addViewControllers(ViewControllerRegistry registry) {
         // 映射
         registry.addViewController("/main.html").setViewName("dashboard");
     }
 }
但是 dashboard.html 页面即使不登录也可以直接访问,这时就需要拦截器
(3). 拦截器
(重写addInterceptors()方法)
 public class LoginInterceptor implements HandlerInterceptor {

     @Override
     public boolean preHandle(HttpServletRequest request, HttpServletResponse response, Object handler) throws Exception {
         HttpSession session = request.getSession();
         Object user = session.getAttribute("loginUser");
         if(user != null){
             // 登录成功
             return true;
         } else{
             // 登录失败,返回登录页面
             request.setAttribute("message","请先登录");
             request.getRequestDispatcher("/index.html").forward(request,response);
             return false;
         }
     }
     ...
 ====================
 @Configuration
 public class MyMvcConfig implements WebMvcConfigurer {
     @Override
     public void addInterceptors(InterceptorRegistry registry) {
         registry.addInterceptor(new LoginInterceptor()).addPathPatterns("/**")                  .excludePathPatterns("/","/index.html","/user/login","/webjars/**","/asserts/**");
     }
 }
三、Restful 风格
1、Rest 风格
URI:/资源名称/资源标识 HTTP请求方式区分对资源CRUD操作
| 普通CRUD(URI区分) | RestfulCRUD(请求方式) | |
|---|---|---|
| 查询 | getEmp | emp—GET |
| 添加 | addEmp?xxx | emp—POST |
| 修改 | updateEmp?id=1 | emp/{id}—PUT |
| 删除 | deleteEmp?id=1 | emp/{id}—DELETE |
2、实验的请求架构
| 功能 | 请求URI | 请求方式 |
|---|---|---|
| 查询所有员工 | emps | GET |
| 查询某个员工 | emp/1 | GET |
| 来到添加页面 | emp | GET |
| 添加员工 | emp | POST |
| 来到修改页面(员工信息回显) | emp/1 | GET |
| 修改员工 | emp | PUT |
| 删除员工 | emp/1 | DELETE |
4、如何发送 put 请求
- SpringMVC中配置 HiddenHttpMethodFilter;(SpringBoot 自动配置好了,但是SpringBoot默认不支持,需要修改配置文件 spring.mvc.hiddenmethod.filter.enabled = true)
- 页面创建post表单
- 创建一个input项,name=’_method’;值就是我们指定的请求方式
 WebMvcAutoConfiguration.java
     @Bean
     @ConditionalOnMissingBean(HiddenHttpMethodFilter.class)
     @ConditionalOnProperty(prefix = "spring.mvc.hiddenmethod.filter", name = "enabled", matchIfMissing = false)
     public OrderedHiddenHttpMethodFilter hiddenHttpMethodFilter() {
         return new OrderedHiddenHttpMethodFilter();
     }
 # 启用Http请求方法过滤
 spring.mvc.hiddenmethod.filter.enabled=true
 <form th:action="@{/emp}" method="post">
     <input type="hidden" name="_method" value="put" th:if="${emp!=null}"/>
     ...
 </form>
为了是布局更美观,使用 js 的方式提交
 <!-- 提交按钮 -->
 <button th:attr="del_uri=@{emp/} + ${emp.id}" class="btn btn-sm btn-danger deleteBtn">删除</button>

 <!-- 要提交的表单,分开放置    method=post不能丢了 -->
 <form id="deleteEmpForm" method="post">
     <input type="hidden" name="_method" value="delete"/>
 </form>

 <!-- js提交表单 -->
 <script>
     $(".deleteBtn").click(function(){
         // 删除当前员工
         $("#deleteEmpForm").attr("action",$(this).attr("del_uri")).submit();
         return false;
     });
 </script>


 8453
8453


 被折叠的 条评论
为什么被折叠?
被折叠的 条评论
为什么被折叠?
 到【灌水乐园】发言


