


一、概述
1.1SpringBoot整合SpringMVC配置
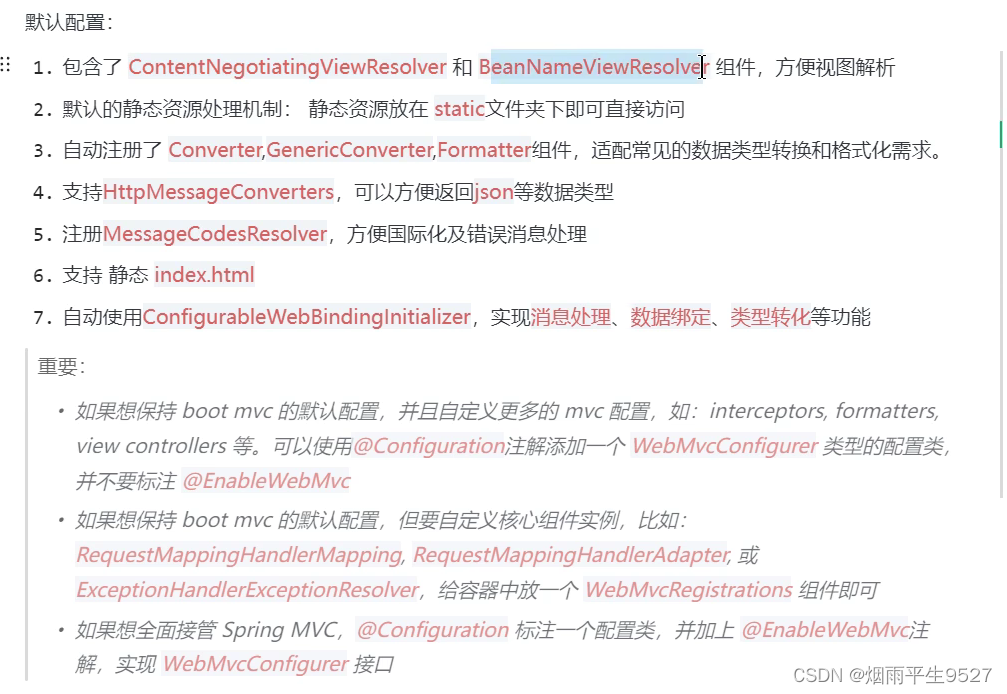
SpringBoot对SpringMVC的配置主要包括以下几个方面:
- 自动配置:SpringBoot会自动配置一个嵌入式的Servlet容器(如Tomcat),并为我们提供默认的SpringMVC配置。这样我们无需手动配置Servlet容器和SpringMVC,只需添加相应的依赖即可快速搭建一个Web应用。
- 视图解析器:SpringBoot默认使用Thymeleaf作为视图解析器,如果需要更换其他视图解析器,可以在pom.xml中修改对应的依赖。
- 静态资源处理:SpringBoot默认会处理静态资源(如HTML、CSS、JavaScript等),并将其放在项目的/static或/public目录下。如果需要自定义静态资源的处理方式,可以通过编写一个类实现WebMvcConfigurer接口,并重写addResourceHandlers方法来实现。
- 拦截器:SpringBoot支持自定义拦截器,可以通过实现HandlerInterceptor接口来创建拦截器,并在主配置类上添加@EnableWebMvc注解,然后在该注解的configurers属性中添加自定义的拦截器。
- 异常处理:SpringBoot默认使用WhitelabelErrorView来处理异常,如果需要自定义异常处理方式,可以通过编写一个类实现ErrorController接口,并重写errorHtml方法来实现。
- 参数绑定:SpringBoot支持多种参数绑定方式,如@RequestParam、@PathVariable、@RequestBody等。如果需要自定义参数绑定方式,可以通过编写一个类实现MethodArgumentResolver接口,并重写resolveArgument方法来实现。
- 跨域支持:SpringBoot默认支持CORS跨域请求,如果需要自定义跨域配置,可以通过编写一个类实现WebMvcConfigurer接口,并重写addCorsMappings方法来实现。
总之,SpringBoot为我们提供了丰富的默认配置和灵活的扩展机制,可以方便地定制和扩展SpringMVC以满足项目需求。
 1.2WebMvcConfiguration概述
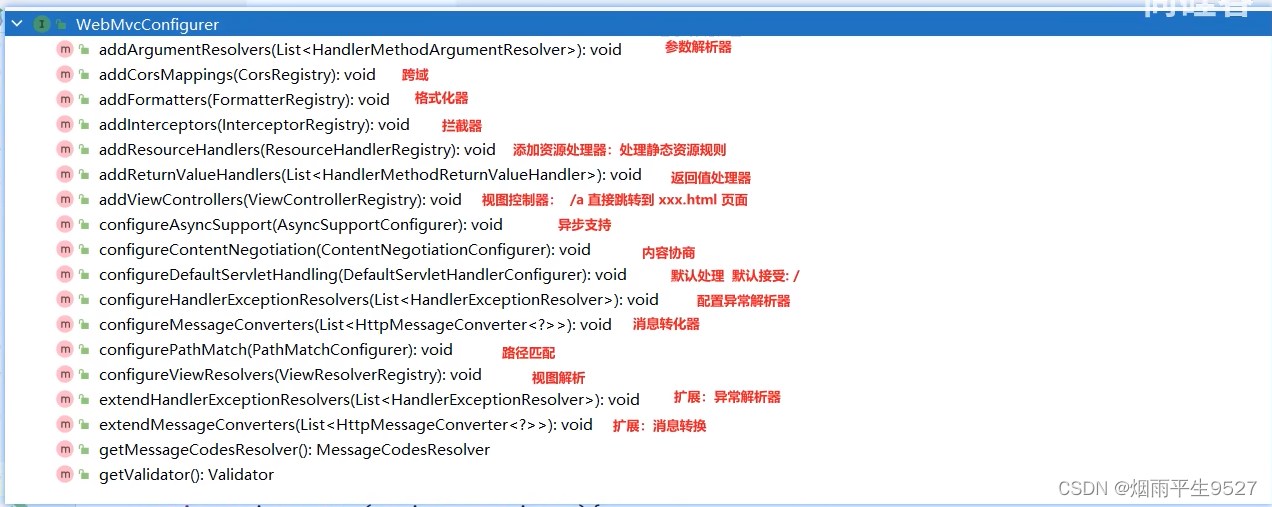
WebMvcConfigurer接口是Spring提供的一个用于自定义Spring MVC配置的接口,主要提供了WebMvcConfigurer接口是Spring提供的一个用于自定义Spring MVC配置的接口,主要提供了多个回调方法,包括添加或修改Spring MVC的配置,如添加拦截器,自定义消息转换器等。具体来说,WebMvcConfigurer接口的主要方法包括:
- - configurePathMatch(S):此方法用于配置路由请求规则。
- - configureContentNegotiation(S):该方法用于内容协商配置。
- - configureAsyncSupport(S):该方法用于异步支持配置。
- - configureDefaultServletHandling(S):该方法用于配置默认静态资源处理器。
- - addFormatters(S):此方法用于注册自定义转化器。
- - addInterceptors(S):此方法用于拦截器配置。
- - addResourceHandlers(S):此方法用于资源处理。
- - addCorsMappings(S):此方法用于CORS配置。
在使用时,只需要实现WebMvcConfigurer接口,重写上述的方法即可完成自定义配置。
二、详解
2.1资源处理器
import org.springframework.http.CacheControl;
import org.springframework.web.servlet.config.annotation.ResourceHandlerRegistry;
import org.springframework.web.servlet.config.annotation.WebMvcConfigurer;

import java.util.concurrent.TimeUnit;
@Configuration
public class MyConfig implements WebMvcConfigurer {
    @Override
    public void addResourceHandlers(ResourceHandlerRegistry registry) {
        // 保留以前的配置
        WebMvcConfigurer.super.addResourceHandlers(registry);

        // 自定义配置
        registry.addResourceHandler("/static/**")
            .addResourceLocations("classpath:/a/", "classpath:/b/")
            .setCacheControl(CacheControl.maxAge(1180, TimeUnit.SECONDS));
    }
}
实现了WebMvcConfigurer接口。它的作用是配置静态资源的处理方式。具体来说,它会将"/static/**"路径下的资源映射到"classpath:/a/"和"classpath:/b/"这两个目录下,并设置缓存时间为1180秒。

2.2 路径匹配
Spring5.3之后加入了更多的请求路径匹配的实现策略;
以前只支持AntPathMatcher策略,现在提供了PathPatternParser策略。并且可以让我们指定到底使用那种策略。
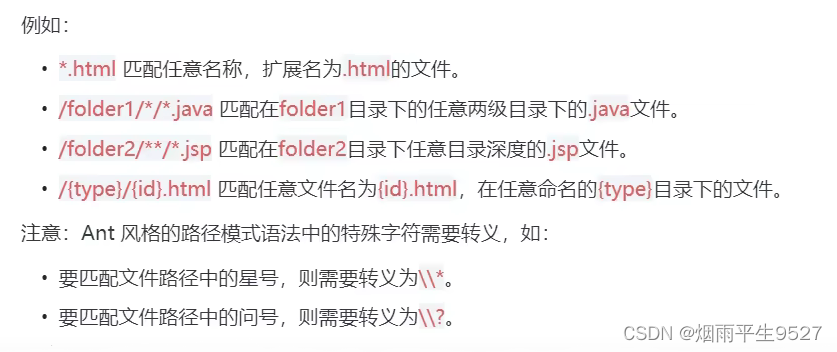
Ant风格
Ant风格的路径模式语法具有以下规则:
- *:表示任意数量的字符。
- ?:表示任意一个字符。
- **:表示任意数量的目录。
- {}:表示一个命名的模式占位符。
- []:表示字符集合,例如[a-z]表示小写字母。
PathPatternParser策略
PathPatternParser是Spring框架中用于解析URL路径模式的策略类。它可以解析和匹配URL路径模式,并且支持Ant风格的通配符,例如?、*和**。
- ·PathPatternParser在jmh基准测试下,有6~8倍吞l提升,降低30%~40%空间分配率
- ·PathPatternParser兼容AntPathMatcheri语法,并支持更多类型的路径模式
- ·PathPatternParser"*"多段匹配的支持仅允许在模式末尾使用
 /**
     * 默认使用新版 PathPatternParser 进行路径匹配
     * 不能匹配 ** 在中间的情况,剩下的和 antPathMatcher语法兼容
     * @param request
     * @param path
     * @return
     */
    @GetMapping("/a*/b?/**/{p1:[a-f]+}/**")
    public String hello(HttpServletRequest request, @PathVariable("p1") String path) {

        log.info("路径变量p1: {}", path);
        String uri = request.getRequestURI();
        return uri;
    }
模式转换
# 使用新版的路径匹配策略PathPatternParser
spring.mvc.pathmatch.matching-strategy=path_pattern_parser

# 使用老版的路径匹配策略AntPathMatcher
# spring.mvc.pathmatch.matching-strategy=ant_path_matcher
2.3内容协商配置
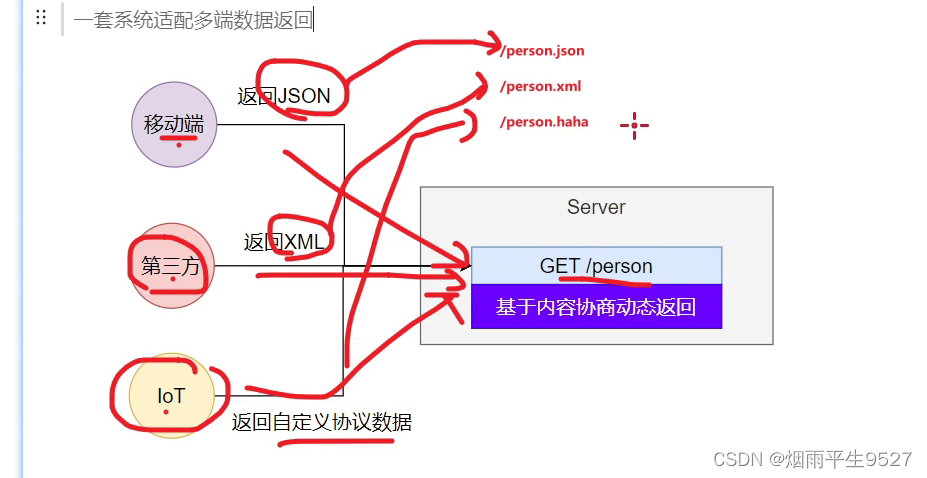
在Spring Boot中,内容协商(Content Negotiation)是一种处理不同客户端请求的方法。它允许服务器根据请求的内容类型、参数或其他条件来选择合适的响应格式。要配置内容协商,你需要使用
WebMvcConfigurer接口的实现类。

基于请求头内容协商:默认
客户端向服务端发送请求,携带HTTP标准的Accept请求头。
- .Accept:application/json.text/xml.text/yaml
- 服务端根据客户端情求头期望的数据类型进行动态返回
基于请求参数内容协商:需要开启
- 发送请求GET/projects/spring-boot?format=json
- 匹配到@GetMapping("*/projects/spring-boot")
- 根据参数协商,优先返回json类型数据【需要开启参数匹配设置】
- 发送请求GET/projects/spring-boot?format:=xml,优先返回xml类型数据
web场景自动引入了json场景
在 spring-boot-starter-web 依赖下:
<dependency>
      <groupId>org.springframework.boot</groupId>
      <artifactId>spring-boot-starter-json</artifactId>
      <version>2.3.4.RELEASE</version>
      <scope>compile</scope>
</dependency>
内容协助实现转xml
请求同一个接口,可以返回json和xml不同格式数据
- 引入支持写出xml内容依赖
<dependency> <groupId>com.fasterxml.jackson.dataformat</groupId> <artifactId>jackson-dataformat-xml</artifactId> </dependency> - 标注注解
package com.yanyu.springplustest4.dto; import com.fasterxml.jackson.dataformat.xml.annotation.JacksonXmlRootElement; import lombok.AllArgsConstructor; import lombok.Data; import lombok.NoArgsConstructor; @JacksonXmlRootElement // 可以写出为xml文档 @Data @AllArgsConstructor @NoArgsConstructor public class Person { private Long id; private String userName; private String email; private Integer age; private String role; }@JacksonXmlRootElement注解是Jackson库中的一个注解,用于指定XML文档的根元素。当使用Jackson库将Java对象转换为XML时,可以使用此注解来设置根元素的标签名。例如:import com.fasterxml.jackson.annotation.JacksonXmlRootElement; @JacksonXmlRootElement(localName = "student") public class Student { private String name; private int age; // 省略getter和setter方法 }在这个例子中,
Student类被标记为@JacksonXmlRootElement(localName = "student"),表示生成的XML文档的根元素标签名为<student>。 - 开启基于请求参数的内容协商
# 开启基于请求参数的内容协商功能。 默认参数名:format。 默认此功能不开启 spring.mvc.contentnegotiation.favor-parameter=true # 指定内容协商时使用的参数名。默认是 format spring.mvc.contentnegotiation.parameter-name=type - 测试
package com.yanyu.springplustest4.Controller;

import com.fasterxml.jackson.core.JsonProcessingException;
import com.fasterxml.jackson.databind.ObjectMapper;
import com.yanyu.springplustest4.dto.Person;
import jakarta.servlet.http.HttpServletRequest;
import lombok.extern.slf4j.Slf4j;
import org.springframework.beans.factory.annotation.Autowired;
import org.springframework.context.MessageSource;
import org.springframework.web.bind.annotation.*;

import java.util.Locale;

/**
 * @author lfy
 * @Description
 * @create 2023-04-10 18:31
 */
@Slf4j
@RestController
public class HelloController {

    /**
     * 1、默认支持把对象写为json。因为默认web场景导入了jackson处理json的包;jackson-core
     * 2、jackson也支持把数据写为xml。导入xml相关依赖
     * @return
     */
    @GetMapping("/person")
    public Person person(){
        Person person = new Person();
        person.setId(1L);
        person.setUserName("张三");
        person.setEmail("aaa@qq.com");
        person.setAge(18);
        return person;
    }

}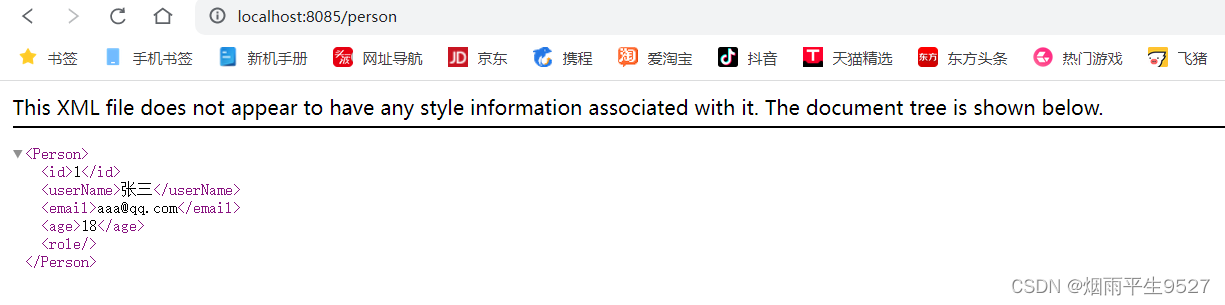
配置协商规则与支持类型
- 修改内容协商方式
#使用参数进行内容协商 spring.mvc.contentnegotiation.favor-parameter=true #自定义参数名,默认为format spring.mvc.contentnegotiation.parameter-name=myparam - 大多数 MediaType 都是开箱即用的。也可以自定义内容类型
spring.mvc.contentnegotiation.media-types.yaml=text/yaml
2.4消息转化器
WebMvcAutoConfiguration提供几种默认HttpMessageConverters
EnableWebMvcConfiguration通过addDefaultHttpMessageConverters添加了默认的MessageConverter;如下:ByteArrayHttpMessageConverter: 支持字节数据读写StringHttpMessageConverter: 支持字符串读写ResourceHttpMessageConverter:支持资源读写ResourceRegionHttpMessageConverter: 支持分区资源写出AllEncompassingFormHttpMessageConverter:支持表单xml/json读写MappingJackson2HttpMessageConverter: 支持请求响应体Json读写默认8个:
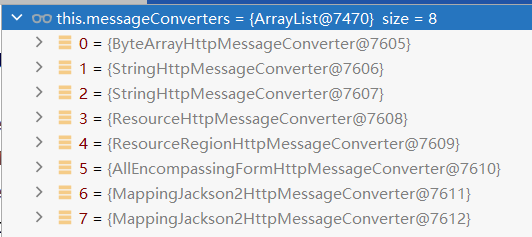
系统提供默认的MessageConverter 功能有限,仅用于json或者普通返回数据。额外增加新的内容协商功能,必须增加新的
HttpMessageConverter

在Spring Boot中,可以通过配置类来自定义消息转换器。例如,以下代码演示了如何配置一个将Java对象转换为JSON格式的消息的转换器:
@Configuration
public class WebConfig implements WebMvcConfigurer {
    @Override
    public void configureMessageConverters(List<HttpMessageConverter<?>> converters) {
        converters.add(new MappingJackson2HttpMessageConverter());
    }
}
举例
1. 增加yaml返回支持
导入依赖
<dependency>
    <groupId>com.fasterxml.jackson.dataformat</groupId>
    <artifactId>jackson-dataformat-yaml</artifactId>
</dependency>
把对象写出成YAML
package com.yanyu.springplustest4.Controller;

import com.fasterxml.jackson.core.JsonProcessingException;
import com.fasterxml.jackson.databind.ObjectMapper;
import com.yanyu.springplustest4.dto.Person;
import lombok.extern.slf4j.Slf4j;
import org.springframework.beans.factory.annotation.Autowired;
import org.springframework.context.MessageSource;
import org.springframework.web.bind.annotation.*;
import com.fasterxml.jackson.databind.ObjectMapper;
import com.fasterxml.jackson.dataformat.yaml.YAMLFactory;
import com.fasterxml.jackson.dataformat.yaml.YAMLGenerator;
import java.util.Locale;


@Slf4j
@RestController
public class HelloController {
    @GetMapping("/person")
    public Person person(/*@RequestBody Person person*/){
        Person person = new Person();
        person.setId(1L);
        person.setUserName("张三");
        person.setEmail("aaa@qq.com");
        person.setAge(18);
        return person;
    }
    public static void aaa(String[] args) throws JsonProcessingException {
        Person person = new Person();
        person.setId(1L);
        person.setUserName("张三");
        person.setEmail("aaa@qq.com");
        person.setAge(18);

        YAMLFactory factory = new YAMLFactory().disable(YAMLGenerator.Feature.WRITE_DOC_START_MARKER);
        ObjectMapper mapper = new ObjectMapper(factory);

        String s = mapper.writeValueAsString(person);
        System.out.println(s);
    }
}
编写配置
#新增一种媒体类型
spring.mvc.contentnegotiation.media-types.yaml=text/yaml增加HttpMessageConverter组件,专门负责把对象写出为yaml格式
package com.yanyu.springplustest4;

import com.fasterxml.jackson.databind.ObjectMapper;
import com.fasterxml.jackson.dataformat.yaml.YAMLFactory;
import com.fasterxml.jackson.dataformat.yaml.YAMLGenerator;
import org.springframework.http.HttpInputMessage;
import org.springframework.http.HttpOutputMessage;
import org.springframework.http.MediaType;
import org.springframework.http.converter.AbstractHttpMessageConverter;
import org.springframework.http.converter.HttpMessageNotReadableException;
import org.springframework.http.converter.HttpMessageNotWritableException;

import java.io.IOException;
import java.io.OutputStream;
import java.nio.charset.Charset;

/**
 * 自定义的HTTP消息转换器,用于将对象转换为YAML格式
 */
public class MyYamlHttpMessageConverter extends AbstractHttpMessageConverter<Object> {

    private ObjectMapper objectMapper = null; // 用于将对象转换为YAML格式的ObjectMapper

    /**
     * 构造方法,配置YAML格式的ObjectMapper
     */
    public MyYamlHttpMessageConverter(){
        super(new MediaType("text", "yaml", Charset.forName("UTF-8")));
 // 告诉SpringBoot这个MessageConverter支持哪种媒体类型
        YAMLFactory factory = new YAMLFactory()
                .disable(YAMLGenerator.Feature.WRITE_DOC_START_MARKER);
// 禁用YAML文档起始标记
        this.objectMapper = new ObjectMapper(factory);
    }

    /**
     * 判断是否支持转换指定的类
     * @param clazz 要转换的类
     * @return 如果是对象类型(非基本类型),返回true;否则返回false
     */
    @Override
    protected boolean supports(Class<?> clazz) {
        return true;
    }

    /**
     * 从HTTP输入消息中读取数据,暂不实现
     * @param clazz 要转换的类
     * @param inputMessage HTTP输入消息
     * @return 返回null
     * @throws IOException 如果发生I/O错误
     * @throws HttpMessageNotReadableException 如果无法读取消息
     */
    @Override
    protected Object readInternal(Class<?> clazz, HttpInputMessage inputMessage) throws IOException, HttpMessageNotReadableException {
        return null;
    }

    /**
     * 将对象写入HTTP输出消息中
     * @param methodReturnValue 要写出的对象
     * @param outputMessage HTTP输出消息
     * @throws IOException 如果发生I/O错误
     * @throws HttpMessageNotWritableException 如果无法写出消息
     */
    @Override
    protected void writeInternal(Object methodReturnValue, HttpOutputMessage outputMessage) throws IOException, HttpMessageNotWritableException {
        // 使用try-with-resources语法,自动关闭流
        try(OutputStream os = outputMessage.getBody()){
            this.objectMapper.writeValue(os, methodReturnValue);
        }
    }
}
2.5国际化配置
国际化的自动配置参照MessageSourceAutoConfiguration
实现步骤:
- Spring Boot 在类路径根下查找messages资源绑定文件。文件名为:messages.properties
- 多语言可以定义多个消息文件,命名为
messages_区域代码.properties。如:messages.properties:默认messages_zh_CN.properties:中文环境messages_en_US.properties:英语环境
- 在程序中可以自动注入
MessageSource组件,获取国际化的配置项值 - 在页面中可以使用表达式
#{}获取国际化的配置项值@Autowired //国际化取消息用的组件 MessageSource messageSource; @GetMapping("/haha") public String haha(HttpServletRequest request){ Locale locale = request.getLocale(); //利用代码的方式获取国际化配置文件中指定的配置项的值 String login = messageSource.getMessage("login", null, locale); return login; } -
配置
spring.messages.basename=messages
spring.messages.encoding=UTF-8
1. `spring.messages.basename=messages`:这个属性设置了Spring Boot默认的消息文件的基本名称,即在类路径下查找名为"messages"的文件。这些文件通常用于存储国际化消息,例如错误消息、提示消息等。
2. `spring.messages.encoding=UTF-8`:这个属性设置了Spring Boot默认的消息文件的字符编码。在这个例子中,编码被设置为UTF-8,这意味着消息文件中的文本将使用UTF-8编码进行存储和读取。
2.6错误处理机制
2.6.1默认机制
错误处理的自动配置都在
ErrorMvcAutoConfiguration中,两大核心机制
- SpringBoot 会自适应处理错误,响应页面或JSON数据
- SpringMVC的错误处理机制依然保留,MVC处理不了,才会交给boot进行处理**
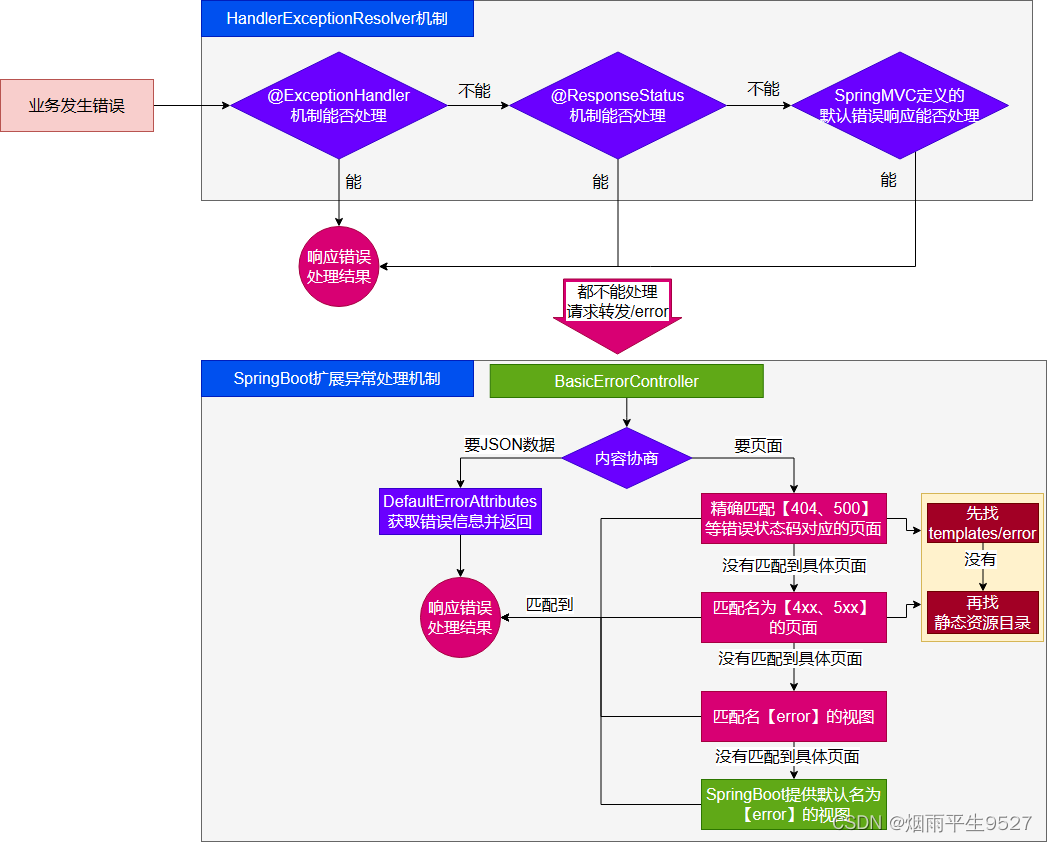
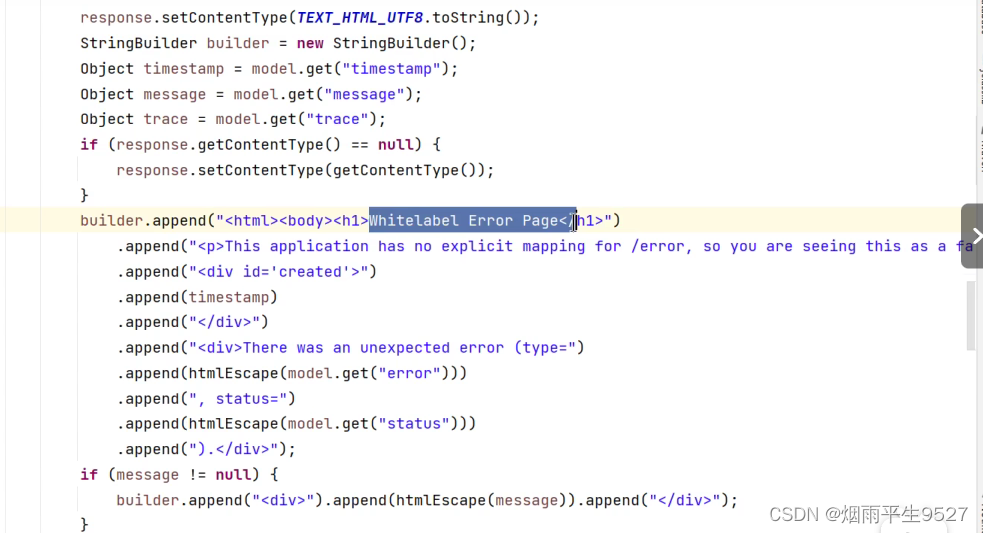
- 发生错误以后,转发给/error路径,SpringBoot在底层写好一个 BasicErrorController的组件,专门处理这个请求
- 错误页面是这么解析到的
//1、解析错误的自定义视图地址 ModelAndView modelAndView = resolveErrorView(request, response, status, model); //2、如果解析不到错误页面的地址,默认的错误页就是 error return (modelAndView != null) ? modelAndView : new ModelAndView("error", model);- 容器中专门有一个错误视图解析器
- SpringBoot解析自定义错误页的默认规则
- 容器中有一个默认的名为 error 的 view; 提供了默认白页功能
规则:
- 解析一个错误页
- 如果发生了500、404、503、403 这些错误
- 如果有模板引擎,默认在
classpath:/templates/error/**精确码.html**- 如果没有模板引擎,在静态资源文件夹下找
**精确码.html**- 如果匹配不到
精确码.html这些精确的错误页,就去找5xx.html,4xx.html模糊匹配
- 如果有模板引擎,默认在
classpath:/templates/error/5xx.html- 如果没有模板引擎,在静态资源文件夹下找
5xx.html- 如果模板引擎路径
templates下有error.html页面,就直接渲染
2.6.2自定义错误响应
1. 自定义json响应
使用@ControllerAdvice + @ExceptionHandler 进行统一异常处理
2. 自定义页面响应
根据boot的错误页面规则,自定义页面模板
2.6.3实现
- 前后分离
- 后台发生的所有错误,
@ControllerAdvice + @ExceptionHandler进行统一异常处理。- 服务端页面渲染
- 不可预知的一些,HTTP码表示的服务器或客户端错误
- 给
classpath:/templates/error/下面,放常用精确的错误码页面。500.html,404.html- 给
classpath:/templates/error/下面,放通用模糊匹配的错误码页面。5xx.html,4xx.html- 发生业务错误
- 核心业务,每一种错误,都应该代码控制,跳转到自己定制的错误页。
- 通用业务,
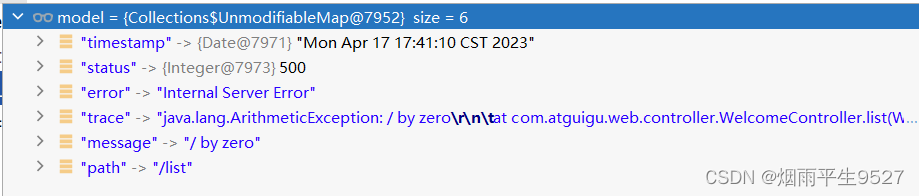
classpath:/templates/error.html页面,显示错误信息。页面,JSON,可用的Model数据如下
页面,JSON,可用的Model数据如下

三、嵌入式容器
Servlet容器:管理、运行Servlet组件(Servlet、Filter、Listener)的环境,一般指服务器
3.1自动配置原理
- SpringBoot 默认嵌入Tomcat作为Servlet容器。
- 自动配置类是
ServletWebServerFactoryAutoConfiguration,EmbeddedWebServerFactoryCustomizerAutoConfiguration- 自动配置类开始分析功能。
xxxxAutoConfiguration
ServletWebServerFactoryAutoConfiguration自动配置了嵌入式容器场景- 绑定了
ServerProperties配置类,所有和服务器有关的配置serverServletWebServerFactoryAutoConfiguration导入了 嵌入式的三大服务器Tomcat、Jetty、Undertow
- 导入
Tomcat、Jetty、Undertow都有条件注解。系统中有这个类才行(也就是导了包)- 默认
Tomcat配置生效。给容器中放 TomcatServletWebServerFactory- 都给容器中
ServletWebServerFactory放了一个** web服务器工厂(造web服务器的)**- web服务器工厂 都有一个功能,
getWebServer获取web服务器- TomcatServletWebServerFactory 创建了 tomcat。
- ServletWebServerFactory 什么时候会创建 webServer出来。
ServletWebServerApplicationContextioc容器,启动的时候会调用创建web服务器- Spring**容器刷新(启动)**的时候,会预留一个时机,刷新子容器。
onRefresh()- refresh() 容器刷新 十二大步的刷新子容器会调用
onRefresh();
Web场景的Spring容器启动,在onRefresh的时候,会调用创建web服务器的方法。 Web服务器的创建是通过WebServerFactory搞定的。容器中又会根据导了什么包条件注解,启动相关的 服务器配置,默认EmbeddedTomcat会给容器中放一个 TomcatServletWebServerFactory,导致项目启动,自动创建出Tomcat。
3.2服务器配置
用法:
- 修改
server下的相关配置就可以修改服务器参数- 通过给容器中放一个
**ServletWebServerFactory**,来禁用掉SpringBoot默认放的服务器工厂,实现自定义嵌入任意服务器。
3.3切换服务器;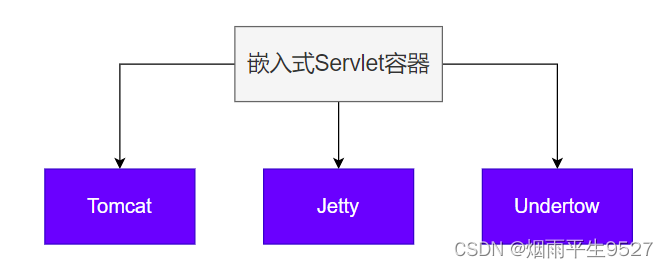
<properties>
    <servlet-api.version>3.1.0</servlet-api.version>
</properties>
<dependency>
    <groupId>org.springframework.boot</groupId>
    <artifactId>spring-boot-starter-web</artifactId>
    <exclusions>
        <!-- Exclude the Tomcat dependency -->
        <exclusion>
            <groupId>org.springframework.boot</groupId>
            <artifactId>spring-boot-starter-tomcat</artifactId>
        </exclusion>
    </exclusions>
</dependency>
<!-- Use Jetty instead -->
<dependency>
    <groupId>org.springframework.boot</groupId>
    <artifactId>spring-boot-starter-jetty</artifactId>
</dependency>
四、总结
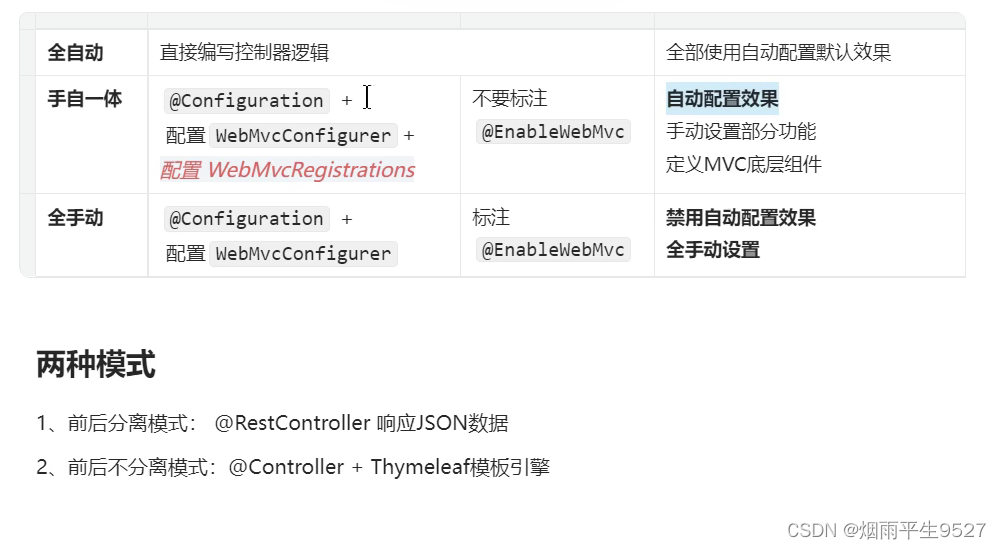
- SpringBoot 默认配置好了 SpringMVC 的所有常用特性。
- 如果我们需要全面接管SpringMVC的所有配置并禁用默认配置,仅需要编写一个
WebMvcConfigurer配置类,并标注@EnableWebMvc即可- 全手动模式
@EnableWebMvc: 禁用默认配置**WebMvcConfigurer**组件:定义MVC的底层行为
WebMvcAutoConfigurationweb场景的自动配置类
- 支持RESTful的filter:HiddenHttpMethodFilter
- 支持非POST请求,请求体携带数据:FormContentFilter
- 导入
**EnableWebMvcConfiguration**:
RequestMappingHandlerAdapterWelcomePageHandlerMapping: 欢迎页功能支持(模板引擎目录、静态资源目录放index.html),项目访问/ 就默认展示这个页面.RequestMappingHandlerMapping:找每个请求由谁处理的映射关系ExceptionHandlerExceptionResolver:默认的异常解析器LocaleResolver:国际化解析器ThemeResolver:主题解析器FlashMapManager:临时数据共享FormattingConversionService: 数据格式化 、类型转化Validator: 数据校验JSR303提供的数据校验功能WebBindingInitializer:请求参数的封装与绑定ContentNegotiationManager:内容协商管理器**WebMvcAutoConfigurationAdapter**配置生效,它是一个WebMvcConfigurer,定义mvc底层组件
- 定义好
WebMvcConfigurer底层组件默认功能;所有功能详见列表- 视图解析器:
InternalResourceViewResolver- 视图解析器:
BeanNameViewResolver,**视图名(controller方法的返回值字符串)**就是组件名- 内容协商解析器:
ContentNegotiatingViewResolver- 请求上下文过滤器:
RequestContextFilter: 任意位置直接获取当前请求- 静态资源链规则
ProblemDetailsExceptionHandler:错误详情
- SpringMVC内部场景异常被它捕获:
- 定义了MVC默认的底层行为:
WebMvcConfigurer
@EnableWebMvc 禁用默认行为
@EnableWebMvc给容器中导入DelegatingWebMvcConfiguration组件,他是 `WebMvcConfigurationSupport`
WebMvcAutoConfiguration有一个核心的条件注解,@ConditionalOnMissingBean(WebMvcConfigurationSupport.class),容器中没有WebMvcConfigurationSupport,WebMvcAutoConfiguration才生效.@EnableWebMvc 导入
WebMvcConfigurationSupport导致WebMvcAutoConfiguration失效。导致禁用了默认行为
- @EnableWebMVC 禁用了 Mvc的自动配置
- WebMvcConfigurer 定义SpringMVC底层组件的功能类


 426
426

 被折叠的 条评论
为什么被折叠?
被折叠的 条评论
为什么被折叠?
 到【灌水乐园】发言


