


network_setup.sh分析
1. 具体流程
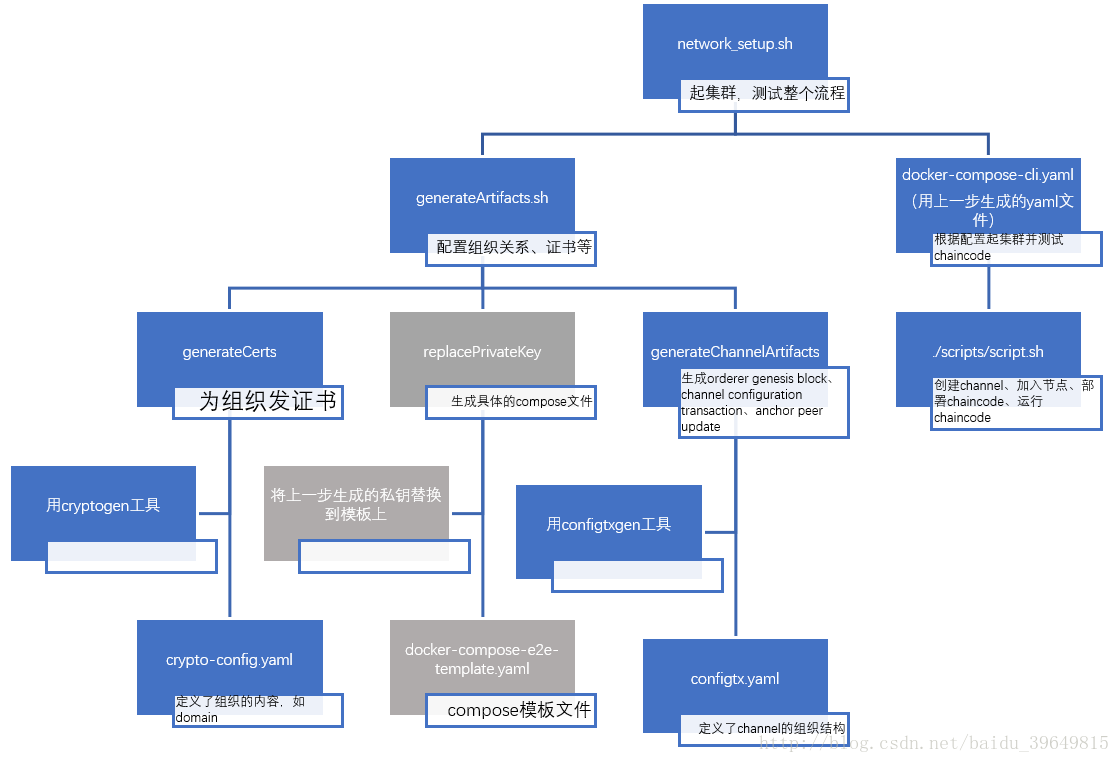
fabric/examples/e2e_cli目录下存有文件network_setup.sh用于一键部署环境并测试chaincode示例代码。其中包括两个部分,一个是利用generateArtifacts.sh脚本文件配置组织关系和颁发证书,另一个是docker-compose-cli.yaml用于根据配置启动集群并测试chaincode的示例代码。
2. generateArtifacts.sh脚本文件
包含三个函数:
- generateCerts:使用cryptogen工具根据
crypto-config.yaml来生成证书。 - replacePrivateKey:将docker-compose-e2e-template.yaml文档中的ca私钥替换成具体的私钥。(本例中未使用)
- generateChannelArtifacts:使用configtxgen工具根据
configtx.yaml文件来生成orderer genesis block、channel configuration transaction、anchor peer update。
crypto-config.yaml的具体内容如下:
# ---------------------------------------------------------------------------
# "OrdererOrgs" - Definition of organizations managing orderer nodes
# ---------------------------------------------------------------------------
OrdererOrgs:
  # ---------------------------------------------------------------------------
  # Orderer
  # ---------------------------------------------------------------------------
  - Name: Orderer
    Domain: example.com
    # ---------------------------------------------------------------------------
    # "Specs" - See PeerOrgs below for complete description
    # ---------------------------------------------------------------------------
    Specs:
      - Hostname: orderer
# ---------------------------------------------------------------------------
# "PeerOrgs" - Definition of organizations managing peer nodes
# ---------------------------------------------------------------------------
PeerOrgs:
  # ---------------------------------------------------------------------------
  # Org1
  # ---------------------------------------------------------------------------
  - Name: Org1
    Domain: org1.example.com
    # ---------------------------------------------------------------------------
    # "Specs"
    # ---------------------------------------------------------------------------
    # Uncomment this section to enable the explicit definition of hosts in your
    # configuration.  Most users will want to use Template, below
    #
    # Specs is an array of Spec entries.  Each Spec entry consists of two fields:
    #   - Hostname:   (Required) The desired hostname, sans the domain.
    #   - CommonName: (Optional) Specifies the template or explicit override for
    #                 the CN.  By default, this is the template:
    #
    #                              "{{.Hostname}}.{{.Domain}}"
    #
    #                 which obtains its values from the Spec.Hostname and
    #                 Org.Domain, respectively.
    # ---------------------------------------------------------------------------
    # Specs:
    #   - Hostname: foo # implicitly "foo.org1.example.com"
    #     CommonName: foo27.org5.example.com # overrides Hostname-based FQDN set above
    #   - Hostname: bar
    #   - Hostname: baz
    # ---------------------------------------------------------------------------
    # "Template"
    # ---------------------------------------------------------------------------
    # Allows for the definition of 1 or more hosts that are created sequentially
    # from a template. By default, this looks like "peer%d" from 0 to Count-1.
    # You may override the number of nodes (Count), the starting index (Start)
    # or the template used to construct the name (Hostname).
    #
    # Note: Template and Specs are not mutually exclusive.  You may define both
    # sections and the aggregate nodes will be created for you.  Take care with
    # name collisions
    # ---------------------------------------------------------------------------
    Template:
      Count: 2
      # Start: 5
      # Hostname: {{.Prefix}}{{.Index}} # default
    # ---------------------------------------------------------------------------
    # "Users"
    # ---------------------------------------------------------------------------
    # Count: The number of user accounts _in addition_ to Admin
    # ---------------------------------------------------------------------------
    Users:
      Count: 1
  # ---------------------------------------------------------------------------
  # Org2: See "Org1" for full specification
  # ---------------------------------------------------------------------------
  - Name: Org2
    Domain: org2.example.com
    Template:
      Count: 2
    Users:
Count: 1configtx.yaml的具体内容如下:
################################################################################
#
#   Profile
#
#   - Different configuration profiles may be encoded here to be specified
#   as parameters to the configtxgen tool
#
################################################################################
Profiles:

    TwoOrgsOrdererGenesis:
        Orderer:
            <<: *OrdererDefaults
            Organizations:
                - *OrdererOrg
        Consortiums:
            SampleConsortium:
                Organizations:
                    - *Org1
                    - *Org2
    TwoOrgsChannel:
        Consortium: SampleConsortium
        Application:
            <<: *ApplicationDefaults
            Organizations:
                - *Org1
                - *Org2

################################################################################
#
#   Section: Organizations
#
#   - This section defines the different organizational identities which will
#   be referenced later in the configuration.
#
################################################################################
Organizations:

    # SampleOrg defines an MSP using the sampleconfig.  It should never be used
    # in production but may be used as a template for other definitions
    - &OrdererOrg
        # DefaultOrg defines the organization which is used in the sampleconfig
        # of the fabric.git development environment
        Name: OrdererOrg

        # ID to load the MSP definition as
        ID: OrdererMSP

        # MSPDir is the filesystem path which contains the MSP configuration
        MSPDir: crypto-config/ordererOrganizations/example.com/msp

    - &Org1
        # DefaultOrg defines the organization which is used in the sampleconfig
        # of the fabric.git development environment
        Name: Org1MSP

        # ID to load the MSP definition as
        ID: Org1MSP

        MSPDir: crypto-config/peerOrganizations/org1.example.com/msp

        AnchorPeers:
            # AnchorPeers defines the location of peers which can be used
            # for cross org gossip communication.  Note, this value is only
            # encoded in the genesis block in the Application section context
            - Host: peer0.org1.example.com
              Port: 7051

    - &Org2
        # DefaultOrg defines the organization which is used in the sampleconfig
        # of the fabric.git development environment
        Name: Org2MSP

        # ID to load the MSP definition as
        ID: Org2MSP

        MSPDir: crypto-config/peerOrganizations/org2.example.com/msp

        AnchorPeers:
            # AnchorPeers defines the location of peers which can be used
            # for cross org gossip communication.  Note, this value is only
            # encoded in the genesis block in the Application section context
            - Host: peer0.org2.example.com
              Port: 7051

################################################################################
#
#   SECTION: Orderer
#
#   - This section defines the values to encode into a config transaction or
#   genesis block for orderer related parameters
#
################################################################################
Orderer: &OrdererDefaults

    # Orderer Type: The orderer implementation to start
    # Available types are "solo" and "kafka"
    OrdererType: solo

    Addresses:
        - orderer.example.com:7050

    # Batch Timeout: The amount of time to wait before creating a batch
    BatchTimeout: 2s

    # Batch Size: Controls the number of messages batched into a block
    BatchSize:

        # Max Message Count: The maximum number of messages to permit in a batch
        MaxMessageCount: 10

        # Absolute Max Bytes: The absolute maximum number of bytes allowed for
        # the serialized messages in a batch.
        AbsoluteMaxBytes: 98 MB

        # Preferred Max Bytes: The preferred maximum number of bytes allowed for
        # the serialized messages in a batch. A message larger than the preferred
        # max bytes will result in a batch larger than preferred max bytes.
        PreferredMaxBytes: 512 KB

    Kafka:
        # Brokers: A list of Kafka brokers to which the orderer connects
        # NOTE: Use IP:port notation
        Brokers:
            - 127.0.0.1:9092

    # Organizations is the list of orgs which are defined as participants on
    # the orderer side of the network
    Organizations:

################################################################################
#
#   SECTION: Application
#
#   - This section defines the values to encode into a config transaction or
#   genesis block for application related parameters
#
################################################################################
Application: &ApplicationDefaults

    # Organizations is the list of orgs which are defined as participants on
    # the application side of the network
    Organizations:
3. docker-compose-cli.yaml文件
根据组织关系启动docker集群,并在cli容器中执行command命令运行./scripts/script.sh脚本文件。
./scripts/script.sh脚本包含以下函数:
- createChannel:创建channel。
- joinChannel:将每个peer节点加入channel。
- updateAnchorPeers
- installChaincode:部署chaincode。
- instantiateChaincode:初始化chaincode,并设置背书策略。
- chaincodeQuery
- chaincodeInvoke


 104
104

 被折叠的 条评论
为什么被折叠?
被折叠的 条评论
为什么被折叠?
 到【灌水乐园】发言


