


1、添加springsecurity依赖
            <!-- SpringSecurity 对 Web 应用进行权限管理 -->
            <dependency>
                <groupId>org.springframework.security</groupId>
                <artifactId>spring-security-web</artifactId>
                <version>4.2.10.RELEASE</version>
            </dependency>
            <!-- SpringSecurity 配置 -->
            <dependency>
                <groupId>org.springframework.security</groupId>
                <artifactId>spring-security-config</artifactId>
                <version>4.2.10.RELEASE</version>
            </dependency>
            <!-- SpringSecurity 标签库 -->
            <dependency>
                <groupId>org.springframework.security</groupId>
                <artifactId>spring-security-taglibs</artifactId>
                <version>4.2.10.RELEASE</version>
            </dependency>
2、在配置文件中添加springsecurity的过滤器
该过滤器是被spring的IOC容器装载的。所以如果使用springmvc的IOC容器加载springsecurity对象的时候会导致报错。需要新建一个spring-securiy.xml文件并制定对应配置文件的位置。然后让spring扫描到对应的配置文件
  	<filter>
        <filter-name>springSecurityFilterChain</filter-name>
        <filter-class>org.springframework.web.filter.DelegatingFilterProxy</filter-class>
    </filter>
    <filter-mapping>
        <filter-name>springSecurityFilterChain</filter-name>
        <url-pattern>/*</url-pattern>
    </filter-mapping>
因为springsecurity的过滤链是由依赖关系的。所有只能命名过滤链的名称是这个
3、配置对应的springsecirty的配置类
新建一个对应类,并把它放到ioc容器中,让后让他继承对应父类
// 注意!这个类一定要放在自动扫描的包下,否则所有配置都不会生效! // 将当前类标记为配置类
@Configuration
// 启用 Web 环境下权限控制功能
@EnableWebSecurity
public class WebAppSecurityConfig extends WebSecurityConfigurerAdapter {

    @Autowired
    private UserDetailsService userDetailsService;

    @Override
    protected void configure(AuthenticationManagerBuilder builder) throws Exception {
        // 与 SpringSecurity 环境下用户登录相关
//        builder.inMemoryAuthentication().withUser("tom").password("123123").roles("ADMIN");

        builder.userDetailsService(userDetailsService);
    }

    @Override
    protected void configure(HttpSecurity security) throws Exception {
        // 与 SpringSecurity 环境下请求授权相关
//        security.authorizeRequests().anyRequest().permitAll();
        security
            .authorizeRequests() // 对请求进行授权
            .antMatchers("/admin/do/login.html") // 针对登录页进行设置
            .permitAll()   // 无条件访问
            .antMatchers("/bootstrap/**")  // 针对静态资源进行设置,无条件访问
            .permitAll() // 针对静态资源进行设置,无条件访问
            .antMatchers("/crowd/**") // 针对静态资源进行设置,无条件访问
            .permitAll() // 针对静态资源进行设置,无条件访问
            .antMatchers("/css/**") // 针对静态资源进行设置,无条件访问
            .permitAll() // 针对静态资源进行设置,无条件访问
            .antMatchers("/fonts/**") // 针对静态资源进行设置,无条件访问
            .permitAll() // 针对静态资源进行设置,无条件访问
            .antMatchers("/img/**") // 针对静态资源进行设置,无条件访问
            .permitAll() // 针对静态资源进行设置,无条件访问
            .antMatchers("/jquery/**") // 针对静态资源进行设置,无条件访问
            .permitAll() // 针对静态资源进行设置,无条件访问
            .antMatchers("/layer/**") // 针对静态资源进行设置,无条件访问
            .permitAll() // 针对静态资源进行设置,无条件访问
            .antMatchers("/script/**") // 针对静态资源进行设置,无条件访问
            .permitAll() // 针对静态资源进行设置,无条件访问
            .antMatchers("/ztree/**") // 针对静态资源进行设置,无条件访问
            .permitAll()
            .anyRequest()
            .authenticated()
            .anyRequest() // 其他任意请求
            .authenticated() // 认证后访问
            .and()
            .csrf() // 防跨站请求伪造功能
            .disable() // 禁用
            .formLogin() // 开启表单登录的功能
            .loginPage("/admin/do/login.html") // 指定登录页面
            .loginProcessingUrl("/security/do/login.html") // 指定处理登录请求的地址
            .defaultSuccessUrl("/admin/to/main/page.html")// 指定登录成功后前往的地
            .usernameParameter("loginAcct") // 账号的请求参数名称
            .passwordParameter("userPswd") // 密码的请求参数名称
            .and()
            .logout()
            .logoutUrl("/security/do/logout.html")
            .logoutSuccessUrl("/admin/do/login.html")
        ;
    }

}
3.1、configure(HttpSecurity security)方法
这个方法是控制路径的访问方式,该路径是可以直接访问还是需要授权才可以访问。等等。对应参数说明如下
    @Override
    protected void configure(HttpSecurity http) throws Exception {

//        JdbcTokenRepositoryImpl tokenRepository = new JdbcTokenRepositoryImpl();
//        tokenRepository.setDataSource(dataSource);
//        tokenRepository.setCreateTableOnStartup(true);
//        tokenRepository.initDao();

        http
            .authorizeRequests()
            .antMatchers("/index.jsp")
            .permitAll()
            .antMatchers("/layui/**")
            .permitAll()
            .antMatchers("/level1/**")
            .hasRole("学徒")
            .antMatchers("/level2/**")
            .hasAuthority("内门弟子")
            .and()
            .authorizeRequests()
            .anyRequest()
            .authenticated()
            .and()
            .formLogin()
            .loginPage("/index.jsp")
            .loginProcessingUrl("/do/login.html") // 指定提交登录表单的地址
            .permitAll()
            .usernameParameter("loginAcct")         // 登录账号的请求参数
            .passwordParameter("userPswd")          // 登陆密码
            .defaultSuccessUrl("/main.html")        // 登陆成功后前往的地址

            .and()    // 禁用csrf的最简单退出
//            .csrf().disable()
            .logout()
            .logoutUrl("/do/logout.html")
            .logoutSuccessUrl("/index.jsp")
            .and()
            .exceptionHandling() // 指定一个异常的处理器
//            .accessDeniedPage("/to/no/auth/page.html")  // 被拒绝的时候访问的页面
            .accessDeniedHandler(new AccessDeniedHandler() {
                @Override
                public void handle(HttpServletRequest httpServletRequest, HttpServletResponse httpServletResponse, AccessDeniedException e) throws IOException, ServletException {
                    httpServletRequest.setAttribute("message","抱歉无法访问资源");
                    httpServletRequest.getRequestDispatcher("/WEB-INF/views/no_auth.jsp").forward(httpServletRequest,httpServletResponse);
                }
            })// 待handler的都可以自己去写处理代码
            .and()
            .rememberMe()
//            .tokenRepository(tokenRepository);

        ;
        super.configure(http);
    }
3.2、 configure(AuthenticationManagerBuilder builder)方法
该方法是控制用户登陆授权的。使用该方法的时候有两种使用方式,一种是直接从内存中读取对应的账户和密码信息,该方法必须录入角色或者权限信息。另一种是通过使用userDetailsservice类自己定义处理方法,一般使用数据库的时候使用后者。
第一种方法:内存读取
    @Override
    protected void configure(AuthenticationManagerBuilder auth) throws Exception {
        super.configure(auth);  基于内存的
        auth.inMemoryAuthentication()                               // 从内存中读取
                .withUser("tom").password("123123")
                .roles("ADMIN","学徒")                                     // 设置角色
                .and()
                .withUser("jerry").password("123123")      // 设置另一个账号的密码
                .authorities("SAVE","EDIT","内门弟子");                        // 设置权限

    }
第二种方法:自定义配置
    @Override
    protected void configure(AuthenticationManagerBuilder auth) throws Exception {
        auth.userDetailsService(myUserDeatilsService);
    }
@Component
public class MyUserDeatilsService implements UserDetailsService {

    @Autowired
    private JdbcTemplate jdbcTemplate;

    @Override
    public UserDetails loadUserByUsername(
            // 表单提交的用户名
            String s
    ) throws UsernameNotFoundException {
        // 1.从数据库查询Admin对象
        String sql = "SELECT id,loginacct,userpswd,username,email FROM t_admin WHERE loginacct=?";

        List<Admin> list = jdbcTemplate.query(sql, new BeanPropertyRowMapper<>(Admin.class), s);

        Admin admin = list.get(0);

        // 2.给Admin设置角色权限信息
        List<GrantedAuthority> authorities = new ArrayList<>();

        authorities.add(new SimpleGrantedAuthority("ROLE_ADMIN"));
        authorities.add(new SimpleGrantedAuthority("UPDATE"));

        // 3.把admin对象和authorities封装到UserDetails中

        String userpswd = admin.getUserpswd();

        return new User(s, userpswd, authorities);
    }
}
MyUserDeatilsService类中做的处理就是获取当前账户的角色信息以及权限信息。然后通过GrantedAuthority集合封装交给springsecurity的User对象。会自动给当前用户赋予对应的权限信息和角色信息。判断对应对应路径是否可以访问。
User类我们可以自己重写。
4、加密
springsecurity提供了对应的加密。其中使用md5加密的时候会造成对应的数据固定,可能会被破译出来。
可以通过多次加密的技术来判断对应的数据是否相同。
或者使用“盐”来增加对应的复杂度。
4.1、盐
盐指的是一小串字符串。党对数据进行加密的时候会先拼接这个随机的字符串,然后完成加密。这样就不会有人知道密码是什么了。
springsecurity使用的盐前几位告诉你第几位到底几位是盐,然后获取对应的盐,在拼接对应的盐之后,进行md5加密。比较剩余字符和对应加密后字符是否相同。大大的增加了破译难度。
5、密码擦除
springsecurtiy有默认的密码擦除机制,它会擦除我们创建的securityadmin对象的密码。但是不会擦除这个类中的admin对象的密码。需要我们手动擦除。
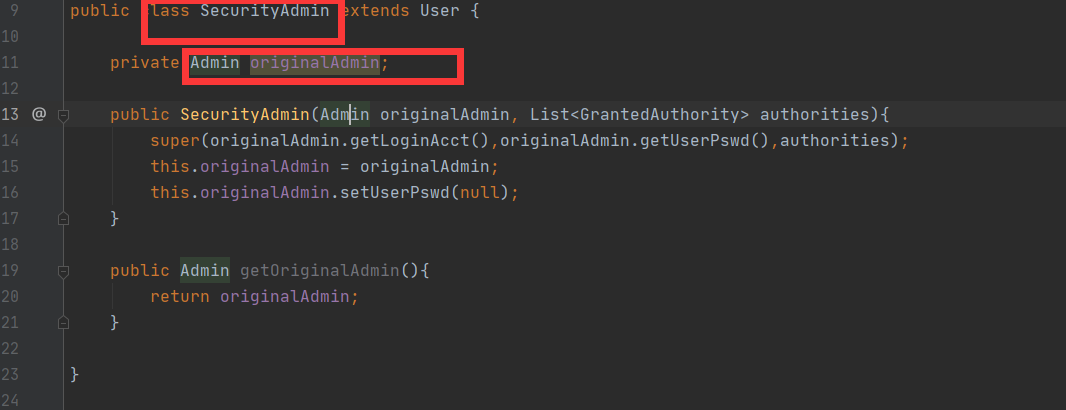
springsecurity给前端提供了数据的返显功能,可以通过principal指向securityAdmin对象。并且可是获取其中的各种数据。

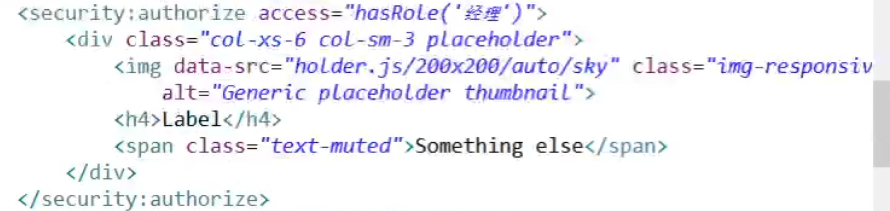
6、注解控制权限
    @PreAuthorize("hasRole('部长')")   //控制当前访问路径的权限
    @RequestMapping("/role/get/page/info.json")
    @ResponseBody
    public ResultEntity<PageInfo<Role>> getPageInfo(
            @RequestParam(value = "pageNum",defaultValue = "1") Integer pageNum,
            @RequestParam(value = "pageSize",defaultValue = "5") Integer pageSize,
            @RequestParam(value = "keyword",defaultValue = "") String keyword
    ){

        PageInfo<Role> pageInfo = roleService.getPageInfo(pageNum,pageSize,keyword);

        return ResultEntity.successWitchData(pageInfo);
    }
需要先开启注解开关


控制页面的局部权限
前提是引入springsecurity标签库


 754
754


 被折叠的 条评论
为什么被折叠?
被折叠的 条评论
为什么被折叠?
 到【灌水乐园】发言


