


基础教程,大神可以绕道啦
——————————
概述:
- 方法一:通过直接在canvas上剪裁圆形区域
- 方法二:使用PorterDuffXfermod混排模式
- 第一种方法实现的会有锯齿,推荐第二种
预览
上下两个图分别是使用方法一、二实现

那么如何实现呢
方法一:
注意事项:调用canvas的clipPath方法在画布上剪裁出一个圆(必须得先剪裁,不然不起作用)然后再drawBitmap()。
新建Java类继承View类
public class CircleImageView extends View {

    private Bitmap bitmap;//要进行转换的图片
    private Paint paint;//画笔
    private int bitmapWidth;//图片的宽度
    private int bitmapHeight;//图片的高度
    private float circleRadius;//截取圆形区域的半径
    private int width;//控件的宽度
    private int height;//控件的高度
    private Path path;//路径
    private float clipRadius;//截取半径的浮点数(可以理解为百分比)

    public CircleImageView(Context context) {
        this(context, null);
    }

    public CircleImageView(Context context, AttributeSet attrs) {
        this(context, attrs, 0);
    }

    public CircleImageView(Context context, AttributeSet attrs, int defStyleAttr) {
        super(context, attrs, defStyleAttr);
        //获取自定义属性
        TypedArray typedArray = context.getTheme().obtainStyledAttributes(attrs, R.styleable.CircleImageView, defStyleAttr, 0);
        //获取图片的资源id
        //这里使用的自定义属性,没有你就直接加载图片吧
        int imgResouce = typedArray.getResourceId(R.styleable.CircleImageView_img, R.mipmap.default_img);
        //截取的百分比,默认0.35
        clipRadius = typedArray.getFloat(R.styleable.CircleImageView_clipRadius, 0.35f);
        //使用完了记得释放
        typedArray.recycle();
        if (imgResouce != R.mipmap.default_img) {
            bitmap = BitmapFactory.decodeResource(getResources(), imgResouce);
        } else {
            bitmap = BitmapFactory.decodeResource(getResources(), imgResouce);
        }
        bitmapWidth = bitmap.getWidth();//图片宽度
        bitmapHeight = bitmap.getHeight();//图片的高度
        circleRadius = Math.min(bitmapHeight,bitmapWidth)*clipRadius;//使用小的一边的0.35长度作为半径
        //初始化画笔、路径
        path = new Path();
        paint = new Paint();
        paint.setDither(true);
        paint.setFilterBitmap(true);
    }

    @Override
    protected void onMeasure(int widthMeasureSpec, int heightMeasureSpec) {
        int widMod = MeasureSpec.getMode(widthMeasureSpec);
        int heiMod = MeasureSpec.getMode(heightMeasureSpec);
        //设置默认宽高
        int defaultWid = 80;
        int defaultHei = 80;
        //给出了精确的就按精确的数值,如果wrap_content则包裹内容
        if (widMod == MeasureSpec.EXACTLY) {
            width = MeasureSpec.getSize(widthMeasureSpec);
        } else {
            width = defaultWid + getPaddingRight() + getPaddingLeft();
        }

        if (heiMod == MeasureSpec.EXACTLY) {
            height = MeasureSpec.getSize(heightMeasureSpec);
        } else {
            height = defaultHei  + getPaddingTop() + getPaddingBottom();
        }
        //测量完记得调用该方法传回测量结果
        setMeasuredDimension(width, height);

    }

    @Override
    protected void onDraw(Canvas canvas) {
        //因为图片设置在控件的中心,因此圆心的X为宽的一半,Y为高的一半
        //图片也要居中,所以左上角的X坐标为:(getMeasuredWidth() - bitmapWidth) / 2
        //Y坐标为(getMeasuredHeight() - bitmapHeight) / 2
        path.addCircle(getMeasuredWidth() / 2, getMeasuredHeight() / 2, circleRadius, Path.Direction.CCW);
        canvas.save();
        canvas.clipPath(path);
        canvas.drawBitmap(bitmap, (getMeasuredWidth() - bitmapWidth) / 2, (getMeasuredHeight() - bitmapHeight) / 2, paint);
        canvas.restore();
    }
}
方法二:
跟方法一没多大区别,不同就在于onDraw()方法
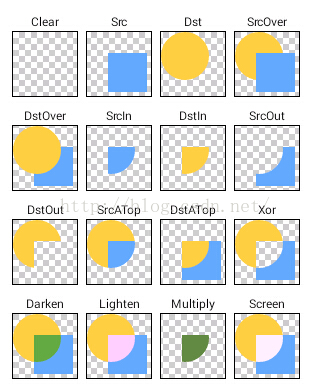
贴一张图说明下xfermode 的几种模式的含义(这里少了两种,有兴趣的可以百度或者google看看)
public class CircleImg extends View {

    private Paint paint;
    //混排模式
    private PorterDuffXfermode xfermode = new PorterDuffXfermode(PorterDuff.Mode.SRC_IN);
    private int imgWid;//图片宽度
    private int imgHeight;//图片高度
    private float circleRadius;//圆的半径
    private Bitmap bitmap;//要转换的图片

    public CircleImg(Context context) {
        this(context,null);
    }

    public CircleImg(Context context, AttributeSet attrs) {
        this(context, attrs,0);
    }

    public CircleImg(Context context, AttributeSet attrs, int defStyleAttr) {
        super(context, attrs, defStyleAttr);
        paint = new Paint();

        bitmap = BitmapFactory.decodeResource(getResources(), R.mipmap.img_girl);
        imgWid = bitmap.getWidth();
        imgHeight = bitmap.getHeight();
        circleRadius = Math.min(imgWid,imgHeight)*0.35f;
//关闭硬件加速,PorterDuffXfermode 这个API的bug貌似还蛮多,你可以选择不关闭试试
        setLayerType(View.LAYER_TYPE_SOFTWARE,null);
    }

    @Override
    protected void onMeasure(int widthMeasureSpec, int heightMeasureSpec) {
        int widMod = MeasureSpec.getMode(widthMeasureSpec);
        int heiMod = MeasureSpec.getMode(heightMeasureSpec);

        int defaultWid = 80;
        int defaultHei = 80;

        int width;
        int height;

        if(widMod == MeasureSpec.EXACTLY){
            width = MeasureSpec.getSize(widthMeasureSpec);
        }else{
            width = defaultWid + getPaddingRight() + getPaddingLeft();
        }
        if(heiMod == MeasureSpec.EXACTLY){
            height = MeasureSpec.getSize(heightMeasureSpec);
        }else{
            height = defaultHei + getPaddingTop() + getPaddingBottom();
        }
        setMeasuredDimension(width,height);
    }

    @Override
    protected void onDraw(Canvas canvas) {
        int saveLayer = canvas.saveLayer(0,0,getMeasuredWidth(),getMeasuredHeight(),paint,0);
        canvas.drawCircle(getMeasuredWidth()/2,getMeasuredHeight()/2,circleRadius,paint);
        paint.setFilterBitmap(true);
        paint.setAntiAlias(true);
        paint.setXfermode(xfermode);
        canvas.drawBitmap(bitmap,(getMeasuredWidth() - imgWid)/2,(getMeasuredHeight() - imgHeight)/2,paint);
        paint.setXfermode(null);
        canvas.restoreToCount(saveLayer);
    }
}
总结
我觉得只要会点绘图api看懂上面应该没问题,而且简直没逻辑。
本人才疏学浅,不足之处大家轻喷!!为了省篇幅,我少说点,大家看注释,不懂的下面留言


 744
744

 被折叠的 条评论
为什么被折叠?
被折叠的 条评论
为什么被折叠?
 到【灌水乐园】发言


