


前言
Spring 究竟是什么?其实Spring简单来说就是一个包含众多工具方法的IOC容器。
那么什么是IOC呢?
IoC = Inversion of Control 翻译成中⽂是“控制反转”的意思.
既然Spring 是⼀个IoC(控制反转)容器,重点还在“容器”⼆字上,那么它就具备两个最基础的功能:
● 将对象存⼊到容器;
● 从容器中取出对象。
也就是说学Spring 最核⼼的功能,就是学如何将对象存⼊到Spring 中,再从Spring 中获取对象的过程。Spring 是⼀个控制反转的容器,说的是对象的创建和销毁的权利都交给 Spring 来管理了,它本身⼜具备了存储对象和获取对象的能⼒。
说到IoC 不得不提的⼀个词就是“DI”,DI 是Dependency Injection 的缩写,翻译成中⽂是“依赖注 ⼊”的意思。
所谓依赖注⼊,就是由IoC 容器在运⾏期间,动态地将某种依赖关系注⼊到对象之中(所谓依赖注入就是在程序运行期间,动态的将某个对象引入当前的对象中的机制)。所以,依 赖注⼊(DI)和控制反转(IoC)是从不同的⻆度的描述的同⼀件事情,就是指通过引⼊IoC 容 器,利⽤依赖关系注⼊的⽅式,实现对象之间的解耦。
IoC 是“⽬标”也是⼀种思想,⽽⽬标和思想只是⼀种指导原则,最终还是要有可⾏的落地⽅案,⽽DI 就属于具体的实现。
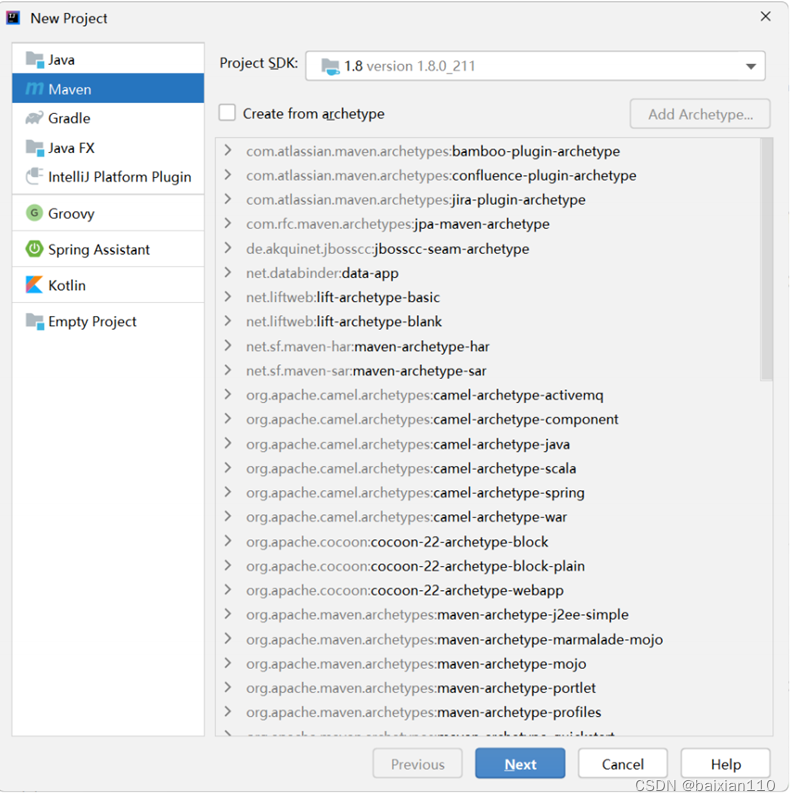
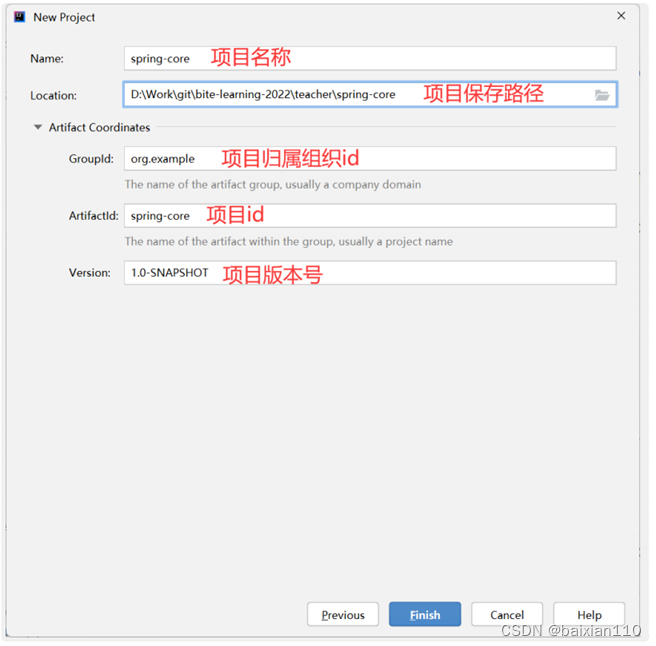
一、Spring的创建和使用
1.1 创建maven项目
1.1.1 新建maven项目
1.1.2 添加Spring 框架⽀持(引入依赖)
在项⽬的pom.xml 中添加Spring 框架的⽀持,xml 配置如下:
<dependencies>
         <dependency>
            <groupId>org.springframework</groupId>
             <artifactId>spring-context</artifactId>
             <version>5.2.3.RELEASE</version>
          </dependency>

         <dependency>
            <groupId>org.springframework</groupId>
             <artifactId>spring-beans</artifactId>
             <version>5.2.3.RELEASE</version>
          </dependency>
     </dependencies>
从上述配置中可以看出,添加的框架有spring-context:spring 上下⽂,还有spring-beans:管理对 象的模块。
1.1.3 添加启动类
最后在创建好的项⽬java ⽂件夹下创建⼀个启动类,包含main ⽅法即可: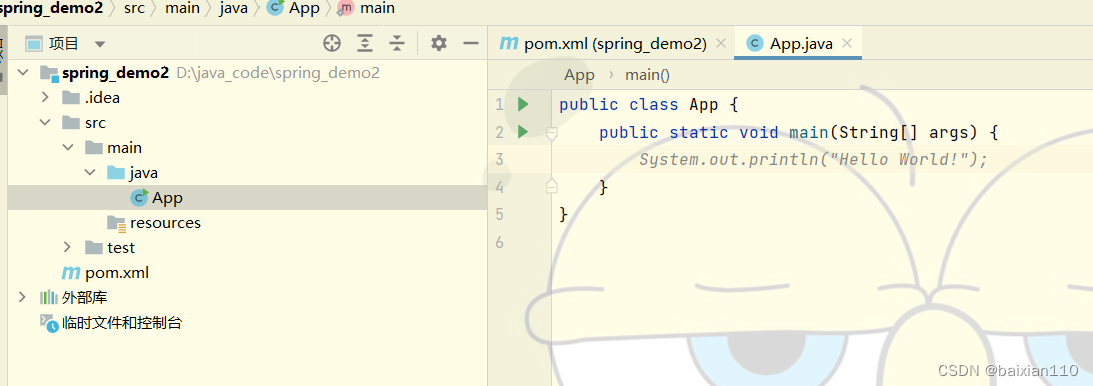
1.2 存储Bean 对象
存储Bean 分为以下2 步:
- 存储Bean 之前,先得有Bean 才⾏,因此先要创建⼀个Bean。
- 将创建的Bean 注册到Spring 容器中。
具体实现如下。
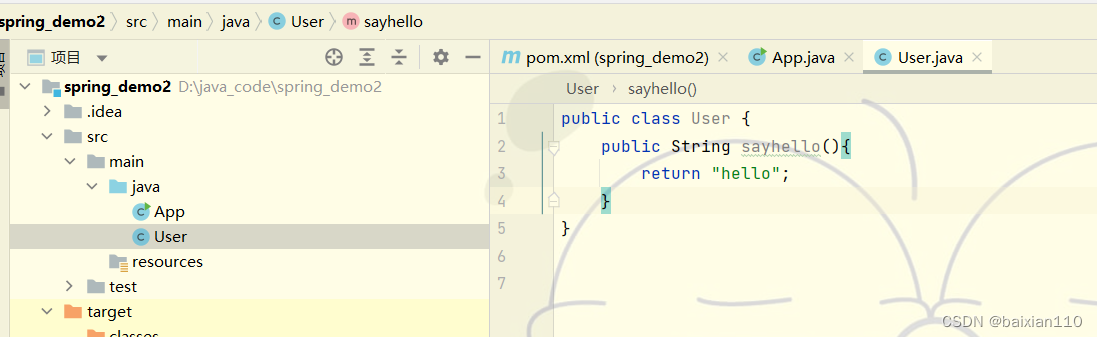
1.2.1 创建Bean
所谓的Bean 就是Java 语⾔中的⼀个普通对象,实现代码如下:
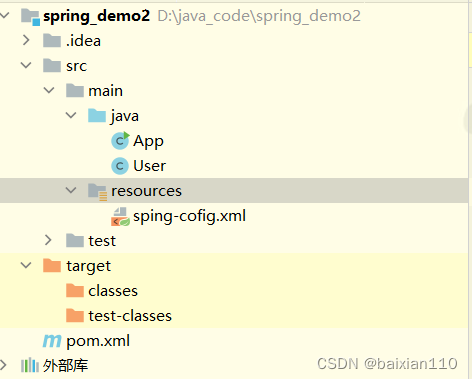
1.2.2 将Bean 注册到容器
在创建好的项⽬中添加Spring 配置⽂件spring-config.xml,将此⽂件放到resources 的根⽬录下,
如下图所示:
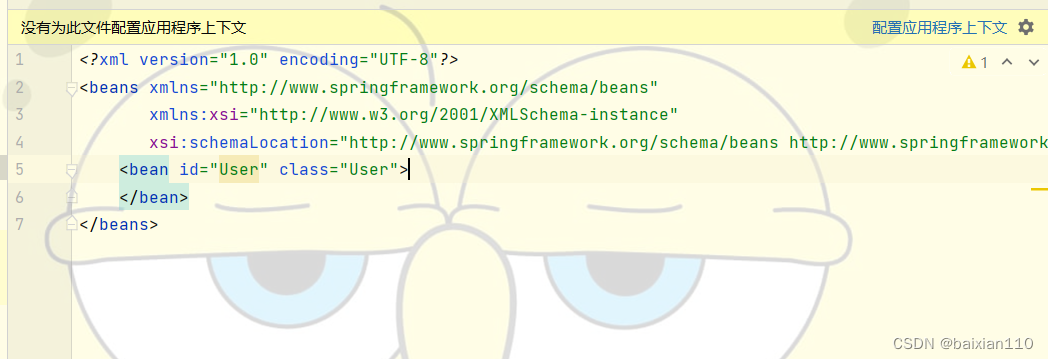
<beans>
<bean id="User" class="User"></bean>
</beans>
这一句就是在将User 对象注册到Spring 中就可以
id是我们注册对象的名字,可以保持与我们的类名一致,也可以不一样(这可以理解为主键,不同的bean对象id是一定不同的),class后面填是这个对象的类型(也就是对象本身),通常是包名.类名,这里没有包,所以就还是类名。
这里额外提一下这个文件

每一个项目里都有一个这个文件,这个java的资源文件,什么是资源文件,所有后缀不是.java的文件都可以为资源文件
1.3创建并获取使用bean对象
获取并使⽤Bean 对象,分为以下3 步:
- 得到Spring 上下⽂对象,因为对象都交给Spring Comtext管理了,所获取对象要从Spring 中获取,那 么就得先得到Spring 的上下⽂。
- 通过Spring 上下⽂,获取某⼀个指定的Bean 对象。
- 使⽤Bean 对象。
- 如果取多个Bean 的话重复以上第2、3 步骤
1.3.1 创建Spring 上下⽂
Spring 上下⽂对象可使⽤ApplicationContext,实现代码如下:
ApplicationContext applicationContext = new ClassPathXmlApplicationContext("sping-cofig.xml");
注意后面的路径一定是我们是spring 配置文件的路径
1.3.2获取bean对象
User user = (User) applicationContext.getBean("User");
getBean()里面的参数就是我们之前所写的bean的ID
这里还发生了一个强制转换,这是因为applicationContext.getBean返回的对象是一个是一个Object类型。
这里的储存对象可以理解为之前的new。
1.3.3 使⽤ Bean
import javafx.application.Application;
import org.springframework.context.ApplicationContext;
import org.springframework.context.support.ClassPathXmlApplicationContext;
public class App {
public static void main(String[] args) {
ApplicationContext applicationContext = new ClassPathXmlApplicationContext("sping-cofig.xml");
User user = (User) applicationContext.getBean("User");
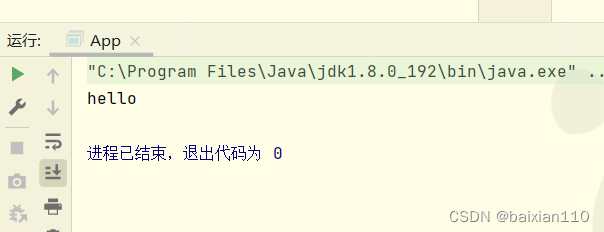
System.out.println(user.sayhello());
}
}
1.4 扩展说明
获取bean对象也可以使用其他方法
上个例子中我们是使用bean的ID来获取bead的;也可以根据beand的类型来获取
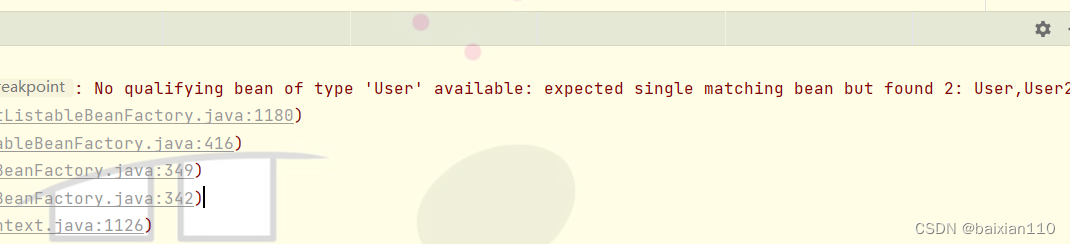
UserController user = context.getBean(User.class);
但是这种方式会有限制,因为当xml中有两个同类型,不同ID的bean的时候,我们使用类型来取,idea就不知道取哪一个了,就会报错。
例如下面这个例子
spring-config.xml中新增一个bean。
<?xml version="1.0" encoding="UTF-8"?>
<beans xmlns="http://www.springframework.org/schema/beans"
       xmlns:xsi="http://www.w3.org/2001/XMLSchema-instance"
       xsi:schemaLocation="http://www.springframework.org/schema/beans http://www.springframework.org/schema/beans/spring-beans.xsd">
    <bean id="User" class="User"></bean>
    <bean id="User2"  class="User"></bean>
</beans>
App.java
import javafx.application.Application;
import org.springframework.context.ApplicationContext;
import org.springframework.context.support.ClassPathXmlApplicationContext;

public class App {
    public static void main(String[] args) {
        ApplicationContext applicationContext = new ClassPathXmlApplicationContext("sping-cofig.xml");
        User user = (User) applicationContext.getBean(User.class);
        System.out.println(user.sayhello());
    }
}
执行结果
也可以根据名称+ 类型获取Bean来获取
User user = context.getBean("user", User.class);
这个方法因为在参数上已经指定了bean对象的类型,所以返回值不再是object了,就是User类。上面只输入类型作为参数的方法也是这样。
当获取bean的时候bean不存在,返回值为null.。
此外,除了用new ClassPathXmlApplicationContext("sping-cofig.xml");来创建这个上下文,也可以使用我们还可以使⽤BeanFactory 来作为Spring 的管理,如下代码所示:
BeanFactory beanFactory = new XmlBeanFactory(new ClassPathResource("spring-config.xml"));
但是实际你将代码写入IDEA会发现,这个方法已经被弃用

1.5 ApplicationContext vs BeanFactory
那么ApplicationContext vs BeanFactory两者有什么区别呢?
相同点:
1.都可以得到Spring的上下文
2.两个都是Spring 容器有两个顶级的接⼝
不同点:
从继承关系和性能上来说:
BeanFactory 提供了基础的访问容器的能⼒,⽽ApplicationContext 属于BeanFactory 的⼦类,它除了继承了BeanFactory 的所有功能之外,它还拥有独特的特性, 还添加了对国际化⽀持、资源访问⽀持、以及事件传播等⽅⾯的⽀持。
从性能⽅⾯来说:ApplicationContext 是⼀次性加载并初始化所有的Bean 对象(牺牲了空间来换取时间),所以ApplicationContext后面访问Bean对象时会很快,⽽ BeanFactory 是需要那个才去加载那个,因此更加轻量,但是相应的访问速度会变慢。在以前,计算机的硬件资源还不是很发达的时候BeanFactory这种懒汉模式下还是很有必要的,但是现在在计算机内存资源比较充沛的情况下,早已不需要BeanFactory
所以理论上前者是饿汉模式,后者是懒汉模式。但是在现在的Spring框架下究竟是饿汉还是懒汉早就是由JVM动态决定的了,比如说我现在系统内存非常臃肿,那么即使我用的是Application,JVM也不会加载全部的Bean对象。
我们可以来验证一下,给User添加一个构造方法,只要调用这个构造方法就打印构造方法
public class User {

    public String sayhello(){
        return "hello";
    }

    public User() {
        System.out.println("构造方法");
    }

}
我们使用application构造上下文,那么执行会发现
import org.springframework.beans.factory.xml.XmlBeanFactory;
import org.springframework.context.ApplicationContext;
import org.springframework.context.support.ClassPathXmlApplicationContext;
import org.springframework.core.io.ClassPathResource;

public class App {
    public static void main(String[] args) {
        ApplicationContext applicationContext = new ClassPathXmlApplicationContext("sping-cofig.xml");
//        BeanFactory beanFactory = new XmlBeanFactory(new ClassPathResource("spring-config.xml"));
        User user = (User) applicationContext.getBean("User");
        System.out.println(user.sayhello());
    }
}
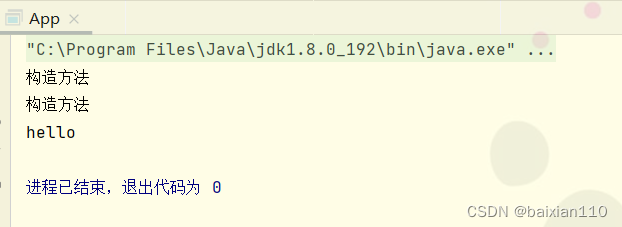
会发现调用了两次构造函数,证明加载sping-cofig.xml的时候将这里面的所有对象都初始化了(调用了构造函数)创建了出来,也就是实例化了。但是如果用的是beanFactory,那么只会执行一个构造函数,证明此时只实例化了一个。
import javafx.application.Application;
import org.springframework.beans.factory.BeanFactory;
import org.springframework.beans.factory.xml.XmlBeanFactory;
import org.springframework.context.ApplicationContext;
import org.springframework.context.support.ClassPathXmlApplicationContext;
import org.springframework.core.io.ClassPathResource;

public class App {
    public static void main(String[] args) {
//        ApplicationContext applicationContext = new ClassPathXmlApplicationContext("spring-config.xml");
        BeanFactory beanFactory = new XmlBeanFactory(new ClassPathResource("spring-config.xml"));
        User user = (User) beanFactory.getBean("User");
        System.out.println(user.sayhello());
    }
}
二、Spring 更简单的读取和存储对象
2.1.存储 Bean 对象
之前我们存储Bean 时,需要在spring-config 中添加⼀⾏bean 注册内容才⾏,(这其实也在说明spring-config.xml文件实际就是一个用于告诉java一步一步怎么做的一个操作手册)。⽽现在我们只需要⼀个注解就可以替代之前要写⼀⾏配置的尴尬了,不过在开始存储对象之前,我们先要来点准备⼯作。
1 前置⼯作:配置扫描路径(重要)
注意:想要将对象成功的存储到Spring 中,我们需要配置⼀下存储对象的扫描包路径,只有被配置的 包下的所有类,添加了注解才能被正确的识别并保存到Spring 中。
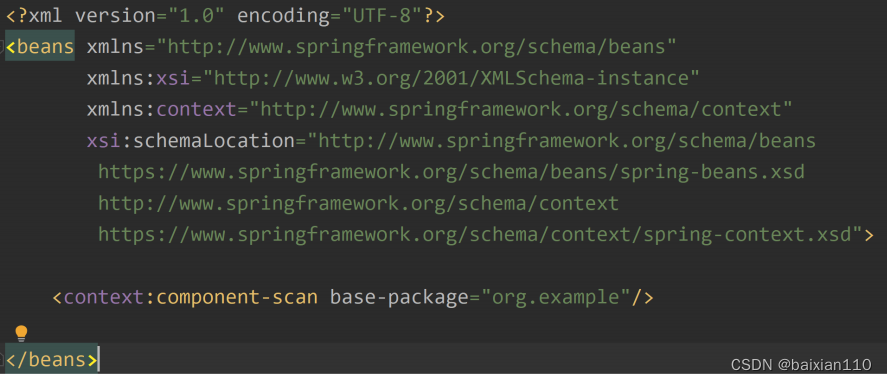
在spring-config.xml 添加如下配置
 <?xml version="1.0" encoding="UTF-8"?>
<beans xmlns="http://www.springframework.org/schema/beans"
       xmlns:xsi="http://www.w3.org/2001/XMLSchema-instance"
       xmlns:content="http://www.springframework.org/schema/context"
       xsi:schemaLocation="http://www.springframework.org/schema/beans http://www.springframework.org/schema/beans/spring-beans.xsd http://www.springframework.org/schema/context https://www.springframework.org/schema/contex
        t/spring-context.xsd">
    <content:component-scan base-package="软件包名称"></content:component-scan>
</beans>
最核心的就是
content:component-scan base-package=“软件包名称”
这一句
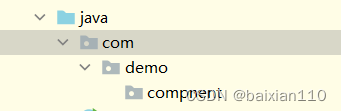
我们构造这样的软件包
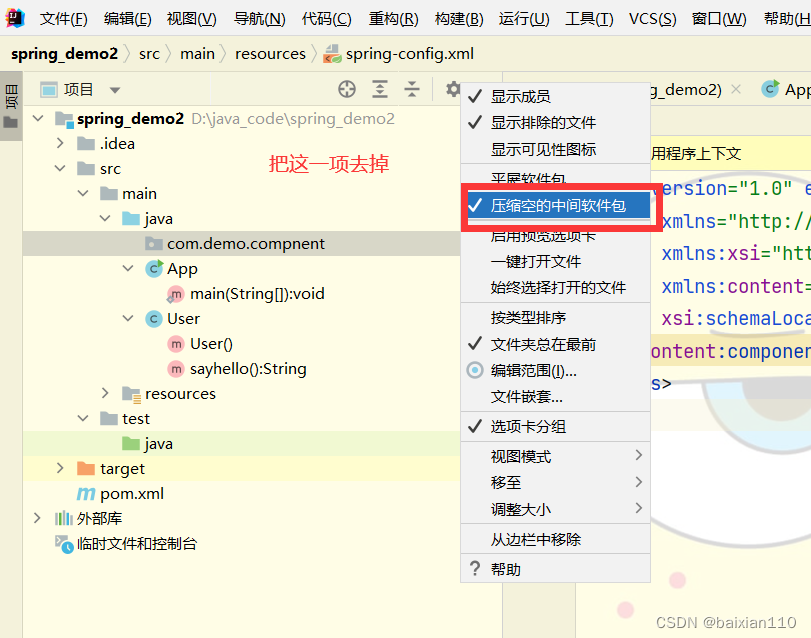
注意:如果是IDEA2021版本,初始的时候是没有办法显示现在的软件包树形结构的,看下面的图片设置一下就好
那么如果我们要在Spring上下文初始化的时候实例化component里面的对象,那么直接写
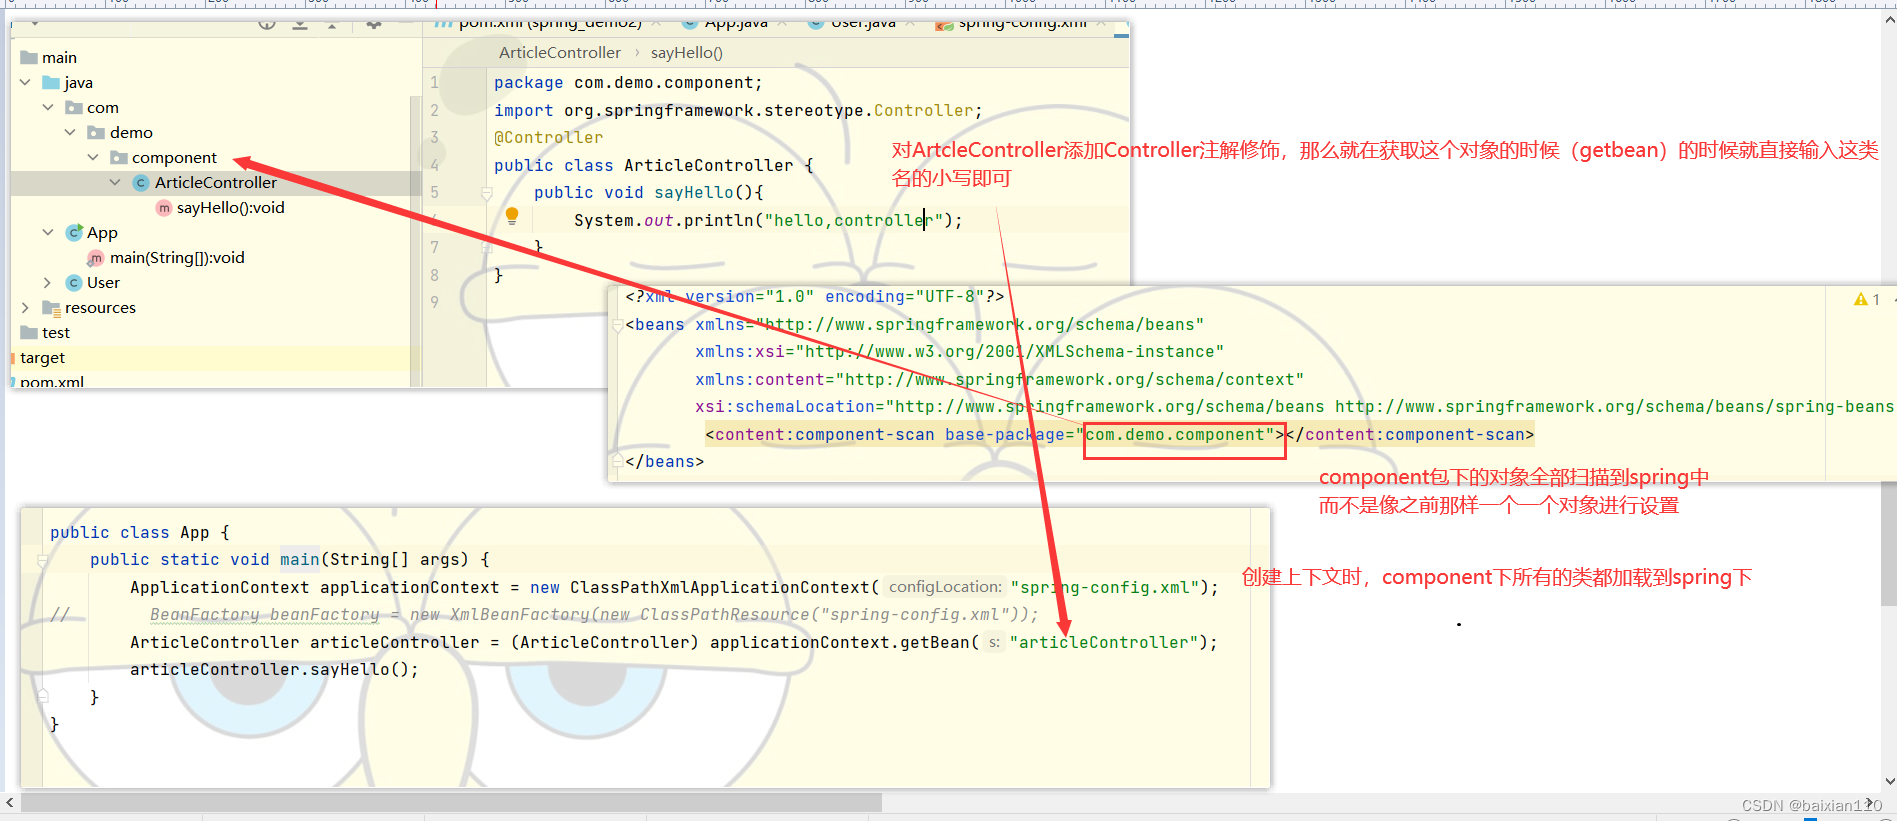
<content:component-scan base-package="com.demo.component"></content:component-scan>
即可。
也就是说,即使添加了注解,如果不是在配置的扫描包下的类对象,也是不能被存储到Spring 中的。
2 添加注解存储Bean 对象
想要将对象存储在Spring 中,有两种注解类型可以实现:
类注解:
@Controller(控制器)、@Service(服务)、@Repository(仓库)、@Component(组件)、@Configuration(配置)。
⽅法注解:
@Bean(将当前修饰的对象存储到Spring中去)
我们先来一个实例来看一下具体的使用方式
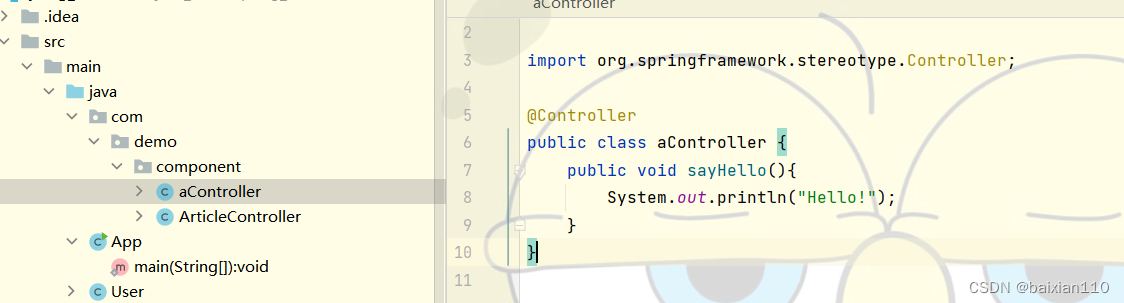
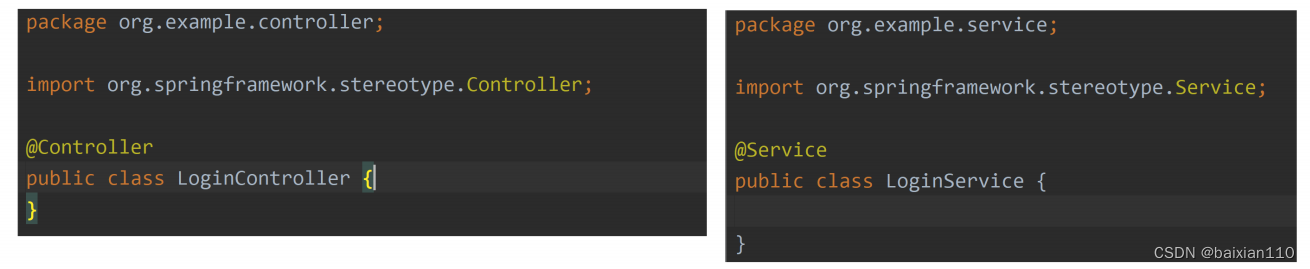
我们在component文件夹下常见Articlecontroller类,然后对这个类添加controller注解
package com.demo.component;
import org.springframework.stereotype.Controller;
@Controller
public class ArticleController {
    public void sayHello(){
        System.out.println("hello,controller");
    }
}
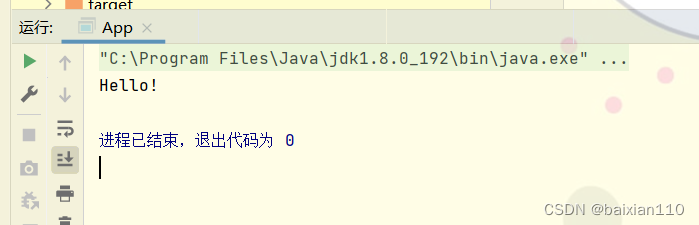
我们就能在App这个类的主函数中使用这个对象了
import com.demo.component.ArticleController;
import javafx.application.Application;
import org.springframework.beans.factory.BeanFactory;
import org.springframework.beans.factory.xml.XmlBeanFactory;
import org.springframework.context.ApplicationContext;
import org.springframework.context.support.ClassPathXmlApplicationContext;
import org.springframework.core.io.ClassPathResource;

public class App {
    public static void main(String[] args) {
        ApplicationContext applicationContext = new ClassPathXmlApplicationContext("spring-config.xml");
        ArticleController articleController = (ArticleController) applicationContext.getBean("articleController");
        articleController.sayHello();
    }
}
值得注意的是,使用添加注解的方式来使用存储bean对象(这里存储的意思就是加入到将这个对象加入到spring中),使用getBean时,这个对象的ID就是其注解的时候修饰的那个类的名称的小写形式。
但是这里也有几个问题
-
如果类名的首字母是小写,那怎么从Spring中获取bean呢?
我们先看一个示例
故意构建一个命名不规范的类acontroller
 然后在主函数进行获取并调用

此时的beanID我输入的是acontrller,结果发现依旧可以编译成功并输出Hello
那么这是为什么呢?
这还是因为无论类名是小写和大写,sping都是将类型的首字母小写来获取对象的,也就是说即使创建类名是用的小写,也没事,spring对这个的类的ID也依旧存的是这个小写的类名。 -
类名的开头是两个大写字母
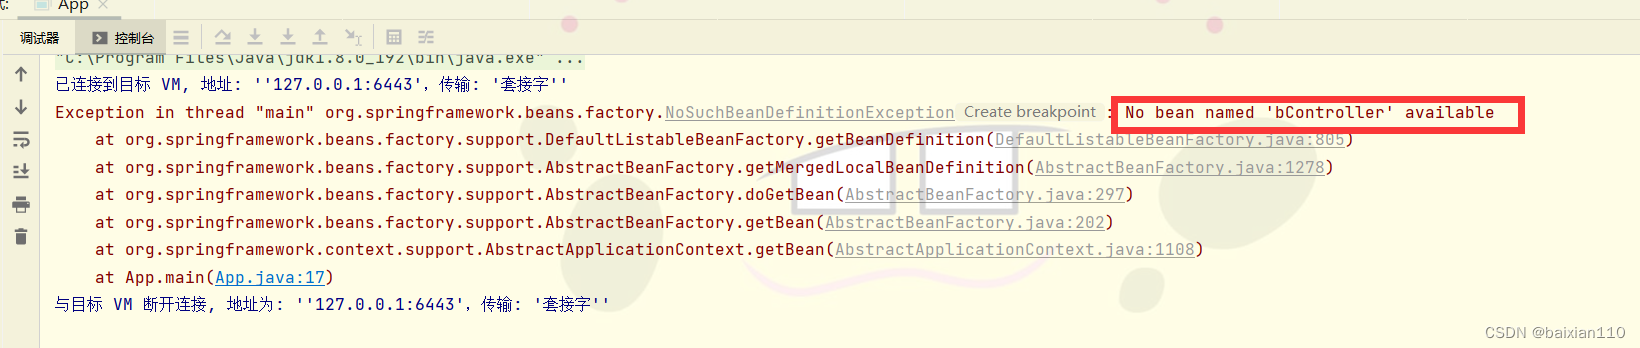
我们先来看一个实例
我创建一个类名字是BController,然后getbean输入bController
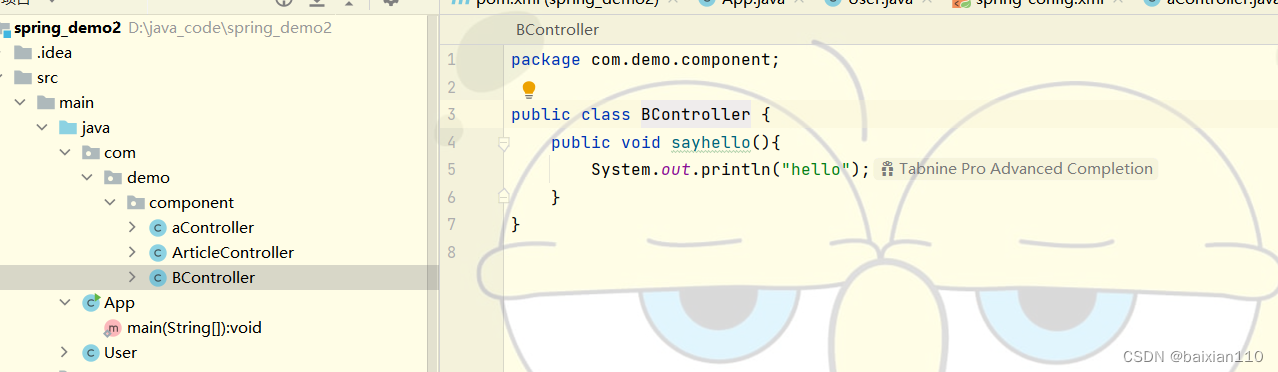
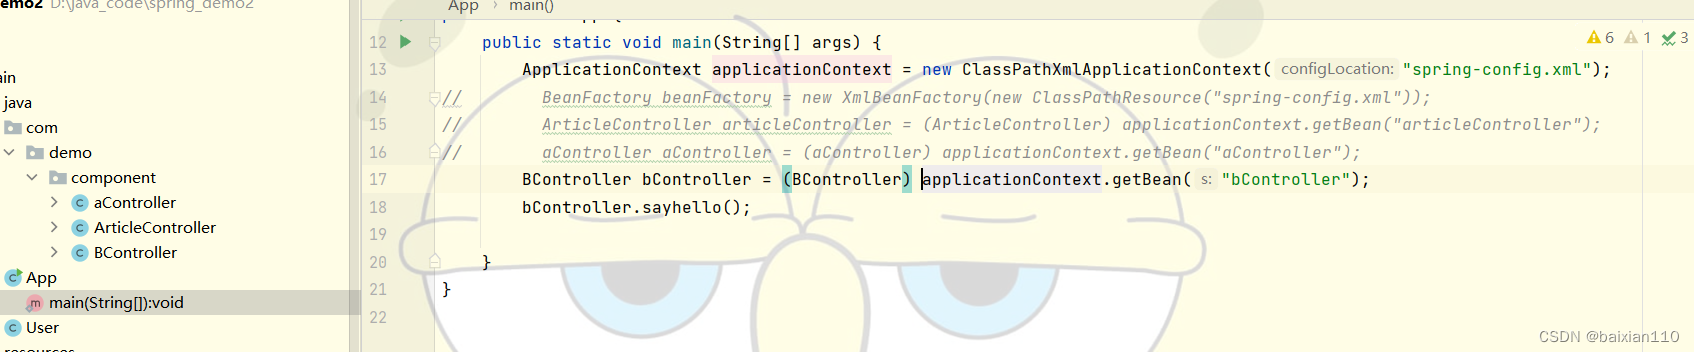 然而结果是:报错了
-
当使用默认规则,首字母小写来获取bean对象时,失败了!正确获取Bean的方式是使用原类名。
正如上面的例子,如果我id输入的是BController,那么就执行成功了

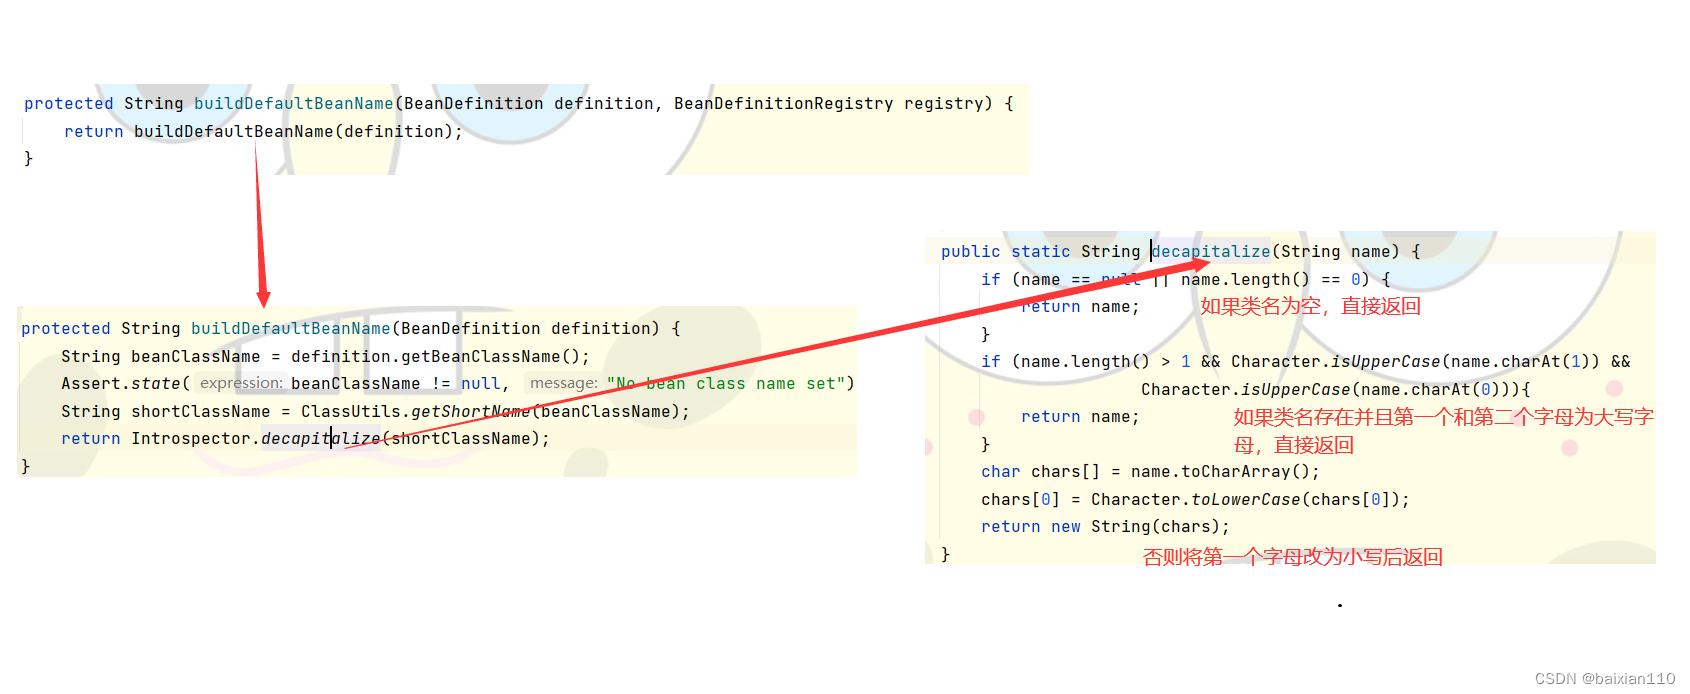
4.我们可以看一下spring在这里的原码设计
下面我们再来看一个问题
如果我的项目里面没有目录,也就是没有软件包,配置<content:component-scan base-package="软件包名称">的时候怎么配置呢?
其实这种是么有问题的,因为每个项目都有根路径,我们可以通过通配符来表示将根路径下面的所有对象全部加载到spring,然后从中取我们需要的对象
<content:component-scan base-package="**"></content:component-scan>
但是这样会非常慢,并不建议这样,因为实际这样是将这个项目所有对象都注入Spring中这里只是给大家演示。
那么现在问题就来了,为什么需要五个注解呢?就是让程序员看到类注解之后,就能直接了解当前类的⽤途
3 五大类注解的用途
● @Controller:表示的是控制器; 归属于业务逻辑层,用来控制用户的行为,它用来检查用户参数的有效性的。
● @Servie:服务层;归属于服务层,调用持久化类实现相应的功能,简单来说就是协调业务的。本身是不操作数据库的,但是他可以告诉下面的代码该怎么去做,类似于控制中心。
● @Repository:仓库,归属于持久层。是直接与数据库进行交互的,通常每一个表都会对应一个@repository注解
● @Configuration:配置,归属于配置层,这个层特殊,就是用于配置当前项目的一些信息的。
●@componenet:组件,归属于公共工具类,提供公共的方法。
比如说我现在执行一个数据库的增加操作,首先我会现在业务逻辑层Controller检测输入密码,用户名的有效性。验证完成后返回,然后进入服务层,这是一个控制中心,控制我们的程序该怎么进行下一步。比如说我要在表中新增一条数据,那么我就需要在调用两个持久化类,一个类负责在数据的某个表里新增一条数据,一个类负责在日志文件中记录。这两个持久化类就是持久层,所以持久层是只关注数据库表的一些问题的。
4 ⽅法注解@Bean
类注解是添加到某个类上的,⽽⽅法注解是放到某个⽅法上的,这样我们就能存储这个方法返回的那个对象
我们构建以下代码
public class Application {
    public static void main(String[] args) {
         ApplicationContext context = new ClassPathXmlApplicationContext("spring-config.xml");
         User user = (User) context.getBean("user1");
         System.out.println(user.toString());
     }
}
public class Users {
    @Bean
    public User user1() {
            User user = new User();
            user.setId(1);
            user.setName("Java");
            return user;
        }
}
当我们写完以上代码,尝试获取bean 对象中的user1 时却发现,根本获取不到.
在Spring 框架的设计中,⽅法注解@Bean 要配合类注解才能将对象正常的存储到Spring 容器中
这是因为@Bean是修饰方法的,换句话说spring并不知道这个方法属于哪个类进而也就不知道该注入哪个类了。
bean注解是用来修饰对象的方法的,但是bean注解的本质还是将这个方法所返回的对象存储起来(而不是存储调用这个方法的对象)。
这里我们再给一个例子来说明一下
在demo下构建一个软件包modle,在这个包下创建类Student,然后,对这个Student添加属性和方法
package com.demo.model;

public class Student {
    private int id;
    private String name;
    private int age;

    public void setId(int id) {
        this.id = id;
    }

    public void setName(String name) {
        this.name = name;
    }
    public void setAge(int age) {
        this.age = age;
    }

    @Override
    //为了后面打印方便
    public String toString() {
        return "Student{" +
                "id=" + id +
                ", name='" + name + '\'' +
                ", age=" + age +
                '}';
    }
}
在原来的component软件包下创建StudentBean类,在这个类中,我们创建一个Student对象,并对其进行设置,那么我们如何获取这个对象将其注入Spring中,我们需要添加两个注解一个在StudentBean前,一个在getStudent这个方法前,说明是这个类调用了这个方法来获取Stuednt实例。
package com.demo.component;

import com.demo.model.Student;
import org.springframework.context.annotation.Bean;
import org.springframework.stereotype.Controller;

@Controller
public class StudentBean {
    @Bean
    public Student getStudent(){
        Student student = new Student();
        student.setId(1);
        student.setName("aaa");
        student.setAge(18);
        return student;
    }

}
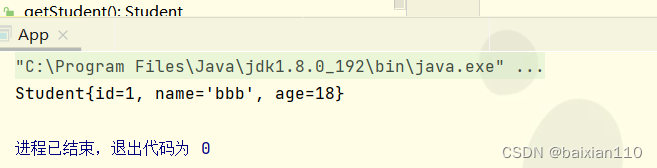
然后我们在主函数里使用getBean,这里的BeanId应该对应我们的注解@Bean修饰的那个方法的名称(首字母小写),这里的对象类型应该是这个方法的返回值.class(这个方法一定返回一个对象)。一定一定要注意,这里的ID和类型跟studentBean本身没有关系。因为我们不是要注入这个对象,而是这个类调用的那个方法所返回的实例。
import org.springframework.beans.factory.xml.XmlBeanFactory;
import org.springframework.context.ApplicationContext;
import org.springframework.context.support.ClassPathXmlApplicationContext;
import org.springframework.core.io.ClassPathResource;

public class App {
    public static void main(String[] args) {
        ApplicationContext applicationContext = new ClassPathXmlApplicationContext("spring-config.xml");
        Student student = (Student) applicationContext.getBean("getStudent",Student.class);
        System.out.println(student);

    }
}
此外,bean的使用建议使用ApplicationContext来构建上下文。
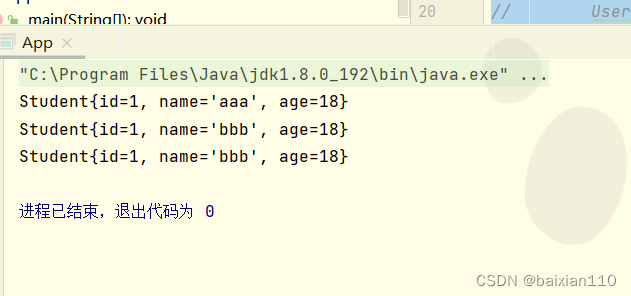
我们现在来看这种情况,我再创建一个类StudentBean2,这个类也是调用方法获取一个Student实例,那么此时执行结果如何呢?
package com.demo.component;

import com.demo.model.Student;
import org.springframework.context.annotation.Bean;
import org.springframework.stereotype.Controller;

@Controller
public class StudentBean2 {
    @Bean
    public Student getStudent(){
        Student student = new Student();
        student.setId(1);
        student.setName("bbb");
        student.setAge(18);
        return student;
    }
}
 答案是只会返回前一个实例。但是bead注解的好处就在于他可以自定义取名字的
@Controller
public class StudentBean {
    @Bean
    public Student getStudent(){
        Student student = new Student();
        student.setId(1);
        student.setName("aaa");
        student.setAge(18);
        return student;
    }
}
@Controller
public class StudentBean2 {
    @Bean(name={"s1","s2"})
    public Student getStudent(){
        Student student = new Student();
        student.setId(1);
        student.setName("bbb");
        student.setAge(18);
        return student;
    }
}
public class App {
    public static void main(String[] args) {
        ApplicationContext applicationContext = new ClassPathXmlApplicationContext("spring-config.xml");
        Student student1 = (Student) applicationContext.getBean("getStudent");
        System.out.println(student1);
        Student student2 = (Student) applicationContext.getBean("s1");
        System.out.println(student2);
        Student student3 = (Student) applicationContext.getBean("s2");
        System.out.println(student3);
    }
}
 这个重命名的name 其实是⼀个数组,⼀个bean 可以有多个名字。
其中name= 可以省略
@Bean({"s1","s2"})
这里还有一点需要说明,如果这里只有一个方法(比如说只有一个StudentBean2,没有StudentBean),StudentBean2里面被注解的方法起了s1 s2这样的名字,主函数里存储时使用的ID是getstudent(原方法名首字母小写这种默认方式),那么代码会报错
就像下面这样
@Controller
public class StudentBean2 {
//    @Bean(name={"s1","s2"})
    @Bean({"s1","s2"})
    public Student getStudent(){
        Student student = new Student();
        student.setId(1);
        student.setName("bbb");
        student.setAge(18);
        return student;
    }
}
public class App {
    public static void main(String[] args) {
        ApplicationContext applicationContext = new ClassPathXmlApplicationContext("spring-config.xml");
        Student student1 = (Student) applicationContext.getBean("getStudent");
        System.out.println(student1);
//        Student student2 = (Student) applicationContext.getBean("s1");
//        System.out.println(student2);
//        Student student3 = (Student) applicationContext.getBean("s2");
//        System.out.println(student3);

    }
}
2.2 获取Bean 对象(对象装配)
获取bean 对象也叫做对象装配,是把对象取出来放到某个类中,有时候也叫对象注⼊。
注意哈,在上面的演示中。我们获取bean都是用的getbean,因为前面主要演示的是bean的存储到SPring中,但是我们这里是说如何从一个类里面去取另一个对象放入这个类中
对象装配(对象注⼊)的实现⽅法以下3 种:
- 属性注⼊
- 构造⽅法注⼊
- Setter 注⼊
接下来,我们分别来看。
1 属性注⼊
我们在demo文件下创建controller和service文件。实际开发也会用这两个包来表示控制器和服务。我们要达到什么样的目的呢?我们想在coonroller中获取service,我们新建两个类,StudentContorller和StudentService类分别放入这两个软件包里。
这两个类分别构建出如下代码
package com.demo.controller;
import com.demo.service.StudentService;
import org.springframework.beans.factory.annotation.Autowired;
import org.springframework.stereotype.Controller;
@Controller
public class StudentController {
//我们需要在contrller里面来获取service
//1.使用属性注入的方式获取Bean
@Autowired
private StudentService studentService;
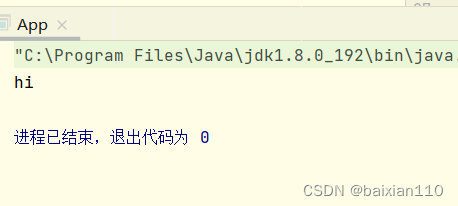
public void sahHi(){
//调用service方法
studentService.sayHi();
}
}
package com.demo.service;
@Service
public class StudentService {
    public void sayHi(){
        System.out.println("hi");
    }
}
Autowired本身的意思是自动连线,自动装配,所以这个注解主打一个自动,使用这个注解修饰之后,我们就可以获取service这个对象,(我们之前的工作时将这个对象存储到Spring中)而现在是通过Spring方法去获取的。
那么我们接下来验证一下,这里的我们通过main函数去获取我们的controller对象(用老的getbean方法),然后controller再去调用service的方法,如果打印出来了,那就证明service成功注入了。
import com.demo.component.aController;
import com.demo.controller.StudentController;
import com.demo.model.Student;
import javafx.application.Application;
import org.springframework.beans.factory.BeanFactory;
import org.springframework.beans.factory.xml.XmlBeanFactory;
        import org.springframework.context.ApplicationContext;
        import org.springframework.context.support.ClassPathXmlApplicationContext;
        import org.springframework.core.io.ClassPathResource;

public class App {
    public static void main(String[] args) {

        ApplicationContext applicationContext = new ClassPathXmlApplicationContext("spring-config.xml");
        StudentController studentController = (StudentController) applicationContext.getBean("studentController",StudentController.class);
        studentController.sayHi();

    }
}
 打印成功!
打印成功!
本质上
@Autowired
    private StudentService studentService;
这个和我们用常规方法
private StudentService studentService = studentService;
是类似的,只不过前者是从Spring容器里面去找studentService的实例化对象,然后获取的而后者可能需要包的导入。
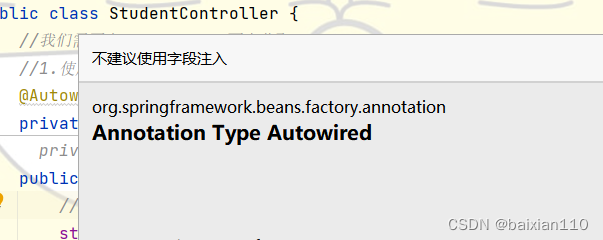
属性注入首先优点是简单的,但是我们会发现IDEA是不建议这样用的(专业版会有提示)
这是因为属性注入有三个缺点
- @Autowired不能修饰由final修饰的对象。本质上这是Spring和JDK在设计上冲突了。由final修饰的对象是不可变的变量,所以在创建的时候就必须赋值,所以要么直接=赋值,要么就在构造方面里面直接赋值。所以如果这个属性或者对象被final修饰了,那就是一定要赋值的。但是被@Autowired修饰,可以不赋值(前面的例子就是不赋值)这就冲突了。
- @Autowired只能适用于IOC容器
- 更容易违背单一设计原则
2 使用set注入
package com.demo.controller;

import com.demo.service.StudentService;
import org.springframework.beans.factory.annotation.Autowired;
import org.springframework.stereotype.Controller;

@Controller
public class StudentController {


    //2.使用set注入
    private StudentService studentService;
	@Autowired
    public void setStudentService(StudentService studentService) {
        this.studentService = studentService;
    }

    public void sayHi(){
        //调用service方法
        studentService.sayHi();
    }
}
set注入的优点:
- set注入时更加符合单一设计原则(相对于属性输入)。
set注入的缺点:
- 和属性注入一样,不可以注入不可变对象(final修饰)
- 注入对象可被修改
因为本质上set注入是通过set方法去设置对象的,而set方法是由public修饰的,也就意味着类在任何情况下都可以多次调用set方法去修改对象,这就非常不好。
3 构造方法注入(推荐)
package com.demo.controller;

import com.demo.service.StudentService;
import org.springframework.beans.factory.annotation.Autowired;
import org.springframework.stereotype.Controller;

@Controller
public class StudentController {
    private StudentService studentService;
    @Autowired
    public StudentController(StudentService studentService) {
        this.studentService = studentService;
    }

    public void sayHi(){
        //调用service方法
        studentService.sayHi();
    }
}
但是实际上,Spring4.X以后,如果这个类只有这一个构造方法,就支持即使这里不注解,依旧是可以编译成功。这是因为IDEA为了推广构造方法注解这种形式而做的优化措施。
构造注入的优点:
- 可以注入一个不可变的对象,即可以修饰一个被final修饰的对象
- 注入的对象不会被修改,构造方法只会在类的加载的时候执行一次,不像set方法可以被多次执行。
- 注入的对象会被完全初始化,这和构造方法机制相关
- 通用性更好,属性注入只适用于IOC容器,但是构造方法不是,通用性更好。
但是,实际在开发中,属性注入还是主流!!
4 @Resource:另⼀种注⼊关键字
在进⾏类注⼊时,除了可以使⽤@Autowired 关键字之外,我们还可以使⽤@Resource 进⾏注⼊。
那么两者的区别是啥
@Autowired 和@Resource 的区别
- 出身不同:@Autowired 来⾃于Spring,⽽@Resource 来⾃于JDK 的注解;
- 使⽤时设置的参数不同:相对于@Autowired 来说,@Resource ⽀持更多的参数设置,例如 name 设置,根据名称获取Bean。
- 此外,@Resource在获取对象是现根据类型去获取的,再根据名称去获取,@Autowired现根据名称去获取的,在根据类型去获取。
- @Autowired 可⽤于Setter 注⼊、构造函数注⼊和属性注⼊,⽽@Resource 只能⽤于Setter 注 ⼊和属性注⼊,不能⽤于构造函数注⼊。
其实按照我的理解Autowired注解注入的类是需要自己手动声明的。
但是Resource注解注入的类往往是框架自带的类,不需要自己手动声明。
那么现在的问题是@Resource这里面的的参数有什么用呢?
@Resource可以用来解决多个想要注入多个同类型的对象到一个类里面去的问题
解决同⼀个类型,多个bean 的解决⽅案有以下两个:
● 使⽤@Resource(name=“user1”) 定义。
● 使⽤@Qualifier 注解定义名称。
①使⽤@Resource(name=“XXX”)
@Controller
 class UserController4 {
      // 注⼊
      @Resource(name="user1")
      private User user;

 public User getUser() {
          return user;
}
  }
使⽤@Qualifier
@Controller
 public class UserController5 {
      // 注⼊
	@Autowired
  @Qualifier(value = "user2")
  private User user;
 	public User getUser() {
           return user;
      }
 }
三、Bean的生命周期和作用域
3.1 Bead的作用域的定义
Bean在整个Spring框架(项目)中的某种行为模式。这个定义是比较难懂的,没关系,我们看一下下面的实例
在model目录下创建User类,然后在Component目录下创建UserBeans类,并且使用User的set方法,构造一个User对象user1并使用Bean注解将其存储入Spring中,然后在Controller目录下创建UserController类,在这个类中,使@ @Autowired注解从Spring获取bean对象(也就是刚刚的user1)将其注入UserController类中。
代码如下
package com.demo.model;

import lombok.Data;
import lombok.Getter;
import lombok.Setter;

@Data
public class User {
    private int id;
    private String name;
    private String  password;
}
package com.demo.component;


import com.demo.model.User;
import org.springframework.context.annotation.Bean;
import org.springframework.stereotype.Component;

/**
 * 作者:小黑
 */
@Component
public class UserBeans {
    @Bean
    public User user1(){
        User user = new User();
        user.setId(1);
        user.setName("zhangsan");
        user.setPassword("123456");
        user.getId();
        return user;
    }
}
package com.demo.controller;

import com.demo.model.User;
import org.springframework.beans.factory.annotation.Autowired;
import org.springframework.stereotype.Controller;

/**
 * 作者:小白
 */
@Controller
public class UserController {
    @Autowired
    private User user1;

    public void getUser() {
        System.out.println("User1:"+user1);
    }

}
此时,小白想要在他负责的模块中再创建一个User类(命名为u),并且这个类是被user1赋值的,然后重新设置这个对象的名字
代码如下
package com.demo.controller;

import com.demo.model.User;
import org.springframework.beans.factory.annotation.Autowired;
import org.springframework.stereotype.Controller;

/**
 * 作者:小白
 */
@Controller
public class UserController {
    @Autowired
    private User user1;

    public void getUser() {
        System.out.println("小白| User1:"+user1);
        User u = user1;
        u.setName("lihua");
        System.out.println("小白| u:"+u);
    }

}
此时另一个模块的负责人是小黄,他也是编写Contoller模块的。他在Controller目录下创建UserAdvicedController类
package com.demo.controller;

import com.demo.model.User;
import org.springframework.beans.factory.annotation.Autowired;
import org.springframework.stereotype.Controller;

import javax.annotation.Resource;

/**
 * 作者小黄
 */
@Controller
public class UserAdvicedController {
    @Resource
    private User user1;


    public void getUser(){
        System.out.println("小黄| user1"+user1);
    }
}
他也想取得小黑编写的User的那个对象(也就是zhangsan的那个对象)。那么是不是这样的结果呢?
我们的主函数调用代码如下
        ApplicationContext applicationContext = new ClassPathXmlApplicationContext("spring-config.xml");
        //调用小白的代码
        UserController userController = (UserController)  applicationContext.getBean("userController", UserController.class);
        userController.getUser();
        //调用小黄的代码
        UserAdvicedController userAdvicedController  = applicationContext.getBean("userAdvicedController", UserAdvicedController.class);
        userAdvicedController.getUser();
结果是
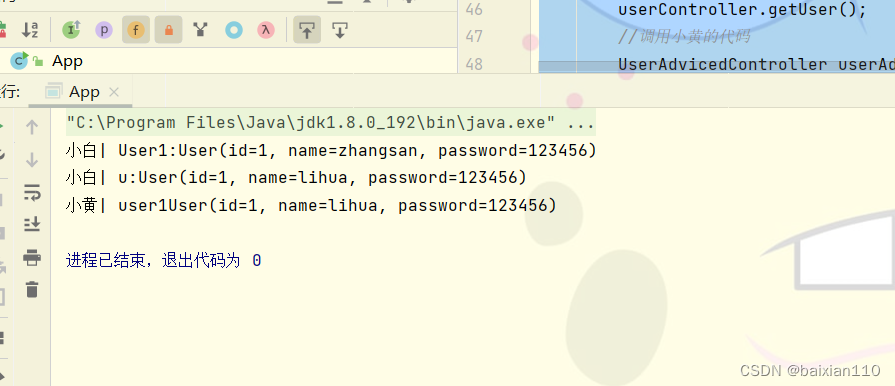
发现小黄拿到的是lihua这个对象而不是zhangsan这个对象。
从小白的角度而言,小白也是没有修改lihua这个对象的,那么为什么这个对象会变呢?
这是因为
User u = user1;
u.setName("lihua");
这一句是将设置了User引用u指向了user1这个对象(并没有创建新的对象),所以这里的u.setName修改的name就是user1对象指向的存储空间里面的name。
这个实际就和
        String str = "abc";
        String str1 = str;
        System.out.println(str1 == str);
这个代码返回true是一样的道理。这可以理解为是JVM本身的设置就是这样,也可以理解为是Spring框架依旧保持了这个设定即因为Bean 默认情况下是单例状态(singleton),也就是所有⼈的使⽤的都是同 ⼀个对象,之前我们学单例模式的时候都知道,使⽤单例可以很⼤程度上提⾼性能,所以在Spring 中 Bean 的作⽤域默认也是singleton 单例模式也就是bean对象每次在不同的代码(类、文件等)中被调用的的时候都是直接使用的bean这个对象本身,而不是构建了一个副本之类的。也就是全局共享的。
经过这个例子之后我们再来理解一下bead的作用域
Bean 的作⽤域是指Bean 在Spring 整个框架中的某种⾏为模式,⽐如singleton 单例作⽤域,就 表示Bean 在整个Spring 中只有⼀份,它是全局共享的,那么当其他⼈修改了这个值之后,那么另⼀ 个⼈读取到的就是被修改的值。
那么我们如果不想上面的情况发生,就需要修改bean的作用域已达到我们的需求。那么Spring中一个提供了六种bean的作用域
3.2 Bean 的6 种作⽤域
Spring 容器在初始化⼀个Bean 的实例时,同时会指定该实例的作⽤域。Spring有6 种作⽤域,最后 四种是基于Spring MVC ⽣效的:
- singleton:单例作⽤域
- prototype:原型作⽤域(多例作⽤域)
- request:请求作⽤域
- session:回话作⽤域
- application:全局作⽤域
- websocket:HTTP WebSocket 作⽤域
注意后4 种状态是Spring MVC 中的值,在普通的Spring 项⽬中只有前两种。
singleton(单例模式)
● 官⽅说明:(Default) Scopes a single bean definition to a single object instance for each Spring IoC container.
● 描述:该作⽤域下的Bean在IoC容器中只存在⼀个实例:获取Bean(即通过applicationContext.getBean等⽅法获取)及装配Bean(即通过@Autowired注⼊)都是同⼀个对 象。
● 场景:通常⽆状态的Bean使⽤该作⽤域。⽆状态表示Bean对象的属性状态不需要更新
● 备注:Spring默认选择该作⽤域
prototype(原型模式,多例模式)
● 官⽅说明:Scopes a single bean definition to any number of object instances.
● 描述:每次对该作⽤域下的Bean的请求都会创建新的实例:获取Bean(即通过 applicationContext.getBean等⽅法获取)及装配Bean(即通过@Autowired注⼊)都是新的对象实例 。这就和类似深克隆。
● 场景:通常有状态的Bean使⽤该作⽤域(经常修改对象)
像我们刚才的需求就适合用 prototype。
request(请求作用域)
● 官⽅说明:Scopes a single bean definition to the lifecycle of a single HTTP request. That is, each HTTP request has its own instance of a bean created off the back of a single bean definition. Only valid in the context of a web-aware Spring ApplicationContext.
将单个bean定义范围限定为单个HTTP请求的生命周期。也就是说,每个HTTP请求都有自己的bean实例,该实例是在单个bean定义的后面创建的。仅在支持web的Spring ApplicationContext的上下文中有效。
● 描述:每次http请求会创建新的Bean实例,类似于prototype
● 场景:⼀次http的请求和响应的共享Bean
● 备注:限定SpringMVC中使⽤。
session(会话作用域)
● 官⽅说明:Scopes a single bean definition to the lifecycle of an HTTP Session. Only valid in the context of a web-aware Spring ApplicationContext.
● 描述:在⼀个http session中,定义⼀个Bean实例
● 场景:⽤户会话的共享Bean, ⽐如:记录⼀个⽤户的登陆信息
● 备注:限定SpringMVC中使⽤
application(了解)
● 官⽅说明:Scopes a single bean definition to the lifecycle of a ServletContext. Only valid in
the context of a web-aware Spring ApplicationContext.
● 描述:在⼀个http servlet Context中,定义⼀个Bean实例
● 场景:Web应⽤的上下⽂信息,⽐如:记录⼀个应⽤的共享信息
● 备注:限定SpringMVC中使⽤
websocket(了解)
● 官⽅说明:Scopes a single bean definition to the lifecycle of a WebSocket. Only valid in the
context of a web-aware Spring ApplicationContext.
● 描述:在⼀个HTTP WebSocket的⽣命周期中,定义⼀个Bean实例
● 场景:WebSocket的每次会话中,保存了⼀个Map结构的头信息,将⽤来包裹客户端消息头。第⼀
次初始化后,直到WebSocket结束都是同⼀个Bean。
● 备注:限定Spring WebSocket中使⽤
3.3 设置作⽤域
使⽤@Scope 标签就可以⽤来声明Bean 的作⽤域。(Scope的英文意思就是作用域)
@Scope 标签既可以修饰⽅法也可以修饰类,@Scope 有两种设置⽅式:
- 直接设置值:@Scope(“prototype”)
- 使用全局变量来设置:
@Scope(ConfigurableBeanFactory.SCOPE_PROTOTYPE)
下面来看示例:
首先要解决的问题是这个注解就是是修饰谁呢?注意我们设置的作用域是谁的作用域呢?在上面的例子里说的是小黑创建的对象()(name是zhangsan这个对象,也就是UsersBeans类里面的调用函数返回的对象),那么我们就要在这个对象上去设置
package com.demo.component;


import com.demo.model.User;
import org.springframework.beans.factory.config.ConfigurableBeanFactory;
import org.springframework.context.ConfigurableApplicationContext;
import org.springframework.context.annotation.Bean;
import org.springframework.context.annotation.Scope;
import org.springframework.stereotype.Component;

/**
 * 作者:小黑
 */
@Component
public class UserBeans {
    @Bean
    @Scope(ConfigurableBeanFactory.SCOPE_PROTOTYPE)
    public User user1(){
        User user = new User();
        user.setId(1);
        user.setName("zhangsan");
        user.setPassword("123456");
        user.getId();
        return user;
    }
}
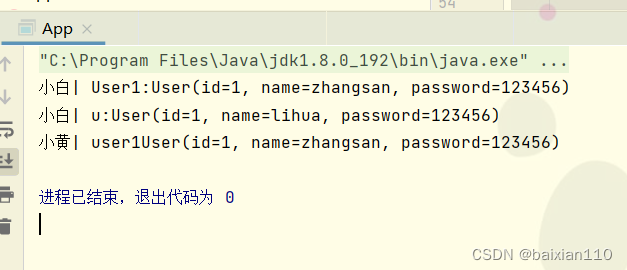
执行结果就满足我们的需求了。
4.4 Spring 执⾏流程和Bean 的⽣命周期
1. Spring 执⾏流程
首先是启动容器,当我们运行APP目录下的main函数的时候,会先启动容器(宏观上就是启动这个maven项目),然后执行第一句,也就是加载配置文件:当前根目录下的beans.xml。
 然后在来看加载这个beans.xml的配置文件具体做些什么,如果有bean标签的话,那么就将bean标签里面的bean对象加载到Spring中,如果是content标签就是将扫描这个路径下的所有的类,去检索这些类有么有添加五大类注解,如果有就注入Spring中。(所以这里又叫完成了Bean的初始化工作,或者说叫将bean注入Spring 中),根据上下文的不同,游客分配一次一次注入,还是全部注入。
 然后如果Bean对象需要使用其他Bean对象作为属性,可以使用@Resource和@Autowired来注解(这叫做装配Bean的属性)
面试题:说一下Spring的执行流程
1.启动容器(启动项目)(加载配置文件)
2.如果在xml中有bean标签,那么会直接将这个bean对象注入到Spring中。或者就是配置扫描路径,对路径下的包进行扫描,五大类注解修饰的Bean对象全部注入Spring。
3.如果需要在一个Bean对象中注入另一个Bean对象,那就需要先从Spring中取出,在装配到相应的类中。
2.Bean 的⽣命周期
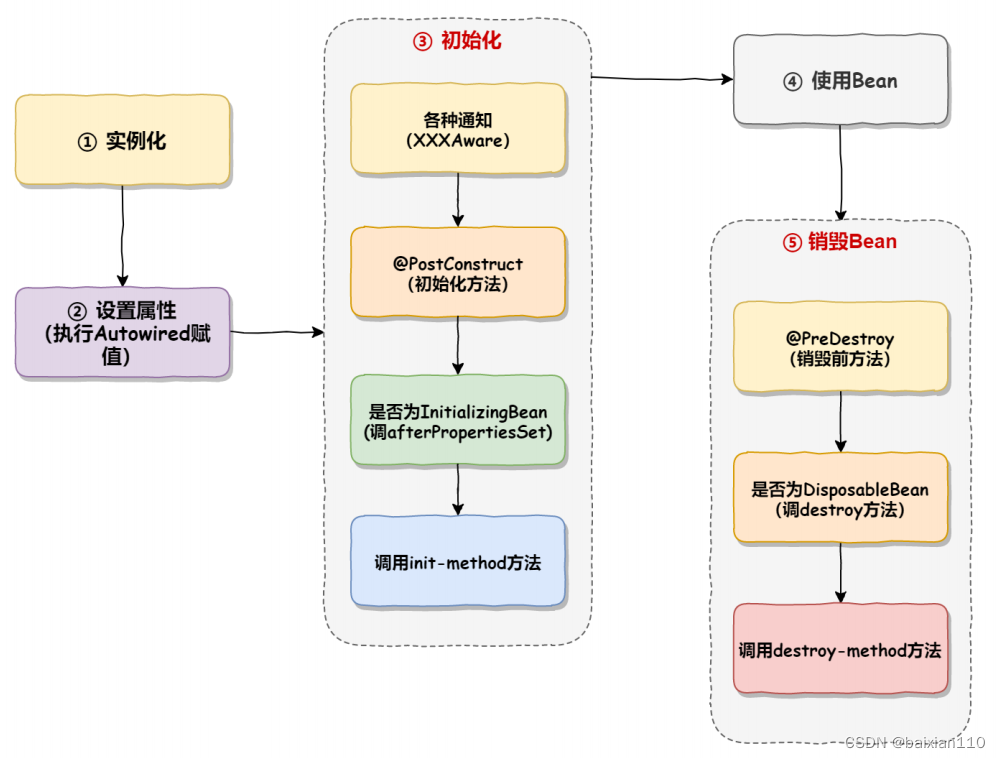
所谓的⽣命周期指的是⼀个对象从诞⽣到销毁的整个⽣命过程,我们把这个过程就叫做⼀个对象的⽣命 周期。
Bean 的⽣命周期分为以下5 ⼤部分
-
实例化Bean(为Bean 分配内存空间)
实例化bean与JVM中类的加载是一样的(将字节码转化为内存中的对象,这单纯只是分配的内存,就理解成从无到有就行了) -
设置属性(可以叫填充属性,Bean 注⼊和装配都可以,对应的是JVM中的实例化)
这里就和JVM正好是反的了,JVM在加载了类之后就会调用类的构造函数进行初始化,那么为什么Spring不是呢?首先这里的属性是指类属性,Spring中属性有两种,一种是当前类的普通属性,直接赋值的,一种是从Spring取的其他类对象然后进行赋值。但是Spring中初始化类(调用类的构造方法)的时候可能会调用和使用类属性
比如说在上面的例子中,类是UserConroller,那么这个类初始化的时候需要对他的属性private User user1进行赋值,但是如果此时Spring中存的user1还处于属性未填充状态(也就是name,password等属性还没有赋值,那么怎么初始化这个UserConrolle类呢?,但是如果我此时类属性都没有赋值,又何从谈调用和使用呢?所以,就必须先设置属性(先实例化)。
再举个生活中来说,我们建立一个房子,首先需要一块地标记上这块地用于这个房子的搭建,然后在这块地上先搭建一个房子的框架用来初步规划和占地方这就是实例化Bean,然后我要建造这个房子好需要好多的材料,这些材料就对应着类的属性的值,我先把这些“值”给他运进来,到时候要啥直接取就行。 -
Bean 初始化
● 实现了各种Aware 通知的⽅法,如BeanNameAware、BeanFactoryAware、
ApplicationContextAware 的接⼝⽅法;(相当于打电话给各种各样的师傅,通知师傅材料买好了,可以装了)
● 执⾏BeanPostProcessor 初始化前置⽅法;(师傅来了,先大体看一下该怎么装修比较合理一些)
● 执⾏@PostConstruct 初始化⽅法,依赖注⼊操作之后被执⾏;
● 执⾏⾃⼰指定的init-method ⽅法(如果有指定的话);(,师傅正式开始装修了。与上一个PostConstruct本质上是一回事,前者一个是注解时代:java5之后提供的一种初始化方法,而init-method是XMl提供的一个方法,先执行注解时代的初始化方法,再执行XML的)
● 执⾏BeanPostProcessor 初始化后置⽅法。(就好像房子建好之后还需要处理一些施工的垃圾一样,主要进行扫尾工作) -
使⽤Bean
-
销毁Bean
销毁容器的各种⽅法,如@PreDestroy、DisposableBean 接⼝⽅法、destroy-method。
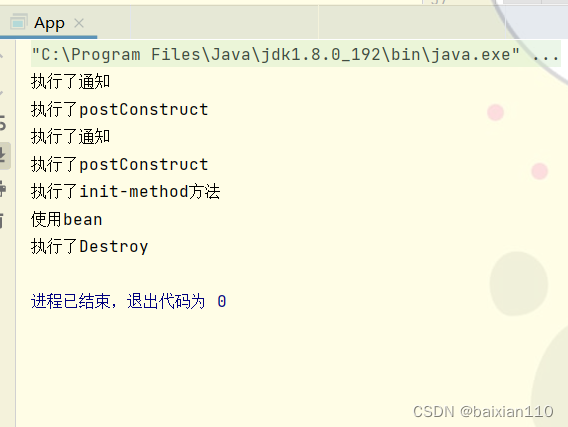
具体我们也可以代码验证一下
package com.demo.component;

import com.sun.scenario.effect.impl.sw.java.JSWBlend_SRC_OUTPeer;
import org.springframework.beans.factory.BeanNameAware;
import org.springframework.stereotype.Component;

import javax.annotation.PostConstruct;
import javax.annotation.PreDestroy;

@Component
public class BeanLifeComponent implements BeanNameAware {//实现了通知的接口

    @Override
    public void setBeanName(String name) {
        System.out.println("执行了通知");
    }

    @PostConstruct
    public void postConstruct() {
        System.out.println("执行了postConstruct");
    }

    public void init() {
        System.out.println("执行了init-method方法");
    }

    @PreDestroy
    public void PreDestroy() {
        System.out.println("执行了Destroy");
    }
}
<?xml version="1.0" encoding="UTF-8"?>
<beans xmlns="http://www.springframework.org/schema/beans"
       xmlns:xsi="http://www.w3.org/2001/XMLSchema-instance"
       xmlns:content="http://www.springframework.org/schema/context"
       xsi:schemaLocation="http://www.springframework.org/schema/beans http://www.springframework.org/schema/beans/spring-beans.xsd http://www.springframework.org/schema/context https://www.springframework.org/schema/context/spring-context.xsd">
        <content:component-scan base-package="com.demo"></content:component-scan>
        <bean id="myComponent" class="com.demo.component.BeanLifeComponent" init-method="init"></bean>
</beans>
import com.demo.component.*;
import	org.springframework.context.support.ClassPathXmlApplicationContext;


public class App {
    public static void main(String[] args) {


        ClassPathXmlApplicationContext classPathXmlApplicationContext = new ClassPathXmlApplicationContext("spring-config.xml");
        // ClassPathXmlApplicationContext是ApplicationContext的子类,只有这个类有销毁方法,ApplicationContext没有销毁方法
        BeanLifeComponent beanLifeComponent = classPathXmlApplicationContext.getBean("myComponent",BeanLifeComponent.class);
        System.out.println("使用bean");
        beanLifeComponent.PreDestroy()


  }
}
关于先设置属性后初始化这个,我们也可以用代码去验证一下
package com.demo.component;

import org.springframework.beans.factory.annotation.Autowired;
import org.springframework.stereotype.Component;

import javax.annotation.PostConstruct;

@Component
public class AComponent {
    @Autowired
    private BComponent bComponent;

    @PostConstruct
    public void PostConstruct(){
        System.out.println("AComponent PostConstruct");
    }
}
package com.demo.component;

import org.springframework.beans.factory.annotation.Autowired;
import org.springframework.stereotype.Component;

import javax.annotation.PostConstruct;

@Component
public class BComponent {
    @Autowired
    private CComponent cComponent;

    @PostConstruct
    public void PostConstruct(){
        System.out.println("BComponetde PostConstruct");
    }
}
package com.demo.component;

import org.springframework.stereotype.Component;

import javax.annotation.PostConstruct;

@Component
public class CComponent {

   @PostConstruct
    public  void PostConstruct() {
       System.out.println("CComponent PostConstruct");
   }

}
package com.demo;

import com.demo.component.AComponent;
import org.springframework.context.ApplicationContext;
import org.springframework.context.support.ClassPathXmlApplicationContext;

public class APP {
    public static void main(String[] args) {
        ApplicationContext applicationContext = new ClassPathXmlApplicationContext("spring-config.xml");
        applicationContext.getBean("AComponent", AComponent.class);
    }
}
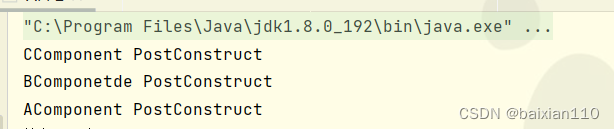
或者我们还有一个角度去验证
package com.demo.component;

import org.springframework.beans.factory.annotation.Autowired;
import org.springframework.stereotype.Component;

import javax.annotation.PostConstruct;

@Component
public class AComponent {
    @Autowired
    private BComponent bComponent;//1

    @PostConstruct
    public void PostConstruct(){
        bComponent.sayhi();//2
        System.out.println("AComponent PostConstruct");
    }
}
我们想这个代码执行成功的前提是private BComponent bComponent中bComponent这个对象已经实例化了,那么从AComponent角度来说就是他的这个属性bComponent已经被赋值了,只有这样后面执行bComponent.sayhi();才不会报空指针异常。如果2在1前面先执行,那么就一定会报空指针异常


 203
203


 被折叠的 条评论
为什么被折叠?
被折叠的 条评论
为什么被折叠?
 到【灌水乐园】发言


