


spring5
1、spring的概述
1.1、spring是什么
- Spring 是于 2003 年兴起的一个轻量级的 Java 开发框架,它是为了解决企业应用开发的复杂性而创建的。
- Spring 的核心是控制反转(IoC)和面向切面编程(AOP)。Spring 是可以在 Java SE/EE 中使用的轻量级开源框架
- spring官网地址:https://spring.io/
- spring官网下载地址:https://repo.spring.io/release/org/springframework/spring/
- GitHub : https://github.com/spring-projects
1.2、spring的优点
- Spring是一个开源的免费的框架(容器)。
- spring提供面向切面编程,可以方便的实现对程序进行权限拦截、运行监控等功能(AOP 编程的支持)。
- 声明式事务的支持,可以将我们从单调烦闷的事务管理代码中解脱出来,通过声明式方式灵活的进行事务的管理,提高开发效率和质量。
- Spring 不排斥各种优秀的开源框架,相反 Spring 可以降低各种框架的使用难度(方便集成各种优势框架)。Spring 可以降低各种框架的使用难度,提供了对各种优秀框架(Struts、Hibernate、Hessian、Quartz等)的直接支持。
- Spring 框架运行占用的资源少,运行效率高,不依赖其他 jar(轻量),非侵入式的框架。
- 提供了 Ioc 控制反转,由容器管理对象及对象的依赖关系(针对接口编程,解耦合)。
- Java 源码是经典学习范例,Spring 的源代码设计精妙、结构清晰、匠心独用,处处体现着大师对 Java 设计模式灵活运用以及对 Java 技术的高深造诣。它的源代码无意是 Java 技术的最佳实践的范例。
1.3、spring的体系结构
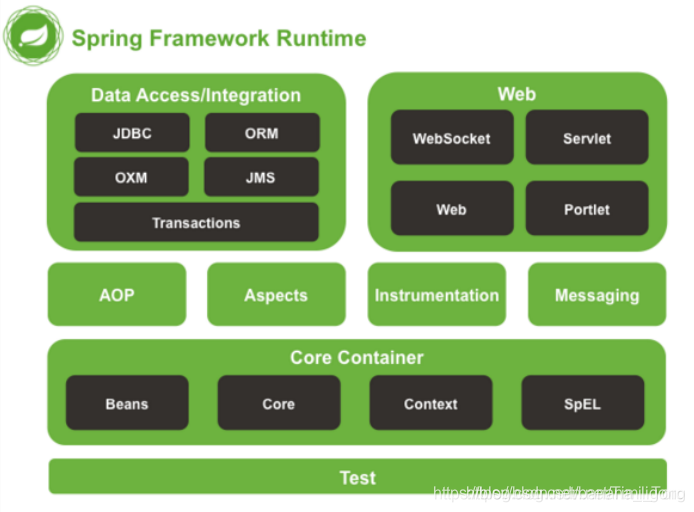
Spring 框架是一个分层架构,由 7 个定义良好的模块组成。Spring 模块构建在核心容器之上,核心容器定义了创建、配置和管理 bean 的方式 .
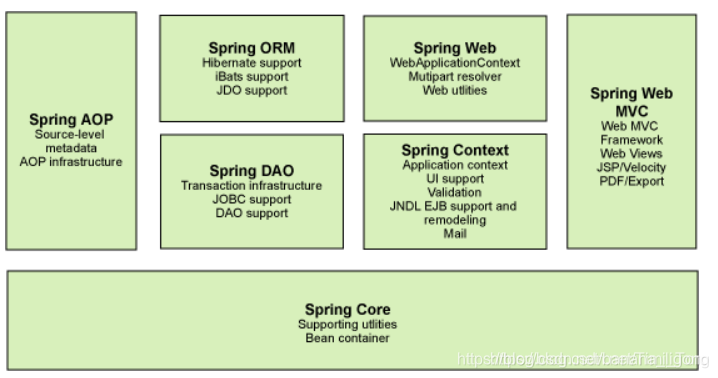
- 核心容器:核心容器提供 Spring 框架的基本功能。核心容器的主要组件是 BeanFactory,它是工厂模式的实现。BeanFactory 使用控制反转(IOC) 模式将应用程序的配置和依赖性规范与实际的应用程序代码分开。
- Spring 上下文:Spring 上下文是一个配置文件,向 Spring 框架提供上下文信息。Spring 上下文包括企业服务,例如 JNDI、EJB、电子邮件、国际化、校验和调度功能。
- Spring AOP:通过配置管理特性,Spring AOP 模块直接将面向切面的编程功能 , 集成到了 Spring 框架中。所以,可以很容易地使 Spring 框架管理任何支持 AOP的对象。Spring AOP 模块为基于 Spring 的应用程序中的对象提供了事务管理服务。通过使用 Spring AOP,不用依赖组件,就可以将声明性事务管理集成到应用程序中。
- Spring DAO:JDBC DAO 抽象层提供了有意义的异常层次结构,可用该结构来管理异常处理和不同数据库供应商抛出的错误消息。异常层次结构简化了错误处理,并且极大地降低了需要编写的异常代码数量(例如打开和关闭连接)。Spring DAO 的面向 JDBC 的异常遵从通用的 DAO 异常层次结构。
- Spring ORM:Spring 框架插入了若干个 ORM 框架,从而提供了 ORM 的对象关系工具,其中包括 JDO、Hibernate 和 iBatis SQL Map。所有这些都遵从 Spring 的通用事务和 DAO 异常层次结构。
- Spring Web 模块:Web 上下文模块建立在应用程序上下文模块之上,为基于 Web 的应用程序提供了上下文。所以,Spring 框架支持与 Jakarta Struts 的集成。Web 模块还简化了处理多部分请求以及将请求参数绑定到域对象的工作。
- Spring MVC 框架:MVC 框架是一个全功能的构建 Web 应用程序的 MVC 实现。通过策略接口,MVC 框架变成为高度可配置的,MVC 容纳了大量视图技术,其中包括 JSP、Velocity、Tiles、iText 和 POI。
2. spring的第一个程序
2.1、环境搭建
导入依赖
<dependencies>
        <dependency>
            <groupId>org.springframework</groupId>
            <artifactId>spring-webmvc</artifactId>
            <version>5.2.0.RELEASE</version>
        </dependency>
        <dependency>
            <groupId>junit</groupId>
            <artifactId>junit</artifactId>
            <version>4.12</version>
        </dependency>
        <dependency>
            <groupId>org.projectlombok</groupId>
            <artifactId>lombok</artifactId>
            <version>1.18.10</version>
        </dependency>
    </dependencies>
说明:导入spring-webmvc的依赖,其中包含了
- org.springframework:spring-aop:5.2.0.RELEASE
- org.springframework:spring-beans:5.2.0.RELEASE
- org.springframework:spring-context:5.2.0.RELEASE
- org.springframework:spring-core:5.2.0.RELEASE
- org.springframework:spring-expression:5.2.0.RELEASE
- org.springframework:spring-web:5.2.0.RELEASE
HelloSpring:
@Data
public class HelloSpring {
    private String say;
}
spring配置文件:applicationContext.xml
<?xml version="1.0" encoding="UTF-8"?>
<beans xmlns="http://www.springframework.org/schema/beans"
       xmlns:xsi="http://www.w3.org/2001/XMLSchema-instance"
       xsi:schemaLocation="http://www.springframework.org/schema/beans
        https://www.springframework.org/schema/beans/spring-beans.xsd">

    <!--配置实列-->
    <bean id="hello" class="com.wjh.HelloSpring"/>

</beans>
说明:把对象的创建改为以文件配置对象,并把对象存进容器,以后对象就交给spring容器来管理。
测试:
public class HelloTest {

    private ApplicationContext context = new ClassPathXmlApplicationContext("applicationContext.xml");
    @Test
    public void testhello(){
        HelloSpring hello = (HelloSpring) context.getBean("hello");
        hello.setSay("你好,spring");
        System.out.println(hello.toString());
    }
}
测试结果:

3、IOC控制反转
Ioc—Inversion of Control,即“控制反转”,不是什么技术,而是一种设计思想。在Java开发中,Ioc意味着将你设计好的对象交给容器控制,而不是传统的在你的对象内部直接控制。如何理解好Ioc呢?理解好Ioc的关键是要明确“谁控制谁,控制什么,为何是反转(有反转就应该有正转了),哪些方面反转了”?
- 谁控制谁,控制什么:传统Java SE程序设计,我们直接在对象内部通过new进行创建对象,是程序主动去创建依赖对象;而IoC是有专门一个容器来创建这些对象,即由Ioc容器来控制对 象的创建;谁控制谁?当然是IoC 容器控制了对象;控制什么?那就是主要控制了外部资源获取(不只是对象包括比如文件等)。
- 为何是反转,哪些方面反转了:有反转就有正转,传统应用程序是由我们自己在对象中主动控制去直接获取依赖对象,也就是正转;而反转则是由容器来帮忙创建及注入依赖对象;为何是反转?因为由容器帮我们查找及注入依赖对象,对象只是被动的接受依赖对象,所以是反转;哪些方面反转了?依赖对象的获取被反转了。
就是说,以后对象的创建、管理、注销等等这个生命周期都交给容器来管理。
3.1 IOC创建对象的方式
1、 使用无参构造对象,默认。
User:
package com.wjh.domain;

public class User {
    private String name;
    public User(){
        System.out.println("使用了无参构造方法");
    }

    public String getName() {
        return name;
    }

    public void setName(String name) {
        this.name = name;
    }

    @Override
    public String toString() {
        return "User{" +
                "name='" + name + '\'' +
                '}';
    }
}
<!--配置user实列-->
    <bean id="user" class="com.wjh.domain.User"></bean>
测试:
@Test
    public void testUser(){
        User user = (User) context.getBean("user");
    }
测试结果:

2 、使用有参构造方法
- 下标赋值
 <bean id="user" class="com.wjh.domain.User">
        <constructor-arg index="0" value="张三"></constructor-arg>
    </bean>
- 类型赋值
<!--类型赋值-->
    <bean id="user" class="com.wjh.domain.User">
        <constructor-arg type="java.lang.String" value="张三"></constructor-arg>
    </bean>
- 参数名赋值
 <!--参数名赋值-->
    <bean id="user" class="com.wjh.domain.User">
        <constructor-arg name="name" value="张三"></constructor-arg>
    </bean>
测试:
   @Test
    public void testUser(){
        User user = (User) context.getBean("user");
        System.out.println(user);
    }
测试结果:

总结:在配置文件加载的时候,容器中管理的对象就已经初始化了。
4、spring的配置
4.1:别名
  <!--配置别名-->
    <alias name="user" alias="user2"></alias>
4.2:Bean的配置
- id: bean的唯一标识。
- class: bean对象对应的全限定类名。
- name:别名。
- scope:bean的作用域。
4.3:import
导入其他applicationContext.xml配置文件。
5、DI依赖注入
DI注入定义:bean 实例在调用无参构造器创建对象后,就要对 bean 对象的属性进行初始化。初始化是由容器自动完成的,称为注入。
- 依赖:bean对象的创建依赖于容器。
- 注入:bean对象的所有属性,由容器来注入。
5.1、构造器注入
5.2、Set方式注入(掌握)
实体类Student:
@Data
@NoArgsConstructor
@AllArgsConstructor
public class Student {
    private String name;
    private Address address;
    private String[] books;
    private List<String> hobbys;
    private Map<String,String> card;
    private Set<String> games;
    private String wife;
    private Properties pros;
}
实体类Address:
@NoArgsConstructor
@AllArgsConstructor
@Data
public class Address {
    private String address;
}
配置文件applicationContext.xml
<bean id="address" class="com.wjh.domain.Address">
        <property name="address" value="广东省"/>
    </bean>

    <bean id="student" class="com.wjh.domain.Student">

        <property name="name" value="张三"/>

        <!--对象引用-->
        <property name="address" ref="address"/>
        <!--数组赋值-->
        <property name="books">
            <array>
                <value>红楼梦</value>
                <value>西游记</value>
                <value>水浒传</value>
                <value>三国演义</value>
            </array>
        </property>
        <!--List赋值-->
        <property name="hobbys">
            <list>
                <value>篮球</value>
                <value>唱歌</value>
                <value>跳舞</value>
                <value>打代码</value>
            </list>
        </property>
        <!--map集合赋值-->
        <property name="card">
            <map>
                <entry key="身份证" value="112233"></entry>
                <entry key="一卡通" value="123456"></entry>
            </map>
        </property>
        <!--Set集合赋值-->
        <property name="games">
            <set>
                <value>绝地求生</value>
                <value>英雄联盟</value>
                <value>王者荣耀</value>
            </set>
            <!--null值赋值-->
        </property>
        <property name="wife">
            <null></null>
        </property>
        <!--Properties赋值-->
        <property name="pros">
            <props>
                <prop key="学号">12346789</prop>
                <prop key="性别">男</prop>
                <prop key="生日">1998-05-20</prop>
            </props>
        </property>
    </bean>
测试:
 @Test
    public void testStudent(){
        Student student = (Student) context.getBean("student");
        System.out.println(student);

    }
测试结果:
Student(name=张三, address=Address(address=广东省), books=[红楼梦, 西游记, 水浒传, 三国演义], hobbys=[篮球, 唱歌, 跳舞, 打代码], card={身份证=112233, 一卡通=123456}, games=[绝地求生, 英雄联盟, 王者荣耀], wife=null, pros={学号=12346789, 生日=1998-05-20, 性别=男})
5.3、扩展方式注入
有对于设值注入与构造注入,在配置文件中,除了使用或标签外,还可使用命名空间注入的方式,让注入的值以标签属性的方式出现。
根据注入实现方式的不同,分为 p 命名空间注入与 c 命名空间注入。
p 命名空间注入:采用设值注入方式,故需要有相应的 setter
c 命名空间注入:采用构造注入方式,故需要有相应的构造器
- p 命名空间注入:
<beans xmlns="http://www.springframework.org/schema/beans"
    xmlns:xsi="http://www.w3.org/2001/XMLSchema-instance"
    xmlns:p="http://www.springframework.org/schema/p"
    xsi:schemaLocation="http://www.springframework.org/schema/beans
        https://www.springframework.org/schema/beans/spring-beans.xsd">

    <bean name="classic" class="com.example.ExampleBean">
        <property name="email" value="someone@somewhere.com"/>
    </bean>

    <bean name="p-namespace" class="com.example.ExampleBean"
        p:email="someone@somewhere.com"/>
</beans>
- c 命名空间注入
修改配置文件头,即添加相应约束xmlns:c=“http://www.springframework.org/schema/c”
 <beans xmlns="http://www.springframework.org/schema/beans"
    xmlns:xsi="http://www.w3.org/2001/XMLSchema-instance"
    xmlns:c="http://www.springframework.org/schema/c"
    xsi:schemaLocation="http://www.springframework.org/schema/beans
        https://www.springframework.org/schema/beans/spring-beans.xsd">

    <bean id="beanTwo" class="x.y.ThingTwo"/>
    <bean id="beanThree" class="x.y.ThingThree"/>

    <!-- traditional declaration with optional argument names -->
    <bean id="beanOne" class="x.y.ThingOne">
        <constructor-arg name="thingTwo" ref="beanTwo"/>
        <constructor-arg name="thingThree" ref="beanThree"/>
        <constructor-arg name="email" value="something@somewhere.com"/>
    </bean>

    <!-- c-namespace declaration with argument names -->
    <bean id="beanOne" class="x.y.ThingOne" c:thingTwo-ref="beanTwo"
        c:thingThree-ref="beanThree" c:email="something@somewhere.com"/>

</beans>
6、bean的作用域

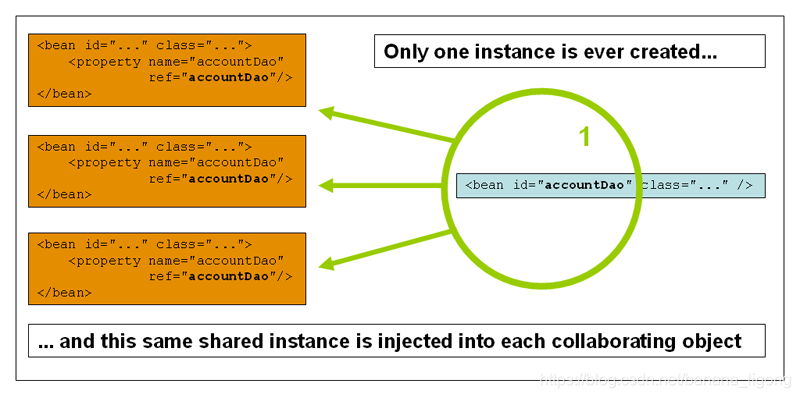
1、Singleton Scope:单例模型(spring默认机制)
- 只有一个单例 bean 的共享实例被管理,并且所有对带有一个或多个 ID 与该 bean 定义匹配的 bean 的请求都会导致Spring 容器返回一个特定的 bean 实例。
- 换句话说,当您定义一个 bean 定义并且它的作用域是一个单例时,Spring IoC 容器会创建该 bean
定义定义的对象的一个实例。该单个实例存储在此类单例 bean 的缓存中,并且对该命名 bean
的所有后续请求和引用都返回缓存对象。下图显示了单例范围的工作原理:
<bean id="user" class="com.wjh.domain.User" scope="singleton">
        <constructor-arg name="name" value="张三"></constructor-arg>
    </bean>
测试:
 @Test
    public void testScope(){
        Object user = context.getBean("user");
        Object user2 = context.getBean("user");
        System.out.println(user == user2);
    }
测试结果:
true
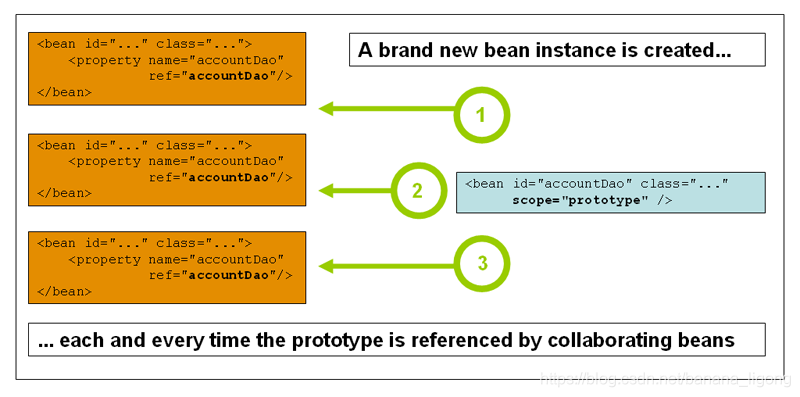
2、Prototype Scope:原型范围
- bean 部署的非单一原型范围导致每次对特定 bean 发出请求时都会创建一个新 bean 实例。也就是说,bean 被注入到另一个 bean 中,或者您通过getBean()容器上的方法调用来请求它。通常,您应该对所有有状态 bean 使用原型作用域,对无状态 bean 使用单例作用域。
<bean id="user" class="com.wjh.domain.User" scope="prototype">
        <constructor-arg name="name" value="张三"></constructor-arg>
    </bean>
测试结果:
false


 1209
1209


 被折叠的 条评论
为什么被折叠?
被折叠的 条评论
为什么被折叠?
 到【灌水乐园】发言


