


 本文分享了作者跟随MIT 6.S081实验,从配置环境、编写基本操作系统的函数如sleep()、pingpong()到实现更复杂的任务如素数筛选、系统调用跟踪。通过实践,深化了对操作系统原理和系统调用的理解,包括进程间通信、管道、fork()、系统调用机制等。
今天开个坑,MIT6.S081的操作系统实验,网上现成代码比较多(狗头),操作系统虽然校招面试的时候背背八股就行了,但是做一遍实验还是理解深刻一点,Just do it!
参考:
中文讲义:这个讲义整理的挺好,还包括一些学生提问也整了,不愧是MIT学生提问都很有水平.
知乎帖子:参考的一些配置方法以及引用的一些讲义资源.
B站大佬:跟着大佬的视频做,不会写的就白嫖(狗头).
Lab util
sleep()
基本上照着帖子配置一下不是很难.用的环境是阿里云服务器上的Ubantu20.4版本,照着帖子把包装一装,然后用VScode remote建了一下远程coding环境,非常舒适,既可以用集成终端写命令行,也可以用编辑器写代码~以及提一下退出qemu终端的快捷键:ctrl+a松掉后按x.
然后新建copy一下sleep() 函数,再验证一下通过,初步环境搭建完成,直接copy大佬的sleep()函数,写得比较严谨.
//这里明白了main的传参方式,argc表示参数个数,argv即为传参列表
int main(int argc, char const *argv[])
{
    if(argc<=1){
        fprintf(2,"useage: sleep seconds\n");
        exit(1);
    }
    sleep(atoi(argv[1]));
    exit(0);
}
pingpong()
实验讲义上写的几个要求:
- 用pipe建立一个管道
- 用fork创建一个子进程
- 用read从管道读,用write向管道写
- 用getpid获得即将调用的进程ID
用大佬给的这篇笔记确实好懂一点.
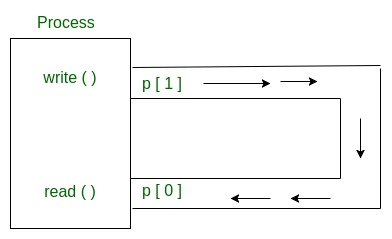
如何理解pipe?
a connection between two processes.pipe可以被创建的进程及其子进程使用进行读写
使用fork()创建子进程进行读写.
fork()<0   //返回值小于0时,表示创建子进程失败。
fork()==0  //返回值等于0时,表示当前进程为子进程。
fork()>0   //返回值大于0时,表示当前进程为父进程,且返回的值为其子进程的进程ID
按照实验要求要创建两个pipe,分别作为子进程和父进程的读写端;
照着这篇帖子写,但是这里注意不要使用wait(NULL)语句因为需要导入的<unistd.h>库中的read,write函数会和这个Xv6环境下的库函数冲突(我的理解是这样的~),就用wait(0)就行.
贴一下代码:
#include "kernel/types.h"
#include "kernel/stat.h"
#include "user/user.h"
#include "kernel/fs.h"
#define MSGSIZE 16

int main()
{
    // We use two pipes
    // First pipe to send input string from parent
    // Second pipe to send concatenated string from child

    int fd1[2]; // Used to store two ends of first pipe
    int fd2[2]; // Used to store two ends of second pipe

    pipe(fd1);
    pipe(fd2);

    int p = fork();

    if (p < 0) {
        printf("fork Failed");
        return 1;
    }

    // Parent process,1口读,0口写
    else if (p > 0) {
        //write end
        close(fd1[0]); // Close reading end of first pipe
        write(fd1[1],"ping\n",MSGSIZE);
        close(fd1[1]);
        wait(0);

        //reading end
        char read_str[MSGSIZE];
        read(fd2[0],read_str,MSGSIZE);
        printf("%d received %s",getpid(),read_str);
        close(fd2[0]);
    }
    //children process
    else {
        //write end
        close(fd2[0]);
        write(fd2[1],"pong\n",MSGSIZE);
        close(fd2[1]);
        wait(0);

        //reading end
        char read_str[MSGSIZE];
        read(fd1[0],read_str,MSGSIZE);
        printf("%d received %s",getpid(),read_str);

        close(fd1[0]);
    }
    exit(0);
}
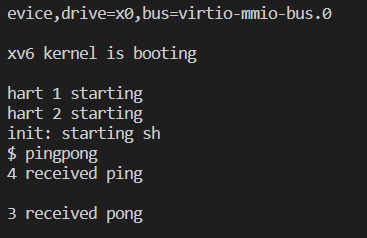
实验结果没问题.
两个进程在各自管道读写的示例图: 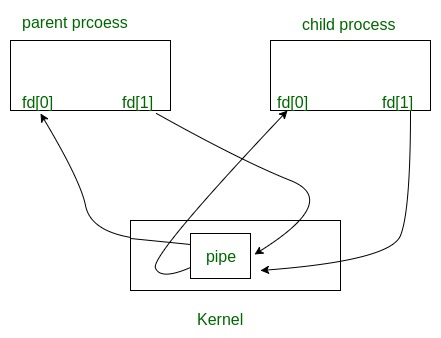
primes()
做一个素数筛,使用pipe和fork搞定. 第一个进程把2到35(考虑到文件描述符和进程的数量限制,到35即可)的数字塞到pipeline里面,对每一个素数,建立一个线程能够reads from its left neighbor over a pipe and writes to its right neighbor over another pipe.实现逐个输出素数的效果.
这个题上来没看明白,如果自己写个for循环把所有的数字找到再用pipe输出就可以实现效果了,但不是这么简单滴!
想了很久~大概知道这个核心算法是一个不断拿前面的数字去消掉后面整数倍数字的过程,最后剩下来的就是素数,但对这个fork之后如何分别执行父子进程还是有点生疏,copy了这位大佬的代码,豁然开朗.
void prim(int p[])
{
    int p2[2], n, m;
    pipe(p2);
    close(p[1]);
    if(read(p[0], &n, sizeof(int)) == 0) {
        close(p[0]);
        exit(0);
    }
    printf("prime %d\n", n);
    if(fork() > 0) {
        close(p2[0]);
        while(read(p[0], &m, sizeof(int))) {
            if(m % n != 0) write(p2[1], &m, sizeof(int));
        }
        close(p[0]);
        close(p2[1]);
        wait(0);
        exit(0);
    } else{
        prim(p2);
        close(p[0]);
    }
}

int main()
{
	//从第一个素数2开始
    int n = 2, i;
    int p1[2];
    pipe(p1);
    if(fork() > 0) {
    	//如果是父进程,先把第一个数字(一定是素数)打印出来
        close(p1[0]);
        printf("prime %d\n", n);
        for(i = 2 ; i <= 35; i++) {
        	//然后把第一个数字非整数倍的剩余数字都放到新的管道中
            if(i % n != 0) write(p1[1], &i, sizeof(int));
        }
        close(p1[1]);
        wait(0);
    } else{
    	  //剩余待筛选的数字放到新的管道中
          prim(p1);
    }
    exit(0);
}
find()
实现实验要求中的find()函数,提示参考ls函数;
ls()函数比较关键的一个实现:
while(read(fd, &de, sizeof(de)) == sizeof(de)){
      if(de.inum == 0)
        continue;
      memmove(p, de.name, DIRSIZ);
      p[DIRSIZ] = 0;
      if(stat(buf, &st) < 0){
        printf("ls: cannot stat %s\n", buf);
        continue;
      }
      printf("%s %d %d %d\n", fmtname(buf), st.type, st.ino, st.size);
    }
看了这篇知乎对dirent的解析(确实很地层,涉及操作系统的文件遍历),理解大致是这个while循环是在判断读取的path为目录情况下不断拼接下一级目录到buf上,因此如果为了实现find()函数找到子目录中的target文件,应当把strcmp()函数加在这个while块中,实现递归的查找.
xargs()
实现UNIX的xargs程序功能,很迷~因为xargs不是一个单独接收参数的命令和前面几个不一样,看了一下大佬的视频的意思,应该是写一个函数可以解析形式如cmdA|xargs cmdB的命令然.三个关键点:
- 如何获取前一个命令的标准化输出:
使用read(0,buf,SIZE)即读取到命令(即cmdA执行完之后的输出)(见实验手册1.2部分) - main函数的argc和*argv就是对应的xargs cmdB部分.
- exec(“(命令名)”,argv)实现命令的执行.
管道符以及xargs
cmdA | xargs cmdB:表示mdA的输出会作为cmbB的输入
cmdA | xargs cmdB:将xargs搭配管道符使用,cmdA的输出会作为cmdB的命令行参数
关于exec()
When exec succeeds, it does not return to the calling program; instead, the instructions loaded from the file start executing at the entry point declared in the ELF header.(当exec执行成功,不会返回到调用程序,那么进程的内容,包括代码和数据会被全部替换掉,旧的进程的代码执行流程就不再存在)
关于wait()
The wait system call returns the PID of an exited (or killed) child of
the current process and copies the exit status of the child to the address passed to wait; if none of
the caller’s children has exited, wait waits for one to do so. If the caller has no children, wait
immediately returns -1. If the parent doesn’t care about the exit status of a child, it can pass a 0
address to wait.(等待子进程执行结束获取其终止状态)
根据实验示例,如果是如下命令:
echo “1\n2” | xargs -n 1 echo line
则实现效果应该是:
line 1
line 2
因此,当用如下方法获得前一段命令的标准化输出时,要对buf做字符解析,以’\n’作为分隔符,将结果分别拼接到参数列表后.
char buf[MSGSIZE];
read(0,buf,MSGSIZE);
具体实现见大佬的视频,跟着敲了一遍之后感觉理解的不是很透彻.当buf[i]读到’\n’时,父进程中将p=&buf[i+1],然后等待子进程运行结束.在子进程中,给待执行参数中加上p使得执行buf中的输出片段,再加上一个结束符,拼接成功.(注意:这里子进程中的p和父进程中的p不同,可以写一些打印函数查看).不过测试通过了就此结束~
Lab syscall
System call tracing
先要在项目目录下调整分支到syscall,使用如下命令:
$ git fetch
$ git checkout syscall
$ make clean
这个lab主要实现trace的功能,trace的参数是一个称为mask的整数,这个整数决定了那些系统调用会被trace.
以trace 32 grep hello README命令为例,最终要实现打印系统调用的过程信息.先根据前几点在一些位置添加trace的声明,按照大佬的视频做就行.
然后后面几个要求:
- Add a sys_trace() function in kernel/sysproc.c .意思大概是要在proc里面添加一个变量存储trace命令中的mask参数,然后写一个sys_trace()读到命令中的这个mask值,然后放到proc struct的成员变量中.(可以参照sysproc.c文件中其他函数的写法)
- Modify fork() (see kernel/proc.c) to copy the trace mask from the parent to the child process.这一步在proc.c中的fork()函数中照着改就行,形式上比较直白.
- Modify the syscall() function in kernel/syscall.c to print the trace output.实现实验要求中的打印效果,照着大佬的写.
关于第三步的实现代码,要参考实验手册4.3节的说明
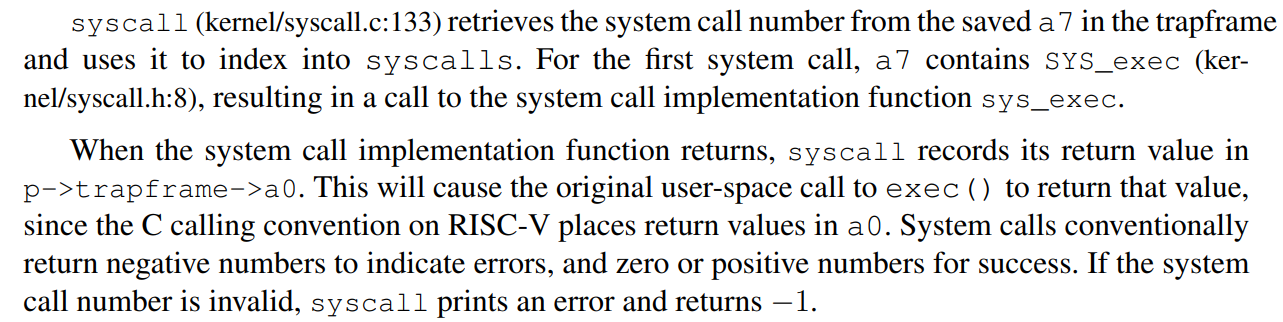
意思大致是syscall从a7位置获得系统调用的number,这个number match the entries in the syscall array(一张函数指针表);系统调用函数完成之后,返回值记录在a0位置.syscall.c中代码实现如下
//在前面代码添加sys_trace编号
static char *syscall_names[]={"fork","exit","wait", "pipe","read","kill","exec","fstat","chdir","dup","getpid","sbrk",
"sleep","uptime","open","write","mknod","unlink","link","mkdir","close","trace"};
void
syscall(void)
{
  int num;
  struct proc *p = myproc();

  num = p->trapframe->a7;
  int trace_mask = p->trace_mask;

  if(num > 0 && num < NELEM(syscalls) && syscalls[num]) {
    p->trapframe->a0 = syscalls[num]();
    //4: syscall trace -> 0
    //trace_mask右移num次的最后一位如果是1,打印对应的调用信息
    if((trace_mask>>num)&1){
      printf("%d: syscall %s ->%d\n",p->pid,syscall_names[num-1],p->trapframe->a0);
    }
  } else {
    printf("%d %s: unknown sys call %d\n",
            p->pid, p->name, num);
    p->trapframe->a0 = -1;
  }
}
关于trace参数的一点说明
It should take one argument, an integer “mask”, whose bits specify which system calls to trace. For example, to trace the fork system call, a program calls trace(1 << SYS_fork), where SYS_fork is a syscall number from kernel/syscall.h. You have to modify the xv6 kernel to print out a line when each system call is about to return, if the system call’s number is set in the mask. 例如, trace 2147483647 grep hello README 命令中的参数转化为二进制为1111111111111111111111(31位)表明syscall.h中声明的22中调用全部要打印.
Sysinfo
前面一些头文件,变量声明和上述类似,主要有三个任务:
- sysinfo needs to copy a struct sysinfo back to user space;
- To collect the amount of free memory, add a function to kernel/kalloc.c
- To collect the number of processes, add a function to kernel/proc.c
意思大致是我们申明了sysinfo这个数据结构之后要在系统调用sysinfo函数中把sysinfo内容用copyout()函数复制到user space;而后面两块即通过在kalloc.c中设计一个getfreemem()函数获得可用空间,在proc.c中设计一个getprocnumber()函数获得所有进程个数;这一块结合实验手册3.4-6看一看(通俗易懂,层层推进,醍醐灌顶!)就大差不差了(难得两个自己写出来的函数).涉及内核的内存管理和进程管理一些知识.
贴出sysinfo函数的代码:
uint64
sys_sysinfo(void)
{
  struct proc *p = myproc();
  struct sysinfo info;

  info.freemem = getfreemem();
  info.nproc = getprocnumber();
  //sysinfo needs to copy a struct sysinfo back to user space
  uint64 addr;
  if (argaddr(0, &addr) < 0)
  {
      return -1;
  }
  if(copyout(p->pagetable, addr, (char *)&info, sizeof(info)) < 0){
    return -1;
  }
  return 0;
}
关于xv6的内核内存管理
xv6 uses the physical memory between the end of the kernel and PHYSTOP for run-time allocation. It allocates and frees whole 4096-byte pages at a time. It keeps track of which pages are freeby threading a linked list through the pages themselves. Allocation consists of removing a page
from the linked list; freeing consists of adding the freed page to the list.(一次分配或释放4K的空间,使用一个空闲表list存储指向各自表的指针,同时分配锁进行保护).
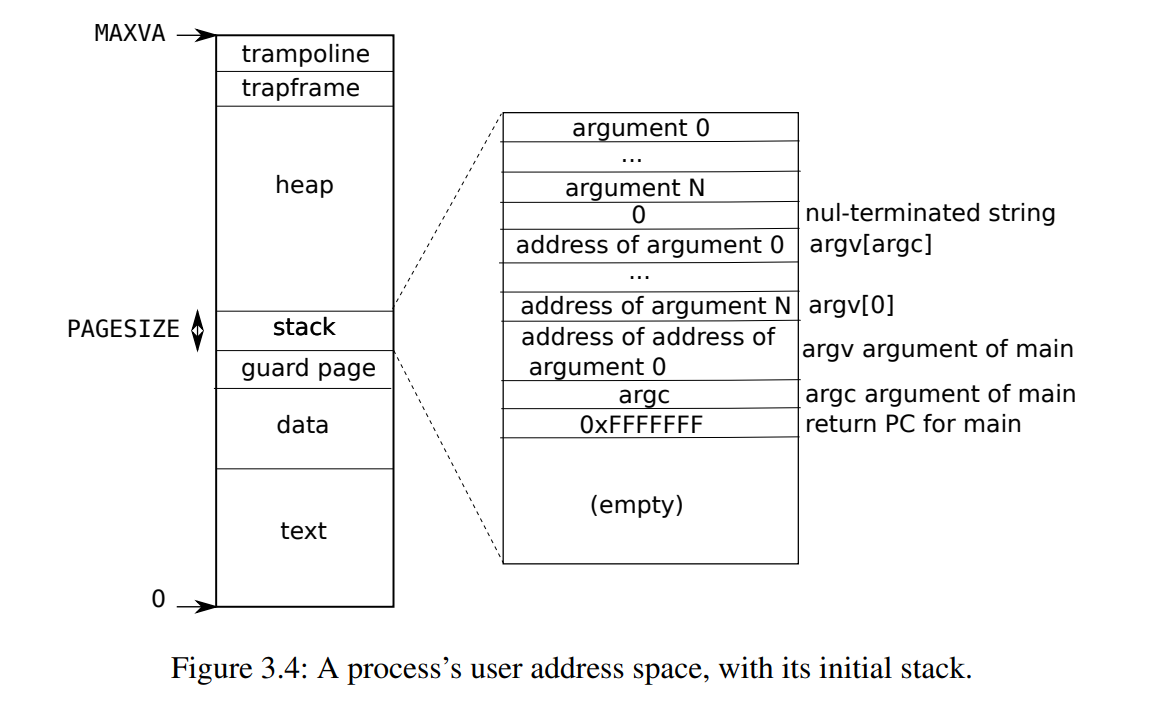
关于xv6的进程的地址空间
Each process has a separate page table, and when xv6 switches between processes, it also changes page tables.(每一个进程都有一张独立的表)图例放到下一个实验里.(现在还不是很懂~下一个实验就是page table,冲!)
关于argaddr(0,&addr)操作和copyout()
在kernel文件中查看这个命令的源码,在syscall()实验中就已经提到了这个地址,当系统调用返回时,将返回值记录在p->trapframe->a0这个位置,addr得到这个位置之后,作为copyout函数的参数,而copyout作用即是Copy from kernel to user.这一函数定义在用于管理页表和地址空间的vm.c文件中.
小结
这个实验做完才对xv6系统的一些概念有个理解,比如内核的划分,以及如何从user mode切换到supervisor mode又往前看了实验书的开头几节.
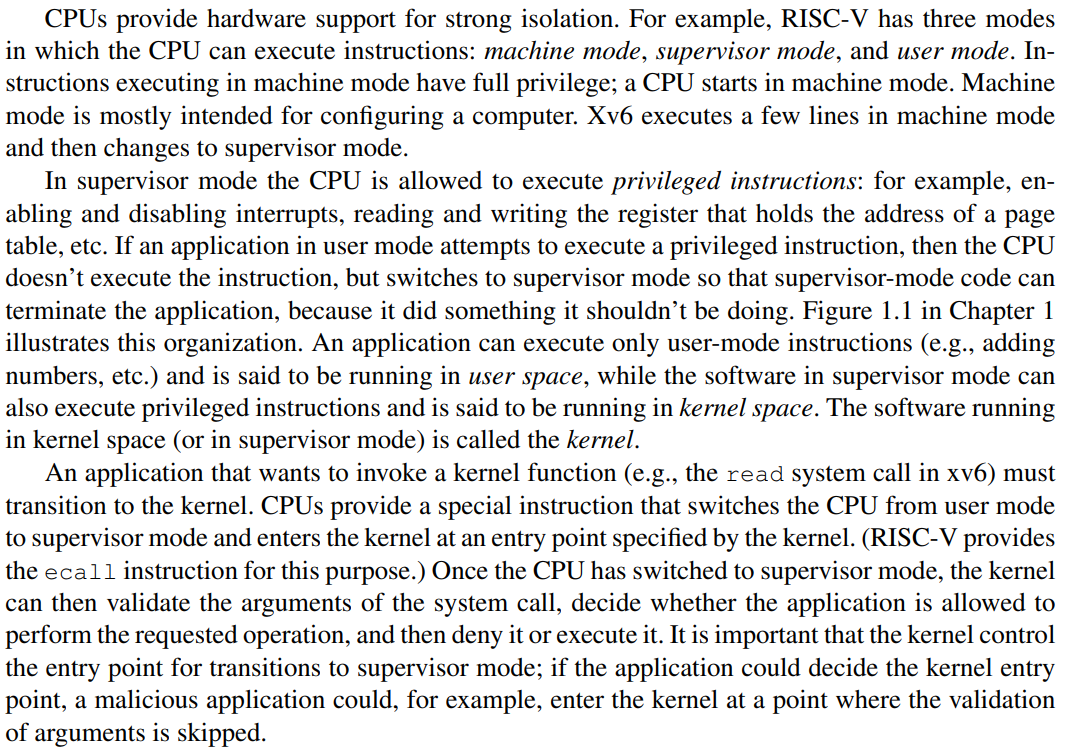
关于用户态到内核态的切换
在RISC-V中,有一个专门的指令用来实现这个功能,叫做ECALL。ECALL接收一个数字参数,当一个用户程序想要将程序执行的控制权转移到内核,它只需要执行ECALL指令,并传入一个数字。这里的数字参数代表了应用程序想要调用的System Call.
(也就是实验中user/usys.pl中添加两个任务的entry,用于生成user/usys.S,在系统调用实现后使用ecall指令跳转到相应的系统调用).只能说吹爆这个实验了~
Lab page tables
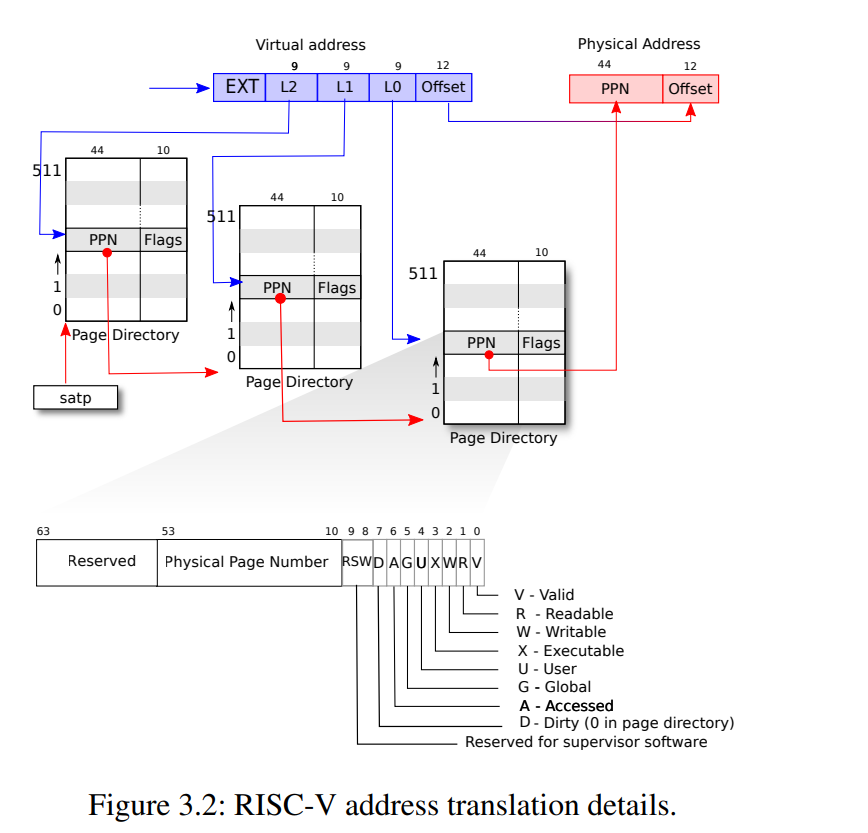
一些概念:
Each PTE contains a 44-bit physical page number (PPN) and some flags,如下图.
Speed up system calls
实现sharing data in a read-only region between userspace and the kernel.根据实验步骤要求理解为map一个USYSCALL在进程的地址空间.For this lab, ugetpid() has been provided on the userspace side and will automatically use the USYSCALL mapping. (在这个实验中userspace中已经设计了ugetpid()方法去读取USYSCALL的mapping结果)因此剩下要做的:
- 在proc_pagetable()函数中添加USYSCALL
- Choose permission bits that allow userspace to only read the page.mappages()函数flag参数位置传参PTE_R | PTE_U.(PTE_U controls whether instructions in user mode are allowed to access the page,if PTE_U is not set, the PTE can be used only in supervisor mode.)
- 相应的freeproc和allocproc中添加代码.
大致理解freewalk这个函数是干嘛的,模仿其逻辑一开始打印结果如下:
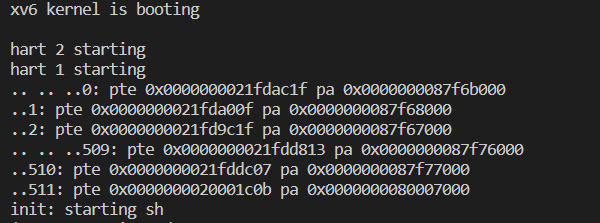
发现只打印除了叶子节点内容,根节点打印没有出现,且每行前面的’…'标识符也不对.照着大佬的视频把逻辑改了一下,最后得到正确结果.
仔细研究freewalk()函数中的语句:
if((pte & PTE_V) && (pte & (PTE_R|PTE_W|PTE_X)) == 0)
这里判断PTE_R,PTE_W,PTE_X全部为0才进行递归(不懂)
Detecting which pages have been accessed
实现一个pgaccess()系统调用函数, 用来检测page是否被访问过.该函数接收三个参数:First, it takes the starting virtual address of the first user page to check. Second, it takes the number of pages to check. Finally, it takes a user address to a buffer to store the results into a bitmask (a datastructure that uses one bit per page and where the first page corresponds to the least significant bit).第一个要检测的user page的va,其次是要检测的page数量,最后接收一个buff的address对应每个page有一比特标志位标记是否访问过.照着大佬视频讲解观察user/pgtbltest.c文件
void
pgaccess_test()
{
  char *buf;
  unsigned int abits;
  printf("pgaccess_test starting\n");
  testname = "pgaccess_test";
  buf = malloc(32 * PGSIZE);
  if (pgaccess(buf, 32, &abits) < 0)
    err("pgaccess failed");
  buf[PGSIZE * 1] += 1;
  buf[PGSIZE * 2] += 1;
  buf[PGSIZE * 30] += 1;
  if (pgaccess(buf, 32, &abits) < 0)
    err("pgaccess failed");
  if (abits != ((1 << 1) | (1 << 2) | (1 << 30)))
    err("incorrect access bits set");
  free(buf);
  printf("pgaccess_test: OK\n");
}
有几个关键步骤:
- 参数的接收?是在syscall里面直接argaddr(k,&dst)吗(是的)
- store a temporary buffer in the kernel and copy it to the user (via copyout()) after filling it with the right bits.
- walk() in kernel/vm.c is very useful for finding the right PTEs
- Be sure to clear PTE_A after checking if it is set.
walk函数的作用:Return the address of the PTE in pagetable that corresponds to virtual address va. If alloc!=0,create any required page-table pages.(通过三级目录搜索找到虚拟地址对应的pte.
自己想了一天思路大概懂了,但是位运算这一块代码能力差了一点,照着大佬的视频敲了一下,比较重要的两个步骤:
//当pte对应PTE_A位为1时候,flag置零操作,这个是真的不熟,C的位运算
if((*pte & PTE_A) != 0){
    //位置零,clear flag操作
    *pte = *pte&(~PTE_A);
    return 1;
 }
...
//用res存储mask结果,先res为0,后根据abit<<i再进行与操作,
//若有第i个page中的PTE_A为1,则将res的第i位置1,
//这个res=res|abit<<i确实很nice.
int res =0;
struct proc *p= myproc();
int abit=0;
pagetable_t pagetable = p->pagetable;
for(int i=0;i<n;i++){
 uint64 va = addr +i*PGSIZE;
 abit = vmpgaccess(pagetable,va);
 res = res | abit << i;
}


 1322
1322

 被折叠的 条评论
为什么被折叠?
被折叠的 条评论
为什么被折叠?
 到【灌水乐园】发言


