


微服务全局配置中心之Config
什么是Config
Spring Cloud Config Server又称为统一配置中心。顾名思义就是将配置统一管理;配置统一管理的好处是在日后大规模集群部署服务应用时相同的服务配置一致,日后再修改配置只需要统一修改后进行同步而不需要一个一个服务手动维护。

- Spring Cloud Config Server基于Netfix config进行二次封装而来,分为Server端和Client端。Server端作为单个的Springboot项目存在,对其而言其余的微服务就是client
- 实际开发中Config Server作为微服务的一部分,为了保证系统的可用性,Config Server同样需要集群部署。为了避免挨个项目修改配置文件以及实现特殊情况下对配置文件的回滚操作,所以我们的Config Server采用从远程仓库读取配置文件并自动同步的方式
Config Server开发
上面我们说了Config Server采取从远程仓库读取配置文件的方式进行开发。那么在gitee\gitlab\github中我们选择国内的gitee(码云)作为我们的远程仓库。首先我们需要在远程仓库中新建一个仓库并获取仓库地址以供Config Server读取配置文件使用。
gitee仓库
登录|注册
在进行这一步的前提是我们需要注册一个gitee账号,登录后我们直接在首页点击立即创建仓库

创建仓库
按照下图提示填写仓库信息,最后点击创建

拷贝地址

仓库创建完毕后页面会自动跳转到仓库详情页,我们点击上方的克隆/下载->HTTPS->复制,然后就可以得到仓库的地址:https://gitee.com/tide001/config-server.git。这个后面我们要使用到
Server端开发
1.新建Module
我们在springcloud_parent项目中新建Module - 07.springcloud_config_server,点击Finish

2.pom.xml
<?xml version="1.0" encoding="UTF-8"?>
<project xmlns="http://maven.apache.org/POM/4.0.0"
         xmlns:xsi="http://www.w3.org/2001/XMLSchema-instance"
         xsi:schemaLocation="http://maven.apache.org/POM/4.0.0 http://maven.apache.org/xsd/maven-4.0.0.xsd">
    <parent>
        <artifactId>springcloud_parent</artifactId>
        <groupId>com.christy</groupId>
        <version>1.0-SNAPSHOT</version>
    </parent>
    <modelVersion>4.0.0</modelVersion>

    <artifactId>07.springcloud_config_server</artifactId>

    <properties>
        <maven.compiler.source>8</maven.compiler.source>
        <maven.compiler.target>8</maven.compiler.target>
    </properties>

    <dependencies>
        <dependency>
            <groupId>org.springframework.boot</groupId>
            <artifactId>spring-boot-starter-web</artifactId>
        </dependency>

        <!-- 引入consul client依赖 -->
        <dependency>
            <groupId>org.springframework.cloud</groupId>
            <artifactId>spring-cloud-starter-consul-discovery</artifactId>
        </dependency>

        <!-- 引入健康检查依赖 -->
        <dependency>
            <groupId>org.springframework.boot</groupId>
            <artifactId>spring-boot-starter-actuator</artifactId>
        </dependency>

        <!--引入统一配置中心-->
        <dependency>
            <groupId>org.springframework.cloud</groupId>
            <artifactId>spring-cloud-config-server</artifactId>
        </dependency>

    </dependencies>
</project>
3.ConfigServerApplication.java
import org.springframework.boot.SpringApplication;
import org.springframework.boot.autoconfigure.SpringBootApplication;
import org.springframework.cloud.client.discovery.EnableDiscoveryClient;
import org.springframework.cloud.config.server.EnableConfigServer;

/**
 * @Author Christy
 * @Date 2021/7/9 13:35
 *
 * @EnableConfigServer注解开启统一配置中心
 **/
@SpringBootApplication
@EnableDiscoveryClient
@EnableConfigServer
public class ConfigServerApplication {
    public static void main(String[] args){
        SpringApplication.run(ConfigServerApplication.class, args);
    }
}
4.application.properties
server.port=8910
spring.application.name=CONFIGSERVER

#注册服务中心
spring.cloud.consul.host=localhost
spring.cloud.consul.port=8500

# 配置远程仓库
# 指定仓库的url
spring.cloud.config.server.git.uri=https://gitee.com/tide001/config-server.git
# 指定访问的分支
spring.cloud.config.server.git.default-label=master

# 如果是私有仓库 需要配置用户名和密码
#spring.cloud.config.server.git.username=
#spring.cloud.config.server.git.password=
5.启动
我们点击启动按钮,服务如果正常启动并且成功注册到consul的话,说明我们的config server就成功了

Config Client开发
我们上面说了,这里的client在实际开发中其实是一个个的微服务。相对于Config Server他们就是一个个的Client。我们这里新建一个Module作为client来进行演示效果
1.新建Module
我们在springcloud_parent项目中新建Module - 07.springcloud_config_client,点击Finish

2.pom.xml
<?xml version="1.0" encoding="UTF-8"?>
<project xmlns="http://maven.apache.org/POM/4.0.0"
         xmlns:xsi="http://www.w3.org/2001/XMLSchema-instance"
         xsi:schemaLocation="http://maven.apache.org/POM/4.0.0 http://maven.apache.org/xsd/maven-4.0.0.xsd">
    <parent>
        <artifactId>springcloud_parent</artifactId>
        <groupId>com.christy</groupId>
        <version>1.0-SNAPSHOT</version>
    </parent>
    <modelVersion>4.0.0</modelVersion>

    <artifactId>07.springcloud_config_client</artifactId>

    <properties>
        <maven.compiler.source>8</maven.compiler.source>
        <maven.compiler.target>8</maven.compiler.target>
    </properties>

    <dependencies>
        <!-- 引入springboot依赖 -->
        <dependency>
            <groupId>org.springframework.boot</groupId>
            <artifactId>spring-boot-starter-web</artifactId>
        </dependency>

        <!-- 引入consul client依赖 -->
        <dependency>
            <groupId>org.springframework.cloud</groupId>
            <artifactId>spring-cloud-starter-consul-discovery</artifactId>
        </dependency>

        <!-- 引入健康检查依赖 -->
        <dependency>
            <groupId>org.springframework.boot</groupId>
            <artifactId>spring-boot-starter-actuator</artifactId>
        </dependency>

        <!-- 引入统一配置中心客户端依赖 -->
        <dependency>
            <groupId>org.springframework.cloud</groupId>
            <artifactId>spring-cloud-starter-config</artifactId>
        </dependency>
    </dependencies>
</project>
引入统一配置中心客户端依赖后(微服务)系统就会自动将其当做统一配置中心的客户端而无需像Config Server在启动类上添加额外的注解
3.ConfigClientApplication.java
import org.springframework.boot.SpringApplication;
import org.springframework.boot.autoconfigure.SpringBootApplication;
import org.springframework.cloud.client.discovery.EnableDiscoveryClient;

/**
 * @Author Christy
 * @Date 2021/7/13 9:42
 **/
@SpringBootApplication
@EnableDiscoveryClient
public class ConfigClientApplication {
    public static void main(String[] args){
        SpringApplication.run(ConfigClientApplication.class, args);
    }
}
4.TestController.java
import org.slf4j.Logger;
import org.slf4j.LoggerFactory;
import org.springframework.beans.factory.annotation.Value;
import org.springframework.web.bind.annotation.RequestMapping;
import org.springframework.web.bind.annotation.RestController;

/**
 * @Author Christy
 * @Date 2021/7/13 9:48
 **/
@RestController
@RequestMapping("/test")
public class TestController {
    private static final Logger log = LoggerFactory.getLogger(TestController.class);

    @Value("${username}")
    private String username;

    @GetMapping("/hello")
    public String sayHello(){
        log.info("Hello " + username + ", Welcome!");
        return "Hello " + username + ", Welcome!";
    }
}
这个Controller没有实际意义,仅仅作为测试使用;username的值来源于配置文件
5.bootstrap.properties
# 配置注册中心
spring.cloud.consul.host=localhost
spring.cloud.consul.port=8500

# 告诉当前Config Client统一配置中心在注册中心的服务id
spring.cloud.config.discovery.service-id=CONFIGSERVER
# 开启当前Config Client 根据服务id去注册中心获取
spring.cloud.config.discovery.enabled=true

# 获取那个配置文件 1.确定分支  2.确定文件名  3.确定环境
spring.cloud.config.label=master
spring.cloud.config.name=configclient
spring.cloud.config.profile=prod
我们上面说了client的配置文件都是放在远程仓库上面的,但不是说client的所有配置都放在远程仓库。client端启动的时候通过注册中心上的Server端来加载远程仓库的配置文件,并且还要告诉Server端加载哪一个分支下面的哪个client的哪一个环境的配置文件。
实际开发中会有很多个client需要将配置文件放在远程仓库
每个client的配置文件可能会细分为测试、开发、正式等
每个仓库有可能细分为master、test等多个分支综上可以知道,上述配置文件中的配置缺一不可,而且只能放在项目中不能放在远程仓库。
相信小伙伴们也注意到了这次的配置文件名称bootstrap.properties和以前的application.properties不一样了
bootstrap.(properties|yml)作为预配置文件,在启动项目时会优先拉取远程配置,远程配置拉取成功之后根据远程配置启动当前应用。而
application.(properties|yml)作为已确定的配置文件,在启动项目时不会等待远程配置拉取,直接根据配置文件中的内容启动。因此当需要注册中心、服务端口等信息时远程配置还没有拉取到,这个时候启动会直接报错

6.配置远程仓库
这里所谓的配置远程仓库其实是在远程仓库新建configclient的配置文件
1.新建文件

2.configclient.properties
server.port=8911
spring.application.name=CONFIGCLIENT

spring.profile.active=dev

点击提交后返回仓库详情页面可以看到我们刚才新建的文件

3.configclient-dev.properties
按照上述步骤2的操作方法添加文件configclient-dev.properties,内容只有一个username,如下
username=dev
4.configclient-prod.properties
按照上述步骤2的操作方法添加文件configclient-prod.properties,内容只有一个username,如下
username=prod
至此们client端的三个配置文件就都配置好了
7.加载配置文件
我们上面提到过Config Client自己不加载配置文件,而是通过服务注册中心的Config Server进行加载,Config Server加载到远程仓库的配置文件后会拉取到本地进行保存,然后通过负载均衡策略通过选取的服务节点将配置信息返回给Config Client。Config Server拉取配置文件可以通过下面的方式进行拉取
http://serverhost:port/branch/serverid-type.properties|yml|json
- serverhost:port指的是Config Server的路径
- branch指的是加载远程仓库的哪个分支下面的配置文件
- serverid指的是加载哪个微服务的配置文件
- type指的是加载哪个分支(dev|test|prod)的配置文件
比如我们需要访问dev的配置文件,可以在浏览器输入http://localhost:8910/master/configclient-dev.properties
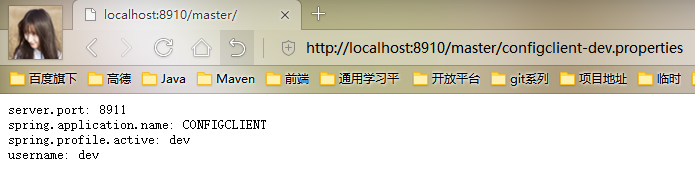
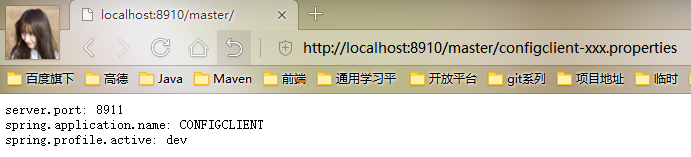
我们可以看到他将我们的configclient.properties和configclient-dev.properties自动合并了。这里有个地方需要注意,如果我们想直接访问configclient.properties的话不能直接在浏览器输入http://localhost:8910/master/configclient.properties,否则你将得到如下结果

我们上面说了Config Server拉取配置文件是通过固定的格式http://serverhost:port/branch/serverid-type.properties|yml|json来拉取的,如果我们仅仅想要访问configclient.properties的话,直接在浏览器输入http://localhost:8910/master/configclient-xxx.properties即可
Config Server通过约定的方式拉取配置文件,比如我们需要拉取configclient-dev.properties这个文件,他会自动将configclient.properties和configclient-dev.properties两个文件都拉取并合并成一个文件返回给client。但是如果没有找到configclient-dev.properties这个文件,他就仅仅返回configclient.properties这个文件
8.测试
我们现在启动Config Client(注意先将配置文件修改为bootstrap.properties),在Config Server的控制台中可以看到远程仓库的配置文件已经被拉取到了本地


现在我们去访问一下Config Client的测试页面,浏览器输入http://localhost:8911/test/hello

我们现在修改bootstrap.properties中的内容为spring.cloud.config.profile=dev,重新启动Config Client后再次访问http://localhost:8911/test/hello

本系列专题源码已经上传至gitee:https://gitee.com/tide001/springcloud_parent,欢迎下载交流


 57
57


 被折叠的 条评论
为什么被折叠?
被折叠的 条评论
为什么被折叠?
 到【灌水乐园】发言


