


 本文介绍了函数式编程和面向对象编程的基本概念,然后详细阐述了面向切面编程(AOP)的核心思想和实现方式。接着,展示了NestJS项目的创建、启动和热重载配置,以及如何在VSCode中进行调试。最后讨论了NestJS应用的生命周期管理和多环境配置策略。
简介:函数式编程(Functional Programming, FP)是一种编程范式——一种构建计算机程序结构和元素的方式,它将计算视为数学函数的评估,并避免改变状态和可变数据。
面向对象编程(Object-oriented Programming, OOP)是一种基于“对象”概念的编程范式,它可以包含字段(通常称为属性或属性)形式的数据,以及过程(通常称为方法)形式的代码。
面向切面编程AOP (Aspect Oriented Programming)特征:面向对象编程的特征在于对于软件事务流程的横切。它的核心是关注点(Concerns),可以解释为软件某一方面的特定需求(如,效率,安全性,可靠性……)。AOP的精髓在于将这些关注点相关代码抽出来,统一写入特定的代码片段中,而在需要确保这些需求的地方动态的插入这些代码片段。 要求:不必显示地在功能代码中引用关注点特定代码,功能代码只需负责自己的功能,无需关注这些特定的关注点。关注点可以更改(可以增加,可以减少,可以修改),任何时候,AOP代码开发者都可以在任何地方插入需要的代码,甚至通过AOP代码修改原有的功能代码。 实现方式:正常代码(目标代码)+AOP代码 -》代码编织器-》最终代码。AOP代码即为关注点相关代码,它们会被插入到特定目标代码中,代码编织器通过AOP代码中定义的条件将其插入,生成完整的功能(符合关注点需求)的代码。
DI和ioc示例代码理解:
class A {
   say () {
  		console.log('hi')
	}
}
class B {
	@Inject
	a!:A;
   say () {
  		this.A.say()
	}
}
new B().say();  // hi
1. nest项目创建以及启动
npm i -g @nestjs/cli
nest new project-name
pnpm start/npm run start
nest g [文件类型] [文件名] [文件目录(src目录下)]
热重载配置(参考示例代码)
1. pnpm i --save-dev webpack-node-externals run-script-webpack-plugin webpack
2. Once the installation is complete, create a webpack-hmr.config.js file in the root directory of your application.
const nodeExternals = require('webpack-node-externals');
const { RunScriptWebpackPlugin } = require('run-script-webpack-plugin');

module.exports = function (options, webpack) {
  return {
    ...options,
    entry: ['webpack/hot/poll?100', options.entry],
    externals: [
      nodeExternals({
        allowlist: ['webpack/hot/poll?100'],
      }),
    ],
    plugins: [
      ...options.plugins,
      new webpack.HotModuleReplacementPlugin(),
      new webpack.WatchIgnorePlugin({
        paths: [/\.js$/, /\.d\.ts$/],
      }),
      new RunScriptWebpackPlugin({ name: options.output.filename, autoRestart: false }),
    ],
  };
};
To enable HMR, open the application entry file (main.ts) and add the following webpack-related instructions:
注:如果ts报类型错误,可安装pnpm i -D @types/webpack-env
import { NestFactory } from '@nestjs/core';
import { AppModule } from './app.module';

async function bootstrap() {
  const app = await NestFactory.create(AppModule);
  await app.listen(3000);
  if (module.hot) {
    module.hot.accept();
    module.hot.dispose(() => app.close());
  }
}
bootstrap();
To simplify the execution process, add a script to your package.json file.
"start:dev": "nest start --watch"
2.vscode调试配置
1.点击vscode调试按钮(ctrl+shift+d)
2.创建launch.json文件,删除该文件configurations代码,右下加添加配置选择nodejs:launch via npm
3. 添加 "runtimeVersion": "16.15.0"(或者 "runtimeVersion": "v16.15.0",视环境而定),"internalConsoleOptions": "neverOpen"(使用自己终端工具,不使用内置console),修改 "runtimeArgs": ["run-script", "start:debug"]
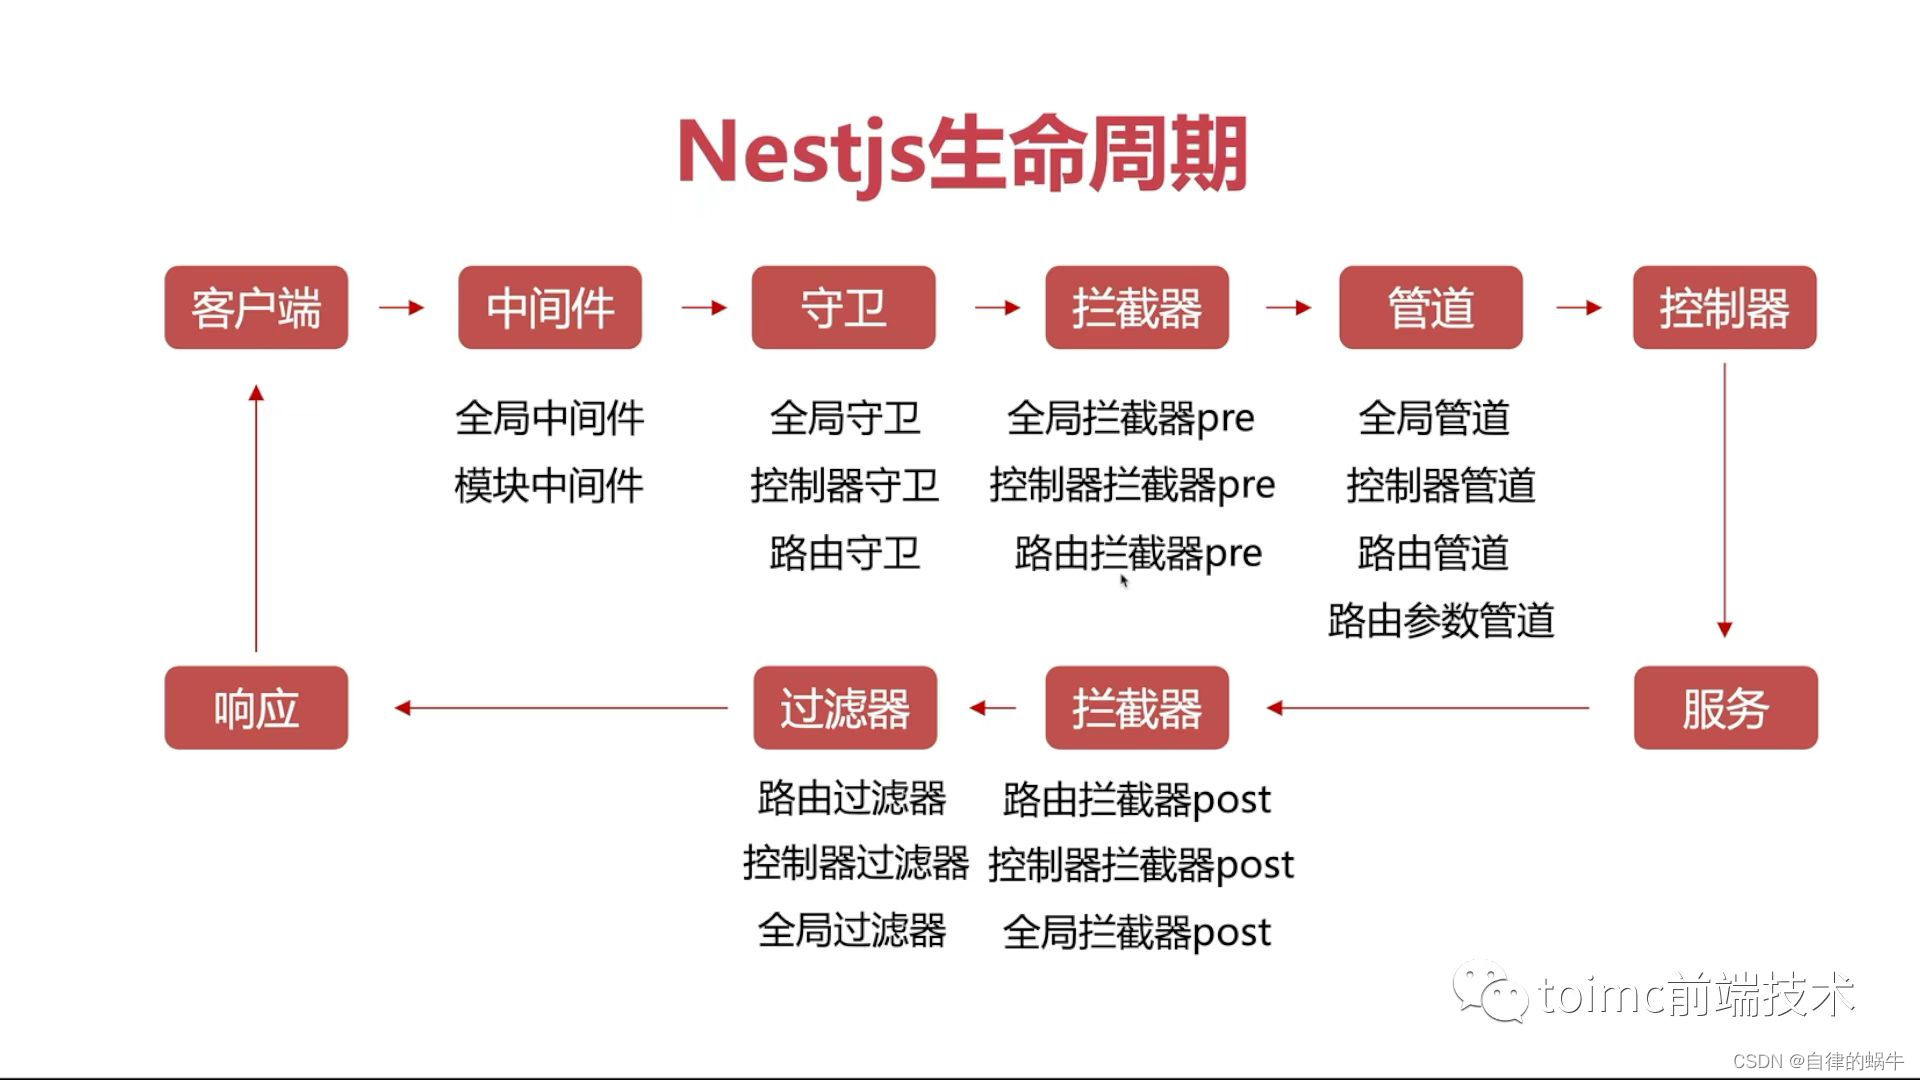
3.nestjs生命周期
(图片来源toimc大佬)
4.多环境配置的两种方式(vscode 数据库插件:Database Client)
dotenv
config
config(想要支持yaml格式,可以通过js-ymal)---->原文:Files ending in .yaml or .yml are parsed in YAML format. Node-config doesn’t include a YAML library, and beware there are some good ones and some not-so-good ones out there. If no global Yaml variable is available, node-config will attempt to load a good one (js-yaml);
官方推荐库,@nestjs/config
也可配合dotenv
pnpm i dotenv 安装后可识别 .env配置文件
使用yml配置
配置yml
pnpm i js-yamlpnpm i @types/js-yaml -D- 创建config/config.yml文件
db:
  mysql1:
    host: 127.0.0.1
    port: 3306
    name: test

  mysql2:
    host: 127.0.0.1
    port: 3306
- 创建
src/configuration.ts
import { readFileSync } from 'fs';
import * as yaml from 'js-yaml';
import { join } from 'path';
const YAML_CONFIG_FILENAME = 'config.yml';
const filePath = join(__dirname, '../config', YAML_CONFIG_FILENAME);
export default () => {
  return yaml.load(readFileSync(filePath, 'utf8'));
};
在 app.module.ts用load方法里面引入
  imports: [
    ConfigModule.forRoot({
      isGlobal: true,
      load: [configuration],
    }),
  ],
增加复杂配置
- 添加
config/config.development.ymlconfig/config.production.yml文件,此时config.yml文件配置信息可共享,也可被覆盖。 - 改造
src/configuration.ts安装lodash库,使用merge方法合并文件
import { readFileSync } from 'fs';
import * as yaml from 'js-yaml';
import { join } from 'path';
import * as _ from 'lodash';

const YAML_COMMON_CONFIG_FILENAME = 'config.yml';

const filePath = join(__dirname, '../config', YAML_COMMON_CONFIG_FILENAME);

const envPath = join(
__dirname,
'../config',
`config.${process.env.NODE_ENV || 'development'}.yml`,
);

const commonConfig = yaml.load(readFileSync(filePath, 'utf8'));

const envConfig = yaml.load(readFileSync(envPath, 'utf8'));

// 因为ConfigModule有一个load方法->函数
export default () => {
return _.merge(commonConfig, envConfig);
};


 873
873

 被折叠的 条评论
为什么被折叠?
被折叠的 条评论
为什么被折叠?
 到【灌水乐园】发言


