


前言
Okhttp作为现在最火的一个网络请求框架,已经有无数牛人给出了工具类等等。
例如:
鸿洋大神的 Android 一个改善的okHttp封装库 和 Android OkHttp完全解析 是时候来了解OkHttp了 以及 Android Https相关完全解析 当OkHttp遇到Https
还有凯子哥的 开源项目OkHttpPlus——支持GET、POST、UI线程回调、JSON格式解析、链式调用、文件上传下
有别人写好的工具类固然好,但是不光用要会用,还要止其所以然。
那么直接取拉官方的代码,研究如何使用以及阅读API说明,对加深理解OkHttp和了解基础,就更有帮助了。
正文
OkHttp现在已经升级到3.0版本了,API较2.0还是有些不同的。稍后再说。
下面将通过一个一个的测试用例来说明和解释API的用法,当然这些用力都是我照着example敲的,研究的过程中自然有了些了解,便记录下来。
创建完工程,引入了包,别忘记创建Client实例。
OkHttpClient yOkHttpClient = new OkHttpClient();那么,OkHttpClient是干嘛用的呢?
简单来说,通过OkHttpClient可以发送一个Http请求,并读取该Http请求的响应,它是一个生产Call的工厂。
此外,受益于一个共享的响应缓存/线程池/复用的连接等因素,绝大多数应用使用一个OkHttpClient实例,便可以满足整个应用的Http请求。
创建一个默认配置OkHttpClient,可以使用默认的构造函数。或者通过new OkHttpClient.Builder()方法来一步一步配置一个OkHttpClient实例。另外,如果要求使用现有的实例,可以通过newBuilder()方法来进行构造。
下面就是一个构造OkHttpClient实例的简单例子。
OkHttpClient client = ...
OkHttpClient clientWith30sTimeout = client.newBuilder()
    .readTimeout(30, TimeUnit.SECONDS)
    .build();
Response response = clientWith30sTimeout.newCall(request).execute();看一下OkHttpClient的源码,会发现缓存/代理等等需求,一应俱全的按照类封装到了Builder中。
Dispatcher dispatcher;          // 分发
Proxy proxy;                    // 代理
List<Protocol> protocols;
List<ConnectionSpec> connectionSpecs;
final List<Interceptor> interceptors = new ArrayList<>(); // 拦截器
final List<Interceptor> networkInterceptors = new ArrayList<>(); // 网络拦截器
ProxySelector proxySelector;
CookieJar cookieJar;
Cache cache;    // 缓存
InternalCache internalCache;
SocketFactory socketFactory;
SSLSocketFactory sslSocketFactory;
HostnameVerifier hostnameVerifier;
CertificatePinner certificatePinner;
Authenticator proxyAuthenticator;   // 代理证书
Authenticator authenticator;        // 证书
ConnectionPool connectionPool;
Dns dns;        // DNS
boolean followSslRedirects;
boolean followRedirects;
boolean retryOnConnectionFailure;
int connectTimeout;
int readTimeout;
int writeTimeout;
简单Get请求
代码:
@Test
public void testGet() throws IOException {
    Request build = new Request.Builder()
            .url("https://raw.github.com/square/okhttp/master/README.md")
            .build();
    Response response = yOkHttpClient.newCall(build)
            .execute();
    System.out.println(response);
}
结果:
在结果中打印了协议,结果码,消息结果,访问的url地址等等。
Response{protocol=http/1.1, code=200, message=OK, url=https://raw.githubusercontent.com/square/okhttp/master/README.md}简单看一下Request类,可以发现它代表一个Http请求,需要注意的是Request一旦build()之后,便不可修改。
Request的实例,主要通过new Request.Builder()来一步一步构造的。看一下Builder的代码。
public Builder() {
  this.method = "GET";
  this.headers = new Headers.Builder();
}默认是Get方法,此外还创建了头信息。值得注意的是Headers类中是通过List<String> namesAndValues = new ArrayList<>(20),来存放头信息的,一开始我也很纳闷,头信息都是一对一对的为什么要用List,看一下源码发现,在存取的时候都是将索引+2或者-2。并且头信息可以存在多个相同的Key信息。
继续看一下如何发起请求的。
yOkHttpClient.newCall(request)跟到newCall()方法中发现,又使用OkHttpClient实例和Request的实例,一起构造了一个RealCall的实例。在跟进RealCall代码中,可以简单了解到RealCall类简单做了一个托管并通过Dispather类对请求进行分发和执行,实际开启线程发起请求的方法就在这个类中。
随后又调用execute()方法,拿到了一个响应。这个execute()方法,实际上执行的就是RealCall中的execute()方法,那么最后就调用了Dispatcher的execute()方法。
最后,再看一下Response类的说明,Response代表一个Http的响应,这个类的实例不可修改。
致次,一个简单的Get请求和说明就结束了,简单跟入源码的原因在于,更清楚的了解OkHttpClient的Api和运行原理。
简单Post请求
提起post请求,必然是有请求体的。
代码:
String bowlingJson(String player1, String player2) {
    return "{'winCondition':'HIGH_SCORE',"
            + "'name':'Bowling',"
            + "'round':4,"
            + "'lastSaved':1367702411696,"
            + "'dateStarted':1367702378785,"
            + "'players':["
            + "{'name':'" + player1 + "','history':[10,8,6,7,8],'color':-13388315,'total':39},"
            + "{'name':'" + player2 + "','history':[6,10,5,10,10],'color':-48060,'total':41}"
            + "]}";
}

@Test
public void testPost() throws IOException {
    MediaType JSON = MediaType.parse("application/json; charset=utf-8");
    RequestBody body = RequestBody.create(JSON, bowlingJson("Jesse", "Jake"));
    Request request = new Request.Builder()
            .url("http://www.roundsapp.com/post")
            .post(body)
            .build();
    Response response = yOkHttpClient.newCall(request).execute();
    System.out.println(response.body().string());
}此处先给一个Http请求头大全的地址,非常好的。
MediaType用于描述Http请求和响应体的内容类型。对于Http请求头不了解的人,请看下面的图(PS:我也不太懂)。
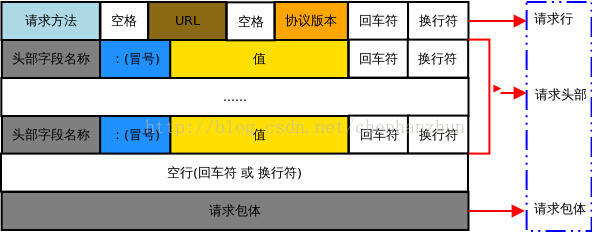
图是在这篇文章上找到的Android网络请求心路历程
很明了吧,MediaType代表的就是请求包体内容的类型。
例如,MediaType.parse("application/json; charset=utf-8");这个就带表请求体的类型为JSON格式的。
定义好数据类型,还要将其变为请求体,最后通过post()方法,随请求一并发出。
RequestBody body = RequestBody.create(JSON, bowlingJson("Jesse", "Jake"));为请求指定头信息
代码:
 @Test
public void testAccessHeaders() throws Exception {
    Request request = new Request.Builder()
            .url("https://api.github.com/repos/square/okhttp/issues")
            // User-Agent   User-Agent的内容包含发出请求的用户信息    User-Agent: Mozilla/5.0 (Linux; X11)
            .header("User-Agent", "OkHttp Headers.java")
            // Accept   指定客户端能够接收的内容类型  Accept: text/plain, text/html
            .addHeader("Accept", "application/json; q=0.5")
            .addHeader("Accept", "application/vnd.github.v3+json")
            .build();

    Response response = yOkHttpClient.newCall(request).execute();

    if (response.isSuccessful()) {
        System.out.println("Server: " + response.header("Server"));
        System.out.println("Date: " + response.header("Date"));
        System.out.println("Vary: " + response.headers("Vary"));
    }
}
响应结果:
Server: GitHub.com
Date: Thu, 28 Jan 2016 15:41:13 GMT
Vary: [Accept, Accept-Encoding]这个例子主要是Http请求头信息的一个展示。
对于header(String name, String value)方法,使用name和value设置一个头信息,如果请求中已经存在响应的信息那么直接替换掉。
而addHeader(String name, String value),如果请求头中已经存在name的name-value,那么还会继续添加,请求头中便会存在多个name相同而value不同的“键值对”。
至于name的取值说明,可以查看这个请求头大全。
异步Get请求
代码如下:
@Test
public void testAsyncGet() {
    final Request request = new Request.Builder().url("http://publicobject.com/helloworld.txt").build();
    System.out.println(request);
    yOkHttpClient.newCall(request).enqueue(new Callback() {
        @Override
        public void onFailure(Call call, IOException e) {
            e.printStackTrace();
        }

        @Override
        public void onResponse(Call call, Response response) throws IOException {
            System.out.println("call = [" + call + "], response = [" + response + "]");
            if (!response.isSuccessful()) {
                throw new IOException("" + response);
            }

            Headers headers = response.headers();
            for (int i = 0; i < headers.size(); i++) {
                System.out.println(headers.name(i) + ": " + headers.value(i));
            }

            System.out.println(response.body().string());
        }
    });
}与同步方法不同,调用的是enqueue()方法,其实际上调用的就是RealCall中的enqueue()方法,那么实际上就是Dispatcher的enqueue()方法。
synchronized void enqueue(AsyncCall call) {
 if (runningAsyncCalls.size() < maxRequests && runningCallsForHost(call) < maxRequestsPerHost) {
   runningAsyncCalls.add(call);
   executorService().execute(call);
 } else {
   readyAsyncCalls.add(call);
 }
}
添加授权证书
代码如下:
@Test
public void testAuthenticate() throws IOException {
    yOkHttpClient = new OkHttpClient.Builder()
            // 授权证书
            .authenticator(new Authenticator() {
                @Override
                public Request authenticate(Route route, Response response) throws IOException {
                    System.out.println("Authenticating for response: " + response);
                    System.out.println("Challenges: " + response.challenges());
                    String credential = Credentials.basic("jesse", "password1");
                    // HTTP授权的授权证书  Authorization: Basic QWxhZGRpbjpvcGVuIHNlc2FtZQ==
                    return response
                            .request()
                            .newBuilder()
                            .header("Authorization", credential)
                            .build();
                }
            })
            .build();

    Request request = new Request.Builder().url("http://publicobject.com/secrets/hellosecret.txt").build();
    Response response = yOkHttpClient.newCall(request).execute();

    if (response.isSuccessful()) {
        System.out.println(response.body().string());
    }
}
结果如下:
 Authenticating for response: Response{protocol=http/1.1, code=401, message=Unauthorized, url=https://publicobject.com/secrets/hellosecret.txt}
Challenges: [Basic realm="OkHttp Secrets"]通过Authenticator类,可以响应来自远程或者代理服务器的授权验证,通常情况会返回一个授权头以做验证;亦或是返回空表示拒绝验证。简单来说,你要访问一个服务,但是你要对方的验证。通过Authenticator类来代理一个认证请求,并使用Credentials.basic()来构造一个证书。
请求缓存
代码如下:
@Test
    public void testCacheResponse() throws IOException {

        int cacheSize = 10 * 1024 * 1024;

        Cache cache = new Cache(new File("bzh.tmp"), cacheSize);

        yOkHttpClient = new OkHttpClient.Builder()
                .cache(cache)
                .build();

        Request request = new Request.Builder()
                .url("http://publicobject.com/helloworld.txt").build();

        Response response1 = yOkHttpClient.newCall(request).execute();
        if (!response1.isSuccessful()) throw new IOException("Unexpected code " + response1);

        String response1Body = response1.body().string();
        System.out.println("Response 1 response:          " + response1);
        System.out.println("Response 1 cache response:    " + response1.cacheResponse());
        System.out.println("Response 1 network response:  " + response1.networkResponse());

        Response response2 = yOkHttpClient.newCall(request).execute();
        if (!response1.isSuccessful()) throw new IOException("Unexpected code " + response1);

        String response2Body = response2.body().string();
        System.out.println("Response 2 response:           " + response2);
        System.out.println("Response 2 cache response:     " + response2.cacheResponse());
        System.out.println("Response 2 network response:   " + response2.networkResponse());

        System.out.println("Response 2 equals Response 1 ? " + response1Body.equals(response2Body));
    }
说起这个缓存那就更有趣了,okhttp自带缓存,是不是很厉害。
对于OkHttpClient来说,只要为其设置了如下代码,那么便有了缓存功能。
Cache cache = new Cache(new File("bzh.tmp"), cacheSize);
yOkHttpClient = new OkHttpClient.Builder()
        .cache(cache)
.build();其中最为关键的就是Cache类,他的主要作用在于缓存HTTP和HTTPS响应文件,所以他们可以重复使用,节省时间和带宽。
强制使用网络请求
Request request = new Request.Builder()
     // or  .cacheControl(CacheControl.FORCE_NETWORK)
     .cacheControl(new CacheControl.Builder().noCache().build())
     .url("http://publicobject.com/helloworld.txt")
.build();其中CacheControl.FORCE_NETWORK和new CacheControl.Builder().noCache().build()是等效的。
测试结果如下:
Response 1 response:          Response{protocol=http/1.1, code=200, message=OK, url=https://publicobject.com/helloworld.txt}
Response 1 cache response:    null
Response 1 network response:  Response{protocol=http/1.1, code=200, message=OK, url=https://publicobject.com/helloworld.txt}
Response 2 response:           Response{protocol=http/1.1, code=200, message=OK, url=https://publicobject.com/helloworld.txt}
Response 2 cache response:     null
Response 2 network response:   Response{protocol=http/1.1, code=200, message=OK, url=https://publicobject.com/helloworld.txt}
Response 2 equals Response 1 ? true
可以看到,响应中只有网络响应,而缓存响应不存在。
另外,如果需要强制服务器验证一下缓存,可以使用如下代码:
Request request = new Request.Builder()
     .cacheControl(new CacheControl.Builder()
         .maxAge(0, TimeUnit.SECONDS)
         .build())
     .url("http://publicobject.com/helloworld.txt")
     .build();
测试运行结果如下:
Response 1 response:          Response{protocol=http/1.1, code=200, message=OK, url=https://publicobject.com/helloworld.txt}
Response 1 cache response:    Response{protocol=http/1.1, code=200, message=OK, url=https://publicobject.com/helloworld.txt}
Response 1 network response:  Response{protocol=http/1.1, code=304, message=Not Modified, url=https://publicobject.com/helloworld.txt}
Response 2 response:           Response{protocol=http/1.1, code=200, message=OK, url=https://publicobject.com/helloworld.txt}
Response 2 cache response:     Response{protocol=http/1.1, code=200, message=OK, url=https://publicobject.com/helloworld.txt}
Response 2 network response:   Response{protocol=http/1.1, code=304, message=Not Modified, url=https://publicobject.com/helloworld.txt}
Response 2 equals Response 1 ? true
可以看到,响应中缓存和网络响应都存在。
强制使用缓存
 Request request = new Request.Builder()
     .cacheControl(new CacheControl.Builder()
         .onlyIfCached()
         .build())
     .url("http://publicobject.com/helloworld.txt")
     .build();
 Response forceCacheResponse = client.newCall(request).execute();
 if (forceCacheResponse.code() != 504) {
   // The resource was cached! Show it.
 } else {
   // The resource was not cached.
}其中,new CacheControl.Builder().onlyIfCached().build()和CacheControl.FORCE_CACHE是一致的。
Response 1 response:          Response{protocol=http/1.1, code=200, message=OK, url=https://publicobject.com/helloworld.txt}
Response 1 cache response:    Response{protocol=http/1.1, code=200, message=OK, url=https://publicobject.com/helloworld.txt}
Response 1 network response:  null
Response 2 response:           Response{protocol=http/1.1, code=200, message=OK, url=https://publicobject.com/helloworld.txt}
Response 2 cache response:     Response{protocol=http/1.1, code=200, message=OK, url=https://publicobject.com/helloworld.txt}
Response 2 network response:   null
Response 2 equals Response 1 ? true
根据结果可以发现,响应中只有缓存响应而无网络响应。
另外还有一种情况,如果缓存过期了,而又无法请求到网络怎么办?
可以通过如下代码,继续使用过期的缓存。
Request request = new Request.Builder()
    .cacheControl(new CacheControl.Builder()
        .maxStale(365, TimeUnit.DAYS)
        .build())
    .url("http://publicobject.com/helloworld.txt")
    .build();
值得一提的
如果在构造OkHttpClient时,没有指定cache,那么便不会有缓存功能。
取消任务
@Test
public void testCancelCall() {
    Request request = new Request.Builder()
            .url("http://httpbin.org/delay/2")
            .build();

    final long startNanos = System.nanoTime();
    final Call call = yOkHttpClient.newCall(request);

    executor.schedule(new Runnable() {
        @Override
        public void run() {
            System.out.printf("%.2f Canceling call.%n", (System.nanoTime() - startNanos) / 1e9f);
            call.cancel();
            System.out.printf("%.2f Canceled call.%n", (System.nanoTime() - startNanos) / 1e9f);
        }
    }, 1, TimeUnit.SECONDS);

    try {
        System.out.printf("%.2f Executing call.%n", (System.nanoTime() - startNanos) / 1e9f);
        Response response = call.execute();
        System.out.printf("%.2f Call was expected to fail, but completed: %s%n", (System.nanoTime() - startNanos) / 1e9f, response);
    } catch (IOException e) {
        System.out.printf("%.2f Call failed as expected: %s%n", (System.nanoTime() - startNanos) / 1e9f, e);
    }
}
测试结果:
0.02 Executing call.
1.01 Canceling call.
1.01 Canceled call.
1.01 Call failed as expected: java.net.SocketException: Socket closed
证书
 @Test
public void testCertificatePinning() throws IOException {
    yOkHttpClient = new OkHttpClient.Builder()
            .certificatePinner(new CertificatePinner.Builder()
                    .add("publicobject.com", "sha1/DmxUShsZuNiqPQsX2Oi9uv2sCnw=")
                    .add("publicobject.com", "sha1/SXxoaOSEzPC6BgGmxAt/EAcsajw=")
                    .add("publicobject.com", "sha1/blhOM3W9V/bVQhsWAcLYwPU6n24=")
                    .add("publicobject.com", "sha1/T5x9IXmcrQ7YuQxXnxoCmeeQ84c=")
                    .build())
            .build();

    Request request = new Request.Builder().url("https://publicobject.com/robots.txt").build();

    Response response = yOkHttpClient.newCall(request).execute();
    if (!response.isSuccessful()) throw new IOException("Unexpected code " + response);

    for (Certificate certificate : response.handshake().peerCertificates()) {
        System.out.println(CertificatePinner.pin(certificate));
    }
}
测试结果:
Connected to the target VM, address: '127.0.0.1:49312', transport: 'socket'
sha1/DmxUShsZuNiqPQsX2Oi9uv2sCnw=
sha1/SXxoaOSEzPC6BgGmxAt/EAcsajw=
sha1/blhOM3W9V/bVQhsWAcLYwPU6n24=
sha1/T5x9IXmcrQ7YuQxXnxoCmeeQ84c=
Disconnected from the target VM, address: '127.0.0.1:49312', transport: 'socket'
超时设置
代码如下
@Test
public void testTimeout() throws IOException {
    yOkHttpClient = new OkHttpClient.Builder()
            .connectTimeout(10, TimeUnit.SECONDS)
            .writeTimeout(10, TimeUnit.SECONDS)
            .readTimeout(30, TimeUnit.SECONDS)
            .build();

    Request request = new Request.Builder()
            .url("http://httpbin.org/delay/2") // This URL is served with a 2 second delay.
            .build();

    Response response = yOkHttpClient.newCall(request).execute();
    System.out.println("Response completed: " + response);
}
结果如下:
Response completed: Response{protocol=http/1.1, code=200, message=OK, url=http://httpbin.org/delay/2}添加日志拦截器
private static class LoggingInerceptor implements Interceptor {

    @Override
    public Response intercept(Chain chain) throws IOException {

        long t1 = System.nanoTime();
        Request request = chain.request();

        System.out.println(String.format("Sending request %s on %s%n%s",
                request.url(), chain.connection(), request.headers()));

        Response response = chain.proceed(request);

        long t2 = System.nanoTime();

        System.out.println(String.format("Received response for %s in %.1fms%n%s",
                request.url(), (t2 - t1) / 1e6d, response.headers()));

        return response;
    }
}

  @Test
public void testLoggingInterceptor() throws IOException {
    yOkHttpClient = new OkHttpClient.Builder()
            .addInterceptor(new LoggingInerceptor())
            .build();

    Request request = new Request.Builder()
            .url("https://publicobject.com/helloworld.txt")
            .build();

    Response execute = yOkHttpClient.newCall(request).execute();

    execute.body().close();
}
测试结果:
Sending request https://publicobject.com/helloworld.txt on null

Received response for https://publicobject.com/helloworld.txt in 2555.9ms
Server: nginx/1.4.6 (Ubuntu)
Date: Sat, 30 Jan 2016 03:49:20 GMT
Content-Type: text/plain
Content-Length: 1759
Last-Modified: Tue, 27 May 2014 02:35:47 GMT
Connection: keep-alive
ETag: "5383fa03-6df"
Accept-Ranges: bytes
OkHttp-Sent-Millis: 1454126228626
OkHttp-Received-Millis: 1454126229516可以了解,在拦截器的intercept()方法中,通过chain.request()可以拿到请求对象;通过chain.proceed(request)可以拿到响应结果;
Gson解析
 @Test
public void testParseResponseGson() throws IOException {

    Gson gson = new Gson();

    Request request = new Request.Builder()
            .url("https://api.github.com/gists/c2a7c39532239ff261be")
            .build();
    Response response = yOkHttpClient.newCall(request).execute();
    if (!response.isSuccessful()) throw new IOException("Unexpected code " + response);

    Gist gist = gson.fromJson(response.body().charStream(), Gist.class);
    response.body().close();

    for (Map.Entry<String, GistFile> entry : gist.files.entrySet()) {
        System.out.println(entry.getKey());
        System.out.println(entry.getValue().content);
    }
}这里面最主要的是调用了response.body().charStream()。大致看一下ResponseBody类。
- ResponseBody存储了服务端发往客户端的原始字节流。
- ResponseBody必须被关闭
- 每一个响应体都是一个有限的资源支持。如果没有关闭的响应体将泄漏这些资源,并可能最终导致应用程序的速度慢下来或崩溃。通过
close(),bytestream()关闭响应体.reader().close()。()。其中bytes()和string()方法会自动关闭响应体。 - 响应主体只能被消耗一次。
- 这个类可以用于非常大的响应流。例如,常见的视频流应用的要求。
- 因为这个ResponseBody不缓冲内存中的全部响应,应用程序不能重新读取响应的字节数。可以利用
bytes()orstring(),source(),byteStream(), orcharStream()等方法,将流内容读入到内存中。
一个请求多个Client配置
 @Test
public void testPerCallSettings() {
    Request request = new Request.Builder()
            .url("http://httpbin.org/delay/1") // This URL is served with a 1 second delay.
            .build();

    try {

        OkHttpClient copy = yOkHttpClient.newBuilder()
                .readTimeout(500, TimeUnit.MILLISECONDS)
                .build();

        Response response = copy.newCall(request).execute();
        System.out.println("Response 1 succeeded: " + response);
    } catch (IOException e) {
        System.out.println("Response 1 failed: " + e);
    }

    try {
        // Copy to customize OkHttp for this request.
        OkHttpClient copy = yOkHttpClient.newBuilder()
                .readTimeout(3000, TimeUnit.MILLISECONDS)
                .build();

        Response response = copy.newCall(request).execute();
        System.out.println("Response 2 succeeded: " + response);
    } catch (IOException e) {
        System.out.println("Response 2 failed: " + e);
    }
}
运行结果:
Response 1 failed: java.net.SocketTimeoutException: timeout
Response 2 succeeded: Response{protocol=http/1.1, code=200, message=OK, url=http://httpbin.org/delay/1}
上传小文件
  @Test
public void testPostFile() throws IOException {
    MediaType MEDIA_TYPE_MARKDOWN = MediaType.parse("text/x-markdown; charset=utf-8");

    File file = new File("记录.md");

    Request request = new Request.Builder()
            .url("https://api.github.com/markdown/raw")
            .post(RequestBody.create(MEDIA_TYPE_MARKDOWN, file))
            .build();

    Response response = yOkHttpClient.newCall(request).execute();

    if (!response.isSuccessful()) {
        throw new IOException("Unexpected code " + response);
    }

    System.out.println(response.body().string());
}
上传表单
@Test
public void testPostForm() throws IOException {
    FormBody formBody = new FormBody.Builder()
            .add("search", "biezhihua")
            .build();

    Request request = new Request.Builder()
            .url("https://en.wikipedia.org/w/index.php")
            .post(formBody)
            .build();

    Response response = yOkHttpClient.newCall(request)
            .execute();

    if (!response.isSuccessful()) {
        throw new IOException("Unexcepted code " + response);
    }

    System.out.println(response.body().string());
}主要利用了FormBody类,不用猜我们也能知道,其继承了RequestBody类,并内置了MediaType类型,用且用集合存储键值对数据。
上传表单
@Test
public void testPostMultipart() throws IOException {
    String IMGUR_CLIENT_ID = "9199fdef135c122";
    MediaType MEDIA_TYPE_PNG = MediaType.parse("image/png");

    MultipartBody requestBody = new MultipartBody.Builder()
            .setType(MultipartBody.FORM)
            .addFormDataPart("title", "Square Logo")
            .addFormDataPart("image", "logo-square.png", RequestBody.create(MEDIA_TYPE_PNG, new File("website/static/logo-square.png")))
            .build();

    Request request = new Request.Builder()
            .header("Authorization", "Client-ID " + IMGUR_CLIENT_ID)
            .url("https://api.imgur.com/3/image")
            .post(requestBody)
            .build();

    Response response = yOkHttpClient.newCall(request)
            .execute();

    if (!response.isSuccessful()) {
        throw new IOException("Unexpected code" + request);
    }

    System.out.println(response.body().string());
}
上传流
 @Test
public void testPostStreaming() throws IOException {
    final MediaType MEDIA_TYPE_MARKDOWN = MediaType.parse("text/x-markdown; charset=utf-8");

    RequestBody requestBody = new RequestBody() {

        @Override
        public MediaType contentType() {
            return MEDIA_TYPE_MARKDOWN;
        }

        @Override
        public void writeTo(BufferedSink sink) throws IOException {
            sink.writeUtf8("Numbers\n");
            sink.writeUtf8("-------\n");
            for (int i = 2; i <= 997; i++) {
                sink.writeUtf8(String.format(" * %s = %s\n", i, factor(i)));
            }
        }

        private String factor(int n) {
            for (int i = 2; i < n; i++) {
                int x = n / i;
                if (x * i == n) return factor(x) + " × " + i;
            }
            return Integer.toString(n);
        }
    };

    Request request = new Request.Builder()
            .url("https://api.github.com/markdown/raw")
            .post(requestBody)
            .build();

    Response response = yOkHttpClient.newCall(request).execute();
    if (!response.isSuccessful()) throw new IOException("Unexpected code " + response);

    System.out.println(response.body().string());

}其实以上这几个测试,实质上都是一个东西,就是对RequestBody做的封装或者重写,都是将本地数据放入到Http协议的请求体中,然后发送到服务端。其中唯一不同,就是别人帮你写好的;或是你自己重写的几个方法。
上传字符串
@Test
public void testPostString() throws IOException {
    MediaType MEDIA_TYPE_MARKDOWN = MediaType.parse("text/x-markdown; charset=utf-8");
    String postBody = ""
            + "Releases\n"
            + "--------\n"
            + "\n"
            + " * _1.0_ May 6, 2013\n"
            + " * _1.1_ June 15, 2013\n"
            + " * _1.2_ August 11, 2013\n";
    Request request = new Request.Builder()
            .url("https://api.github.com/markdown/raw")
            .post(RequestBody.create(MEDIA_TYPE_MARKDOWN, postBody))
            .build();


    Response response = yOkHttpClient.newCall(request).execute();
    if (!response.isSuccessful()) throw new IOException("Unexpected code " + response);

    System.out.println(response.body().string());
}
加载进度
代码如下
// 监听进度的接口
interface ProgressListener {
    void update(long bytesRead, long contentLength, boolean done);
// 处理进度的自定义响应体
static class ProgressResponseBody extends ResponseBody {

      private final ResponseBody responseBody;
      private final ProgressListener progressListener;
      private BufferedSource bufferedSource;

      public ProgressResponseBody(ResponseBody responseBody, ProgressListener progressListener) {
          this.responseBody = responseBody;
          this.progressListener = progressListener;
      }


      @Override
      public MediaType contentType() {
          return responseBody.contentType();
      }

      @Override
      public long contentLength() {
          return responseBody.contentLength();
      }

      @Override
      public BufferedSource source() {

          if (bufferedSource == null) {
              bufferedSource = Okio.buffer(source(responseBody.source()));
          }

          return bufferedSource;
      }

      private Source source(Source source) {

          return new ForwardingSource(source) {

              long totalBytesRead = 0L;

              @Override
              public long read(Buffer sink, long byteCount) throws IOException {
                  long bytesRead = super.read(sink, byteCount);
                  totalBytesRead += bytesRead != -1 ? bytesRead : 0;
                  progressListener.update(totalBytesRead, responseBody.contentLength(), bytesRead == -1);
                  return bytesRead;
              }
          };
      }
  }
}

// 为客户端实例添加网络拦截器,并相应回调。
@Test
public void testProgress() throws IOException {
    Request request = new Request.Builder()
            .url("https://publicobject.com/helloworld.txt")
            .build();

    final ProgressListener progressListener = new ProgressListener() {

        @Override
        public void update(long bytesRead, long contentLength, boolean done) {
            System.out.println("bytesRead = [" + bytesRead + "], contentLength = [" + contentLength + "], done = [" + done + "]");
            System.out.format("%d%% done\n", (100 * bytesRead) / contentLength);
        }
    };

    yOkHttpClient = new OkHttpClient.Builder()
            .addNetworkInterceptor(new Interceptor() {
                @Override
                public Response intercept(Chain chain) throws IOException {
                    Response originalResponse = chain.proceed(chain.request());
                    return originalResponse.newBuilder()
                            .body(new ProgressResponseBody(originalResponse.body(), progressListener))
                            .build();
                }
            })
            .build();

    Response response = yOkHttpClient.newCall(request).execute();
    if (!response.isSuccessful()) throw new IOException("Unexpected code " + response);

    System.out.println(response.body().string());
}


 221
221

 被折叠的 条评论
为什么被折叠?
被折叠的 条评论
为什么被折叠?
 到【灌水乐园】发言


