


 本文是关于卷积神经网络(CNN)的学习笔记,重点讲解了如何在Matlab中实现CNN。内容包括网络结构图,详细解释了测试文件test_example_cnn.m、配置文件cnnsetup.m、前向传播函数cnnff.m、反向传播计算gradient的cnnbp.m,以及权重更新的cnnapplygrads.m。最后,cnntest.m用于验证测试样本的准确率。
近期正在学习卷积神经网络,大致的原理在之前参考前辈们经验,转载的两个笔记中已经做了简要梳理,下边就Github中的DeepLearnToolbox中的CNN的代码进行理解和实现讲解
参考代码来源:[CNN卷积神经网络的Matlab实现](https://github.com/rasmusbergpalm/DeepLearnToolbox)
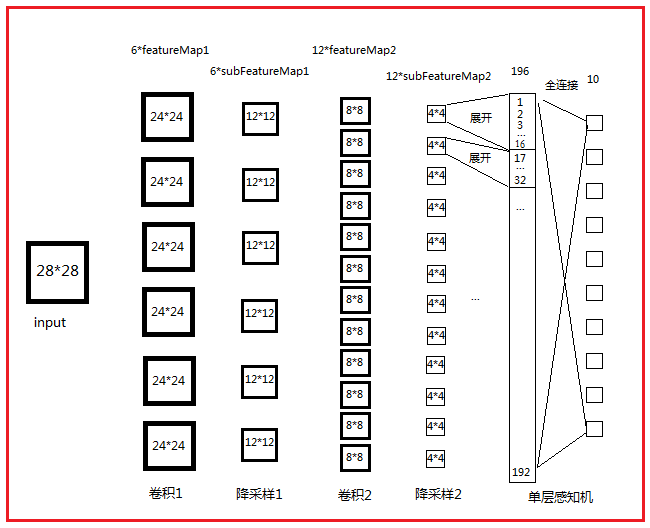
网络结构图:
打开路径\tests\test_example_cnn.m
function test_example_CNN
clc,
clear;
addpath D:\matlab文档\DeepLearnToolbox\data\ %按照文档所在路径进行加载
addpath D:\matlab文档\DeepLearnToolbox\CNN\
addpath D:\matlab文档\DeepLearnToolbox\util\
load mnist_uint8;  %加载训练、测试数据

train_x = double(reshape(train_x',28,28,60000))/255;   % 训练集变成60000张28*28的图片 28*28*60000,像素点归一化到[0,1]
test_x = double(reshape(test_x',28,28,10000))/255;      %  测试集   28*28*10000
train_y = double(train_y');   %10*6000
test_y = double(test_y');

%% ex1 Train a 6c-2s-12c-2s Convolutional neural network
%will run 1 epoch in about 200 second and get around 11% error.
%With 100 epochs you'll get around 1.2% error
rand('state',0)  %如果指定状态,产生随机结果就相同

cnn.layers = {        %%% 设置各层feature maps个数及卷积模板大小等属性
    struct('type', 'i') %input layer
    struct('type', 'c', 'outputmaps', 6, 'kernelsize', 5) %卷积层有6张特征图,卷积核大小为5*5
    struct('type', 's', 'scale', 2) %抽样层,定义2*2的临域相连接
    struct('type', 'c', 'outputmaps', 12, 'kernelsize', 5) %同上
    struct('type', 's', 'scale', 2) %同上
};

opts.alpha = 1;    %迭代下降的速率
opts.batchsize = 50;   %每次选择50个样本进行更新
opts.numepochs = 1;   %迭代次数

cnn = cnnsetup(cnn, train_x, train_y); %对各层参数进行初始化 包括权重和偏置
cnn = cnntrain(cnn, train_x, train_y, opts); %训练的过程,包括bp算法及迭代过程

[er, bad] = cnntest(cnn, test_x, test_y);
%plot mean squared error
figure; plot(cnn.rL);
assert(er<0.12, 'Too big error');
end
\CNN\cnnsetup.m
function net = cnnsetup(net, x, y)   %对各层参数进行初始化 包括权重和偏置
    assert(~isOctave() || compare_versions(OCTAVE_VERSION, '3.8.0', '>='), ['Octave 3.8.0 or greater is required for CNNs as there is a bug in convolution in previous versions. See http://savannah.gnu.org/bugs/?39314. Your version is ' myOctaveVersion]);
    inputmaps = 1;   %输入图片数量
    mapsize = size(squeeze(x(:, :, 1)));   % 图片的大小 squeeze 要不要都行28 28,squeeze的功能是删除矩阵中的单一维

    for l = 1 : numel(net.layers)   %layer层数
        if strcmp(net.layers{l}.type, 's')
            mapsize = mapsize / net.layers{l}.scale;%% sumsampling的featuremap长宽都是上一层卷积层featuremap的不重叠平移scale大小
            %分别为24/2=12;8/2=4
            %%assert:断言函数
            assert(all(floor(mapsize)==mapsize), ['Layer ' num2str(l) ' size must be integer. Actual: ' num2str(mapsize)]);

            for j = 1 : inputmaps % 就是上一层有多少张特征图,通过初始化为1然后依层更新得到
                net.layers{l}.b{j} = 0;
                % 将偏置初始化0, 权重weight,这段代码subsampling层将weight设为1/4 而偏置参数设为0,故subsampling阶段无需参数
            end
        end
        if strcmp(net.layers{l}.type, 'c')
            mapsize = mapsize - net.layers{l}.kernelsize + 1; % 得到当前层feature map的大小,卷积平移,默认步长为1
            fan_out = net.layers{l}.outputmaps * net.layers{l}.kernelsize ^ 2;% 隐藏层的大小,是一个(后层特征图数量)*(用来卷积的kernel的大小)
            for j = 1 :
最低0.47元/天 解锁文章


 283
283

 被折叠的 条评论
为什么被折叠?
被折叠的 条评论
为什么被折叠?
 到【灌水乐园】发言


