ExoPlayer架构详解与源码分析(3)——Timeline

系列文章目录

ExoPlayer架构详解与源码分析(1)——前言
ExoPlayer架构详解与源码分析(2)——Player
ExoPlayer架构详解与源码分析(3)——Timeline
ExoPlayer架构详解与源码分析(4)——整体架构
ExoPlayer架构详解与源码分析(5)——MediaSource
ExoPlayer架构详解与源码分析(6)——MediaPeriod
ExoPlayer架构详解与源码分析(7)——SampleQueue
ExoPlayer架构详解与源码分析(8)——Loader
ExoPlayer架构详解与源码分析(9)——TsExtractor
ExoPlayer架构详解与源码分析(10)——H264Reader
ExoPlayer架构详解与源码分析(11)——DataSource
ExoPlayer架构详解与源码分析(12)——Cache
ExoPlayer架构详解与源码分析(13)——TeeDataSource和CacheDataSource


前言

如果播放器就是一只火箭,那么火箭发射就必须要有一个基于时序的发射计划,火箭在运行过程中通过获取当前时间点的发射计划就会知道当前的时序状态,以及决定下一步该干什么,如需要在什么时候点火、发动机什么时候停机、各个阶段的姿态调整等等。

所以设计了播放器还是不够的,还需要描述出媒体的时序结构,但是播放器播放的媒体种类有很多,可以是一个播放列表、一个mp4文件、一个网络的url,一段视频的流,反正千奇百怪。如何设计一个数据结构可以灵活的表示出上面各种的媒体在不同时间点的时序结构呢。ExoPlayer给出的答案是 Timeline(时间线)。Timeline贯穿在整个的Exoplayer源码中,后续系列文章提到的Player、MediaSource、LoadControl、TrackSelector等等都会使用到Timeline,所以有必要将Timeline提前了解下。

Timeline

Timeline 是媒体时序结构的灵活表示。因为只是用来获取状态,所以Timeline是一个不可变的对象,所有的属性都是不可变的(final),这样设计也保证了多线程下的数据安全。对于动态媒体(例如直播流),Timeline 表示是当前状态的快照。
Timeline 由 一个或多个Window(窗口) 和 Period(时段) 组成。

  • Window :通常对应一个播放列表的子项。 它可能会跨多个 Period 并且定义了这些 Period 中可播放的区域。Window 还包含一些其他信息,如当前Window 是否可以Seek,可以开始播放的默认位置等。
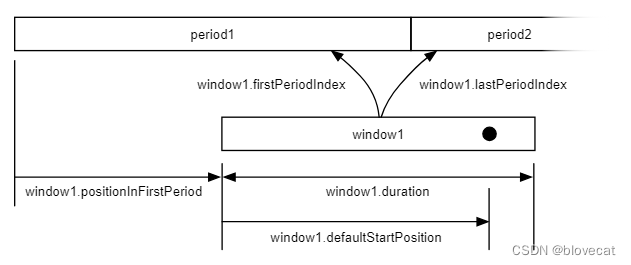
    在这里插入图片描述
    上图中window1横跨了2个period,Window包含以下属性:

    • uid Window的唯一标识符。单Window必须使用 Window.SINGLE_WINDOW_UID。
    • firstPeriodIndex 记录横跨的第一个Period的索引。
    • lastPeriodIndex 记录横跨的最后一个Period的索引。
    • durationUs 表示Window的时长。
    • defaultPositionUs 默认开始播放位置(图中黑点)相对于Window开始时间的差值。
    • positionInFirstPeriodUs Window开始时间相对于第一个Period开始时间的位置的差值,因为Window开始时间肯定大于等于第一个Period的开始时间,这个值一定是大于0的。
    • mediaItem 与窗口关联的mediaItem,mediaItem 是在Player setMediaItem时,创建Timeline并设置到其中的Window里。同样Player在获取当前mediaItem时首先获取当前的Timeline,然后在Timeline里获取当前的Window,最后在Window里获取mediaItem。
    • manifest Window的清单,播放单个文件的时候为null,当在播放HLS流时,会将HLS流的索引文件相关信息设置进去。
    • windowStartTimeMs Window的开始时间。
    • isSeekable 是否可以Seek。
    • isDynamic 是否是动态的Window,当Timeline 随着时间变化时,Window是否也会随着变化。
    • isLive 是否为直播流。
    • liveConfiguration 直播流的相关配置。
    • elapsedRealtimeEpochOffsetMs 本地时间和服务器时间偏差,用于Timeline.getCurrentUnixTimeMs获取当前实际时间。
    • isPlaceholder用于标记当前Window是否为占位的Window,因为当前正式数据还未加载,因此只包含初始值的占位信息,其中mediaItem在播放前已知,PlaceholderTimeline会将此值设置为true。
  • Period:定义了媒体的单个逻辑块,如一个视频文件。它还可以定义插入到视频里的广告组,还记录这些广告是否已经加载和播放。
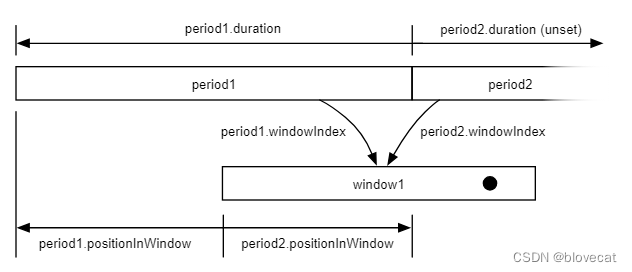
    在这里插入图片描述
    上图包含了2个Period,指向同一个Window,Period包含以下属性:

    • uid Period的唯一标识符。
    • windowIndex Period 所属Window的索引。
    • durationUs 当前Period的时长,Period结束时间相对于Period开始时间的差值,对于直播流(图中period2)就没有值。
    • positionInWindowUs 该Period的开始时间相对于其所属Window开始时间的差值。如果该Period的开始时间在Window左侧,则为负值,如上图的period1,对比Window的图可以看到他们都是指示的同一线段只是方向不一致,也就是这个值的绝对值是和Window的positionInFirstPeriodUs是相等的。
    • adPlaybackState 插入到Period中的广告相关信息。

Timeline是不可变的,是当前播放的一个静态快照,从这个角度对比火箭发射(播放器播放),发射火箭的时段可能是连续的几天(时段),但是可以发射(可以播放)的窗口期可能就在这一天中的某1个小时,具体在这个小时的哪个时间点发射(播放)就对应Window的defaultPositionUs(小黑点),而这个窗口期可能正好在23:30-1:00,跨越2天(时段)。

下面列举出各种媒体 Timeline 的表示

单文件或者点播流媒体

在这里插入图片描述这类媒体包含一个Period和一个Window。 Window和 Period 一样长,Window的默认播放位置就在Period 起点。这个很好理解,当你播放本地的一个视频文件时,由于是单个文件可以理解为只有一个文件的播放列表,这个文件可以从头播放播放到结束,由于文件只有一个所以 Period 只有一段。像单个视频文件或者点播类的HLS就是用的这种方式抽象的 Timeline,一个文件或者点播流就对应一个 Period。

文件播放列表或者点播流列表

在这里插入图片描述
这类媒体包含多个Window和多个Period,每个Period 都有一个自己的Window与之对应,Window默认播放位置就在每个Period的开始,这类媒体可以想象成将上面的单个文件添加到一个播放列表。这类媒体只有在列表里播放到相应的项才能获取到Window和Period。ExoPlayer 针对这种结构,其实是通过将上面的单个Timeline组合起来,抽象出一个新的ListTimeline来实现的,也就是上图相当于3个Timeline。

有限可播的直播流

在这里插入图片描述
因为是直播内容是实时产生的,随着时间不断增多,所以Period总时长是未知的。因为是有限的,仍然可播放内容时间只占 Period 的一段,所以Window就定义了这段可播放范围,开始播放播放位置也不一定在Window的开头。此时Window的 isLive=true,当Window改变时isDynamic将被设置为true。这类媒体的默认播放位置一般在Window的边缘,接近于当前时间,如上图的黑点。像直播类的DASH或者HLS都属于这类。举个例子,当你看一个直播时,你可以回看2分钟之前到现在的视频,这个2分钟到现在就是一个Window,随着时间的推移Window也在向右平移,那么这个Window就是动态的,isDynamic=true,而打开这个直播默认的播放位置往往是最接近当前时间的点,同时也在Window的右侧边缘。

无限可播的直播流

在这里插入图片描述和上面有限可播的直播流类似,唯一不同的是Window的起点固定在Period的开头,也就是可以播放之前已播的所有直播内容。

有多个Period的直播流

在这里插入图片描述
这类将直播流分成了多个Period,和有限可播的直播流类似,只是Window可能跨一个或多个Period。

先点播后直播流

在这里插入图片描述
这类将点播流和直播流结合,当点播流播放结束的时候直播流将在Window靠近当前时间的一侧开始播放。这种可以当作将点播文件和直播文件放到一个播放列表里。

带有插播广告的点播流

在这里插入图片描述

这类在单个点播流中插入了广告(上图灰色)。通过查询当前的Period可以获取广告组或者广告的信息。

对于一些动态的媒体,比如说播放一个直播流,随着时间的推移不同时间点的Timeline(播放快照)对应Period的时长或者数量是不断增加的,不同时间点的Timeline对应的Window是不停改变的,其中包括Window的 开始时间、结束时间、时长等等都在不停的变化,而非直播流这些又是相对固定的。

小结下特点

  • Timeline 里可能包含多个Period或者Window
  • 多个Period都是连续的,而多个Window可能是不连续的
  • Window时长小于等于所有Period的时长和
  • 一个Window可能跨域多个Peroid
  • Window开始时间大于等于第一个Period的开始时间
  • Window的默认播放位置不是固定的
  • Period可以随着时间没有右边界,但Window是一定有右边界的,也就是有确定的durationUs
  • 对于静态媒体。在不同时间获取的Timelin对应的Period和Window是相对固定的。
  • 对于动态媒体。在不同时间获取的Timelin对应的Period和Window是相对变化的。

Timeline的实现

说完结构设计,看下代码具体是怎么实现上述设计的,先看下整体架构
在这里插入图片描述

ExoPlayer 播放各种媒体时,主要通过这几个实现类来描述Timeline
来看下各自的作用

Timeline

这里没有定义任何属性,主要定义实现了以下几个功能

  • 查询Window和Period
//使用指定Window索引的数据填充Window
public final Window getWindow(int windowIndex, Window window)
public abstract int getWindowCount();
//获取下个Window,媒体列表的循环模式最终就是在这里实现,这里其实也是填充Window容器
public int getNextWindowIndex(int windowIndex, @Player.RepeatMode int repeatMode, boolean shuffleModeEnabled));
public final Period getPeriod(int periodIndex, Period period);
  • 通过已知的Window的位置,查找到对应的Period的位置,这里重点看下,加深下Winodw和Period之间关系的理解

在这里插入图片描述

这个函数作用是获得Window中黑点(windowPositionUs)对应的Period红点(periodPositionUs)位置,这个位置是相对于Period开始位置的差值。

  • 对于动态媒体periodPositionUs = windowPositionUs-period2.positionInWindowUs
  • 对于静态媒体period.positionInWindowUs = 0,periodPositionUs = windowPositionUs

看下源码实现

public final Pair<Object, Long> getPeriodPositionUs(
      Window window,
      Period period,
      int windowIndex,
      long windowPositionUs,
      long defaultPositionProjectionUs) {
    Assertions.checkIndex(windowIndex, 0, getWindowCount());
    getWindow(windowIndex, window, defaultPositionProjectionUs);//获取当前的Window
    if (windowPositionUs == C.TIME_UNSET) {
      windowPositionUs = window.getDefaultPositionUs();//windowPositionUs 没有设置,获取默认开始播放位置
      if (windowPositionUs == C.TIME_UNSET) {//没有设置则返回
        return null;
      }
    }
    int periodIndex = window.firstPeriodIndex;
    getPeriod(periodIndex, period);
    while (periodIndex < window.lastPeriodIndex//从第一个period开始查找到最后一个
        && period.positionInWindowUs != windowPositionUs//查找到第一个开始时间=Window位置或者结束时间(下一个period开始时间)>Window位置的period
        && getPeriod(periodIndex + 1, period).positionInWindowUs <= windowPositionUs) {
      periodIndex++;
    }
    getPeriod(periodIndex, period, /* setIds= */ true);
    long periodPositionUs = windowPositionUs - period.positionInWindowUs;//用Window当前位置减去period开始位置(这2个位置都是相对于Window开始时间的),结果就是相对于当前period开始位置的period当前位置,参考上图
    // The period positions must be less than the period duration, if it is known.
    if (period.durationUs != C.TIME_UNSET) {
      periodPositionUs = min(periodPositionUs, period.durationUs - 1);//确保不要超出period 总时长
    }
    // Period positions cannot be negative.
    periodPositionUs = max(0, periodPositionUs);
    return Pair.create(Assertions.checkNotNull(period.uid), periodPositionUs);
  }

Timeline 实现类中其实并不包含Window和Period成员属性,而是保存了可以组装出这2个对象的数据,通过定义获取方法对传入的Window和Period对象填充来获取这个2个对象。简单说Window和Period就相当于一个获取数据容器,用于盛放数据,向上层提供数据。

SinglePeriodTimeline

这是一个只包含一个Period和一个静态Window的Timeline实现。

  • 包含了用于组装Window和Period的必要数据
  private final long presentationStartTimeMs;//用于媒体裁剪,可以先不用管
  private final long windowStartTimeMs;//对应Window属性
  private final long elapsedRealtimeEpochOffsetMs;//对应Window属性取当前实际时间
  private final long periodDurationUs;//对应Period属性
  private final long windowDurationUs;//对应Window属性
  private final long windowPositionInPeriodUs;//对应Window positionInFirstPeriodUs属性,因为这个值是以Window为出发点计算的,所以取负数就是以Period为出发点计算,-positionInFirstPeriodUs则对应Period的positionInWindowUs属性,
  private final long windowDefaultStartPositionUs;//对应Window属性
  private final boolean isSeekable;//对应Window属性
  private final boolean isDynamic;//对应Window属性
  private final boolean suppressPositionProjection;
  private final Object manifest;//对应Window属性
  private final MediaItem mediaItem;//对应Window属性
  private final MediaItem.LiveConfiguration liveConfiguration;//对应Window属性
  • 实现了单个Window和Period的填充方法,也就是Timeline里定义的虚函数getWindow和getPeriod,这里实现就很简单因为只有一个Window和Period,直接将定义的属性设置进去
@Override
  public Window getWindow(int windowIndex, Window window, long defaultPositionProjectionUs) {
    Assertions.checkIndex(windowIndex, 0, 1);
    long windowDefaultStartPositionUs = this.windowDefaultStartPositionUs;
    if (isDynamic && !suppressPositionProjection && defaultPositionProjectionUs != 0) {
      if (windowDurationUs == C.TIME_UNSET) {
        // Don't allow projection into a window that has an unknown duration.
        windowDefaultStartPositionUs = C.TIME_UNSET;
      } else {
        windowDefaultStartPositionUs += defaultPositionProjectionUs;
        if (windowDefaultStartPositionUs > windowDurationUs) {
          // The projection takes us beyond the end of the window.
          windowDefaultStartPositionUs = C.TIME_UNSET;
        }
      }
    }
    return window.set(
        Window.SINGLE_WINDOW_UID,
        mediaItem,
        manifest,
        presentationStartTimeMs,
        windowStartTimeMs,
        elapsedRealtimeEpochOffsetMs,
        isSeekable,
        isDynamic,
        liveConfiguration,
        windowDefaultStartPositionUs,
        windowDurationUs,
        /* firstPeriodIndex= */ 0,
        /* lastPeriodIndex= */ 0,
        windowPositionInPeriodUs);//正值
  }
  @Override
  public Period getPeriod(int periodIndex, Period period, boolean setIds) {
    Assertions.checkIndex(periodIndex, 0, 1);
    @Nullable Object uid = setIds ? UID : null;
    return period.set(/* id= */ null, uid, 0, periodDurationUs, -windowPositionInPeriodUs);//取负值设置Period
  }

PlaceholderTimeline

一个占位的Timeline,通常用于播放器perpared前占位,因为在播准备前Window和Period都是动态不确定的,只有mediaItem是确定的

ForwardingTimeline

这个类就很简单了,直接构造的时候传入一个Timeline,直接将有方法转发给这个Timeline

MaskingTimeline

继承自ForwardingTimeline,在已有Timeline覆盖一层,主要服务于MaskingMediaSource,在MaskingMediaSource创建时如果没有Timeline则在占位的PlaceholderTimeline上覆盖一层。

  • 在播放器媒体没有prepared前,创建MaskingTimeline覆盖在PlaceholderTimeline上来占位。
    public static MaskingTimeline createWithPlaceholderTimeline(MediaItem mediaItem) {
      return new MaskingTimeline(
          new PlaceholderTimeline(mediaItem),
          Window.SINGLE_WINDOW_UID,
          MASKING_EXTERNAL_PERIOD_UID);
    }
  • 在prepared后,创建MaskingTimeline时传入需要被替换成原始ID的PeriodUid和WindowUid,当获取这些指定的ID时将返回原始ID(Window.SINGLE_WINDOW_UID或者MASKING_EXTERNAL_PERIOD_UID)。
    private final Object replacedInternalWindowUid;
    private final Object replacedInternalPeriodUid;
    public static MaskingTimeline createWithRealTimeline(
        Timeline timeline, @Nullable Object firstWindowUid, @Nullable Object firstPeriodUid) {
      return new MaskingTimeline(timeline, firstWindowUid, firstPeriodUid);
    }

    @Override
    public Window getWindow(int windowIndex, Window window, long defaultPositionProjectionUs) {
      timeline.getWindow(windowIndex, window, defaultPositionProjectionUs);
      if (Util.areEqual(window.uid, replacedInternalWindowUid)) {
        window.uid = Window.SINGLE_WINDOW_UID;
      }
      return window;
    }
  • 创建MaskingTimeline的过程主要在创建MaskingMediaSource时完成。
  public MaskingMediaSource(MediaSource mediaSource, boolean useLazyPreparation) {
    super(mediaSource);
    this.useLazyPreparation = useLazyPreparation && mediaSource.isSingleWindow();
    window = new Timeline.Window();
    period = new Timeline.Period();
    @Nullable Timeline initialTimeline = mediaSource.getInitialTimeline();
    if (initialTimeline != null) {
      timeline =
          MaskingTimeline.createWithRealTimeline(
              initialTimeline, /* firstWindowUid= */ null, /* firstPeriodUid= */ null);
      hasRealTimeline = true;
    } else {
      timeline = MaskingTimeline.createWithPlaceholderTimeline(mediaSource.getMediaItem());
    }
  }

AbstractConcatenatedTimeline

将一个或多个Timeline按照一定次序串联成一个新的Timeline的抽象基类。

  • 定义了一个播放顺序的分发器用于支持按照指定顺序播放列表,和一个标记当前所有的子Timeline列表否是原子的,不可拆分的,必须作为一个整体进行重复播放,并且不支持指定顺序。
  private final ShuffleOrder shuffleOrder;
  private final boolean isAtomic;
    @Override
  public int getNextWindowIndex(
      int windowIndex, @Player.RepeatMode int repeatMode, boolean shuffleModeEnabled) {
    if (isAtomic) {
      // Adapt repeat and shuffle mode to atomic concatenation.
      repeatMode = repeatMode == Player.REPEAT_MODE_ONE ? Player.REPEAT_MODE_ALL : repeatMode;//必须作为一个整体进行重复播放
      shuffleModeEnabled = false;//不支持指定顺序
    }
   .....
  }
  private int getNextChildIndex(int childIndex, boolean shuffleModeEnabled) {
    return shuffleModeEnabled
        ? shuffleOrder.getNextIndex(childIndex)//使用指定次序代替列表顺序
        : childIndex < childCount - 1 ? childIndex + 1 : C.INDEX_UNSET;
  }
  • 因为包含了多个Timeline,实现或者重写了原来Timeline里关于Window和Period获取的相关方法。大致流程就是先去查询Timeline列表获取当前的Timeline(这部分Timeline的管理是虚函数由子类实现),然后从当前的Timeline里获取指定的Window或者Period。
@Override
  public final Window getWindow(int windowIndex, Window window, long defaultPositionProjectionUs) {
    int childIndex = getChildIndexByWindowIndex(windowIndex);//通过windowIndex获取子Timeline的索引
    int firstWindowIndexInChild = getFirstWindowIndexByChildIndex(childIndex);//获取子Timeline的第一个Window在所有Timeline中的索引
    int firstPeriodIndexInChild = getFirstPeriodIndexByChildIndex(childIndex);//获取子Timeline的第一个Period在所有Timeline中的索引
    getTimelineByChildIndex(childIndex)//获取子Timeline
        .getWindow(windowIndex - firstWindowIndexInChild, window, defaultPositionProjectionUs);//用当前windowIndex-firstWindowIndexInChild获取指定Window索引在子Timeline里的索引
    Object childUid = getChildUidByChildIndex(childIndex);//获取子Timeline的UID
    //如果当前Window的UID为SINGLE_WINDOW_UID,则直接使用Timeline的UID,因为此时的Timeline里只包含这一个Window
    window.uid =
        Window.SINGLE_WINDOW_UID.equals(window.uid)
            ? childUid
            : getConcatenatedUid(childUid, window.uid);//否则用子Timeline的UID和当前Window的UID合成一个新的UID
    window.firstPeriodIndex += firstPeriodIndexInChild;//更新第一个Period的索引
    window.lastPeriodIndex += firstPeriodIndexInChild;
    return window;
  }

PlaylistTimeline

继承了AbstractConcatenatedTimeline,实际管理了多个Timeline,获取指定索引的子Timeline。ExoPlayer默认会将所有的媒体都封装成PlaylistTimeline。
具体数据结构参考下图
在这里插入图片描述
这里每个Window或者Priod都有2个Index,一个是在PalylistTimeline中的索引,一个是在当前Timeline中的索引,firstPeriodInChildIndices记录了每个子Timeline中第一个Window或者Period在PlaylistTimeline中的索引,firstWindowInChildIndices类似,看下代码实现

  private final int windowCount;//Window总数
  private final int periodCount;//PeriodCount总数
  private final int[] firstPeriodInChildIndices;
  private final int[] firstWindowInChildIndices;
  private final Timeline[] timelines;//所有Timeline的数组
  private final Object[] uids;//可以理解成Timeline的UID数组
  private final HashMap<Object, Integer> childIndexByUid;//包含UID对应的子Timeline索引的MAP
  
  private PlaylistTimeline(Timeline[] timelines, Object[] uids, ShuffleOrder shuffleOrder) {
    super(/* isAtomic= */ false, shuffleOrder);//这里播放列表不具有原子性
    int childCount = timelines.length;
    this.timelines = timelines;
    firstPeriodInChildIndices = new int[childCount];
    firstWindowInChildIndices = new int[childCount];
    this.uids = uids;
    childIndexByUid = new HashMap<>();
    int index = 0;
    int windowCount = 0;
    int periodCount = 0;
    for (Timeline timeline : timelines) {
      this.timelines[index] = timeline;
      firstWindowInChildIndices[index] = windowCount;//保存
      firstPeriodInChildIndices[index] = periodCount;
      windowCount += this.timelines[index].getWindowCount();//累加索引
      periodCount += this.timelines[index].getPeriodCount();
      childIndexByUid.put(uids[index], index++);
    }
    this.windowCount = windowCount;
    this.periodCount = periodCount;
  }

总结

  • Timeline只是对媒体播放状态的一种描述方式,方便播放器查询当前的播放状态的快照,用于指导播放器播放。
  • Timeline里并不包含用来给播放渲染音视频的媒体数据,mediaItem也只是保存了媒体的描述。
  • 实际在播放不同媒体结构时,Timeline的结构并不是上面某个单一的数据结构,而是上面这些类型结构的组合,后续系列文章会提到,如播放单文件Timeline结构,播放列表Timeline结构。

版权声明 ©
本文为CSDN作者山雨楼原创文章
转载请注明出处
原创不易,觉得有用的话,收藏转发点赞支持

  • 1
    点赞
  • 2
    收藏
    觉得还不错? 一键收藏
  • 0
    评论
好的,让我们来一步步实现这个功能。 首先,我们需要安装 Element UI,可以通过 npm 安装: ``` npm install element-ui --save ``` 然后在 main.js 中引入并使用: ```js import Vue from 'vue' import ElementUI from 'element-ui' import 'element-ui/lib/theme-chalk/index.css' Vue.use(ElementUI) ``` 接下来,我们来实现时间线组件。可以在组件中使用 el-timeline 和 el-timeline-item 组件,代码如下: ```html <template> <el-timeline> <el-timeline-item v-for="(item,index) in list" :key="index" :timestamp="item.time">{{ item.content }}</el-timeline-item> </el-timeline> </template> ``` 其中,list 是传入组件的数据,包含每个时间点的内容和时间信息。 接着,我们来实现自动滚动功能。可以通过监听 el-timeline 的 scroll 事件,将 el-timeline 的 scrollTop 设置为最大值,让其自动滚动到底部。代码如下: ```html <template> <el-timeline ref="timeline" @scroll="handleScroll"> <el-timeline-item v-for="(item,index) in list" :key="index" :timestamp="item.time">{{ item.content }}</el-timeline-item> </el-timeline> </template> <script> export default { methods: { handleScroll() { const timelineEl = this.$refs.timeline.$el timelineEl.scrollTop = timelineEl.scrollHeight } } } </script> ``` 然后,我们来实现无限滚动和动态加载功能。可以使用 v-infinite-scroll 插件,通过监听 el-timeline 的滚动事件,在滚动到底部时触发加载更多数据的方法。代码如下: ```html <template> <el-timeline ref="timeline" @scroll="handleScroll" v-infinite-scroll="loadMore" infinite-scroll-disabled="loading" infinite-scroll-distance="10"> <el-timeline-item v-for="(item,index) in list" :key="index" :timestamp="item.time">{{ item.content }}</el-timeline-item> <div v-if="loading">正在加载...</div> </el-timeline> </template> <script> import { InfiniteScroll } from 'element-ui' export default { directives: { InfiniteScroll }, data() { return { list: [], // 数据列表 loading: false // 是否正在加载 } }, methods: { // 加载数据 loadMore() { if (this.loading) { return } this.loading = true // 模拟异步加载数据 setTimeout(() => { const newData = [{ time: '2021-08-01', content: '新的内容' }] this.list = this.list.concat(newData) this.loading = false }, 1000) }, // 滚动事件 handleScroll() { const timelineEl = this.$refs.timeline.$el if (timelineEl.scrollTop === 0) { this.loadMore() } } } } </script> ``` 在上面的代码中,我们使用了 element-ui 中的 InfiniteScroll 指令来实现无限滚动功能。同时,我们在 el-timeline 中添加了 infinite-scroll-disabled 和 infinite-scroll-distance 属性,分别用于控制是否禁用无限滚动和触发加载更多数据的距离。 现在我们已经完成了 element-ui 的时间线组件 + 自动滚动 + v-infinite-scroll 无限滚动 + 动态加载功能的实现。

“相关推荐”对你有帮助么?

  • 非常没帮助
  • 没帮助
  • 一般
  • 有帮助
  • 非常有帮助
提交
评论
添加红包

请填写红包祝福语或标题

红包个数最小为10个

红包金额最低5元

当前余额3.43前往充值 >
需支付:10.00
成就一亿技术人!
领取后你会自动成为博主和红包主的粉丝 规则
hope_wisdom
发出的红包
实付
使用余额支付
点击重新获取
扫码支付
钱包余额 0

抵扣说明:

1.余额是钱包充值的虚拟货币,按照1:1的比例进行支付金额的抵扣。
2.余额无法直接购买下载,可以购买VIP、付费专栏及课程。

余额充值