


前言
CNTK中网络模型的使用是通过EvalDLL进行的。但EvalDLL目前为C++的实现,本文将仿照CNTK中EvalWrapper工程,将EvalDLL封装为Python可以调用的Python模块。
目标
根据EvalWrapper工程,具体需要封装的其实只有2个全局的方法(分别对应float和double)以及1个接口。
enum NodeGroup
{
    nodeInput,  // an input node
    nodeOutput, // an output node
    nodeSpecified
};

// IEvaluateModel - interface used by decoders and other components that need just evaluator functionality in DLL form
template <class ElemType>
class IEvaluateModel // Evaluate Model Interface
{
public:
    virtual void Init(const std::string& config) = 0;
    virtual void Destroy() = 0;

    virtual void CreateNetwork(const std::string& networkDescription) = 0;
    virtual void GetNodeDimensions(std::map<std::wstring, size_t>& dimensions, NodeGroup nodeGroup) = 0;
    virtual void StartEvaluateMinibatchLoop(const std::wstring& outputNodeName) = 0;
    virtual void Evaluate(std::map<std::wstring, std::vector<ElemType>*>& inputs, std::map<std::wstring, std::vector<ElemType>*>& outputs) = 0;
    virtual void Evaluate(std::map<std::wstring, std::vector<ElemType>*>& outputs) = 0;
    virtual void ResetState() = 0;
};

// GetEval - get a evaluator type from the DLL
// since we have 2 evaluator types based on template parameters, exposes 2 exports
// could be done directly with the templated name, but that requires mangled C++ names
template <class ElemType>
void EVAL_API GetEval(IEvaluateModel<ElemType>** peval);
extern "C" EVAL_API void GetEvalF(IEvaluateModel<float>** peval);
extern "C" EVAL_API void GetEvalD(IEvaluateModel<double>** peval);
上述声明中的GetEvalF以及GetEvalD方法分别对应获取float或者是double类型的IEvaluateModel。之后通过IEvaluateModel即可调用已经训练完成的网络模型。
实现
封装的思路
通过Python调用C++的方法有很多,这里计划使用Boost.Python来封装,原因主要是因为CNTK工程中已经引入的Boost库,所以继续使用Boost.Python可以不增加负担,并且目前为Boost.Python的封装的软件也有好多,包括py++等。使用Boost.Python对C++进行封装也是比较成熟的方法。所以笔者目前决定使用Boost.Python来对EvalDLL进行针对Python调用的封装。
具体针对Boost.Python的介绍可以参考如下链接:
http://www.boost.org/doc/libs/1_60_0/libs/python/doc/html/index.html
另外介绍一点,其实Apache的thrift也是在备选范围内的一种,Thrift的本质目的就是提供一种异步架构的互操作机制。但是如果要使用Thrift,则需要提供一个service的进程来提供服务。相比于直接利用C++中本身Boost库提供的机制来讲,Boost.Python在封装上相比较thrift比较麻烦,但是提供给最终用户的调用很方便。
具体针对Thrift的介绍可以参考如下链接:
创建及配置工程
为保持CNTK的整体Project的结构风格,笔者将在CNTK工程中的Extensibility目录创建一个子工程,命名为CNTKPythonWrapper,目标目录选择CNTK\Source\Extensibility\。

之后就是配置工程,配置工程不建议用Visual Studio的界面去配置,因为目前已经存在EvalWrapper工程,并且我们的工程配置信息应该同这个类似,所以我建议复制EvalWrapper.vcxproj的内容,来修改我们的配置。
具体需要做的事情就是:
1. 将EvalWrapper.vcxproj拷贝至CNTKPythonWrapper工程目录,然后改名为CNTKPythonWrapper.vcxproj覆盖原油的.vcxproj文件。(这步骤主要是方便直接创建了x64以及Debug和Debuy_CPUonly等编译相关的配置管理)
2. 删除.vcxproj中对原有.cpp文件的引用,就是删掉下面的内容,
```
  <ItemGroup>
    <ClCompile Include="EvalWrapper.cpp" />
  </ItemGroup>
```
3. 去掉clr编译选项
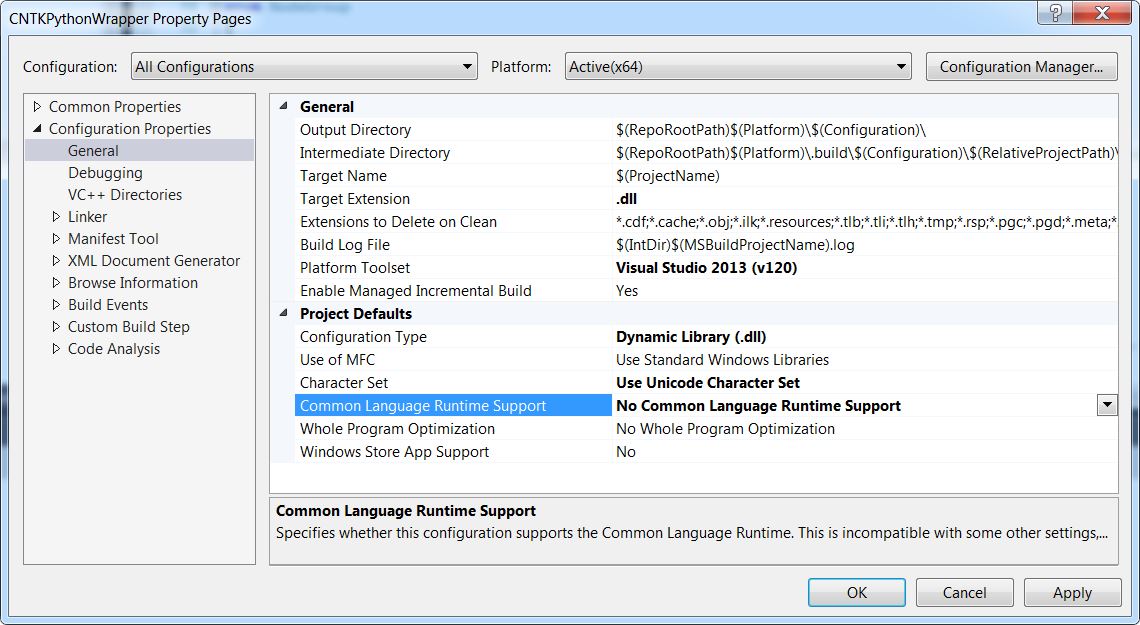
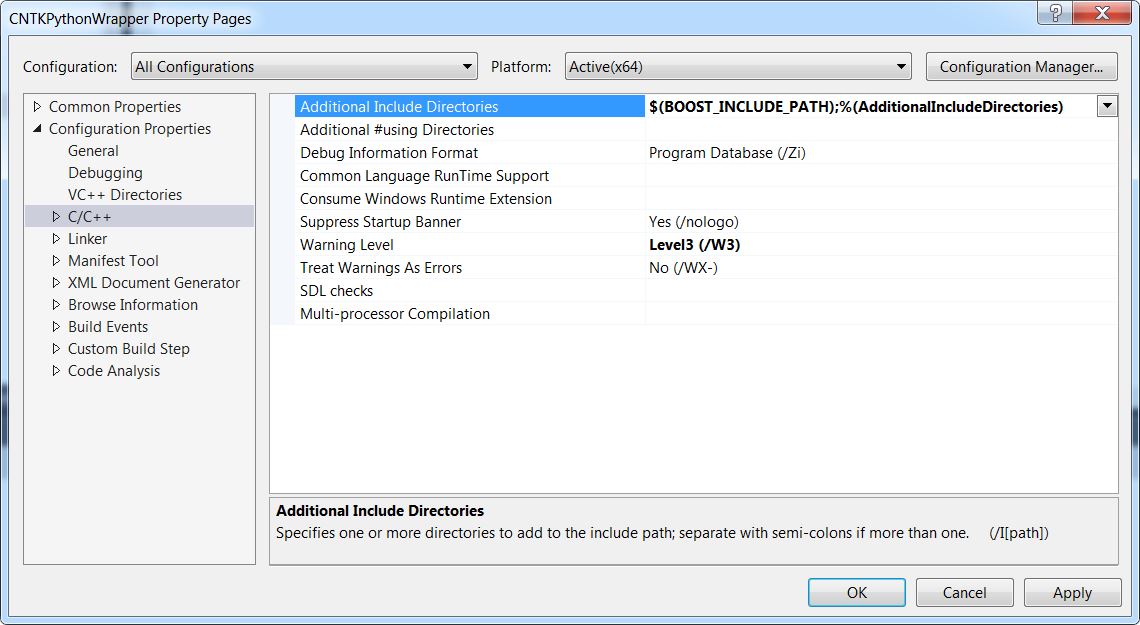
4. 添加Boost相关的Header文件以及Lib文件引用

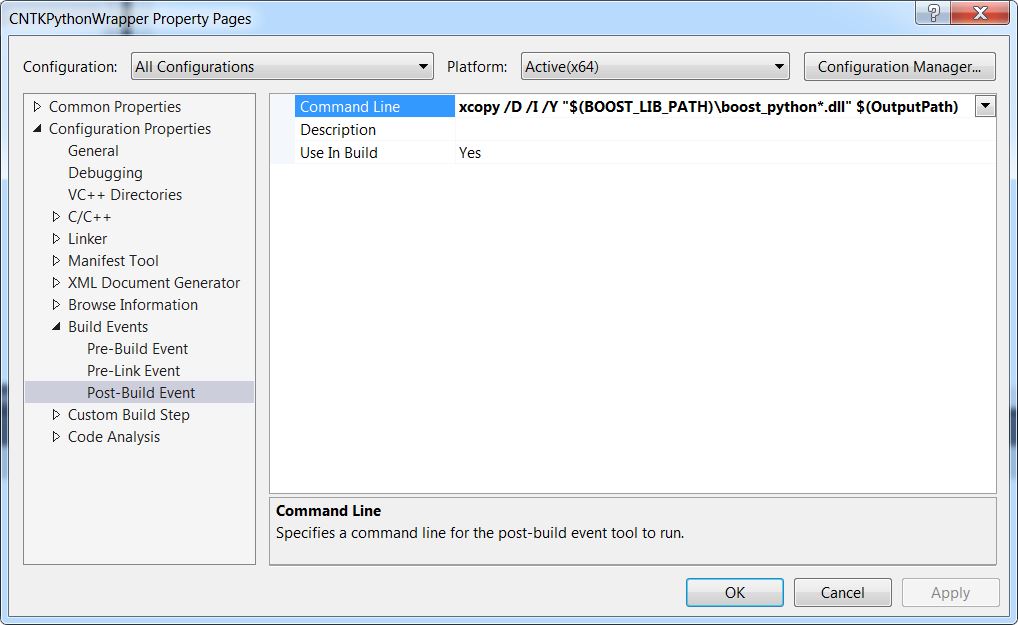
5. Post-build时的文件拷贝(主要是boost库的一些dll)
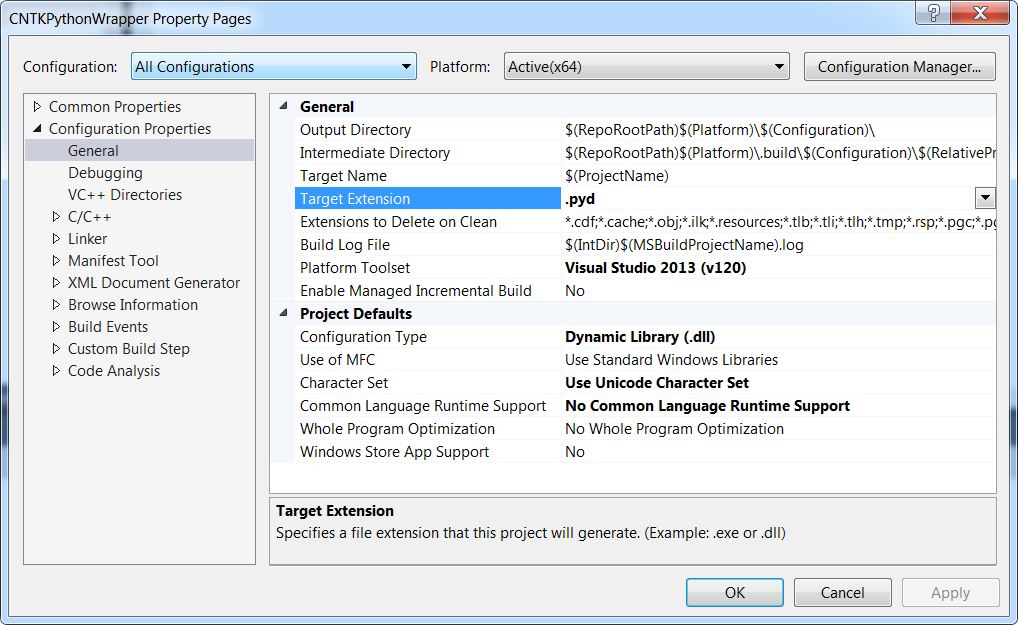
- 重要的一点是Python加载的模块的拓展名为.pyd,我们修改输出文件为.pyd文件
根据上述步骤,我们即完成了工程的创建以及配置工作。由于是该工程是用于封装,所以不必复杂,我们简单的添加一个PythonWrapper.cpp文件在工程中,所有实现都写在这个文件里即可(不用使用头文件,python调用不需要关心这些的)。
Boost.Python简单的介绍
这里简单介绍下Boost.Python的使用,首先是Header文件的引用,
#include <boost/python.hpp>对于Boost.Python,是通过BOOST_PYTHON_MODULE来创建一个Python的模块,模块名字写在其后面的括号中,具体形式如下:
BOOST_PYTHON_MODULE(TestForPython)
{
    using namespace boost::python;
    class_<hello>("hello", init<std::string>())
        // Add a regular member function.
        .def("greet", &hello::greet)
        // Add invite() as a member of hello!
        .def("invite", invite);

    // Also add invite() as a regular function to the module.
    def("invite", invite);
}
上述代码中则实现了一个TestForPython的Python模块的封装,其中,定义了一个hello的类型,hello类型中,包括了一个传入std::string的构造函数,以及greet方法。
而invite方法,被定义了两次,第一次是定义于hello类型中,默认这种定义要求的是可以接受一个hello类型作为传入参数的方法。而后面单独的def("invite", invite);则是定义invite为一个全局方法。
def函数后面可能根据需要还需要添加针对参数以及返回值的修饰说明,例如下面情况,
def("getHello", getHello, return_value_policy<reference_existing_object>());这里定义的getHello方法将返回值作为引用类型返回,这种情况下getHello的原型可能为:
hello& getHello()还有就是一些传入的数组等,Boost.Python中,提供了boost::python::list类型供使用。所以一般c++同Python交互的时候使用该类型,然后再在c++这端将其解开在赋值。
封装IEvaluateModel
笔者对Boost.Python并不是很熟悉,研究了一下午,简单的封装了下IEvalueteModel方法,重点其实涉及到的主要是加载DLL以及找到函数的入口并进行调用。
首先是定义一下GetEval方法的原型,也就是之前在EvalDLL中暴露出来的C方法。
 // Used for retrieving the model appropriate for the element type (float / double)
 template<typename ElemType>
 using GetEvalProc = void(*)(IEvaluateModel<ElemType>**);
可以根据下面的方法,首先先加载evaldll.dll,然后再该dll中找到具体的获取IEvaluateModel对象的方法(GetEvalF或者是GetEvalD)。
auto hModule = LoadLibraryA("evaldll.dll");
if (hModule == nullptr)
{
    throw std::runtime_error("Cannot find library: evaldll.dll");
}

auto procAddress = GetProcAddress(hModule, funcName.c_str());
auto getEvalProc = (GetEvalProc<ElemType>)procAddress;
getEvalProc(&m_eval);
if (m_eval == nullptr)
{
    throw std::runtime_error("Cannot get IEvaluateModel.");
}
最后就是针对于相关接口的封装,其中用到了Boost.Python的一些对象,包括boost::python::dict以及boost::python::list等。笔者将最后的封装完成的代码粘贴如下:
 // Used for retrieving the model appropriate for the element type (float / double)
 template<typename ElemType>
 using GetEvalProc = void(*)(IEvaluateModel<ElemType>**);

 /// Managed wrapper for the native evaluation model
 template<typename ElemType>
 class IPythonEvaluateModel
 {
     typedef std::pair<std::wstring, std::vector<ElemType>*> MapEntry;

 public:
     /// <summary>Initializes a new instance of the <see cref="IPythonEvaluateModel"> class.</summary>
     /// <param name="funcName">Factory function name for retrieving the native model from the dll.</param>
     IPythonEvaluateModel(const std::string& funcName)
     {
         auto hModule = LoadLibraryA("evaldll.dll");
         if (hModule == nullptr)
         {
             throw std::runtime_error("Cannot find library: evaldll.dll");
         }

         auto procAddress = GetProcAddress(hModule, funcName.c_str());
         auto getEvalProc = (GetEvalProc<ElemType>)procAddress;
         getEvalProc(&m_eval);
         if (m_eval == nullptr)
         {
             throw std::runtime_error("Cannot get IEvaluateModel.");
         }

     }

     /// <summary>Initializes the model evaluation library with a CNTK configuration</summary>
     /// <param name="config">Model configuration entries</param>
     void Init(const std::string& config)
     {
         if (m_eval == nullptr)
         {
             throw std::runtime_error("Object has been disposed.");
         }

         m_eval->Init(config);
     }

     /// <summary>Creates a network based from the network description in the configuration</summary>
     /// <param name="networkDescription">The configuration file containing the network description</param>
     void CreateNetwork(const std::string& networkDescription)
     {
         if (m_eval == nullptr)
         {
             throw std::runtime_error("Object has been disposed.");
         }

         m_eval->CreateNetwork(networkDescription);
     }

     /// <summary>Evaluates the model using a single forward feed pass and retrieves the output layer data</summary>
     /// <param name="outputKey"></param>
     /// <param name="outputSize"></param>
     /// <returns>Results for specified layer</returns>
     boost::python::list Evaluate(const std::wstring& outputKey, int outputSize)
     {
         if (m_eval == nullptr)
         {
             throw std::runtime_error("Object has been disposed.");
         }

         std::map<std::wstring, std::vector<ElemType>* > stdOutputs;

         std::shared_ptr<std::vector<ElemType> > pOutputVector(new std::vector<ElemType>());

         pOutputVector->resize(outputSize);

         stdOutputs[outputKey]=pOutputVector.get();

         m_eval->Evaluate(stdOutputs);

         boost::python::list ret;

         for (std::vector<ElemType>::iterator itr = pOutputVector->begin(); itr != pOutputVector->end(); ++itr)
         {
             ret.append(*itr);
         }

         return ret;

     }


     /// <summary>Evaluates the model against input data and retrieves the output layer data</summary>
     /// <param name="inputs"></param>
     /// <param name="outputKey"></param>
     /// <param name="outputSize"></param>
     /// <returns>Results for specified layer</returns>
     boost::python::list Evaluate2(const boost::python::dict& inputs, const std::wstring& outputKey, int outputSize)
     {
         if (m_eval == nullptr)
         {
             throw std::runtime_error("Object has been disposed.");
         }

         std::map<std::wstring, std::vector<ElemType>* > stdInputs;
         std::vector<std::shared_ptr<std::vector<ElemType> >> resourceManagement;
         for (int i = 0; i < boost::python::len(inputs); ++i)
         {
             std::shared_ptr<std::vector<ElemType> > pInputVector(new std::vector<ElemType>());
             resourceManagement.push_back(pInputVector);
             boost::python::list theValues = boost::python::extract<boost::python::list>(inputs.values()[i]);
             for (int j = 0; j < boost::python::len(theValues); ++j)
             {
                 pInputVector->push_back(boost::python::extract<ElemType>(theValues[j]));
             }

             std::wstring key = boost::python::extract<std::wstring>(inputs.keys()[i]);
             stdInputs[key] = pInputVector.get();
         }


         std::map<std::wstring, std::vector<ElemType>* > stdOutputs;

         std::shared_ptr<std::vector<ElemType> > pOutputVector(new std::vector<ElemType>());

         pOutputVector->resize(outputSize);

         stdOutputs[outputKey]=pOutputVector.get();

         m_eval->Evaluate(stdInputs, stdOutputs);

         boost::python::list ret;

         for (std::vector<ElemType>::iterator itr = pOutputVector->begin(); itr != pOutputVector->end(); ++itr)
         {
             ret.append(*itr);
         }

         return ret;
     }

     std::string TEST()
     {
         return "TEST";
     }

#if 0 //Not IMPLEMENT

     /// <summary>Evaluates the model against input data and retrieves the output layer data</summary>
     /// <param name="inputs"></param>
     /// <param name="outputs"></param>
     void Evaluate3(const boost::python::dict& inputs, boost::python::dict& outputs)
     {
         if (m_eval == nullptr)
         {
             throw std::runtime_error("Object has been disposed.");
         }

         throw std::runtime_error("Not implemented.");
     }
#endif

     ~IPythonEvaluateModel()
     {
         if (m_eval != nullptr)
         {
             m_eval->Destroy();
             m_eval = nullptr;
         }
     }

 private:
     // Native model evaluation instance
     IEvaluateModel<ElemType> *m_eval;

 };
上述封装的内容为base类,根据不同的类型(float或者是double),派生出来2个其他类型,IPythonEvaluateModelF以及IPythonEvaluateModelD,这两个类型将在python中直接使用。
 class IPythonEvaluateModelF : public IPythonEvaluateModel<float>
 {
 public:
     IPythonEvaluateModelF()
         : IPythonEvaluateModel("GetEvalF")
     {
     }
 };

 class IPythonEvaluateModelD : public IPythonEvaluateModel<double>
 {
 public:
     IPythonEvaluateModelD()
         : IPythonEvaluateModel("GetEvalD")
     {
     }
 };
封装Python模块
上述内容只是将IEvaluateModel给暴露出来,但是并没有暴露到具体的Python模块。下面的代码将根据Boost.Python将其封装成模块。
BOOST_PYTHON_MODULE(CNTKPythonWrapper)
{
    using namespace boost::python;
    using namespace Microsoft::MSR::CNTK::Extensibility::Managed;

    class_<IPythonEvaluateModelD>("IPythonEvaluateModelD", init<>())
        .def("Init", &IPythonEvaluateModelD::Init)
        .def("CreateNetwork", &IPythonEvaluateModelD::CreateNetwork)
        .def("Evaluate", &IPythonEvaluateModelD::Evaluate)
        .def("Evaluate2", &IPythonEvaluateModelD::Evaluate2)
        .def("TEST", &IPythonEvaluateModelD::TEST);

    class_<IPythonEvaluateModelF>("IPythonEvaluateModelF", init<>())
        .def("Init", &IPythonEvaluateModelF::Init)
        .def("CreateNetwork", &IPythonEvaluateModelF::CreateNetwork)
        .def("Evaluate", &IPythonEvaluateModelF::Evaluate)
        .def("Evaluate2", &IPythonEvaluateModelF::Evaluate2)
        .def("TEST", &IPythonEvaluateModelF::TEST);

}
这里Python模块的名称为CNTKPythonWrapper,包含两个类型IPythonEvaluateModelD以及IPythonEvaluateModelF,并提供若干方法。
完成上述操作后,即完成了针对Python的封装。可以在Python中进行调用。
在Python中尝试调用
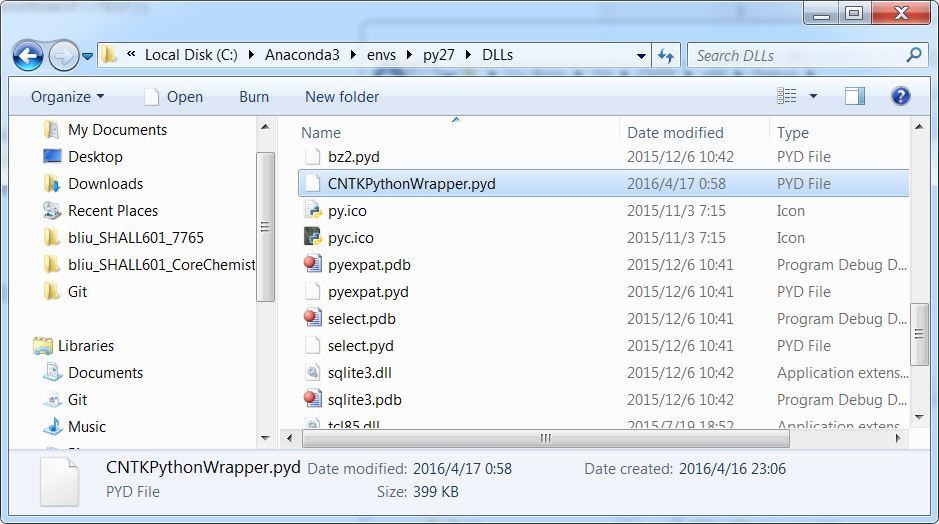
首先,我们需要将工程生成的pyd文件拷贝至python环境的dlls目录中。(否则会提示找不到指定名称的模块)。
之后,即可的执行Python代码,调用我们封装的CNTK的EvalDLL。
# -*- coding: utf-8 -*-
"""
Created on Sun Apr 17 00:42:52 2016

@author: LiuXz
"""


from CNTKPythonWrapper import *

model=IPythonEvaluateModelF();
config="C:\\Users\\liuxz\\Git\\CNTK\\Examples\\Image\\MNIST\\Config\\01_OneHidden.cntk";
model.Init(config);
networkConfig="deviceId=-1\nmodelPath=\"C:\\Users\\liuxz\\Git\\CNTK\\Examples\\Image\\MNIST\\Output\\Models\\01_OneHidden\""
model.CreateNetwork(networkConfig)
values=[232,250,164,3,193,222,83,195,98,157,206,105,56,246,6,227,213,181,110,99,66,121,35,70,77,62,193,10,144,163,180,229,101,77,109,195,23,71,189,82,122,253,194,235,73,156,239,183,8,172,185,142,207,236,125,111,214,93,180,131,28,72,50,189,232,231,4,234,137,66,204,141,247,28,231,68,181,55,252,176,77,10,2,226,233,37,21,119,206,252,235,185,145,57,53,49,203,4,2,96,152,5,46,196,223,43,149,179,5,57,185,158,96,3,54,18,70,78,211,194,209,139,27,139,85,18,250,189,229,181,119,176,53,155,24,72,218,60,3,189,143,97,114,149,67,76,88,141,3,34,234,124,48,62,142,12,233,161,110,205,47,214,205,78,192,8,105,195,234,236,54,10,75,21,51,112,25,132,72,9,184,108,186,194,202,250,128,245,13,11,94,57,204,52,142,183,147,36,211,58,226,147,162,21,235,223,49,26,11,30,242,100,88,101,20,193,28,10,130,197,134,115,182,222,142,252,61,22,134,123,219,243,176,14,38,36,201,164,214,234,200,101,233,237,24,248,223,102,32,203,155,136,160,14,178,110,220,194,134,237,162,26,147,143,65,253,179,74,63,238,247,118,50,151,251,33,136,199,198,148,28,213,244,185,223,83,83,161,90,182,71,7,30,231,72,174,208,90,172,25,69,149,38,49,211,36,85,9,17,145,229,20,250,240,208,203,36,217,175,236,170,17,239,136,166,240,88,74,78,77,79,46,27,173,79,134,174,195,229,186,252,73,144,200,207,51,11,45,22,123,137,246,169,191,110,52,164,157,137,226,203,11,185,195,66,183,248,77,160,74,28,96,242,243,239,97,128,39,183,114,229,42,51,210,194,87,131,90,62,27,224,17,57,3,238,240,142,203,133,24,58,188,139,203,94,40,3,181,206,12,179,125,228,23,252,160,215,230,0,233,51,157,15,133,104,11,39,239,5,253,209,179,160,158,55,40,158,102,115,154,83,205,139,49,103,98,43,34,6,77,25,167,202,155,228,156,173,5,99,83,1,19,176,208,58,254,220,70,222,211,2,113,114,101,150,101,17,220,30,5,222,4,233,182,228,42,231,5,185,154,122,152,3,32,152,64,28,186,246,103,133,228,66,49,75,166,52,101,4,126,138,207,229,93,115,251,40,248,234,15,22,215,139,67,88,104,110,81,203,86,72,86,228,182,127,249,192,183,107,61,244,130,0,59,15,169,178,164,172,155,23,35,206,230,80,172,89,253,216,225,56,226,152,173,53,51,234,47,221,121,58,111,141,172,26,147,215,80,52,173,181,201,164,47,62,37,135,252,101,209,160,193,222,136,5,18,232,81,5,218,190,130,197,51,97,166,148,34,204,188,212,8,201,43,44,110,62,105,111,16,171,236,201,11,215,119,144,5,166,8,170,133,74,88,238,50,3,112,205,150,143,101,48,167,251,151,247,179,91,150,211,127,225,244,47,208,184,185,90,232,22,143,122,195,18,79,188,113,59,248,106,204,154,215,128,70,187,33,15,64,127,220,168,16,52,42,162,85,41,29,121,72,22,228,128,254,234,107,149,172,217,134,119,98,43,6,227,10,115,232,21,150,170,26,104,57,229,105,143,230,171,102,72,30,126,34,181,181,87,128,91,79,139,98,101,248,100,70,228,45,69,152,224,63,7,226,156,251,123,70,25,128,219,173,0,114,61,88,226,8,79,46,178,242,141,196,10,72,179,111,211,159,132,98,160,19,133,8,22,154,132,185,57,16]
inputs={"features":values}
outputs=model.Evaluate2(inputs, "ol.z", 10)

print outputs
最后,上述的Python代码使用的是MNIST样例中的网络模型,通过输入一个指定的样本(图像灰度数组,共784维,28*28的图像),最后将返回输出节点输出的数据(10维度对应0-9十个数字的字母)。

总结
本文中首先讨论了针对EvalDLL中重要的接口,之后是提出了将CNTK拓展的本质接口。最后针对CNTK的接口针对Python环境进行封装。希望能够对大家的使用有所帮助。
笔者对Python以及Python与C++的互操作并非很熟悉,所以如果本文中有错误请及时指正。


 被折叠的 条评论
为什么被折叠?
被折叠的 条评论
为什么被折叠?
 到【灌水乐园】发言


