


方式一: xxl-job(分布式定时任务/分布式调度中心)
1.xxl_job是什么?
现有的定时任务的缺点:
spring task:
	加入一个注解@EnableScheduling
	写一个方法 添加一个注解@Scheduled 指定cron表达式
	不支持集群 不能及时停止
quratz:
	配置相对多
	支持集群,实现很麻烦,配置多
timer:
	原生,使用起来麻烦

分布式定时任务解决以上的问题:xxl-job,elastic-job,oracle job.
xxl-job是什么:
XXL-JOB是一个分布式任务调度平台,其核心设计目标是开发迅速、学习简单、轻量级、易扩展。现已开放源代码并接入多家公司线上产品线,开箱即用。
它是大众点评公司的许雪里开发出来的框架。

什么是任务调度?
某一时间段进行任务的操作。

具体任务调度有哪些应用的场景?
1.时间驱动:房贷短信,营销类短信,对账单.日结等
2.数据驱动:数据同步、异步数据交换等。
xxl_job优点:
1、简单:支持通过Web页面对任务进行CRUD操作,操作简单,一分钟上手;

2、动态:支持动态修改任务状态、启动/停止任务,以及终止运行中任务,即时生效;

3、路由策略:执行器集群部署时提供丰富的路由策略,包括:第一个、最后一个、轮询、随机、一致性HASH、最不经常使用、最近最久未使用、故障转移、忙碌转移等;

4、故障转移:任务路由策略选择”故障转移”情况下,如果执行器集群中某一台机器故障,将会自动Failover切换到一台正常的执行器发送调度请求。

5、任务超时控制:支持自定义任务超时时间,任务运行超时将会主动中断任务

6、一致性:“调度中心”通过DB锁保证集群分布式调度的一致性, 一次任务调度只会触发一次执行

7、邮件报警:任务失败时支持邮件报警,支持配置多邮件地址群发报警邮件;

8、任务进度监控:支持实时监控任务进度.
xxl-job中的角色说明:
1、调度中心 : 将调度行为抽象形成“调度中心”公共平台,而平台自身并不承担业务逻辑,“调度中心”负责发起调度请求

2、执行器(触发器): 将任务抽象成分散的JobHandler,交由“执行器”统一管理,“执行器”负责接收调度请求并执行对应的JobHandler中业务逻辑
任务: 具体执行的逻辑代码

“调度”和“任务”两部分可以相互解耦,提高系统整体稳定性和扩展性。
官网地址 https://www.xuxueli.com/xxl-job/
2.快速入门
2.1 下载源码
源码下载地址:
https://github.com/xuxueli/xxl-job
https://gitee.com/xuxueli0323/xxl-job
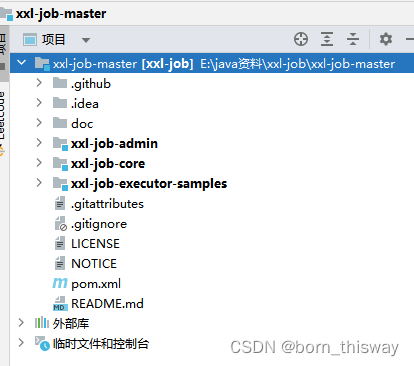
IDE打开源码,源码结构如下:
2.1 初始化调度数据库
请下载项目源码并解压,获取 “调度数据库初始化SQL脚本” 并执行即可。
“调度数据库初始化SQL脚本” 位置为:
/xxl-job/doc/db/tables_xxl_job.sql
2.3 配置与部署 调度中心
2.3.1 配置 调度中心
修改xxl-job-admin项目的配置文件application.properties,把数据库账号密码配置上
### web
server.port=8080
server.servlet.context-path=/xxl-job-admin

### actuator
management.server.servlet.context-path=/actuator
management.health.mail.enabled=false

### resources
spring.mvc.servlet.load-on-startup=0
spring.mvc.static-path-pattern=/static/**
spring.resources.static-locations=classpath:/static/

### freemarker
spring.freemarker.templateLoaderPath=classpath:/templates/
spring.freemarker.suffix=.ftl
spring.freemarker.charset=UTF-8
spring.freemarker.request-context-attribute=request
spring.freemarker.settings.number_format=0.##########

### mybatis
mybatis.mapper-locations=classpath:/mybatis-mapper/*Mapper.xml
#mybatis.type-aliases-package=com.xxl.job.admin.core.model

### xxl-job, datasource
spring.datasource.url=jdbc:mysql://192.168.202.200:3306/xxl_job?useUnicode=true&characterEncoding=UTF-8&autoReconnect=true&serverTimezone=Asia/Shanghai
spring.datasource.username=root
spring.datasource.password=WolfCode_2017
spring.datasource.driver-class-name=com.mysql.cj.jdbc.Driver

### datasource-pool
spring.datasource.type=com.zaxxer.hikari.HikariDataSource
spring.datasource.hikari.minimum-idle=10
spring.datasource.hikari.maximum-pool-size=30
spring.datasource.hikari.auto-commit=true
spring.datasource.hikari.idle-timeout=30000
spring.datasource.hikari.pool-name=HikariCP
spring.datasource.hikari.max-lifetime=900000
spring.datasource.hikari.connection-timeout=10000
spring.datasource.hikari.connection-test-query=SELECT 1
spring.datasource.hikari.validation-timeout=1000

### xxl-job, email
spring.mail.host=smtp.qq.com
spring.mail.port=25
spring.mail.username=xxx@qq.com
spring.mail.from=xxx@qq.com
spring.mail.password=xxx
spring.mail.properties.mail.smtp.auth=true
spring.mail.properties.mail.smtp.starttls.enable=true
spring.mail.properties.mail.smtp.starttls.required=true
spring.mail.properties.mail.smtp.socketFactory.class=javax.net.ssl.SSLSocketFactory

### xxl-job, access token
xxl.job.accessToken=default_token

### xxl-job, i18n (default is zh_CN, and you can choose "zh_CN", "zh_TC" and "en")
xxl.job.i18n=zh_CN

## xxl-job, triggerpool max size
xxl.job.triggerpool.fast.max=200
xxl.job.triggerpool.slow.max=100

### xxl-job, log retention days
xxl.job.logretentiondays=30
2.3.2 部署 调度中心
运行XxlJobAdminApplication程序即可.
调度中心访问地址: http://localhost:8080/xxl-job-admin
默认登录账号 “admin/123456”, 登录后运行界面如下图所示。
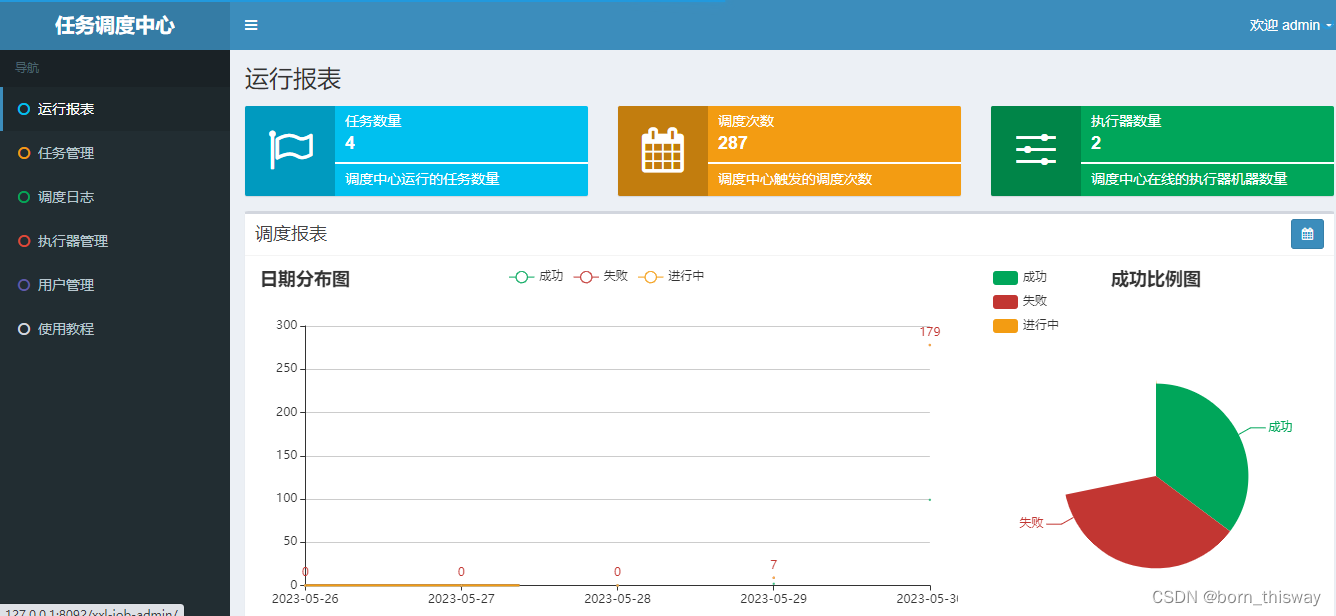
至此“调度中心”项目已经部署成功。
2.4 配置与部署 执行器
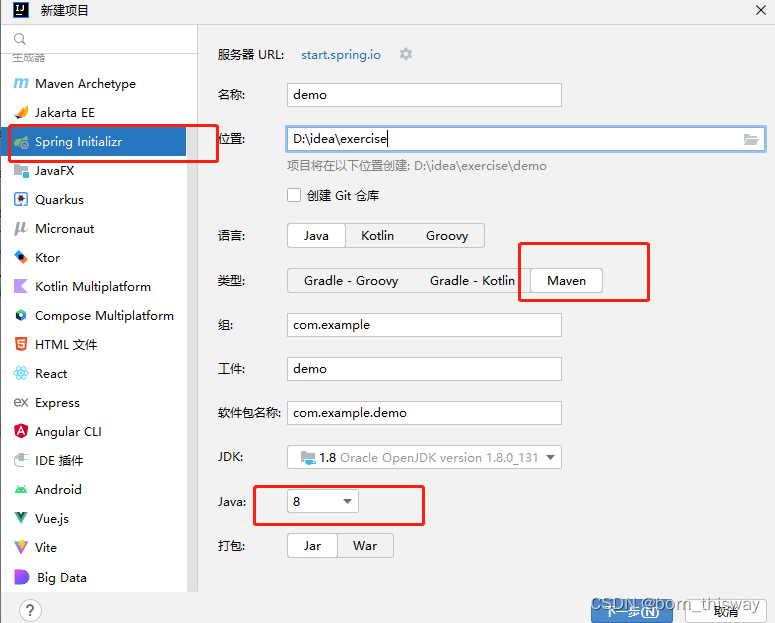
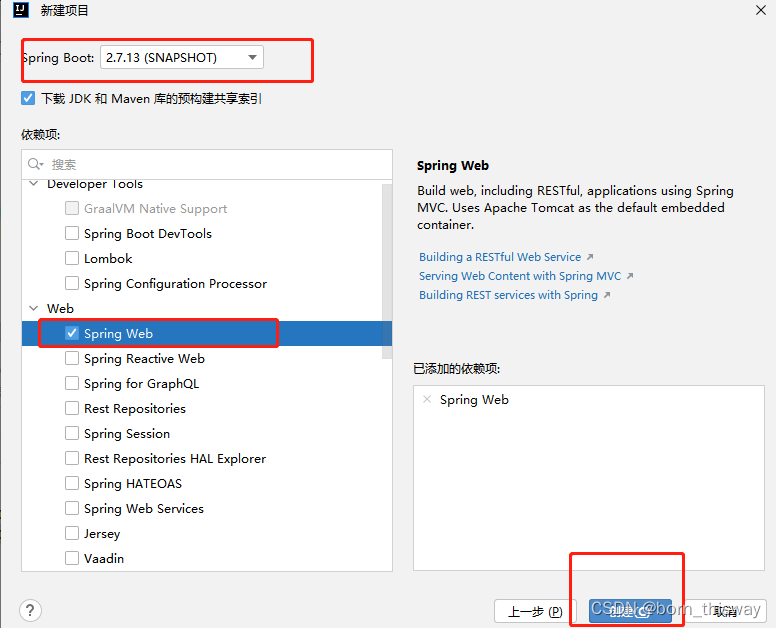
2.4.1 创建项目 、添加Maven依赖
创建SpringBoot项目并且添加如下依赖:
1、如何快速创建SpringBoot项目:
2、添加如下依赖:
<dependency>
    <groupId>com.xuxueli</groupId>
    <artifactId>xxl-job-core</artifactId>
    <version>2.3.1</version>
</dependency>
2.4.2 配置 执行器
在配置文件中添加如下配置:
xxl.job.admin.addresses对应的是调度中心的地址
### 调度中心部署根地址 [选填]:如调度中心集群部署存在多个地址则用逗号分隔。执行器将会使用该地址进行"执行器心跳注册"和"任务结果回调";为空则关闭自动注册;
xxl.job.admin.addresses=http://127.0.0.1:8080/xxl-job-admin
### 执行器通讯TOKEN [选填]:非空时启用;
xxl.job.accessToken=default_token
### 执行器AppName [选填]:执行器心跳注册分组依据;为空则关闭自动注册
xxl.job.executor.appname=xxl-job-demo
### 执行器注册 [选填]:优先使用该配置作为注册地址,为空时使用内嵌服务 ”IP:PORT“ 作为注册地址。从而更灵活的支持容器类型执行器动态IP和动态映射端口问题。
xxl.job.executor.address=
### 执行器IP [选填]:默认为空表示自动获取IP,多网卡时可手动设置指定IP,该IP不会绑定Host仅作为通讯实用;地址信息用于 "执行器注册" 和 "调度中心请求并触发任务";
xxl.job.executor.ip=127.0.0.1
### 执行器端口号 [选填]:小于等于0则自动获取;默认端口为9999,单机部署多个执行器时,注意要配置不同执行器端口;
xxl.job.executor.port=9999
### 执行器运行日志文件存储磁盘路径 [选填] :需要对该路径拥有读写权限;为空则使用默认路径;
xxl.job.executor.logpath=/data/applogs/xxl-job/jobhandler
### 执行器日志文件保存天数 [选填] : 过期日志自动清理, 限制值大于等于3时生效; 否则, 如-1, 关闭自动清理功能;
xxl.job.executor.logretentiondays=30
2.4.3 添加执行器配置
创建XxlJobConfig配置对象:
@Configuration
public class XxlJobConfig {
    @Value("${xxl.job.admin.addresses}")
    private String adminAddresses;
    @Value("${xxl.job.accessToken}")
    private String accessToken;
    @Value("${xxl.job.executor.appname}")
    private String appname;
    @Value("${xxl.job.executor.address}")
    private String address;
    @Value("${xxl.job.executor.ip}")
    private String ip;
    @Value("${xxl.job.executor.port}")
    private int port;
    @Value("${xxl.job.executor.logpath}")
    private String logPath;
    @Value("${xxl.job.executor.logretentiondays}")
    private int logRetentionDays;

    @Bean
    public XxlJobSpringExecutor xxlJobExecutor() {
        XxlJobSpringExecutor xxlJobSpringExecutor = new XxlJobSpringExecutor();
        xxlJobSpringExecutor.setAdminAddresses(adminAddresses);
        xxlJobSpringExecutor.setAppname(appname);
        xxlJobSpringExecutor.setAddress(address);
        xxlJobSpringExecutor.setIp(ip);
        xxlJobSpringExecutor.setPort(port);
        xxlJobSpringExecutor.setAccessToken(accessToken);
        xxlJobSpringExecutor.setLogPath(logPath);
        xxlJobSpringExecutor.setLogRetentionDays(logRetentionDays);
        return xxlJobSpringExecutor;
    }
}
2.4.3 添加任务处理类
添加任务处理类,交给Spring容器管理,在处理方法上贴上@XxlJob注解
@Component
public class SimpleXxlJob {
    @XxlJob("demoJobHandler")
    public void demoJobHandler() throws Exception {
        System.out.println("执行定时任务,执行时间:"+new Date());
    }
}
2.5 Bean(类)模式
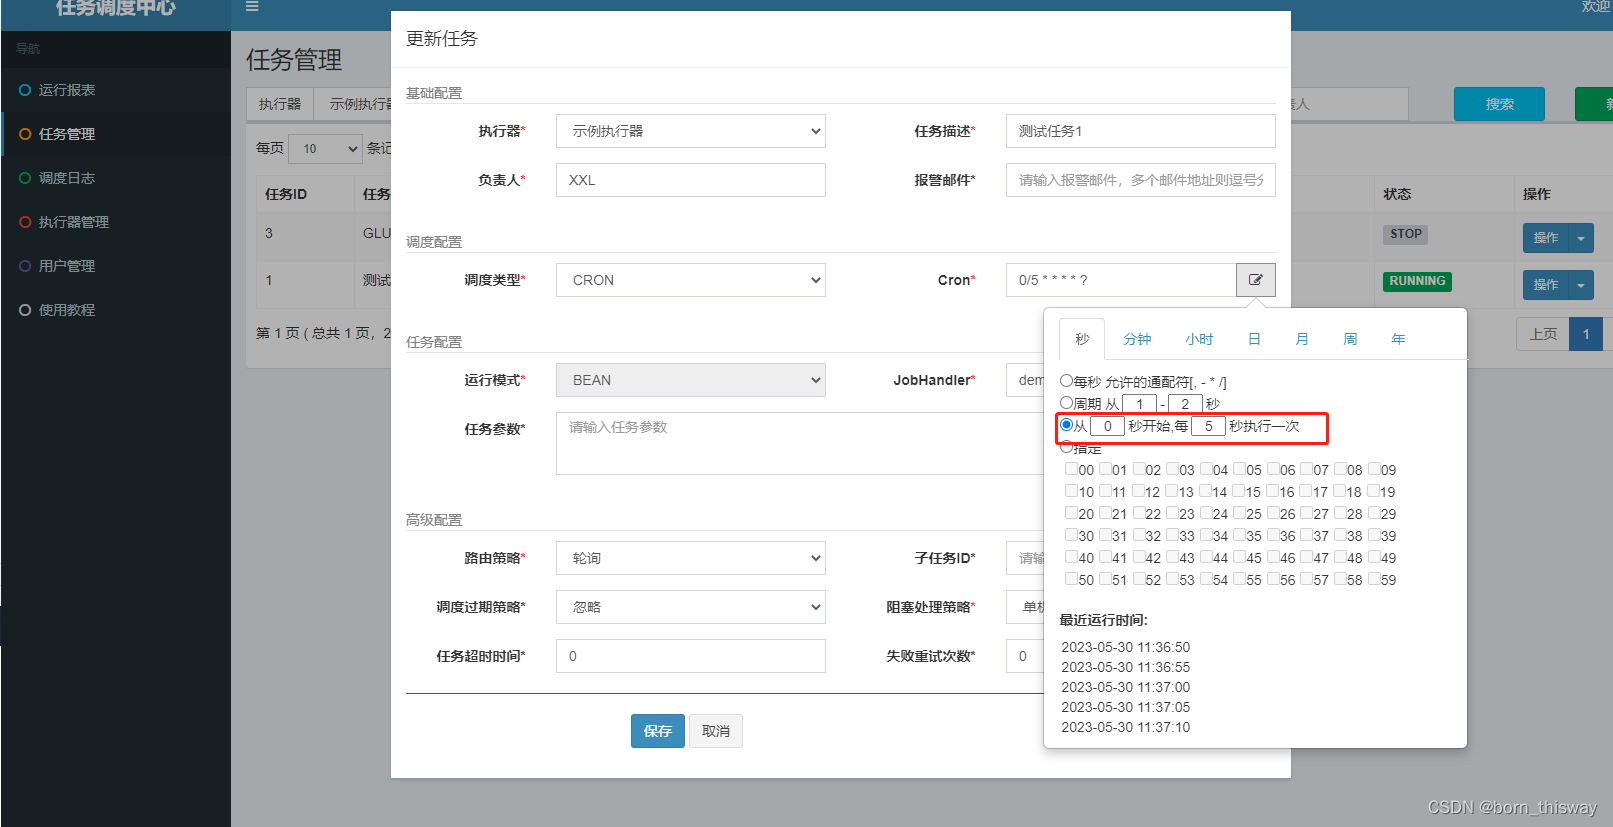
2.5.1 任务配置&触发执行
两个位置要对应:

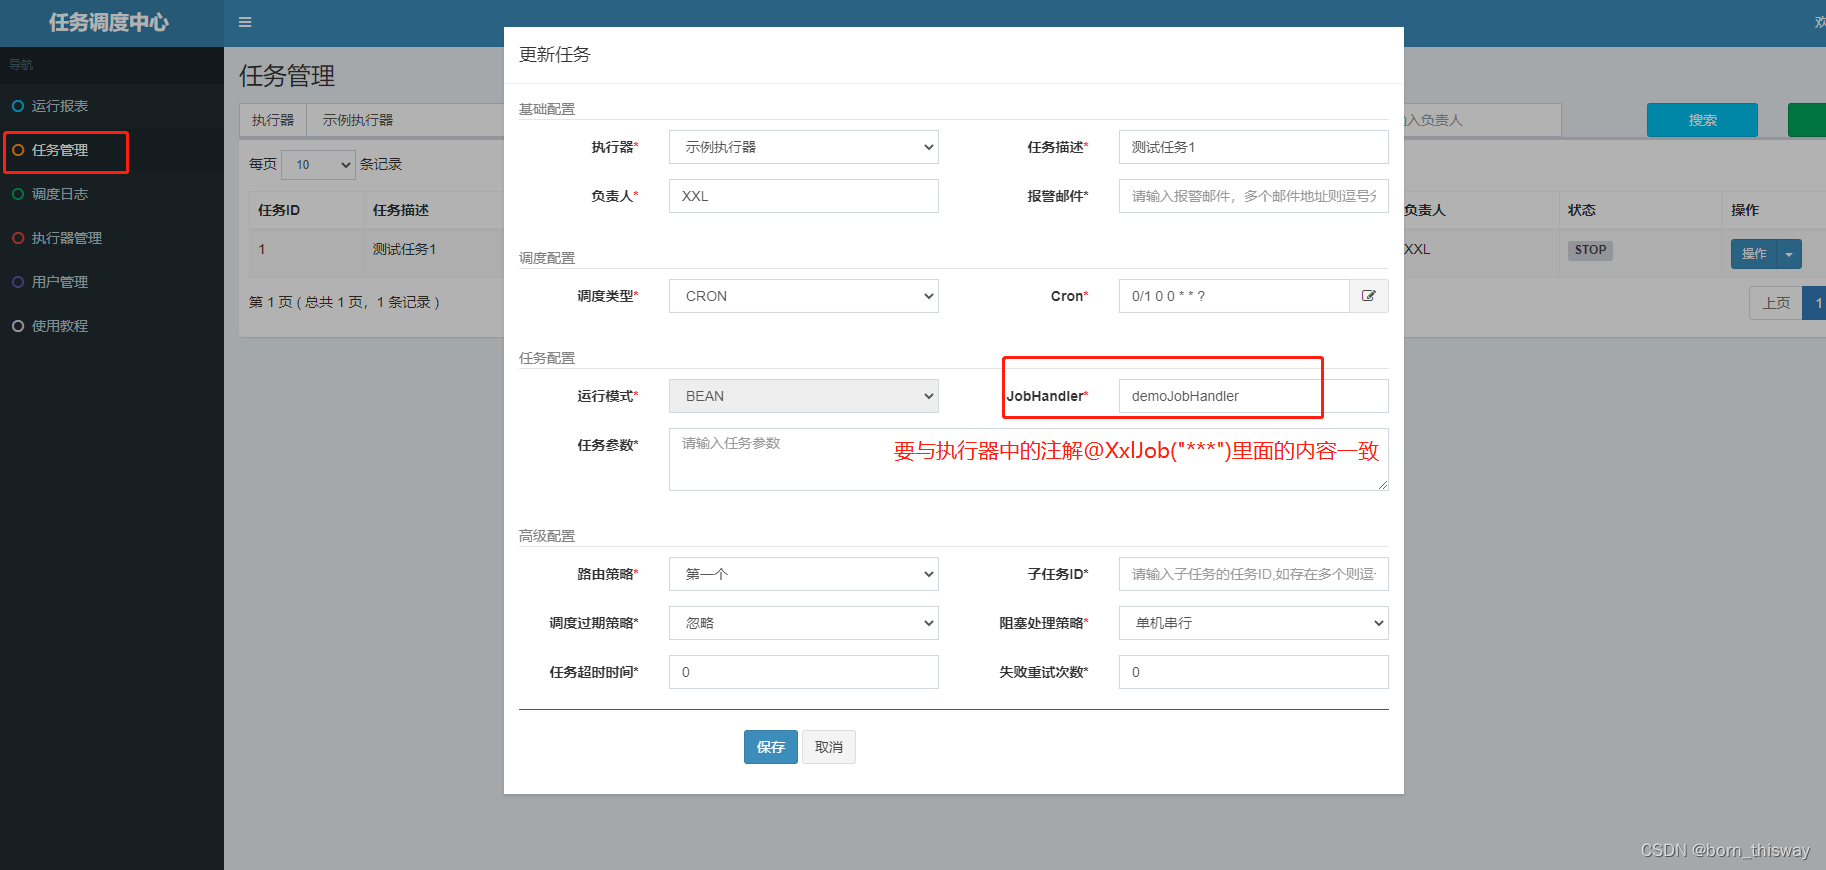
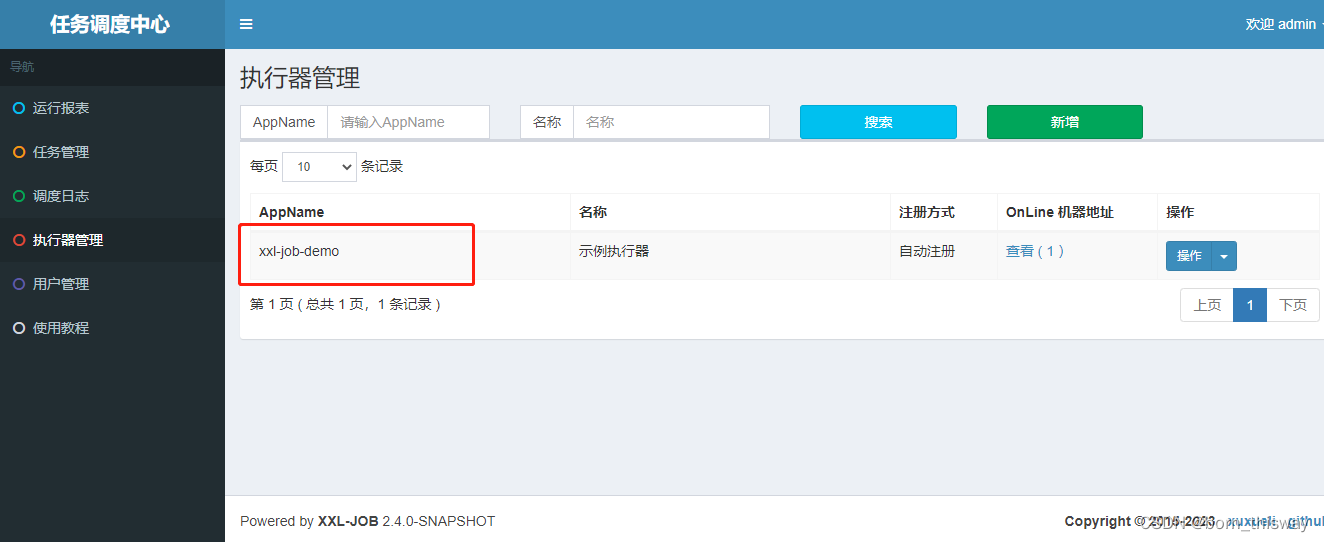
就可以看到OnLine 机器地址就有注册上来执行器的地址。
点击操作右侧的 执行一次看下执行器代码的控制台有没有输出一条
2.5.2 查看日志
在调度中心的调度日志中就可以看到,任务的执行结果.
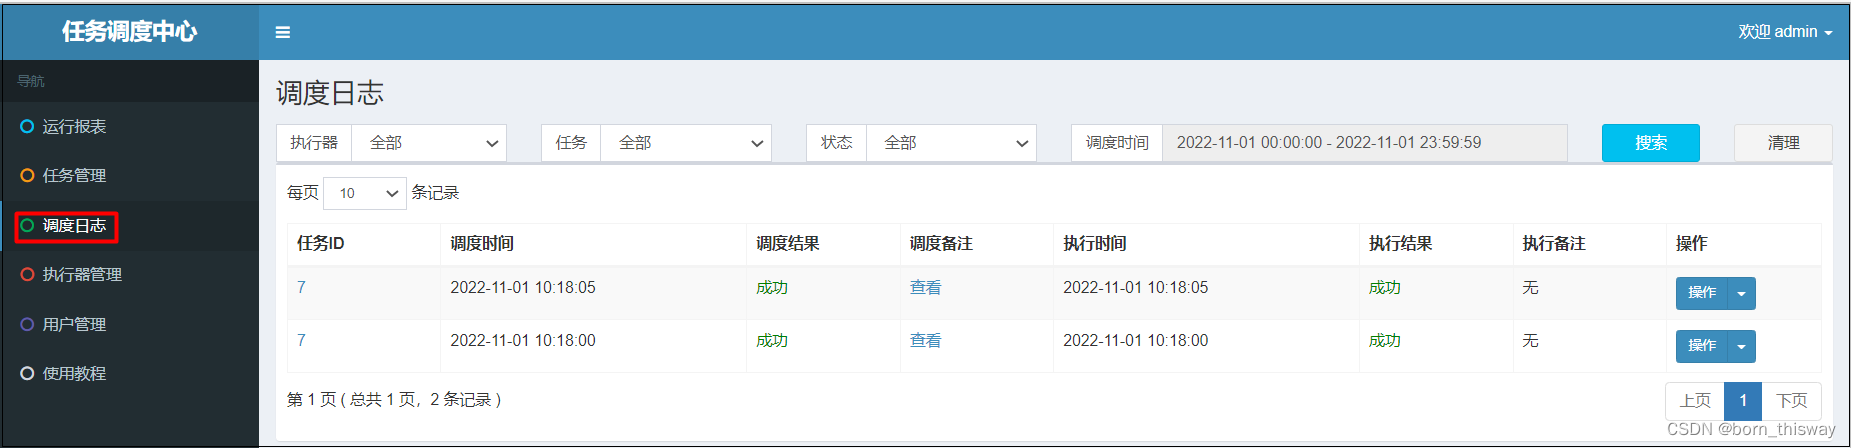
管控台也可以看到任务的执行信息.

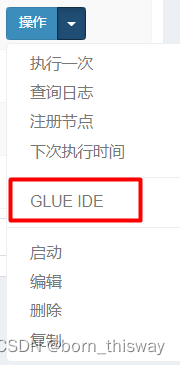
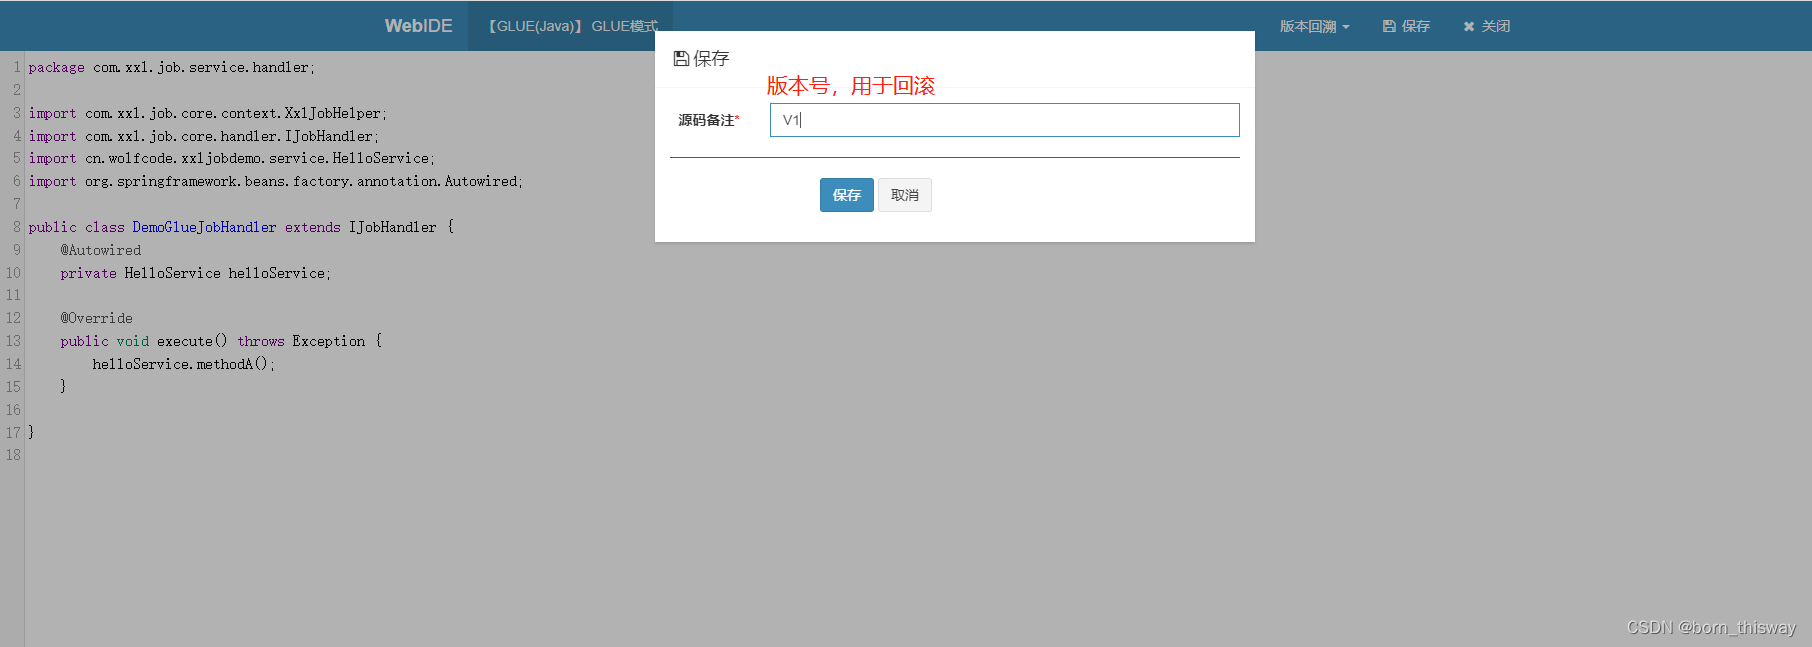
2.6 GLUE模式(Java)
任务以源码为JAVA的方式维护在调度中心,支持通过Web IDE在线更新,实时编译和生效,因此不需要指定JobHandler
添加Service
@Service
public class HelloService {
    public void methodA(){
        System.out.println("执行MethodA的方法");
    }
    public void methodB(){
        System.out.println("执行MethodB的方法");
    }
}
添加任务配置
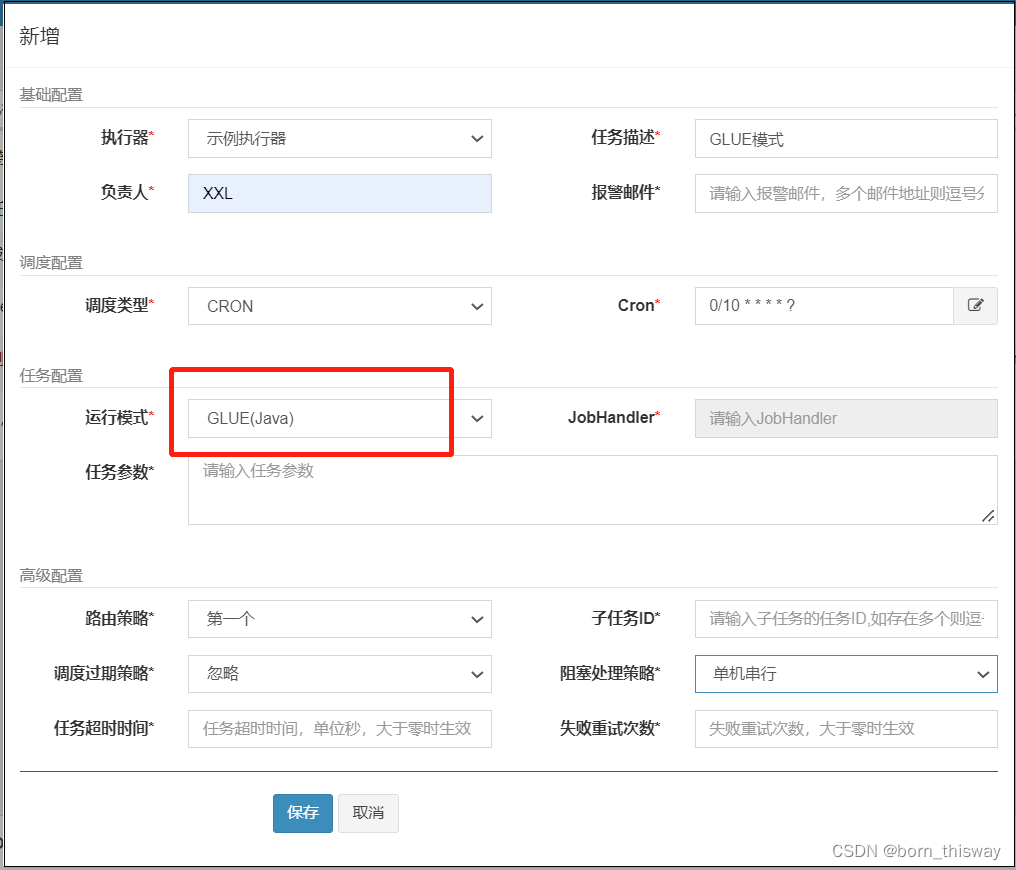
通过GLUE IDE在线编辑代码
编写内容如下:
注意:import org.springframework.beans.factory.annotation.Autowired;
import cn.wolfcode.xxljobdemo.service.HelloService;
是额外粘贴进去的
package com.xxl.job.service.handler;

import cn.wolfcode.xxljobdemo.service.HelloService;
import com.xxl.job.core.handler.IJobHandler;
import org.springframework.beans.factory.annotation.Autowired;

public class DemoGlueJobHandler extends IJobHandler {
    @Autowired
    private HelloService helloService;
    @Override
    public void execute() throws Exception {
        helloService.methodA();
    }
}
启动并执行程序
2.7 执行器集群
2.7.1 集群环境搭建
在IDEA中设置SpringBoot项目运行开启多个集群
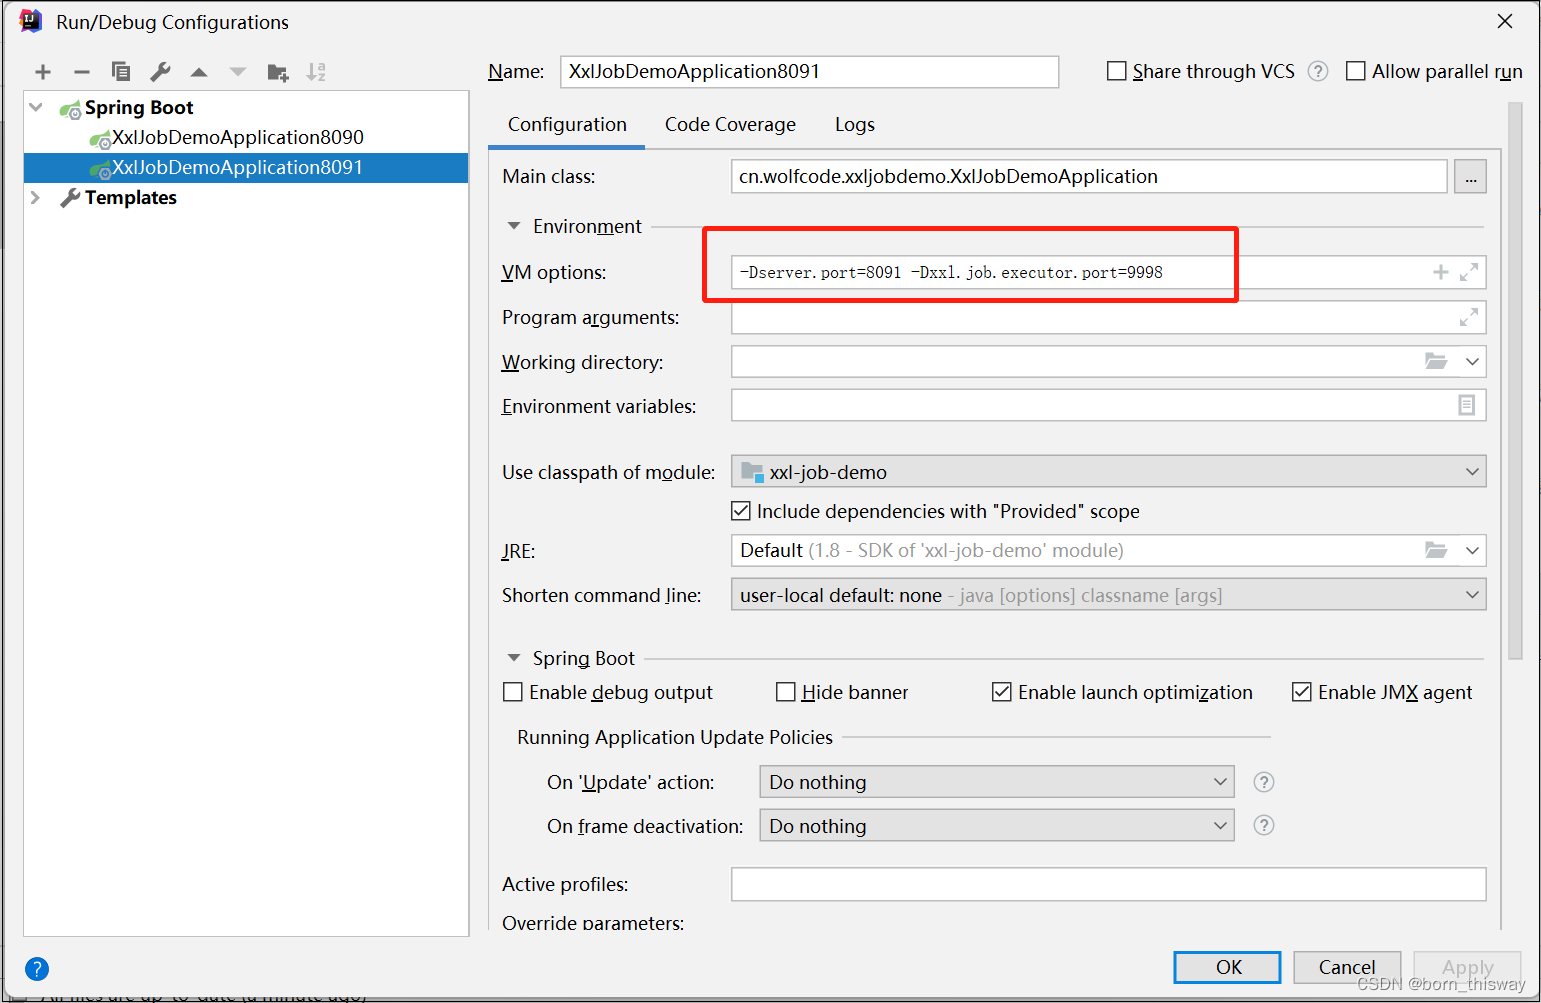
启动两个SpringBoot程序,需要修改Tomcat端口和执行器端口
-Dserver.port=8090 -Dxxl.job.executor.port=9998
-Dserver.port=8091 -Dxxl.job.executor.port=9999

在任务管理中,修改路由策略,修改成轮询
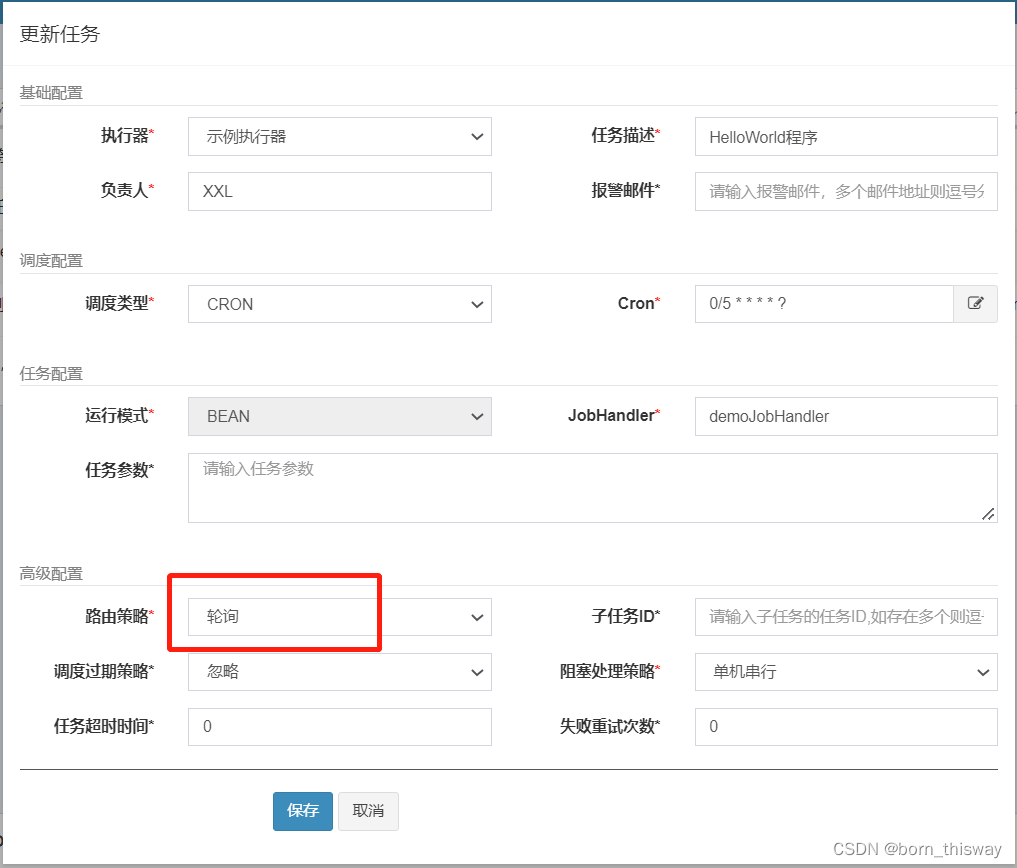
重新启动,我们可以看到效果是,定时任务会在这两台机器中进行轮询的执行
8090端口的控制台日志如下:

8091端口的控制台日志如下:

2.7.2 路由策略
当执行器集群部署时,提供丰富的路由策略,包括:
1. `FIRST(第一个):固定选择第一个机器`

2. `LAST(最后一个):固定选择最后一个机器;`

3. `ROUND(轮询):依次的选择在线的机器发起调度`

4. `RANDOM(随机):随机选择在线的机器;`

5. `CONSISTENT_HASH(一致性HASH):`

   `每个任务按照Hash算法固定选择某一台机器,且所有任务均匀散列在不同机器上。`

6. `LEAST_FREQUENTLY_USED(最不经常使用):使用频率最低的机器优先被选举;`

7. `LEAST_RECENTLY_USED(最近最久未使用):最久未使用的机器优先被选举;`

8. `FAILOVER(故障转移):按照顺序依次进行心跳检测,第一个心跳检测成功的机器选定为目标执行器并发起调度;`

9. `BUSYOVER(忙碌转移):按照顺序依次进行空闲检测,第一个空闲检测成功的机器选定为目标执行器并发起调度;`

10. `SHARDING_BROADCAST(分片广播):`

    `广播触发对应集群中所有机器执行一次任务,同时系统自动传递分片参数;可根据分片参数开发分片任务;`
2.8 分片功能讲解
2.8.1 案例
需求:在指定节假日,需要给平台的所有用户去发送祝福的短信.
2.8.1.1数据库准备
在数据库中导入xxl_job_demo.sql数据
2.8.1.2 代码准备
添加依赖
<!--MyBatis驱动-->
<dependency>
    <groupId>org.mybatis.spring.boot</groupId>
    <artifactId>mybatis-spring-boot-starter</artifactId>
    <version>1.2.0</version>
</dependency>
<!--mysql驱动-->
<dependency>
    <groupId>mysql</groupId>
    <artifactId>mysql-connector-java</artifactId>
</dependency>
<!--lombok依赖-->
<dependency>
    <groupId>org.projectlombok</groupId>
    <artifactId>lombok</artifactId>
    <scope>provided</scope>
</dependency>
<dependency>
    <groupId>com.alibaba</groupId>
    <artifactId>druid</artifactId>
    <version>1.1.10</version>
</dependency>
添加配置
spring.datasource.url=jdbc:mysql://localhost:3306/xxl_job_demo?serverTimezone=GMT%2B8&useUnicode=true&characterEncoding=UTF-8
spring.datasource.driverClassName=com.mysql.jdbc.Driver
spring.datasource.type=com.alibaba.druid.pool.DruidDataSource
spring.datasource.username=root
spring.datasource.password=WolfCode_2017
添加实体类
@Setter@Getter
public class UserMobilePlan {
    private Long id;//主键
    private String username;//用户名
    private String nickname;//昵称
    private String phone;//手机号码
    private String info;//备注
}
添加Mapper处理类
@Mapper
public interface UserMobilePlanMapper {
    @Select("select * from t_user_mobile_plan")
    List<UserMobilePlan> selectAll();
}
任务处理方法实现
@XxlJob("sendMsgHandler")
public void sendMsgHandler() throws Exception{
    List<UserMobilePlan> userMobilePlans = userMobilePlanMapper.selectAll();
    System.out.println("任务开始时间:"+new Date()+",处理任务数量:"+userMobilePlans.size());
    Long startTime = System.currentTimeMillis();
    userMobilePlans.forEach(item->{
        try {
            //模拟发送短信动作
            TimeUnit.MILLISECONDS.sleep(10);
        } catch (InterruptedException e) {
            e.printStackTrace();
        }
    });
    System.out.println("任务结束时间:"+new Date());
    System.out.println("任务耗时:"+(System.currentTimeMillis()-startTime)+"毫秒");
}
任务配置信息
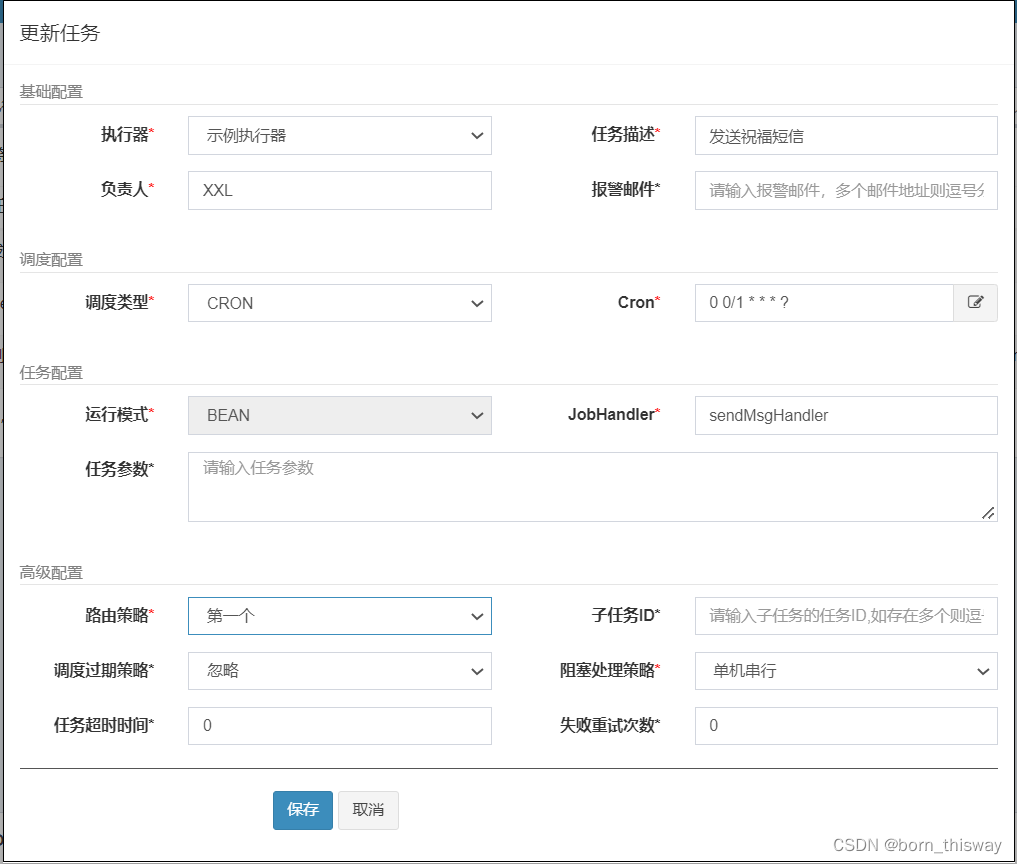
结果:案例中有2000+条数据,如果不采取分片形式的话,任务只会在一台机器上执行,这样的话需要20+秒才能执行完任务.
2.8.2 分片概念讲解
案例中有2000+条数据,如果不采取分片形式的话,任务只会在一台机器上执行,这样的话需要20+秒才能执行完任务.
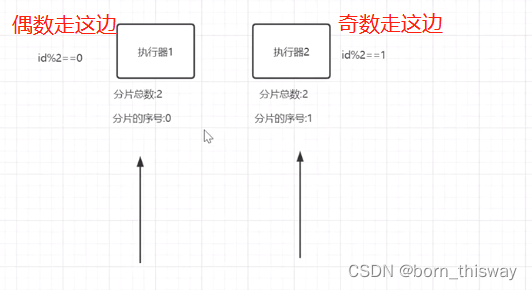
采取分片广播的形式的话,一次任务调度将会广播触发对应集群中所有执行器执行一次任务,同时系统自动传递分片参数;可根据分片参数开发分片任务;
获取分片参数方式:
// 可参考Sample示例执行器中的示例任务"ShardingJobHandler"了解试用
int shardIndex = XxlJobHelper.getShardIndex();//分片索引数(即分片序号)
int shardTotal = XxlJobHelper.getShardTotal();//分片总数(即机器有多少台)
通过这两个参数,我们可以通过求模取余的方式,分别查询,分别执行,这样的话就可以提高处理的速度.
之前2000+条数据只在一台机器上执行需要20+秒才能完成任务,分片后,有两台机器可以共同完成2000+条数据,每台机器处理1000+条数据,这样的话只需要10+秒就能完成任务
总结:也就是如下图,两台机器,都会去执行任务,更高效
2.8.3 案例改造成任务分片
Mapper增加查询方法
@Mapper
public interface UserMobilePlanMapper {
    @Select("select * from t_user_mobile_plan where mod(id,#{shardingTotal})=#{shardingIndex}")
    List<UserMobilePlan> selectByMod(@Param("shardingIndex") Integer shardingIndex,@Param("shardingTotal")Integer shardingTotal);
    @Select("select * from t_user_mobile_plan")
    List<UserMobilePlan> selectAll();
}
任务类方法
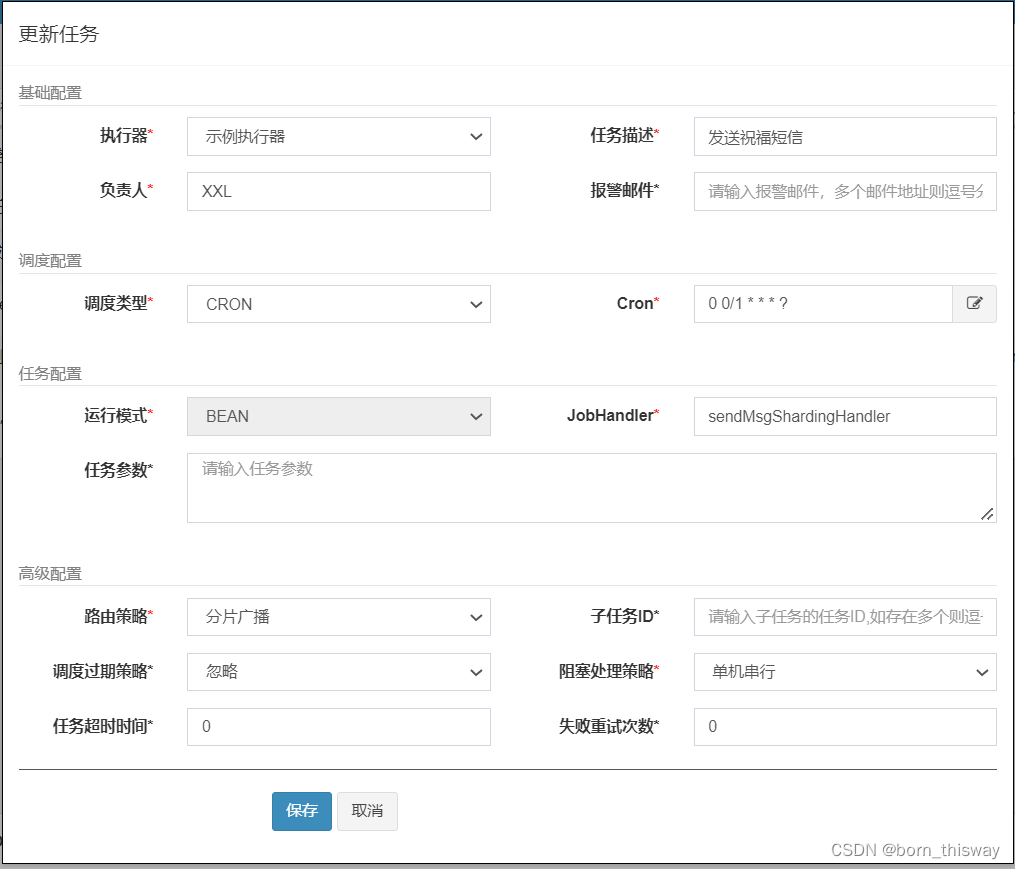
@XxlJob("sendMsgShardingHandler")
public void sendMsgShardingHandler() throws Exception{
    System.out.println("任务开始时间:"+new Date());
    int shardTotal = XxlJobHelper.getShardTotal();
    int shardIndex = XxlJobHelper.getShardIndex();
    List<UserMobilePlan> userMobilePlans = null;
    if(shardTotal==1){
        //如果没有分片就直接查询所有数据
        userMobilePlans = userMobilePlanMapper.selectAll();
    }else{
        userMobilePlans = userMobilePlanMapper.selectByMod(shardIndex,shardTotal);
    }
    System.out.println("处理任务数量:"+userMobilePlans.size());
    Long startTime = System.currentTimeMillis();
    userMobilePlans.forEach(item->{
        try {
            TimeUnit.MILLISECONDS.sleep(10);
        } catch (InterruptedException e) {
            e.printStackTrace();
        }
    });
    System.out.println("任务结束时间:"+new Date());
    System.out.println("任务耗时:"+(System.currentTimeMillis()-startTime)+"毫秒");
}
任务设置
方式二:注解@EnableScheduling(非分布式)
@EnableScheduling是spring自带的定时任务功能
步骤:
1、启动类加@EnableScheduling注解
2、在具体实现方法的类上加@Component注解,在实现方法上加@Scheduled(fixedRate = 1000 * 30)注解
3、方法中写要定时执行的任务
核心注解:
@EnableScheduling注解的作用是发现注解@Scheduled的任务并后台执行,此注解可以加到启动类上也可以加到执行调度任务类上。
经测试,当有多个包含定时任务的类时,@EnableScheduling注解加在其中一个类上就可以保证所有定时任务的成功实现。
注意:定时任务的类上还需要配合使用@Configuration或@Component注解,这两个注解都可以。
案例:
package com.test.domi.config;

import org.springframework.beans.factory.annotation.Configurable;
import org.springframework.scheduling.annotation.EnableScheduling;
import org.springframework.scheduling.annotation.Scheduled;
import org.springframework.stereotype.Component;
import java.text.SimpleDateFormat;
import java.util.Date;

@Component
@Configurable
@EnableScheduling
public class ScheduledTasks {
    //每30秒执行一次
    @Scheduled(fixedRate = 1000 * 30)
    public void reportCurrentTime(){
        System.out.println ("Scheduling Tasks Examples: The time is now " + dateFormat ().format (new Date ()));
    }

    //在固定时间执行
    @Scheduled(cron = "0 */1 *  * * * ")
    public void reportCurrentByCron(){
        System.out.println ("Scheduling Tasks Examples By Cron: The time is now " + dateFormat ().format (new Date()));
    }

    private SimpleDateFormat dateFormat(){
        return new SimpleDateFormat ("HH:mm:ss");
    }
}
其中@Scheduled注解中有以下几个参数:
1.cron是设置定时执行的表达式,如 0 0/5 * * * ?每隔五分钟执行一次 秒 分 时 天 月
2.zone表示执行时间的时区
3.fixedDelay 和fixedDelayString 表示该任务执行完后隔多长时间再调用;
4.fixedRate 和fixedRateString表示Scheduled隔多长时间调用一次,不管任务是否执行完;)
5.initialDelay 和initialDelayString表示一个初始延迟时间,第一次被调用前延迟的时间


 7601
7601


 被折叠的 条评论
为什么被折叠?
被折叠的 条评论
为什么被折叠?
 到【灌水乐园】发言


