


OpenStack Train最小化安装
参考OpenStack官方部署手册完成https://docs.openstack.org/install-guide/environment.html
为什么使用Train版本:官网推荐的最后一个CentOS7版本,后续版本推荐在CentOS8上部署
环境要求
- 控制节点8C16G 2张网卡 CentOS7.8
- 计算节点8C16G 2张网卡 CentOS7.8
- 网络节点和控制节点和部,存储节点使用计算节点的一块硬盘组lvm
官方文档要跑一个CirrOS最小参数要求如下,为避免出现资源不足出现的各种问题,推荐使用上述环境
- Controller Node: 1 processor, 4 GB memory, and 5 GB storage
- Compute Node: 1 processor, 2 GB memory, and 10 GB storag
环境配置
security
为简单起见,组件之间的密码本次配置都使用admin123
注意:所有密码中不能出现@符号,原因是mysql的连接协议中,@符号是分割密码和url的,密码中出现@符号会导致各组件连接数据库失败
参考https://docs.openstack.org/install-guide/environment-security.html配置
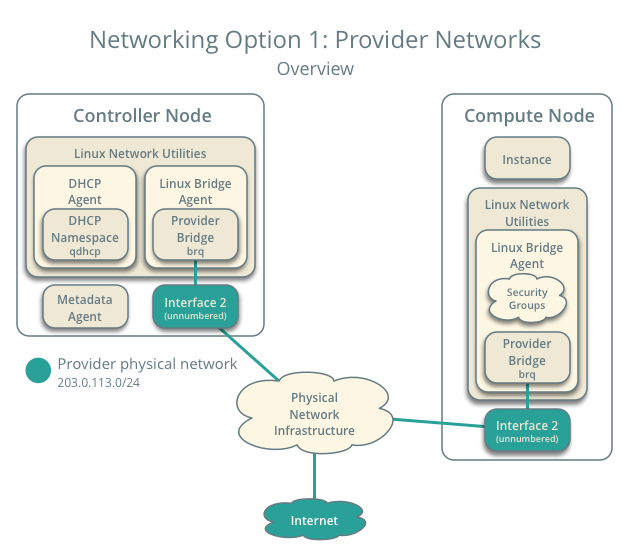
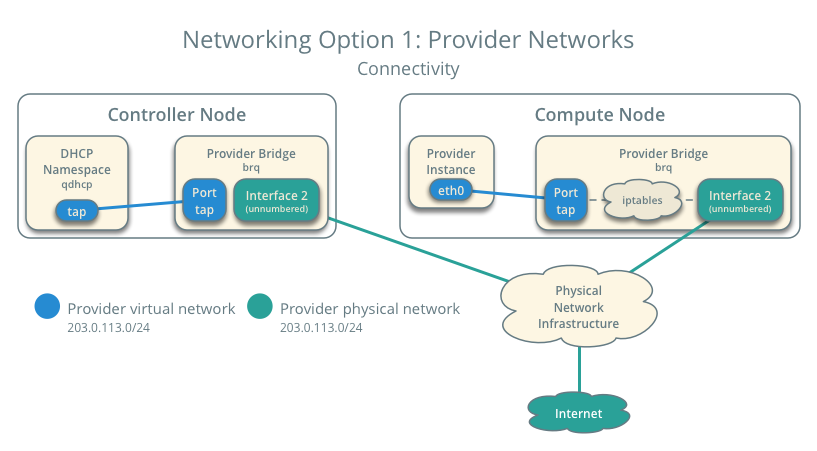
网络环境配置
双网卡配置,一张网卡一个平面。
internal平面: 10.0.0.0/24 ,该平面和存储网络,管理网络合一
provider网络:10.0.1.0/24,联通计算节点和网络节点,负载对外网的通信,比如连接到互联网
关于网络平面的解释,建议参考ASSAF MULLER的博客:https://assafmuller.com/2018/07/23/tenant-provider-and-external-neutron-networks/
一图解万言图中的provider network 203.0.113.0就是10.0.1.0/24网络
主机环境配置
基础配置——控制节点和计算节点
控制节点ip:10.0.0.171,provider:10.0.1.175
计算节点ip:10.0.0.67,provider:10.0.1.182
网络配置
eth0不做配置,对eth1配置启动协议为空,控制节点的eth0网卡配置文件参考:
BOOTPROTO=static
IPADDR=10.0.0.171
GATEWAY=10.0.0.1
MASK=255.255.255.0
DNS1=114.114.114.114
DEVICE=eth0
ONBOOT=yes
TYPE=Ethernet
NAME=eth0
控制节点的eth1配置文件参考:
BOOTPROTO=none
DEVICE=eth1
NAME=eth1
ONBOOT=yes
TYPE=Ethernet
USERCTL=no
注意:官网这边有个坑,需要设置下eth1的网口混杂模式
yum install net-tools -y
ifconfig eth1 promisc
vim /etc/profile
在最后添加一行
ifconfig eth1 promisc
配置/etc/hosts文件
该步使得计算节点和控制节点间能通过hostname互访
# 修改hostname
hostnamectl set-hostname controller
# 修改/etc/hosts文件,在最后添加两行
vim /etc/hosts
10.0.0.171 controller
10.0.0.67 compute1
注意:修改hostname必须提前做,基础环境安装完了再去修改hostname,会导致消息队列主机名异常,后面会写到怎么处理这个坑
配置yum源
替换所有源为华为云CentOS7源,否则可能会出现源冲突的问题,换参考华为云https://mirrors.huaweicloud.com/home

安装openstack-train源
yum install centos-release-openstack-train
yum clean all
yum makecache
安装openstack客户端
yum install python-openstackclient
(可选)安装openstack-selinux自动管理openstack服务的安全规则
yum install openstack-selinux
该步骤不安装也可以,暂时没发现有什么问题
安装配置数据库——仅控制节点
安装mariadb和pymysql
yum install -y mariadb-server python2-PyMySQL
配置/etc/my.cnf.d/openstack.cnf,如不存在,需要新建
vim /etc/my.cnf.d/openstack.cnf
# 添加以下内容
[mysqld]
bind-address = 10.0.0.171
default-storage-engine = innodb
innodb_file_per_table = on
max_connections = 4096
collation-server = utf8_general_ci
character-set-server = utf8
启动mariadb,并初始化数据库
systemctl enable mariadb.service
systemctl start mariadb.service
mysql_secure_installation
mysql_secure_installation初始化数据库,设置root密码为admin123
安装配置消息队列——仅控制节点
安装&启动rabbitmq
yum install rabbitmq-server
systemctl enable rabbitmq-server.service
systemctl start rabbitmq-server.service
创建openstack用户
rabbitmqctl add_user openstack admin123
# 回显如下
Creating user "openstack" ...
# 设置openstack用户的权限,允许读写
rabbitmqctl set_permissions openstack ".*" ".*" ".*"
admin123是rabbitmq中用户openstack的密码,请牢记,会在之后的各个组件的配置文件中用到
安装缓存服务——仅控制节点
yum install memcached python-memcached
# 修改配置文件/etc/sysconfig/memcached,找到 OPTIONS="-l 127.0.0.1,::1"一行,改为
OPTIONS="-l 127.0.0.1,::1,controller"
# 启动并设置开机自启
systemctl enable memcached.service
systemctl start memcached.service
安装ETCD键值对数据库——仅控制节点
yum install etcd
# 修改配置文件/etc/etcd/etcd.conf,修改ETCD_INITIAL_CLUSTER, ETCD_INITIAL_ADVERTISE_PEER_URLS, ETCD_ADVERTISE_CLIENT_URLS, ETCD_LISTEN_CLIENT_URLS为控制节点管理IP 10.0.0.171
#[Member]
ETCD_DATA_DIR="/var/lib/etcd/default.etcd"
ETCD_LISTEN_PEER_URLS="http://10.0.0.171:2380"
ETCD_LISTEN_CLIENT_URLS="http://10.0.0.171:2379"
ETCD_NAME="controller"
#[Clustering]
ETCD_INITIAL_ADVERTISE_PEER_URLS="http://10.0.0.171:2380"
ETCD_ADVERTISE_CLIENT_URLS="http://10.0.0.171:2379"
ETCD_INITIAL_CLUSTER="controller=http://10.0.0.171:2380"
ETCD_INITIAL_CLUSTER_TOKEN="etcd-cluster-01"
ETCD_INITIAL_CLUSTER_STATE="new"
# 启动并设置开机自启
systemctl enable etcd
systemctl start etcd
安装OpenStack服务
注意:按以下步骤安装OpenStack服务,keystone第一个安装,安装完后任何openstack命令都需要先导入环境变量!
任何配置文件的修改,都遵循有配置就修改,无配置就添加的原则
安装并配置keystone——控制节点
创建keystone数据库
mysql -u root -p
Enter password:
MariaDB [(none)]> CREATE DATABASE keystone;
MariaDB [(none)]> GRANT ALL PRIVILEGES ON keystone.* TO 'keystone'@'localhost' IDENTIFIED BY 'admin123';
MariaDB [(none)]> GRANT ALL PRIVILEGES ON keystone.* TO 'keystone'@'%' IDENTIFIED BY 'admin123';
MariaDB [(none)]> exit
数据库密码,之前初始化数据库时设置,本次密码admin123
keystone库账号keystone,密码admin123,账号最好不要修改,密码自定义,后面每个服务配置keystone时都需要用到
安装keystone组件
# 安装组件
yum install openstack-keystone httpd mod_wsgi
# 配置/etc/keystone/keystone.conf
# 在[database]下添加一行,如果存在connection,则修改
connection = mysql+pymysql://keystone:admin123@controller/keystone
# 在[token]下添加一行,如存在则修改
provider = fernet
# 填充keystone数据库
su -s /bin/sh -c "keystone-manage db_sync" keystone
# 初始化Fernet密钥存储库
keystone-manage fernet_setup --keystone-user keystone --keystone-group keystone
keystone-manage credential_setup --keystone-user keystone --keystone-group keystone
# 启动身份认证服务
keystone-manage bootstrap --bootstrap-password admin123 --bootstrap-admin-url http://controller:5000/v3/ --bootstrap-internal-url http://controller:5000/v3/ --bootstrap-public-url http://controller:5000/v3/ --bootstrap-region-id RegionOne
connection中的admin是keystone库的密码
keystone-manage中的admin123是创建的管理员的密码,用于key后台管理,之后要用到
配置并启动http服务器
#修改/etc/httpd/conf/httpd.conf,配置ServerName,修改或添加如下两行
ServerName controller
Listen 90
# 创建到/usr/share/keystone/wsgi-keystone.conf文件的链接
ln -s /usr/share/keystone/wsgi-keystone.conf /etc/httpd/conf.d/
# 启动httpd服务和设置开机自启
systemctl enable httpd.service
systemctl start httpd.service
httpd服务默认使用80端口,由于天翼云上使用公网80 8080 443 8443 端口需要备案,所以修改配置Listen 90,使用90端口
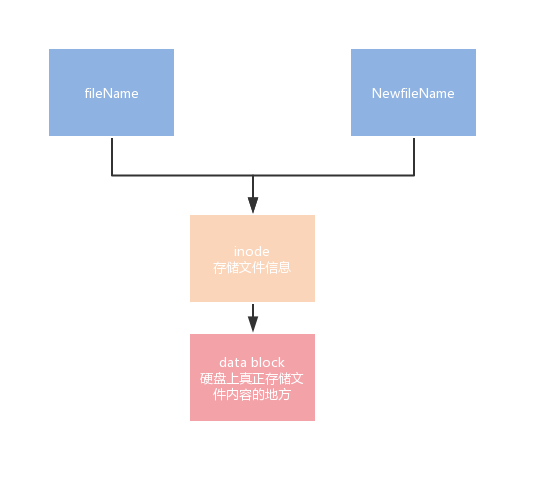
软连接和硬链接
硬链接ln:多个文件名指向一个inode号
软连接ln -s SourceFile DestinationFile:软连接是一个文件,他的数据块是被指向文件文件名

创建domain,project,users,roles
# 初始化环境变量,新创一个文件admin-openrc,写入如下内容,下面的值是keystone-manage bootstrap时默认创建的
export OS_USERNAME=admin
export OS_PASSWORD=admin123
export OS_PROJECT_NAME=admin
export OS_USER_DOMAIN_NAME=Default
export OS_PROJECT_DOMAIN_NAME=Default
export OS_AUTH_URL=http://controller:5000/v3
export OS_IDENTITY_API_VERSION=3
# 导入环境变量
source admin-openrc
# 在default域中创建服务所使用的的项目
openstack project create --domain default  --description "Service Project" service

+-------------+----------------------------------+
| Field       | Value                            |
+-------------+----------------------------------+
| description | Service Project                  |
| domain_id   | default                          |
| enabled     | True                             |
| id          | 24ac7f19cd944f4cba1d77469b2a73ed |
| is_domain   | False                            |
| name        | service                          |
| parent_id   | default                          |
| tags        | []                               |
+-------------+----------------------------------+
# 验证keystone服务
# 方法一:新开一个shell,否则会看不到效果
openstack --os-auth-url http://controller:5000/v3 --os-project-domain-name Default --os-user-domain-name Default --os-project-name admin --os-username admin token issue
# 回显:
Password:
+------------+-----------------------------------------------------------------+
| Field      | Value                                                           |
+------------+-----------------------------------------------------------------+
| expires    | 2016-02-12T20:14:07.056119Z                                     |
| id         | gAAAAABWvi7_B8kKQD9wdXac8MoZiQldmjEO643d-e_j-XXq9AmIegIbA7UHGPv |
|            | atnN21qtOMjCFWX7BReJEQnVOAj3nclRQgAYRsfSU_MrsuWb4EDtnjU7HEpoBb4 |
|            | o6ozsA_NmFWEpLeKy0uNn_WeKbAhYygrsmQGA49dclHVnz-OMVLiyM9ws       |
| project_id | 343d245e850143a096806dfaefa9afdc                                |
| user_id    | ac3377633149401296f6c0d92d79dc16                                |
+------------+-----------------------------------------------------------------+
# 方法二:
source admin-openrc
openstack token issue
# 回显
+------------+-----------------------------------------------------------------+
| Field      | Value                                                           |
+------------+-----------------------------------------------------------------+
| expires    | 2016-02-12T20:44:35.659723Z                                     |
| id         | gAAAAABWvjYj-Zjfg8WXFaQnUd1DMYTBVrKw4h3fIagi5NoEmh21U72SrRv2trl |
|            | JWFYhLi2_uPR31Igf6A8mH2Rw9kv_bxNo1jbLNPLGzW_u5FC7InFqx0yYtTwa1e |
|            | eq2b0f6-18KZyQhs7F3teAta143kJEWuNEYET-y7u29y0be1_64KYkM7E       |
| project_id | 343d245e850143a096806dfaefa9afdc                                |
| user_id    | ac3377633149401296f6c0d92d79dc16                                |
+------------+-----------------------------------------------------------------+
安装并配置glance——控制节点
创建并配置glance数据库
mysql -u root -p
MariaDB [(none)]> CREATE DATABASE glance;
MariaDB [(none)]> GRANT ALL PRIVILEGES ON glance.* TO 'glance'@'localhost' \
  IDENTIFIED BY 'admin123';
MariaDB [(none)]> GRANT ALL PRIVILEGES ON glance.* TO 'glance'@'%' \
  IDENTIFIED BY 'admin123';
创建glance用户
source admin-openrc
openstack user create --domain default --password-prompt glance

User Password:
Repeat User Password:
+---------------------+----------------------------------+
| Field               | Value                            |
+---------------------+----------------------------------+
| domain_id           | default                          |
| enabled             | True                             |
| id                  | 3f4e777c4062483ab8d9edd7dff829df |
| name                | glance                           |
| options             | {}                               |
| password_expires_at | None                             |
+---------------------+----------------------------------+
# 赋予glance用户admin角色
openstack role add --project service --user glance admin
# 创建glance服务实体
openstack service create --name glance --description "OpenStack Image" image
# 回显
+-------------+----------------------------------+
| Field       | Value                            |
+-------------+----------------------------------+
| description | OpenStack Image                  |
| enabled     | True                             |
| id          | 8c2c7f1b9b5049ea9e63757b5533e6d2 |
| name        | glance                           |
| type        | image                            |
+-------------+----------------------------------+
# 创建API endpoint
openstack endpoint create --region RegionOne image public http://controller:9292
# 回显
+--------------+----------------------------------+
| Field        | Value                            |
+--------------+----------------------------------+
| enabled      | True                             |
| id           | 340be3625e9b4239a6415d034e98aace |
| interface    | public                           |
| region       | RegionOne                        |
| region_id    | RegionOne                        |
| service_id   | 8c2c7f1b9b5049ea9e63757b5533e6d2 |
| service_name | glance                           |
| service_type | image                            |
| url          | http://controller:9292           |
+--------------+----------------------------------+

openstack endpoint create --region RegionOne image internal http://controller:9292
# 回显
+--------------+----------------------------------+
| Field        | Value                            |
+--------------+----------------------------------+
| enabled      | True                             |
| id           | a6e4b153c2ae4c919eccfdbb7dceb5d2 |
| interface    | internal                         |
| region       | RegionOne                        |
| region_id    | RegionOne                        |
| service_id   | 8c2c7f1b9b5049ea9e63757b5533e6d2 |
| service_name | glance                           |
| service_type | image                            |
| url          | http://controller:9292           |
+--------------+----------------------------------+

openstack endpoint create --region RegionOne image admin http://controller:9292
# 回显
+--------------+----------------------------------+
| Field        | Value                            |
+--------------+----------------------------------+
| enabled      | True                             |
| id           | 0c37ed58103f4300a84ff125a539032d |
| interface    | admin                            |
| region       | RegionOne                        |
| region_id    | RegionOne                        |
| service_id   | 8c2c7f1b9b5049ea9e63757b5533e6d2 |
| service_name | glance                           |
| service_type | image                            |
| url          | http://controller:9292           |
+--------------+----------------------------------+
安装并配置glance
yum install -y openstack-glance
vim /etc/glance/glance-api.conf
# database部分中,配置数据库访问:
[database]
connection = mysql+pymysql://glance:admin123@controller/glance

# 在[keystone_authtoken]和[paste_deploy]部分中,配置身份服务访问:
[keystone_authtoken]
www_authenticate_uri = http://controller:5000
auth_url = http://controller:5000
memcached_servers = controller:11211
auth_type = password
project_domain_name = Default
user_domain_name = Default
project_name = service
username = glance
password = admin123
[paste_deploy]
flavor = keystone
# [glance_store]部分中,配置本地文件系统存储和镜像文件的位置:
[glance_store]
stores = file,http
default_store = file
filesystem_store_datadir = /var/lib/glance/images/
# 填充glance数据库:
su -s /bin/sh -c "glance-manage db_sync" glance
启动并验证glance
systemctl enable openstack-glance-api.service
systemctl start openstack-glance-api.service
# 下载测试镜像
wget http://download.cirros-cloud.net/0.4.0/cirros-0.4.0-x86_64-disk.img
# 创建并注册镜像
$ glance image-create --name "cirros" --file cirros-0.4.0-x86_64-disk.img --disk-format qcow2 --container-format bare --visibility public

+------------------+------------------------------------------------------+
| Field            | Value                                                |
+------------------+------------------------------------------------------+
| checksum         | 133eae9fb1c98f45894a4e60d8736619                     |
| container_format | bare                                                 |
| created_at       | 2015-03-26T16:52:10Z                                 |
| disk_format      | qcow2                                                |
| file             | /v2/images/cc5c6982-4910-471e-b864-1098015901b5/file |
| id               | cc5c6982-4910-471e-b864-1098015901b5                 |
| min_disk         | 0                                                    |
| min_ram          | 0                                                    |
| name             | cirros                                               |
| owner            | ae7a98326b9c455588edd2656d723b9d                     |
| protected        | False                                                |
| schema           | /v2/schemas/image                                    |
| size             | 13200896                                             |
| status           | active                                               |
| tags             |                                                      |
| updated_at       | 2015-03-26T16:52:10Z                                 |
| virtual_size     | None                                                 |
| visibility       | public                                               |
+------------------+------------------------------------------------------+
# 验证查看镜像列表
glance image-list
+--------------------------------------+--------+--------+
| ID                                   | Name   | Status |
+--------------------------------------+--------+--------+
| 38047887-61a7-41ea-9b49-27987d5e8bb9 | cirros | active |
+--------------------------------------+--------+--------+
安装并配置placement——控制节点
which is placement: OpenStack Placement provides an HTTP service for managing, selecting, and claiming providers of classes of inventory representing available resources in a cloud.Placement 就是 OpenStack 云平台统一资源管理的未来
参考:https://www.99cloud.net/10521.html%EF%BC%8F#top
创建数据库
mysql -u root -p
MariaDB [(none)]> CREATE DATABASE placement;
MariaDB [(none)]> GRANT ALL PRIVILEGES ON placement.* TO 'placement'@'localhost' IDENTIFIED BY 'admin123';
MariaDB [(none)]> GRANT ALL PRIVILEGES ON placement.* TO 'placement'@'%' IDENTIFIED BY 'admin123';
创建placement用户和endpoints
# 创建用户,密码admin123
openstack user create --domain default --password-prompt placement

User Password:
Repeat User Password:
+---------------------+----------------------------------+
| Field               | Value                            |
+---------------------+----------------------------------+
| domain_id           | default                          |
| enabled             | True                             |
| id                  | fa742015a6494a949f67629884fc7ec8 |
| name                | placement                        |
| options             | {}                               |
| password_expires_at | None                             |
+---------------------+----------------------------------+
# 添加placement用户到service项目,并赋予admin角色
openstack role add --project service --user placement admin
# 创建placement服务实体
openstack service create --name placement --description "Placement API" placement
# 回显
+-------------+----------------------------------+
| Field       | Value                            |
+-------------+----------------------------------+
| description | Placement API                    |
| enabled     | True                             |
| id          | 2d1a27022e6e4185b86adac4444c495f |
| name        | placement                        |
| type        | placement                        |
+-------------+----------------------------------+
# 创建API endpoints
openstack endpoint create --region RegionOne placement public http://controller:8778

+--------------+----------------------------------+
| Field        | Value                            |
+--------------+----------------------------------+
| enabled      | True                             |
| id           | 2b1b2637908b4137a9c2e0470487cbc0 |
| interface    | public                           |
| region       | RegionOne                        |
| region_id    | RegionOne                        |
| service_id   | 2d1a27022e6e4185b86adac4444c495f |
| service_name | placement                        |
| service_type | placement                        |
| url          | http://controller:8778           |
+--------------+----------------------------------+

openstack endpoint create --region RegionOne placement internal http://controller:8778

+--------------+----------------------------------+
| Field        | Value                            |
+--------------+----------------------------------+
| enabled      | True                             |
| id           | 02bcda9a150a4bd7993ff4879df971ab |
| interface    | internal                         |
| region       | RegionOne                        |
| region_id    | RegionOne                        |
| service_id   | 2d1a27022e6e4185b86adac4444c495f |
| service_name | placement                        |
| service_type | placement                        |
| url          | http://controller:8778           |
+--------------+----------------------------------+

openstack endpoint create --region RegionOne placement admin http://controller:8778

+--------------+----------------------------------+
| Field        | Value                            |
+--------------+----------------------------------+
| enabled      | True                             |
| id           | 3d71177b9e0f406f98cbff198d74b182 |
| interface    | admin                            |
| region       | RegionOne                        |
| region_id    | RegionOne                        |
| service_id   | 2d1a27022e6e4185b86adac4444c495f |
| service_name | placement                        |
| service_type | placement                        |
| url          | http://controller:8778           |
+--------------+----------------------------------+
安装并配置placement
yum install -y openstack-placement-api
# 修改配置文件
vim /etc/placement/placement.conf
# [api]下加入:
auth_strategy = keystone
# [keystone_authtoken]下加入
auth_url = http://controller:5000/v3
memcached_servers = controller:11211
auth_type = password
project_domain_name = default
user_domain_name = default
project_name = service
username = placement
password = admin123

# [placement_database]下加入
connection = mysql+pymysql://placement:admin123@controller/placement
填充placement数据库
su -s /bin/sh -c "placement-manage db sync" placement
重启httpd服务
systemctl restart httpd
# 检查8778端口是否监听 略
检查placement服务是否正常
placement-status upgrade check
# 回显如下为正常
+----------------------------------+
| Upgrade Check Results            |
+----------------------------------+
| Check: Missing Root Provider IDs |
| Result: Success                  |
| Details: None                    |
+----------------------------------+
| Check: Incomplete Consumers      |
| Result: Success                  |
| Details: None                    |
+----------------------------------+
此处有个坑,检查服务如果报错,需要添加以下配置
vim /etc/httpd/conf.d/00-placement-api.conf
# 添加以下内容
<Directory /usr/bin>
<IfVersion >= 2.4>
   Require all granted
</IfVersion>
<IfVersion < 2.4>
   Order allow,deny
   Allow from all
</IfVersion>
</Directory>
额外的安装
# 安装placement的一些命令参数,不安装的话一部分openstack命令无法执行,但也不影响使用,建议安装一下
pip install osc-placement
# 如果没有pip,请先安装pip
yum install python2-pip
# 安装完测试
openstack --os-placement-api-version 1.2 resource class list --sort-column name
+----------------------------+
| name                       |
+----------------------------+
| DISK_GB                    |
| IPV4_ADDRESS               |
| ...                        |

openstack --os-placement-api-version 1.6 trait list --sort-column name
+---------------------------------------+
| name                                  |
+---------------------------------------+
| COMPUTE_DEVICE_TAGGING                |
| COMPUTE_NET_ATTACH_INTERFACE          |
| ...                                   |
安装计算服务nova
控制节点安装
创建数据库
mysql -u root -p
MariaDB [(none)]> CREATE DATABASE nova_api;
MariaDB [(none)]> CREATE DATABASE nova;
MariaDB [(none)]> CREATE DATABASE nova_cell0;
MariaDB [(none)]> GRANT ALL PRIVILEGES ON nova_api.* TO 'nova'@'localhost' \
  IDENTIFIED BY 'admin123';
MariaDB [(none)]> GRANT ALL PRIVILEGES ON nova_api.* TO 'nova'@'%' \
  IDENTIFIED BY 'admin123';

MariaDB [(none)]> GRANT ALL PRIVILEGES ON nova.* TO 'nova'@'localhost' \
  IDENTIFIED BY 'admin123';
MariaDB [(none)]> GRANT ALL PRIVILEGES ON nova.* TO 'nova'@'%' \
  IDENTIFIED BY 'admin123';

MariaDB [(none)]> GRANT ALL PRIVILEGES ON nova_cell0.* TO 'nova'@'localhost' \
  IDENTIFIED BY 'admin123';
MariaDB [(none)]> GRANT ALL PRIVILEGES ON nova_cell0.* TO 'nova'@'%' \
  IDENTIFIED BY 'admin123';
创建nova用户
openstack user create --domain default --password-prompt nova

User Password:
Repeat User Password:
+---------------------+----------------------------------+
| Field               | Value                            |
+---------------------+----------------------------------+
| domain_id           | default                          |
| enabled             | True                             |
| id                  | 8a7dbf5279404537b1c7b86c033620fe |
| name                | nova                             |
| options             | {}                               |
| password_expires_at | None                             |
+---------------------+----------------------------------+
# 授权admin角色给nova
openstack role add --project service --user nova admin
# 创建nova服务实体
openstack service create --name nova --description "OpenStack Compute" compute

+-------------+----------------------------------+
| Field       | Value                            |
+-------------+----------------------------------+
| description | OpenStack Compute                |
| enabled     | True                             |
| id          | 060d59eac51b4594815603d75a00aba2 |
| name        | nova                             |
| type        | compute                          |
+-------------+----------------------------------+
# 创建计算服务endpoints
openstack endpoint create --region RegionOne compute public http://controller:8774/v2.1

+--------------+-------------------------------------------+
| Field        | Value                                     |
+--------------+-------------------------------------------+
| enabled      | True                                      |
| id           | 3c1caa473bfe4390a11e7177894bcc7b          |
| interface    | public                                    |
| region       | RegionOne                                 |
| region_id    | RegionOne                                 |
| service_id   | 060d59eac51b4594815603d75a00aba2          |
| service_name | nova                                      |
| service_type | compute                                   |
| url          | http://controller:8774/v2.1               |
+--------------+-------------------------------------------+

openstack endpoint create --region RegionOne compute internal http://controller:8774/v2.1

+--------------+-------------------------------------------+
| Field        | Value                                     |
+--------------+-------------------------------------------+
| enabled      | True                                      |
| id           | e3c918de680746a586eac1f2d9bc10ab          |
| interface    | internal                                  |
| region       | RegionOne                                 |
| region_id    | RegionOne                                 |
| service_id   | 060d59eac51b4594815603d75a00aba2          |
| service_name | nova                                      |
| service_type | compute                                   |
| url          | http://controller:8774/v2.1               |
+--------------+-------------------------------------------+

openstack endpoint create --region RegionOne compute admin http://controller:8774/v2.1

+--------------+-------------------------------------------+
| Field        | Value                                     |
+--------------+-------------------------------------------+
| enabled      | True                                      |
| id           | 38f7af91666a47cfb97b4dc790b94424          |
| interface    | admin                                     |
| region       | RegionOne                                 |
| region_id    | RegionOne                                 |
| service_id   | 060d59eac51b4594815603d75a00aba2          |
| service_name | nova                                      |
| service_type | compute                                   |
| url          | http://controller:8774/v2.1               |
+--------------+-------------------------------------------+
安装nova服务软件包
yum install openstack-nova-api openstack-nova-conductor openstack-nova-novncproxy openstack-nova-scheduler
修改nova配置文件
vim /etc/nova/nova.conf
# 在[DEFAULT]加入:
[DEFAULT]
enabled_apis = osapi_compute,metadata
transport_url = rabbit://openstack:admin123@controller:5672/
my_ip = 10.0.0.171
use_neutron = true
firewall_driver = nova.virt.firewall.NoopFirewallDriver
# 在[api_database]和[database]加入:
[api_database]
connection = mysql+pymysql://nova:admin123@controller/nova_api
[database]
connection = mysql+pymysql://nova:admin123@controller/nova

#在[api]和[keystone_authtoken]加入:
[api]
auth_strategy = keystone
[keystone_authtoken]
www_authenticate_uri = http://controller:5000/
auth_url = http://controller:5000/
memcached_servers = controller:11211
auth_type = password
project_domain_name = Default
user_domain_name = Default
project_name = service
username = nova
password = admin123

# 在[vnc]加入:
[vnc]
enabled = true
server_listen = $my_ip
server_proxyclient_address = $my_ip

# 在[glance]加入:
[glance]
api_servers = http://controller:9292

# 在[oslo_concurrency]加入:
[oslo_concurrency]
lock_path = /var/lib/nova/tmp

# 在[placement]加入:
[placement]
region_name = RegionOne
project_domain_name = Default
project_name = service
auth_type = password
user_domain_name = Default
auth_url = http://controller:5000/v3
username = placement
password = admin123
填充数据库
# 填充nova-api数据库
su -s /bin/sh -c "nova-manage api_db sync" nova
# 注册cell0数据库
su -s /bin/sh -c "nova-manage cell_v2 map_cell0" nova
# 创建cell1
su -s /bin/sh -c "nova-manage cell_v2 create_cell --name=cell1 --verbose" nova
# 填充nova数据库
su -s /bin/sh -c "nova-manage db sync" nova
验证cell0和cell1是否正确注册

cell相关的内容参考https://blog.csdn.net/huyoufu200920201078/article/details/78133167,openstack的cell架构和华为的级联架构都是为大规模部署准备的
启动服务并设置开机自启
systemctl enable openstack-nova-api.service openstack-nova-scheduler.service openstack-nova-conductor.service openstack-nova-novncproxy.service
systemctl start openstack-nova-api.service openstack-nova-scheduler.service openstack-nova-conductor.service openstack-nova-novncproxy.service
计算节点安装
安装软件包
yum install openstack-nova-compute -y
修改配置文件
# 修改/etc/nova/nova.conf文件
[DEFAULT]
enabled_apis = osapi_compute,metadata
transport_url = rabbit://openstack:admin123@controller
my_ip = 10.0.0.67
use_neutron = true
firewall_driver = nova.virt.firewall.NoopFirewallDriver
[api]
auth_strategy = keystone
[keystone_authtoken]
www_authenticate_uri = http://controller:5000/
auth_url = http://controller:5000/
memcached_servers = controller:11211
auth_type = password
project_domain_name = Default
user_domain_name = Default
project_name = service
username = nova
password = admin123
[vnc]
enabled = true
server_listen = 0.0.0.0
server_proxyclient_address = $my_ip
novncproxy_base_url = http://controller:6080/vnc_auto.html
[glance]
api_servers = http://controller:9292
[oslo_concurrency]
lock_path = /var/lib/nova/tmp
[placement]
region_name = RegionOne
project_domain_name = Default
project_name = service
auth_type = password
user_domain_name = Default
auth_url = http://controller:5000/v3
username = placement
password = admin123
[libvirt]
virt_type = qemu
virt_type = qemu参数必填,因为天翼云上不支持嵌套虚拟化,需要用纯模拟的方式来运行虚拟机,你可以用egrep -c ‘(vmx|svm)’ /proc/cpuinfo命令来查看所在的环境是否支持硬件加速,0表示不支持,1或更大表示支持
启动服务
systemctl enable libvirtd.service openstack-nova-compute.service
systemctl start libvirtd.service openstack-nova-compute.service
添加计算节点到cell
注意,该步骤在控制节点上执行!
su -s /bin/sh -c "nova-manage cell_v2 discover_hosts --verbose" nova

Found 2 cell mappings.
Skipping cell0 since it does not contain hosts.
Getting compute nodes from cell 'cell1': ad5a5985-a719-4567-98d8-8d148aaae4bc
Found 1 computes in cell: ad5a5985-a719-4567-98d8-8d148aaae4bc
Checking host mapping for compute host 'compute': fe58ddc1-1d65-4f87-9456-bc040dc106b3
Creating host mapping for compute host 'compute': fe58ddc1-1d65-4f87-9456-bc040dc106b3
可以在控制节点上的nova配置文件中添加如下内容自动发现计算节点
[scheduler]
discover_hosts_in_cells_interval = 300
配置并安装neutron
控制节点安装
创就按数据库
mysql -u root -p
MariaDB [(none)] CREATE DATABASE neutron;
MariaDB [(none)]> GRANT ALL PRIVILEGES ON neutron.* TO 'neutron'@'localhost' IDENTIFIED BY 'admin123';
MariaDB [(none)]> GRANT ALL PRIVILEGES ON neutron.* TO 'neutron'@'%' IDENTIFIED BY 'admin123';
创建neutron用户并授权
# 创建neutron用户
openstack user create --domain default --password-prompt neutron

User Password:
Repeat User Password:
+---------------------+----------------------------------+
| Field               | Value                            |
+---------------------+----------------------------------+
| domain_id           | default                          |
| enabled             | True                             |
| id                  | fdb0f541e28141719b6a43c8944bf1fb |
| name                | neutron                          |
| options             | {}                               |
| password_expires_at | None                             |
+---------------------+----------------------------------+
# 授于admin权限
openstack role add --project service --user neutron admin

 openstack service create --name neutron --description "OpenStack Networking" network

+-------------+----------------------------------+
| Field       | Value                            |
+-------------+----------------------------------+
| description | OpenStack Networking             |
| enabled     | True                             |
| id          | f71529314dab4a4d8eca427e701d209e |
| name        | neutron                          |
| type        | network                          |
+-------------+----------------------------------+
创建API服务endpoints
 openstack endpoint create --region RegionOne network public http://controller:9696

+--------------+----------------------------------+
| Field        | Value                            |
+--------------+----------------------------------+
| enabled      | True                             |
| id           | 85d80a6d02fc4b7683f611d7fc1493a3 |
| interface    | public                           |
| region       | RegionOne                        |
| region_id    | RegionOne                        |
| service_id   | f71529314dab4a4d8eca427e701d209e |
| service_name | neutron                          |
| service_type | network                          |
| url          | http://controller:9696           |
+--------------+----------------------------------+

openstack endpoint create --region RegionOne network internal http://controller:9696

+--------------+----------------------------------+
| Field        | Value                            |
+--------------+----------------------------------+
| enabled      | True                             |
| id           | 09753b537ac74422a68d2d791cf3714f |
| interface    | internal                         |
| region       | RegionOne                        |
| region_id    | RegionOne                        |
| service_id   | f71529314dab4a4d8eca427e701d209e |
| service_name | neutron                          |
| service_type | network                          |
| url          | http://controller:9696           |
+--------------+----------------------------------+

openstack endpoint create --region RegionOne network admin http://controller:9696

+--------------+----------------------------------+
| Field        | Value                            |
+--------------+----------------------------------+
| enabled      | True                             |
| id           | 1ee14289c9374dffb5db92a5c112fc4e |
| interface    | admin                            |
| region       | RegionOne                        |
| region_id    | RegionOne                        |
| service_id   | f71529314dab4a4d8eca427e701d209e |
| service_name | neutron                          |
| service_type | network                          |
| url          | http://controller:9696           |
+--------------+----------------------------------+
创建self-service网络
关于provider, self-service, extend-network的相关内容,请参考ASSAF MULLER的博客https://assafmuller.com/2018/07/23/tenant-provider-and-external-neutron-networks/
安装组件
yum install openstack-neutron openstack-neutron-ml2 openstack-neutron-linuxbridge ebtables
配置neutron
[DEFAULT]
core_plugin = ml2
service_plugins = router
allow_overlapping_ips = true
transport_url = rabbit://openstack:admin123@controller
auth_strategy = keystone
notify_nova_on_port_status_changes = true
notify_nova_on_port_data_changes = true

[database]
connection = mysql+pymysql://neutron:admin123@controller/neutron

[keystone_authtoken]
www_authenticate_uri = http://controller:5000
auth_url = http://controller:5000
memcached_servers = controller:11211
auth_type = password
project_domain_name = default
user_domain_name = default
project_name = service
username = neutron
password = admin123
# nova配置需要自行添加,原配置文件中没有[nova]的section
[nova]
auth_url = http://controller:5000
auth_type = password
project_domain_name = default
user_domain_name = default
region_name = RegionOne
project_name = service
username = nova
password = admin123

[oslo_concurrency]
lock_path = /var/lib/neutron/tmp
# /etc/neutron/plugins/ml2/ml2_conf.ini
[ml2]
type_drivers = flat,vlan,vxlan
tenant_network_types = vxlan
mechanism_drivers = linuxbridge,l2population
extension_drivers = port_security
[ml2_type_flat]
flat_networks = provider
[ml2_type_vxlan]
vni_ranges = 1:1000
[securitygroup]
enable_ipset = true
# /etc/neutron/plugins/ml2/linuxbridge_agent.ini
[linux_bridge]
physical_interface_mappings = provider:eth1
[vxlan]
enable_vxlan = true
local_ip = 10.0.0.171
l2_population = true
[securitygroup]
# ...
enable_security_group = true
firewall_driver = neutron.agent.linux.iptables_firewall.IptablesFirewallDriver
vim /etc/sysctl.conf
# 加入下面2行:
net.bridge.bridge-nf-call-iptables = 1
net.bridge.bridge-nf-call-ip6tables = 1

# 加载br_netfilter模块
modprobe br_netfilter
sysctl -p
内核开启iptables这部分官网没给出具体操作步骤
# /etc/neutron/l3_agent.ini配置L3
[DEFAULT]
interface_driver = linuxbridge
# /etc/neutron/dhcp_agent.ini配置dhcp

[DEFAULT]
interface_driver = linuxbridge
dhcp_driver = neutron.agent.linux.dhcp.Dnsmasq
enable_isolated_metadata = true
# /etc/neutron/metadata_agent.ini配置metadata agent
[DEFAULT]
nova_metadata_host = controller
metadata_proxy_shared_secret = admin123
# vim /etc/nova/nova.conf
[neutron]
auth_url = http://controller:5000
auth_type = password
project_domain_name = default
user_domain_name = default
region_name = RegionOne
project_name = service
username = neutron
password = admin123
service_metadata_proxy = true
metadata_proxy_shared_secret = admin123
# 建立ml2的软连接
ln -s /etc/neutron/plugins/ml2/ml2_conf.ini /etc/neutron/plugin.ini
填充neutron数据库
# 填充Neutron数据库
su -s /bin/sh -c "neutron-db-manage --config-file /etc/neutron/neutron.conf --config-file /etc/neutron/plugins/ml2/ml2_conf.ini upgrade head" neutron
重新启动nova-api服务
systemctl restart openstack-nova-api.service
启动neutron服务和配置开机启动
systemctl enable neutron-server.service neutron-linuxbridge-agent.service neutron-dhcp-agent.service neutron-metadata-agent.service
systemctl start neutron-server.service neutron-linuxbridge-agent.service neutron-dhcp-agent.service neutron-metadata-agent.service
systemctl enable neutron-l3-agent.service
systemctl start neutron-l3-agent.service
计算节点安装
yum install openstack-neutron-linuxbridge ebtables ipset conntrack-tools -y
此处官网安装的包中少了conntrack-tools,创虚拟机的时候会在neutron日志中展示,详见错误集
修改配置文件
# vim /etc/neutron/neutron.conf
[DEFAULT]
transport_url = rabbit://openstack:admin123@controller
auth_strategy = keystone

[keystone_authtoken]
www_authenticate_uri = http://controller:5000
auth_url = http://controller:5000
memcached_servers = controller:11211
auth_type = password
project_domain_name = default
user_domain_name = default
project_name = service
username = neutron
password = admin123

[oslo_concurrency]
lock_path = /var/lib/neutron/tmp
# vim  /etc/neutron/plugins/ml2/linuxbridge_agent.ini
[linux_bridge]
physical_interface_mappings = provider:eth1
[vxlan]
enable_vxlan = true
local_ip = 10.0.0.67
l2_population = true
[securitygroup]
enable_security_group = true
firewall_driver = neutron.agent.linux.iptables_firewall.IptablesFirewallDriver
# vim /etc/sysctl.conf
# 加入下面2行:
net.bridge.bridge-nf-call-iptables = 1
net.bridge.bridge-nf-call-ip6tables = 1
modprobe br_netfilter
sysctl -p
# vim /etc/nova/nova.conf
[neutron]
auth_url = http://controller:5000
auth_type = password
project_domain_name = default
user_domain_name = default
region_name = RegionOne
project_name = service
username = neutron
password = admin123
重启nova计算服务
systemctl restart openstack-nova-compute.service
启动neutron服务和设置开机自启动
systemctl enable neutron-linuxbridge-agent.service
systemctl start neutron-linuxbridge-agent.service
验证neutron服务
在控制节点验证,下面命令都需要先导入环境变量
openstack network agent list

安装并配置horizon
可选安装,建议安装上,否则所有操作都在命令行中,本次在控制节点安装
安装软件
yum install openstack-dashboard -y
配置horizon
配置local_settings
# vim /etc/openstack-dashboard/local_settings
OPENSTACK_HOST = "controller"
ALLOWED_HOSTS = ['*']
SESSION_ENGINE = 'django.contrib.sessions.backends.cache'
CACHES = {
    'default': {
         'BACKEND': 'django.core.cache.backends.memcached.MemcachedCache',
         'LOCATION': 'controller:11211',
    }
}
OPENSTACK_KEYSTONE_URL = "http://%s:5000/v3" % OPENSTACK_HOST
OPENSTACK_KEYSTONE_MULTIDOMAIN_SUPPORT = True
OPENSTACK_API_VERSIONS = {
    "identity": 3,
    "image": 2,
    "volume": 3,
}
OPENSTACK_KEYSTONE_DEFAULT_DOMAIN = "Default"
OPENSTACK_KEYSTONE_DEFAULT_ROLE = "user"

OPENSTACK_NEUTRON_NETWORK = {
    'enable_auto_allocated_network': False,
    'enable_distributed_router': True,
    'enable_fip_topology_check': True,
    'enable_ha_router': True,
    'enable_ipv6': True,
    'enable_quotas': True,
    'enable_rbac_policy': True,
    'enable_router': True,

    'default_dns_nameservers': [],
    'supported_provider_types': ['*'],
    'segmentation_id_range': {},
    'extra_provider_types': {},
    'supported_vnic_types': ['*'],
    'physical_networks': [],

}
# 这个配置目前不清楚去掉会如何,配置上不报错
WEBROOT = '/dashboard/'
# 本地化内容,可选
LANGUAGE_CODE = 'zh-hans'
TIME_ZONE = "Asia/Shanghai"
# 以上内容有就修改,没有就添加
重建apache的dashboard配置文件
cd /usr/share/openstack-dashboard
python manage.py make_web_conf --apache > /etc/httpd/conf.d/openstack-dashboard.conf
这步官网文档没有,不做这一步dashboard打不开或显示不对
建立policy.jso的软链接
ln -s /etc/openstack-dashboard /usr/share/openstack-dashboard/openstack_dashboard/conf
不做这一步,登录到dashboard将出现权限错误和显示混乱,尤其是点到导航栏用户相关信息是直接5XX
重启httpd和缓存
systemctl restart httpd.service
systemctl restart memcached.service
验证操作
打开浏览器,输入申请的弹性IPhttp://IP:90/dashboard/访问,默认域default,用户admin,密码admin123

安装并配置块存储(可选)
控制节点安装
创建cinder数据库
mysql -u root -p
MariaDB [(none)]> CREATE DATABASE cinder;
MariaDB [(none)]> GRANT ALL PRIVILEGES ON cinder.* TO 'cinder'@'localhost' IDENTIFIED BY 'CINDER_DBPASS';
MariaDB [(none)]> GRANT ALL PRIVILEGES ON cinder.* TO 'cinder'@'%' IDENTIFIED BY 'CINDER_DBPASS';
创建cinder用户
openstack user create --domain default --password-prompt cinder

User Password:
Repeat User Password:
+---------------------+----------------------------------+
| Field               | Value                            |
+---------------------+----------------------------------+
| domain_id           | default                          |
| enabled             | True                             |
| id                  | 9d7e33de3e1a498390353819bc7d245d |
| name                | cinder                           |
| options             | {}                               |
| password_expires_at | None                             |
+---------------------+----------------------------------+
# 授予admin权限
openstack role add --project service --user cinder admin
密码admin123
创建cinder服务实体
# 需要创建cinderv2 v3两个服务实体
openstack service create --name cinderv2 \
  --description "OpenStack Block Storage" volumev2

+-------------+----------------------------------+
| Field       | Value                            |
+-------------+----------------------------------+
| description | OpenStack Block Storage          |
| enabled     | True                             |
| id          | eb9fd245bdbc414695952e93f29fe3ac |
| name        | cinderv2                         |
| type        | volumev2                         |
+-------------+----------------------------------+
openstack service create --name cinderv3 \
  --description "OpenStack Block Storage" volumev3

+-------------+----------------------------------+
| Field       | Value                            |
+-------------+----------------------------------+
| description | OpenStack Block Storage          |
| enabled     | True                             |
| id          | ab3bbbef780845a1a283490d281e7fda |
| name        | cinderv3                         |
| type        | volumev3                         |
+-------------+----------------------------------+
创建API endpoints
openstack endpoint create --region RegionOne volumev2 public http://controller:8776/v2/%\(project_id\)s

+--------------+------------------------------------------+
| Field        | Value                                    |
+--------------+------------------------------------------+
| enabled      | True                                     |
| id           | 513e73819e14460fb904163f41ef3759         |
| interface    | public                                   |
| region       | RegionOne                                |
| region_id    | RegionOne                                |
| service_id   | eb9fd245bdbc414695952e93f29fe3ac         |
| service_name | cinderv2                                 |
| service_type | volumev2                                 |
| url          | http://controller:8776/v2/%(project_id)s |
+--------------+------------------------------------------+

openstack endpoint create --region RegionOne volumev2 internal http://controller:8776/v2/%\(project_id\)s

+--------------+------------------------------------------+
| Field        | Value                                    |
+--------------+------------------------------------------+
| enabled      | True                                     |
| id           | 6436a8a23d014cfdb69c586eff146a32         |
| interface    | internal                                 |
| region       | RegionOne                                |
| region_id    | RegionOne                                |
| service_id   | eb9fd245bdbc414695952e93f29fe3ac         |
| service_name | cinderv2                                 |
| service_type | volumev2                                 |
| url          | http://controller:8776/v2/%(project_id)s |
+--------------+------------------------------------------+

openstack endpoint create --region RegionOne volumev2 admin http://controller:8776/v2/%\(project_id\)s

+--------------+------------------------------------------+
| Field        | Value                                    |
+--------------+------------------------------------------+
| enabled      | True                                     |
| id           | e652cf84dd334f359ae9b045a2c91d96         |
| interface    | admin                                    |
| region       | RegionOne                                |
| region_id    | RegionOne                                |
| service_id   | eb9fd245bdbc414695952e93f29fe3ac         |
| service_name | cinderv2                                 |
| service_type | volumev2                                 |
| url          | http://controller:8776/v2/%(project_id)s |
+--------------+------------------------------------------+
openstack endpoint create --region RegionOne volumev3 public http://controller:8776/v3/%\(project_id\)s

+--------------+------------------------------------------+
| Field        | Value                                    |
+--------------+------------------------------------------+
| enabled      | True                                     |
| id           | 03fa2c90153546c295bf30ca86b1344b         |
| interface    | public                                   |
| region       | RegionOne                                |
| region_id    | RegionOne                                |
| service_id   | ab3bbbef780845a1a283490d281e7fda         |
| service_name | cinderv3                                 |
| service_type | volumev3                                 |
| url          | http://controller:8776/v3/%(project_id)s |
+--------------+------------------------------------------+

openstack endpoint create --region RegionOne volumev3 internal http://controller:8776/v3/%\(project_id\)s

+--------------+------------------------------------------+
| Field        | Value                                    |
+--------------+------------------------------------------+
| enabled      | True                                     |
| id           | 94f684395d1b41068c70e4ecb11364b2         |
| interface    | internal                                 |
| region       | RegionOne                                |
| region_id    | RegionOne                                |
| service_id   | ab3bbbef780845a1a283490d281e7fda         |
| service_name | cinderv3                                 |
| service_type | volumev3                                 |
| url          | http://controller:8776/v3/%(project_id)s |
+--------------+------------------------------------------+

openstack endpoint create --region RegionOne volumev3 admin http://controller:8776/v3/%\(project_id\)s

+--------------+------------------------------------------+
| Field        | Value                                    |
+--------------+------------------------------------------+
| enabled      | True                                     |
| id           | 4511c28a0f9840c78bacb25f10f62c98         |
| interface    | admin                                    |
| region       | RegionOne                                |
| region_id    | RegionOne                                |
| service_id   | ab3bbbef780845a1a283490d281e7fda         |
| service_name | cinderv3                                 |
| service_type | volumev3                                 |
| url          | http://controller:8776/v3/%(project_id)s |
+--------------+------------------------------------------+
安装并配置cinder
yum install -y openstack-cinder
# /etc/cinder/cinder.conf
[DEFAULT]
transport_url = rabbit://openstack:admin123@controller
auth_strategy = keystone
my_ip = 10.0.0.171
[database]
connection = mysql+pymysql://cinder:admin123@controller/cinder
[keystone_authtoken]
www_authenticate_uri = http://controller:5000
auth_url = http://controller:5000
memcached_servers = controller:11211
auth_type = password
project_domain_name = default
user_domain_name = default
project_name = service
username = cinder
password = admin123

[oslo_concurrency]
lock_path = /var/lib/cinder/tmp
# /etc/nova/nova.conf
[cinder]
os_region_name = RegionOne
# 填充cinder数据库
su -s /bin/sh -c "cinder-manage db sync" cinder
# 重启nova-api服务
systemctl restart openstack-nova-api.service
# 启动cinder-api和cinder-scheduler并设置开机自启
systemctl enable openstack-cinder-api.service openstack-cinder-scheduler.service
systemctl start openstack-cinder-api.service openstack-cinder-scheduler.service
存储节点安装(和计算节点合部)
此处在计算节点上挂载了200G的裸盘,用作块存储
安装lvm包
yum install lvm2 device-mapper-persistent-data
# 启动并设置开机自启
systemctl enable lvm2-lvmetad.service
systemctl start lvm2-lvmetad.service
创建逻辑卷
pvcreate /dev/vdb
vgcreate cinder-volumes /dev/vdb
配置lvm卷扫描范围
# 找到device,在device下的filter中配置
devices {
...
filter = [ "a/vdb/", "r/.*/"]
filter里面是一个列表,a:accept, r:reject,后面跟一个正则表达式,从第一个元素开始匹配,表示接受/dev/vdb/上的卷,最后一个元素必须是"r/.*/",拒绝所有卷,否则会继续扫描剩余的卷,造成不必要的麻烦
安装并配置cinder软件包
yum install -y openstack-cinder targetcli python-keystone
# python-keystone在计算节点其实已经安装,保险起见还是加上
#/etc/cinder/cinder.conf
[database]
connection = mysql+pymysql://cinder:admin123@controller/cinder

[DEFAULT]
transport_url = rabbit://openstack:admin123@controller
auth_strategy = keystone
my_ip = 10.0.0.67
enabled_backends = lvm
glance_api_servers = http://controller:9292

[keystone_authtoken]
www_authenticate_uri = http://controller:5000
auth_url = http://controller:5000
memcached_servers = controller:11211
auth_type = password
project_domain_name = default
user_domain_name = default
project_name = service
username = cinder
password = admin123

[lvm]
volume_driver = cinder.volume.drivers.lvm.LVMVolumeDriver
volume_group = cinder-volumes
target_protocol = iscsi
target_helper = lioadm

[oslo_concurrency]
lock_path = /var/lib/cinder/tmp
启动cinder-volume
systemctl enable openstack-cinder-volume.service target.service
systemctl start openstack-cinder-volume.service target.service
启动第一个实例
此处使用命令行方式创建一个centos7镜像
创建虚拟网络
创建provider网络
openstack network create --share --external --provider-physical-network provider --provider-network-type flat provider1

创建provider网络的子网
openstack subnet create --network provider1 --allocation-pool start=10.0.1.129,end=10.0.1.181 --dns-nameserver 114.114.114.114 --gateway 10.0.1.182 --subnet-range 10.0.1.128/25 provider_sub

创建自服务网络
openstack network create selfservice1

创建主服务网络的子网
openstack subnet create --network selfservice1 --dns-nameserver 114.114.114.114 --gateway 172.16.1.1 --subnet-range 172.16.1.0/24 selfservice_sub

创建虚拟路由器
openstack router create router1

# 将虚拟路由器router1关联到新创建的selfservice1_sub网络
openstack router add subnet router1 selfservice1_sub
# 将路由器连接到provider1网络作为连接provider网络的出口,通过provider网络连接到互联网
openstack router set router1 --external-gateway provider1

创建云主机规格
openstack flavor create --vcpus 1 --ram 1023 --disk 10 m1.small
创建镜像
openstack image create --file centos7.qcow2 --disk-format qcow2 --container-format bare --public CentOS7.6
centos7.qcow2镜像需要自己在本地创建,转化为qcow2格式上传到执行命令的目录,也可以在这个链接下载:
http://cloud.centos.org/centos/7/images/CentOS-7-x86_64-GenericCloud-1907.qcow2
创建安全组
# 创建默认一条全网通的icmp规则,安全组名称default,默认名为default的规则无法在页面删除,在后台删除会自动重选创建
openstack security group rule create --proto icmp default
建议去页面创建,cli创建参数太多
创建秘钥对(可选)
ssh-keygen -q -N ""
openstack keypair create --public-key ~/.ssh/id_rsa.pub mykey
# 回显
+-------------+-------------------------------------------------+
| Field       | Value                                           |
+-------------+-------------------------------------------------+
| fingerprint | ee:3d:2e:97:d4:e2:6a:54:6d:0d:ce:43:39:2c:ba:4d |
| name        | mykey                                           |
| user_id     | 58126687cbcc4888bfa9ab73a2256f27                |
+-------------+-------------------------------------------------+
启动provider网络主机
获取flavor
openstack flavor list

获取network id
openstack network list

获取镜像id
openstack image list

获取安全组id
openstack security group list

启动实例
openstack server create --flavor m1.small --image CentOS7.6 --nic net-id=0cbed434-5f5b-452f-8c24-3717dfbcf1dd --security-group default provider-instance

查看实例
openstack server list

有多个实例时,请用openstack server show instance_id的方式查看
登录实例
在控制台登录

本次开出来的机器内部没有获取到ip地址,原因未知(可能需要自己搭建一个provider网络的dhcp服务器)需要根据平台下发的地址自行配置
vnc未显示的,需要在本机hosts网络添加一条解析,X.X.X.X是控制节点EIP
controller X.X.X.X
纯模拟的机器,运行比较卡顿,请耐心等待命令执行结果
provider上的机器,目前不通网关,原因可能是配置了计算节点eth1 vxlan的原因,需要在计算节点上抓包确定
另外镜像的网络配置文件有问题,网络名和配置文件不一致,需要自己修改
启动自服务网络虚拟机
创建步骤和provider网络虚拟机一值,网络id要换掉
openstack server create --flavor m1.small --image CentOS7.6 --nic net-id=cf9f8029-5e84-4c75-80b1-5a89e08ca1a8 --security-group default selfservice-instance

错误集
手动安装的过程中遇到的问题
dashboard 404
参考 https://blog.csdn.net/weixin_28738845/article/details/103348658
dashboard乱码问题
需要在local_settings中加上LANGUAGE_CODE=‘zh-hans’
dashboard 点任何无反应
浏览器console提示horizen.app You may need to run “python manage.py compress”.
根据日志报错,对django里的静态文件进行压缩,参考
https://docs.openstack.org/horizon/train/install/from-source.html#installation
openstack-nova-compute,neutron-l3-agent服务无法启动
- 重启控制节点和计算节点后,出现openstack-nova-compute,neutron-l3-agent服务无法启动
/var/log/nova/nova-compute.log报错
ERROR nova AccessRefused: (0, 0): (403) ACCESS_REFUSED - Login was refused using authentication mechanism AMQPLAIN. For details see the broker logfile./var/log/neutron/l3-agent.log报错
ERROR neutron AccessRefused: (0, 0): (403) ACCESS_REFUSED - Login was refused using authentication mechanism AMQPLAIN. For details see the broker logfile.# /var/log/rabbitmq/rabbit\@controller.log中的报错 =INFO REPORT==== 14-Jan-2022::14:22:47 === Connection <0.248.3> (10.0.0.171:39544 -> 10.0.0.171:5672) has a client-provided name: neutron-server:6585:062a2131-6614-49f1-9dbf-2af412e06f17 =ERROR REPORT==== 14-Jan-2022::14:22:47 === Error on AMQP connection <0.245.3> (10.0.0.171:39542 -> 10.0.0.171:5672, state: starting): AMQPLAIN login refused: user 'openstack' - invalid credentials原因,安装好rabbitmq后之后修改了hostname导致
[root@controller ~]# rabbitmqctl list_users
Listing users
guest	[administrator]
查看无openstack用户,需要重新创建,参考https://docs.openstack.org/install-guide/environment-messaging-rdo.html
创建volume一直在creating状态

查看控制节点日志/var/log/volume.log

解决办法:查看openstack-cinder-scheduler服务状态down,查看是否开机自启
重启即可
systemctl restart openstack-cinder-scheduler
openstack volume service list
# 都up后可以创建

创建虚拟机失败
创建虚拟机失败,nova-api->nova-scheduler.log->nova-conductor.log->nova-compute.log一路看过来,最终在conductor日志中看到查询neutron的信息,在计算节点neutron/linux-bright.log中查到如下信息:
2022-01-18 09:25:04.640 24307 ERROR neutron.agent.linux.ip_conntrack [-] Failed to process ip_conntrack queue entry: <IpConntrackUpdate(device_info_list=[{u'security_group_source_groups': [u'7cfeaa8b-bc46-4288-83f5-cdb4f5259638'], u'allowed_address_pairs': [], u'extra_dhcp_opts': [], u'updated_at': u'2022-01-17T04:14:13Z', u'device_owner': u'compute:nova', u'revision_number': 5, u'port_security_enabled': True, u'binding:profile': {}, u'fixed_ips': [u'10.0.1.145'], u'id': u'56099c5f-0147-48be-a34f-7f1103af1bfb', u'security_groups': [u'7cfeaa8b-bc46-4288-83f5-cdb4f5259638'], u'binding:vif_details': {u'connectivity': u'l2', u'port_filter': True}, u'binding:vif_type': u'bridge', u'mac_address': u'fa:16:3e:f4:c3:31', u'project_id': u'6748460364f543adb192135d39f6da16', u'status': u'ACTIVE', u'binding:host_id': u'compute1', u'description': u'', u'tags': [], u'security_group_rules': [{u'source_port_range_min': 67, u'direction': u'ingress', u'protocol': u'udp', u'ethertype': u'IPv4', u'port_range_max': 68, u'dest_ip_prefix': u'10.0.1.145/32', u'source_port_range_max': 67, u'port_range_min': 68}, {u'source_port_range_min': 67, u'direction': u'ingress', u'protocol': u'udp', u'ethertype': u'IPv4', u'port_range_max': 68, u'dest_ip_prefix': u'255.255.255.255/32', u'source_port_range_max': 67, u'port_range_min': 68}, {u'source_port_range_min': 547, u'direction': u'ingress', u'protocol': u'udp', u'ethertype': u'IPv6', u'port_range_max': 546, u'dest_ip_prefix': u'fe80::/64', u'source_port_range_max': 547, u'port_range_min': 546}], u'device': u'tap56099c5f-01', u'device_id': u'74de5717-2d7e-4981-972a-74ae5ed5deea', u'name': u'', u'admin_state_up': True, u'network_id': u'4196c051-5a74-40b7-b42f-9d5963a6625e', u'tenant_id': u'6748460364f543adb192135d39f6da16', u'created_at': u'2022-01-17T04:14:09Z', u'binding:vnic_type': u'normal'}, {u'security_group_source_groups': [u'7cfeaa8b-bc46-4288-83f5-cdb4f5259638'], u'allowed_address_pairs': [], u'extra_dhcp_opts': [], u'updated_at': u'2022-01-17T08:24:25Z', u'device_owner': u'compute:nova', u'revision_number': 5, u'port_security_enabled': True, u'binding:profile': {}, u'fixed_ips': [u'10.0.1.149'], u'id': u'610eae2d-df33-4807-984f-834f2ebf1ec8', u'security_groups': [u'7cfeaa8b-bc46-4288-83f5-cdb4f5259638'], u'binding:vif_details': {u'connectivity': u'l2', u'port_filter': True}, u'binding:vif_type': u'bridge', u'mac_address': u'fa:16:3e:c8:36:58', u'project_id': u'6748460364f543adb192135d39f6da16', u'status': u'ACTIVE', u'binding:host_id': u'compute1', u'description': u'', u'tags': [], u'security_group_rules': [{u'source_port_range_min': 67, u'direction': u'ingress', u'protocol': u'udp', u'ethertype': u'IPv4', u'port_range_max': 68, u'dest_ip_prefix': u'10.0.1.149/32', u'source_port_range_max': 67, u'port_range_min': 68}, {u'source_port_range_min': 67, u'direction': u'ingress', u'protocol': u'udp', u'ethertype': u'IPv4', u'port_range_max': 68, u'dest_ip_prefix': u'255.255.255.255/32', u'source_port_range_max': 67, u'port_range_min': 68}, {u'source_port_range_min': 547, u'direction': u'ingress', u'protocol': u'udp', u'ethertype': u'IPv6', u'port_range_max': 546, u'dest_ip_prefix': u'fe80::/64', u'source_port_range_max': 547, u'port_range_min': 546}], u'device': u'tap610eae2d-df', u'device_id': u'24a401c2-6f9d-45a7-9e04-f14e3dae14f4', u'name': u'', u'admin_state_up': True, u'network_id': u'4196c051-5a74-40b7-b42f-9d5963a6625e', u'tenant_id': u'6748460364f543adb192135d39f6da16', u'created_at': u'2022-01-17T08:23:21Z', u'binding:vnic_type': u'normal'}], rule={'ethertype': 'ipv4', 'direction': 'egress'}, remote_ips=['172.16.1.237']>: RemoteError:
---------------------------------------------------------------------------
Unserializable message: ('#ERROR', ValueError('I/O operation on closed file',))
---------------------------------------------------------------------------
解决办法,缺少ip conntrack包
yum install conntrack-tools -y


 2744
2744


 被折叠的 条评论
为什么被折叠?
被折叠的 条评论
为什么被折叠?
 到【灌水乐园】发言


