


最近朋友问我有没有做过Oauth2的第三方登录,请求认证并根据认证返回数据去访问资源服务。发现单点登录做过很多,但是这种第三方的登录认证确实没做过,出于兴趣在网上找了很多资料,自己动手整理了下。
PS:网上很多是基于内存的,但是实际项目中基本上都是从数据库获取相关数据,于是分享一个基于数据库的第三方登录实现。(在实现过程中因为网上大部分资料描述不清晰,走了很多弯路,同时附上自己个人的一些备注)。源码也同时在文章末尾进行分享,希望能帮助各位码友。
废话不多说,下面开始:
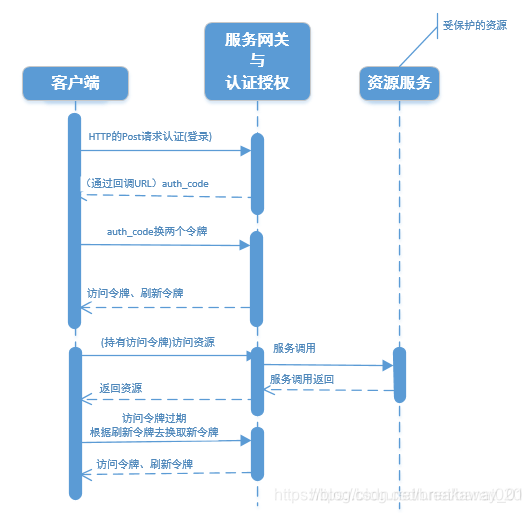
给出网上一个比较好的流程设计图:(实际项目中都大致一样)
1.给出建表sql(oauth2):
-- oauth2中规定的数据表,需要手动创建,一般项目中提供服务接口插入,参数由用户定义,在请求时会自动查询服务器中对应的参数数据匹配认证

CREATE TABLE `oauth_client_details`  (
  `client_id` varchar(256) CHARACTER SET utf8mb4 COLLATE utf8mb4_general_ci NOT NULL,
  `resource_ids` varchar(256) CHARACTER SET utf8mb4 COLLATE utf8mb4_general_ci NULL DEFAULT NULL,
  `client_secret` varchar(256) CHARACTER SET utf8mb4 COLLATE utf8mb4_general_ci NULL DEFAULT NULL,
  `scope` varchar(256) CHARACTER SET utf8mb4 COLLATE utf8mb4_general_ci NULL DEFAULT NULL,
  `authorized_grant_types` varchar(256) CHARACTER SET utf8mb4 COLLATE utf8mb4_general_ci NULL DEFAULT NULL,
  `web_server_redirect_uri` varchar(256) CHARACTER SET utf8mb4 COLLATE utf8mb4_general_ci NULL DEFAULT NULL,
  `authorities` varchar(256) CHARACTER SET utf8mb4 COLLATE utf8mb4_general_ci NULL DEFAULT NULL,
  `access_token_validity` int(11) NULL DEFAULT NULL,
  `refresh_token_validity` int(11) NULL DEFAULT NULL,
  `additional_information` varchar(4096) CHARACTER SET utf8mb4 COLLATE utf8mb4_general_ci NULL DEFAULT NULL,
  `autoapprove` varchar(256) CHARACTER SET utf8mb4 COLLATE utf8mb4_general_ci NULL DEFAULT NULL,
  PRIMARY KEY (`client_id`) USING BTREE
) ENGINE = InnoDB CHARACTER SET = utf8mb4 COLLATE = utf8mb4_general_ci ROW_FORMAT = Dynamic;

INSERT INTO `oauth_client_details` VALUES ('demo-client', NULL, '$2a$10$tj/PXVj9MBRdyuBKq99zeOw6oGkPVe7HNOxjmBWh.hsRmaU4IT2Ba', 'all', 'authorization_code,refresh_token', 'http://localhost:8080/res/getMsg', NULL, 3600, 36000, NULL, '1');

-- 此插入的对象参数中:client_id为demo-client,client_secret为demo-secret,redirect_uri为http://localhost:8080/res/getMsg,注意在请求的时候这些参数一定要一直,否则会出错
注意:参数配置在请求过程中一致的问题,这里给出一个demo测试数据,在真实项目中可以提供后台服务进行插入,或者提供接口给用户进行注册。
2.引入项目依赖pom.xml(真实项目一般认证和资源服务是单独分开,依赖文件根据不同的服务引入即可,这里做demo,放在同一个服务中):
<?xml version="1.0" encoding="UTF-8"?>
<project xmlns="http://maven.apache.org/POM/4.0.0" xmlns:xsi="http://www.w3.org/2001/XMLSchema-instance"
	xsi:schemaLocation="http://maven.apache.org/POM/4.0.0 http://maven.apache.org/xsd/maven-4.0.0.xsd">
	<modelVersion>4.0.0</modelVersion>
	<parent>
		<groupId>org.springframework.boot</groupId>
		<artifactId>spring-boot-starter-parent</artifactId>
		<version>2.1.8.RELEASE</version>
		<relativePath/> <!-- lookup parent from repository -->
	</parent>
	<groupId>com.banling</groupId>
	<artifactId>oauth2-server</artifactId>
	<version>1.0</version>
	<name>oauth2-server</name>
	<description>springboot Oauth2 Server sample :: Oauth2 Authorization Server and Resource Server, combine with Security.</description>

	<properties>
		<java.version>1.8</java.version>
	</properties>

	<dependencies>
		<!-- spring-boot -->
		<dependency>
			<groupId>org.springframework.boot</groupId>
			<artifactId>spring-boot-starter-web</artifactId>
		</dependency>
		<dependency>
			<groupId>org.springframework.boot</groupId>
			<artifactId>spring-boot-starter-test</artifactId>
			<scope>test</scope>
		</dependency>
		<!-- spring-boot -->
		<!-- 此oauth2依赖为spingcloud依赖,在springboot中不要使用 -->
<!--		<dependency>-->
<!--			<groupId>org.springframework.security.oauth</groupId>-->
<!--			<artifactId>spring-security-oauth2</artifactId>-->
<!--		</dependency>-->
		<!-- 此oauth2依赖为spingcloud依赖,在springboot中不要使用 -->

		<!-- 由于一些注解和API从spring security5.0中移除,所以需要导入下面的依赖包  -->
		<!-- spring-boot-oauth2 -依赖于springboot2.0以上版本 -->
		<dependency>
			<groupId>org.springframework.security.oauth.boot</groupId>
			<artifactId>spring-security-oauth2-autoconfigure</artifactId>
			<version>2.0.0.RELEASE</version>
		</dependency>
		<!-- spring-boot-oauth2 -依赖于springboot2.0以上版本 -->
		<!-- spring-boot-security -->
		<dependency>
			<groupId>org.springframework.boot</groupId>
			<artifactId>spring-boot-starter-security</artifactId>
		</dependency>
		<!-- spring-boot-security -->
		<!-- spring-security-jwt 此依赖是springcloud的,在springboot中不要使用 -->
<!--		<dependency>-->
<!--			<groupId>org.springframework.security</groupId>-->
<!--			<artifactId>spring-security-jwt</artifactId>-->
<!--		</dependency>-->
		<!-- spring-security-jwt 此依赖是springcloud的,在springboot中不要使用 -->
		<!-- springboot中使用的jwt -->
		<dependency>
			<groupId>io.jsonwebtoken</groupId>
			<artifactId>jjwt</artifactId>
			<version>0.9.1</version>
		</dependency>
		<!-- springboot中使用的jwt -->
		<!-- mysql -->
		<dependency>
			<groupId>mysql</groupId>
			<artifactId>mysql-connector-java</artifactId>
		</dependency>
		<!-- mysql -->
		<!-- jdbc在整合中需要 -->
		<dependency>
			<groupId>org.springframework.boot</groupId>
			<artifactId>spring-boot-starter-jdbc</artifactId>
		</dependency>
		<!-- jdbc在整合中需要 -->
	</dependencies>

	<build>
		<plugins>
			<plugin>
				<groupId>org.springframework.boot</groupId>
				<artifactId>spring-boot-maven-plugin</artifactId>
			</plugin>
		</plugins>
	</build>

</project>
PS:每个依赖对应都有注解,此处服务为springboot,如果是微服务使用相应依赖即可。
3.application.yml配置文件:
#认证服务器端口号
server:
  port: 8080
#认证服务器数据库连接
spring:
  datasource:
    url: jdbc:mysql://localhost:3306/business_talk?useUnicode=true&characterEncoding=utf-8&useSSL=false&allowMultiQueries=true&serverTimezone=Asia/Shanghai&keepAlive=true
    username: root
    password: 123456
    hikari:
      connection-timeout: 60000
      idle-timeout: 600000
      max-lifetime: 1800000
      maximum-pool-size: 9
management:
  endpoint:
    health:
      enabled: true

########资源服务器oauth2配置 - 此配置暂时不使用,在代码和数据库中已经存在########################################
#security:
#  oauth2:
#    client:
#      client-id: demo-client
#      client-secret: demo-secret
#      user-authorization-uri: http://localhost:8080/oauth/authorize
#      access-token-uri: http://localhost:8080/oauth/token
#    resource:
#      jwt:
#        key-uri: http://localhost:8080/oauth/token_key
#        key-value: demo
#    authorization:
#      check-token-access: http://localhost:8080/oauth/check_token
########资源服务器oauth2配置 - 此配置暂时不使用,在代码和数据库中已经存在########################################
以下为服务的相关config配置:
4.Spring-Security配置类
package com.business.oauth2server.config;

import org.springframework.context.annotation.Bean;
import org.springframework.context.annotation.Configuration;
import org.springframework.security.authentication.AuthenticationManager;
import org.springframework.security.config.annotation.web.builders.HttpSecurity;
import org.springframework.security.config.annotation.web.configuration.EnableWebSecurity;
import org.springframework.security.config.annotation.web.configuration.WebSecurityConfigurerAdapter;
import org.springframework.security.crypto.bcrypt.BCryptPasswordEncoder;
import org.springframework.security.crypto.password.PasswordEncoder;
import org.springframework.security.web.util.matcher.AntPathRequestMatcher;

/**
 * Spring-Security配置类,继承WebSecurityConfigurerAdapter
 *
 * @author Tom
 * @date 2020-09-04
 */
@Configuration
@EnableWebSecurity
public class SecurityConfig extends WebSecurityConfigurerAdapter{

    /**
     * 引入密码加密类
     * @return
     */
    @Bean
    public PasswordEncoder passwordEncoder() {
        return new BCryptPasswordEncoder();
    }

    /**
     * 支持 password 模式(配置)
     * @return
     * @throws Exception
     */
    @Override
    @Bean
    public AuthenticationManager authenticationManagerBean() throws Exception {
        return super.authenticationManagerBean();
    }

    /**
     * 配置URL访问授权,必须配置authorizeRequests(),否则启动报错,说是没有启用security技术。
     * 注意:在这里的身份进行认证与授权没有涉及到OAuth的技术:当访问要授权的URL时,请求会被DelegatingFilterProxy拦截,
     *      如果还没有授权,请求就会被重定向到登录界面。在登录成功(身份认证并授权)后,请求被重定向至之前访问的URL。
     * @param http
     * @throws Exception
     */
	@Override
    protected void configure(HttpSecurity http) throws Exception {
		http.formLogin() //登记界面,默认是permit All
		.and()
		.authorizeRequests().antMatchers("/","/home").permitAll() //不用身份认证可以访问
		.and()
		.authorizeRequests().anyRequest().authenticated() //其它的请求要求必须有身份认证
        .and()
        .csrf() //防止CSRF(跨站请求伪造)配置
        .requireCsrfProtectionMatcher(new AntPathRequestMatcher("/oauth/authorize")).disable();
    }

}
注:该类中相关位置都进行注解,不再赘述(下同)。
5.Oauth2常量类
package com.business.oauth2server.contants;

/**
 * Oauth2常量类
 *
 * @author Tom
 * @date 2020-09-04
 * @version 1.0.0
 */
public class Oauth2Constant {

	/**************************************Oauth2参数配置**********************************************/
	/**
	 * JWT_SIGNING_KEY
	 */
	public static final String JWT_SIGNING_KEY = "jwtsigningkey";

}
6.JwtTokenConfig配置类
package com.business.oauth2server.config;

import com.business.oauth2server.contants.Oauth2Constant;
import org.springframework.context.annotation.Bean;
import org.springframework.context.annotation.Configuration;
import org.springframework.security.oauth2.provider.token.TokenEnhancer;
import org.springframework.security.oauth2.provider.token.TokenStore;
import org.springframework.security.oauth2.provider.token.store.JwtAccessTokenConverter;
import org.springframework.security.oauth2.provider.token.store.JwtTokenStore;

/**
 * JwtTokenConfig配置类
 * 使用TokenStore将引入JwtTokenStore
 *
 * 注:Spring-Sceurity使用TokenEnhancer和JwtAccessConverter增强jwt令牌
 * @author Tom
 * @date 2020-09-04
 */
@Configuration
public class JwtTokenConfig {

    @Bean
    public TokenStore jwtTokenStore() {
        return new JwtTokenStore(jwtAccessTokenConverter());
    }

    /**
     * JwtAccessTokenConverter:TokenEnhancer的子类,帮助程序在JWT编码的令牌值和OAuth身份验证信息之间进行转换(在两个方向上),同时充当TokenEnhancer授予令牌的时间。
     * 自定义的JwtAccessTokenConverter:把自己设置的jwt签名加入accessTokenConverter中(这里设置'demo',项目可将此在配置文件设置)
     * @return
     */
    @Bean
    public JwtAccessTokenConverter jwtAccessTokenConverter() {
        JwtAccessTokenConverter accessTokenConverter = new JwtAccessTokenConverter();
        accessTokenConverter.setSigningKey(Oauth2Constant.JWT_SIGNING_KEY);
        return accessTokenConverter;
    }

    /**
     * 引入自定义JWTokenEnhancer:
     * 自定义JWTokenEnhancer实现TokenEnhancer并重写enhance方法,将附加信息加入oAuth2AccessToken中
     * @return
     */
    @Bean
    public TokenEnhancer jwtTokenEnhancer(){
       return new JWTokenEnhancer();
    }
}
7.自定义TokenEnhancer
package com.business.oauth2server.config;

import org.springframework.security.oauth2.common.DefaultOAuth2AccessToken;
import org.springframework.security.oauth2.common.OAuth2AccessToken;
import org.springframework.security.oauth2.provider.OAuth2Authentication;
import org.springframework.security.oauth2.provider.token.TokenEnhancer;
import java.util.HashMap;
import java.util.Map;

/**
 * TokenEnhancer:在AuthorizationServerTokenServices 实现存储访问令牌之前增强访问令牌的策略。
 * 自定义TokenEnhancer的代码:把附加信息加入oAuth2AccessToken中
 *
 * @author Tom
 * @date 2020-09-04
 */
public class JWTokenEnhancer implements TokenEnhancer {

    /**
     * 重写enhance方法,将附加信息加入oAuth2AccessToken中
     * @param oAuth2AccessToken
     * @param oAuth2Authentication
     * @return
     */
    @Override
    public OAuth2AccessToken enhance(OAuth2AccessToken oAuth2AccessToken, OAuth2Authentication oAuth2Authentication) {
        Map<String, Object> map = new HashMap<String, Object>();
        map.put("jwt-ext", "JWT 扩展信息");
        ((DefaultOAuth2AccessToken) oAuth2AccessToken).setAdditionalInformation(map);
        return oAuth2AccessToken;
    }
}
8.Spring-Security自定义身份认证类(实现UserDetailsService并重写loadUserByUsername方法)
package com.business.oauth2server.config;

import org.springframework.beans.factory.annotation.Autowired;
import org.springframework.security.core.authority.SimpleGrantedAuthority;
import org.springframework.security.core.userdetails.User;
import org.springframework.security.core.userdetails.UserDetails;
import org.springframework.security.core.userdetails.UserDetailsService;
import org.springframework.security.core.userdetails.UsernameNotFoundException;
import org.springframework.security.crypto.password.PasswordEncoder;
import org.springframework.stereotype.Component;
import java.util.ArrayList;
import java.util.List;

/**
 * Spring-Security自定义身份认证类(实现UserDetailsService并重写loadUserByUsername方法)
 * 在loadUserByUsername方法内校验用户名密码是否正确并返回一个UserDetails对象
 *
 * @author Tom
 * @date 2020-09-04
 */
@Component(value = "myUserDetailsService")
public class MyUserDetailsService implements UserDetailsService {

    @Autowired
    private PasswordEncoder passwordEncoder;

    /**
     * 因为security中的User实现了UserDetails,所以返回一个封装了的User信息
     * @param username 用户名
     * @return
     * @throws UsernameNotFoundException
     */
    @Override
    public UserDetails loadUserByUsername(String username) throws UsernameNotFoundException {
        /***真实环境中的操作***/
//        SysUser sysUser = userRepository.findByUserName(username);
//        List<SimpleGrantedAuthority> authorities = new ArrayList<>();
//        authorities.add(new SimpleGrantedAuthority(role1));
//        authorities.add(new SimpleGrantedAuthority(role2));
//        authorities.add(new SimpleGrantedAuthority(role3));
//        return new User(username,sysUser.getpassWord,authorities);
        /***真实环境中的操作***/
        if(!username.equals("admin")){
            throw new UsernameNotFoundException("the user is not found");
        }else{
            // 用户角色也应在数据库中获取
            String role = "ROLE_ADMIN";
            List<SimpleGrantedAuthority> authorities = new ArrayList<SimpleGrantedAuthority>();
            authorities.add(new SimpleGrantedAuthority(role));
            // 线上环境应该通过用户名查询数据库获取加密后的密码
            String password = passwordEncoder.encode("123456");
            // 返回默认的 User
            // return new org.springframework.security.core.userdetails.User(username,password, authorities);
            User user = new User(username,password,authorities);
            return user;
        }
    }

}
PS:这里做测试不做真实数据库查询操作,换在真实项目中,则需要进行用户登录数据查询。
9.OAuth2的授权服务:主要作用是OAuth2的客户端进行认证与授权
package com.business.oauth2server.config;

import org.springframework.beans.factory.annotation.Autowired;
import org.springframework.beans.factory.annotation.Qualifier;
import org.springframework.context.annotation.Configuration;
import org.springframework.security.authentication.AuthenticationManager;
import org.springframework.security.core.userdetails.UserDetailsService;
import org.springframework.security.oauth2.config.annotation.configurers.ClientDetailsServiceConfigurer;
import org.springframework.security.oauth2.config.annotation.web.configuration.AuthorizationServerConfigurerAdapter;
import org.springframework.security.oauth2.config.annotation.web.configuration.EnableAuthorizationServer;
import org.springframework.security.oauth2.config.annotation.web.configurers.AuthorizationServerEndpointsConfigurer;
import org.springframework.security.oauth2.config.annotation.web.configurers.AuthorizationServerSecurityConfigurer;
import org.springframework.security.oauth2.provider.token.TokenEnhancer;
import org.springframework.security.oauth2.provider.token.TokenEnhancerChain;
import org.springframework.security.oauth2.provider.token.TokenStore;
import org.springframework.security.oauth2.provider.token.store.JwtAccessTokenConverter;
import javax.sql.DataSource;
import java.util.ArrayList;
import java.util.List;

/**
 * OAuth2的授权服务:主要作用是OAuth2的客户端进行认证与授权
 *
 * @author Tom
 * @date 2020-09-04
 */
@Configuration
@EnableAuthorizationServer
public class AuthServerConfig extends AuthorizationServerConfigurerAdapter{

	@Autowired
	@Qualifier("myUserDetailsService")
	public UserDetailsService userDetailsService;

	@Autowired
	private DataSource dataSource;

	@Autowired
	private AuthenticationManager authenticationManager;

	@Autowired
	private TokenStore jwtTokenStore;

	@Autowired
	private JwtAccessTokenConverter jwtAccessTokenConverter;

	@Autowired
	private TokenEnhancer jwtTokenEnhancer;

	/**
	 * 配置OAuth2的客户端信息:clientId、client_secret、authorization_type、redirect_url等。
	 * 实际保存在数据库中,建表语句在resource下data中
	 * @param clients
	 * @throws Exception
	 */
	@Override
    public void configure(ClientDetailsServiceConfigurer clients) throws Exception {
		clients.jdbc(dataSource);
    }

	/**
	 * 1.增加jwt 增强模式
	 * 2.调用userDetailsService实现UserDetailsService接口,对客户端信息进行认证与授权
	 * @param endpoints
	 * @throws Exception
	 */
	@Override
    public void configure(AuthorizationServerEndpointsConfigurer endpoints) throws Exception {
		/**
		 * jwt 增强模式
		 * 对令牌的增强操作就在enhance方法中
		 * 下面在配置类中,将TokenEnhancer和JwtAccessConverter加到一个enhancerChain中
		 *
		 * 通俗点讲它做了两件事:
		 * 给JWT令牌中设置附加信息和jti:jwt的唯一身份标识,主要用来作为一次性token,从而回避重放攻击
		 * 判断请求中是否有refreshToken,如果有,就重新设置refreshToken并加入附加信息
		 */
		TokenEnhancerChain enhancerChain = new TokenEnhancerChain();
		List<TokenEnhancer> enhancerList = new ArrayList<TokenEnhancer>();
		enhancerList.add(jwtTokenEnhancer);
		enhancerList.add(jwtAccessTokenConverter);
		enhancerChain.setTokenEnhancers(enhancerList); //将自定义Enhancer加入EnhancerChain的delegates数组中
		endpoints.tokenStore(jwtTokenStore)
				.userDetailsService(userDetailsService)
				/**
				 * 支持 password 模式
				 */
				.authenticationManager(authenticationManager)
				.tokenEnhancer(enhancerChain)
				.accessTokenConverter(jwtAccessTokenConverter);
    }

	@Override
    public void configure(AuthorizationServerSecurityConfigurer security) throws Exception {
        security
        	.tokenKeyAccess("permitAll()")
        	.checkTokenAccess("isAuthenticated()")
			.allowFormAuthenticationForClients();
    }

}
10.基于OAuth2的资源服务配置类
package com.business.oauth2server.config;

import com.business.oauth2server.contants.Oauth2Constant;
import org.springframework.beans.factory.annotation.Autowired;
import org.springframework.context.annotation.Configuration;
import org.springframework.security.config.annotation.method.configuration.EnableGlobalMethodSecurity;
import org.springframework.security.config.annotation.web.builders.HttpSecurity;
import org.springframework.security.config.http.SessionCreationPolicy;
import org.springframework.security.oauth2.config.annotation.web.configuration.EnableResourceServer;
import org.springframework.security.oauth2.config.annotation.web.configuration.ResourceServerConfigurerAdapter;
import org.springframework.security.oauth2.config.annotation.web.configurers.ResourceServerSecurityConfigurer;
import org.springframework.security.oauth2.provider.token.TokenStore;

/**
 * ********在实际项目中此资源服务可以单独提取到资源服务项目中使用********
 *
 * OAuth2的资源服务配置类(主要作用是配置资源受保护的OAuth2策略)
 * 注:技术架构通常上将用户与客户端的认证授权服务设计在一个子系统(工程)中,而资源服务设计为另一个子系统(工程)
 *
 * @author Tom
 * @date 2020-09-04
 */
@Configuration
@EnableResourceServer
@EnableGlobalMethodSecurity(prePostEnabled = true)
public class ResServerConfig extends ResourceServerConfigurerAdapter{

	@Autowired
	private TokenStore jwtTokenStore;

	/**
	 * 同认证授权服务配置jwtTokenStore - 单独剥离服务需要开启注释
	 * @return
	 */
//	@Bean
//	public TokenStore jwtTokenStore() {
//		return new JwtTokenStore(jwtAccessTokenConverter());
//	}

	/**
	 * 同认证授权服务配置jwtAccessTokenConverter  - 单独剥离服务需要开启注释
	 * 需要和认证授权服务设置的jwt签名相同: "demo"
	 * @return
	 */
//	@Bean
//	public JwtAccessTokenConverter jwtAccessTokenConverter() {
//		JwtAccessTokenConverter accessTokenConverter = new JwtAccessTokenConverter();
//		accessTokenConverter.setSigningKey(Oauth2Constant.JWT_SIGNING_KEY);
//		accessTokenConverter.setVerifierKey(Oauth2Constant.JWT_SIGNING_KEY);
//		return accessTokenConverter;
//	}

	@Override
    public void configure(ResourceServerSecurityConfigurer resources) throws Exception {
        resources.tokenStore(jwtTokenStore);
    }

	/**
	 * 配置受OAuth2保护的URL资源。
	 * 注意:必须配置sessionManagement(),否则访问受护资源请求不会被OAuth2的拦截器
	 * 		ClientCredentialsTokenEndpointFilter与OAuth2AuthenticationProcessingFilter拦截,
	 * 		也就是说,没有配置的话,资源没有受到OAuth2的保护。
	 * @param http
	 * @throws Exception
	 */
	@Override
    public void configure(HttpSecurity http) throws Exception {
    	/*
    	 注意:
    	 1、必须先加上:.requestMatchers().antMatchers(...),表示对资源进行保护,也就是说,在访问前要进行OAuth认证。
    	 2、接着:访问受保护的资源时,要具有哪里权限。
    	 ------------------------------------
    	 否则,请求只是被Security的拦截器拦截,请求根本到不了OAuth2的拦截器。
    	 ------------------------------------
    	 requestMatchers()部分说明:
    	 Invoking requestMatchers() will not override previous invocations of ::
    	 mvcMatcher(String)}, requestMatchers(), antMatcher(String), regexMatcher(String), and requestMatcher(RequestMatcher).
    	 */
        http
        	// Since we want the protected resources to be accessible in the UI as well we need
			// session creation to be allowed (it's disabled by default in 2.0.6)
        	//另外,如果不设置,那么在通过浏览器访问被保护的任何资源时,每次是不同的SessionID,并且将每次请求的历史都记录在OAuth2Authentication的details的中
			.sessionManagement().sessionCreationPolicy(SessionCreationPolicy.IF_REQUIRED)
			.and()
			.requestMatchers()
            .antMatchers("/user","/res/**")
            .and()
            .authorizeRequests()
            .antMatchers("/user","/res/**")
            .authenticated();
    }
}
11.全局跨域配置
package com.business.oauth2server.config;

import org.springframework.context.annotation.Configuration;
import org.springframework.core.Ordered;
import org.springframework.core.annotation.Order;
import javax.servlet.*;
import javax.servlet.http.HttpServletRequest;
import javax.servlet.http.HttpServletResponse;
import java.io.IOException;

/**
 * 全局跨域配置
 * (PS:本人测试没有出现跨域的问题,但是在研究的过程中发现很多人出现过跨域的问题,能找到的最好最有效的解决方案就是进行全局配置,所以就加到项目中,有备无患)
 *
 * @author Tom
 * @date 2020-09-04
 */
@Configuration
@Order(Ordered.HIGHEST_PRECEDENCE)
public class CORSFilter implements Filter {

    @Override
    public void init(FilterConfig filterConfig) throws ServletException {}

    @Override
    public void destroy() {}

    @Override
    public void doFilter(ServletRequest servletRequest,ServletResponse servletResponse,FilterChain filterChain) throws IOException, ServletException {
        HttpServletRequest request = (HttpServletRequest) servletRequest;
        HttpServletResponse response = (HttpServletResponse) servletResponse;
        response.setHeader("Access-Control-Allow-Origin", "*");
        response.setHeader("Access-Control-Allow-Credentials", "true");
        response.setHeader("Access-Control-Allow-Methods", "POST,GET,OPTIONS,PUT,DELETE,PATCH,HEAD");
        response.setHeader("Access-Control-Allow-Max-Age", "3600");
        response.setHeader("Access-Control-Allow-Headers", "*");
        if ("OPTIONS".equalsIgnoreCase(request.getMethod())) {
            response.setStatus(HttpServletResponse.SC_OK);
        } else {
            filterChain.doFilter(servletRequest, servletResponse);
        }
    }

}
12.给个GetSecret (获取Header以及加密后的密码),即请求头部分参数和加密后的client_secret
package com.business.oauth2server.web.demo;

import org.apache.commons.codec.binary.Base64;
import org.springframework.security.crypto.bcrypt.BCryptPasswordEncoder;
import java.nio.charset.Charset;

/**
 * GetSecret (获取Header以及加密后的密码)
 *
 * @author Tom
 * @date 2020-09-04
 */
public class GetSecret {

    /**
     * 对应数据库中的client_id的值
     */
    private static final String APP_KEY = "demo-client";
    /**
     * 对应数据库中的client_secret的值
     */
    private static final String SECRET_KEY = "demo-secret";

    /**
     * main方法执行程序获取到数据库中加密后的client_secret和请求头中的getHeader
     * @param args
     */
    public static void main(String[] args){

        System.out.println("client_secret: "+new BCryptPasswordEncoder().encode(SECRET_KEY));

        System.out.println("getHeader: "+getHeader());

    }

    /**
     * 构造Basic Auth认证头信息
     *
     * @return
     */
    private static String getHeader() {
        String auth = APP_KEY + ":" + SECRET_KEY;
        byte[] encodedAuth = Base64.encodeBase64(auth.getBytes(Charset.forName("US-ASCII")));
        String authHeader = "Basic " + new String(encodedAuth);
        return authHeader;
    }


}
PS:main方法中生成的数据可提到相应注册接口中使用,为外部访问请求头部分参数生成。
13.给出几个访问的Controller
package com.business.oauth2server.web;

import org.springframework.web.bind.annotation.RequestMapping;
import org.springframework.web.bind.annotation.RestController;

/**
 * 首页,不被拦截的接口,系统中配置
 *
 * @author Tom
 * @date 2020-09-04
 */
@RestController
public class HomeController {

	@RequestMapping("/home")
	public String home() {
		return "home page";
	}

	@RequestMapping("/")
	public String index() {
		return "index page";
	}

}
package com.business.oauth2server.web;

import java.security.Principal;
import org.springframework.web.bind.annotation.RequestMapping;
import org.springframework.web.bind.annotation.RestController;

/**
 * 用户服务接口
 *
 * @author Tom
 * @date 2020-09-04
 */
@RestController
public class UserController {

	@RequestMapping("/user")
	public Principal user(Principal principal) {
		//principal在经过security拦截后,是org.springframework.security.authentication.UsernamePasswordAuthenticationToken
		//在经OAuth2拦截后,是OAuth2Authentication
	    return principal;
	}

}
package com.business.oauth2server.web;

import java.security.Principal;
import org.springframework.web.bind.annotation.RequestMapping;
import org.springframework.web.bind.annotation.RestController;

/**
 * 资源服务接口
 *
 * @author Tom
 * @date 2020-09-04
 */
@RestController()
public class ResController {

	@RequestMapping("/res/getMsg")
	public String getMsg(String msg,Principal principal) {//principal中封装了客户端(用户,也就是clientDetails,区别于Security的UserDetails,其实clientDetails中也封装了UserDetails),不是必须的参数,除非你想得到用户信息,才加上principal。
		return "Get the msg: "+msg;
	}
}
代码到此结束,下面我们来测试:此处测试使用oauth2中authorization_code方式获取code,其余三种方式不做演示,现在使用最多的也是这一种
1.在浏览器中输入如下地址:
http://localhost:8080/oauth/authorize?client_id=demo-client&response_type=code&redirect_uri=http://localhost:8080/res/getMsg
解析:
1.http://localhost:8080/oauth/authorize 为oauth2的固定请求URL
2.client_id=demo-client 这部分是用户注册在数据库中的client_id字段的值为demo-client,如果你项目中配置字段名和值不同请做相同改变。
3.response_type=code 表示使用oauth2中authorization_code方式获取code(其余三种可见源码中的说明文档有解释)
4.redirect_uri=http://localhost:8080/res/getMsg 表示授权回调uri (注意:这里第一次请求的地址,在后面获取到code去请求token的地址必须一致,否则将会报错)
2.在第1步中访问参数正确则会跳转到登录页,如下图:

这里输入我们在MyUserDetailsService中写死的用户名密码***admin:123456***进行登录。配置到各自项目中则使用真实用户密码登录。
3.在第2步验证成功后会询问用户是否授权客户端

这里点击授权,即上面的Authorize按钮
4.选择授权后会跳转到你的回调地址,浏览器地址上还会包含一个授权码(code=Xnzkr2),浏览器地址栏会显示如下地址:

此时拿到授权码code,即可去请求token了
5.通过授权码向服务器申请令牌,这里我使用 Postman 请求
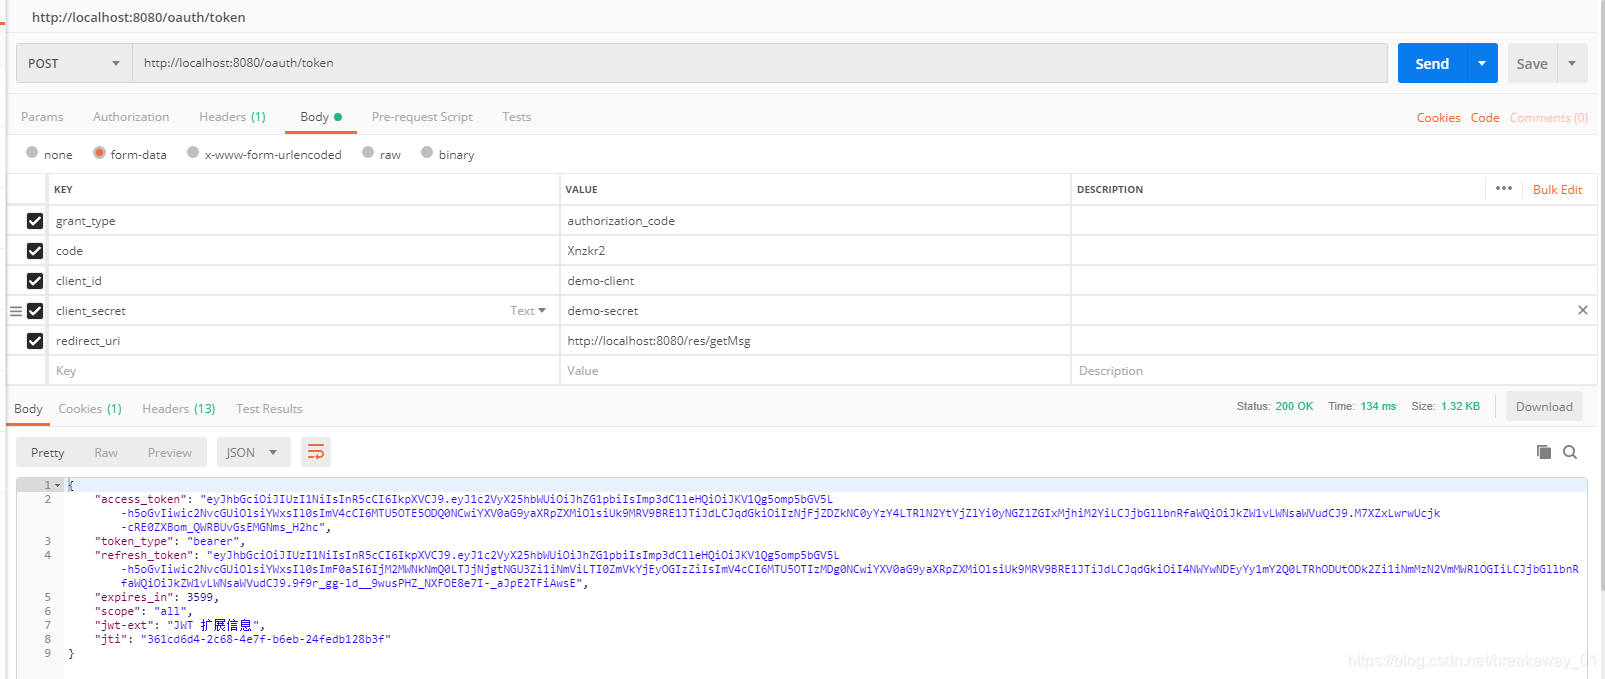
注意:
1.请求方式为post请求
2.请求头中需要配置 Authrization = Basic ZGVtby1jbGllbnQ6ZGVtby1zZWNyZXQ=
(生成方式在代码中GetSecret运行main方法获得),如图:

3.请求参数grant_type为authorization_code,因为在第1步中已经设定了请求authorization_code方式获取code,所以这里必须设置为authorization_code
4.请求参数code为上一步返回,特别注意:code只能使用一次,请求一次即失效
5.redirect_uri参数必须配置为第1步中请求中的回调uri,否则会报错
6.client_id和client_secret为数据库中对应的值。(这里注意,网上很多请求没有这2个参数,是因为他们直接在请求的URL中写入了,如:http://demo-client:demo-secret@localhost:8080/oauth/token),见图:

请求返回的结果如下:
{
    "access_token": "eyJhbGciOiJIUzI1NiIsInR5cCI6IkpXVCJ9.eyJ1c2VyX25hbWUiOiJhZG1pbiIsImp3dC1leHQiOiJKV1Qg5omp5bGV5L-h5oGvIiwic2NvcGUiOlsiYWxsIl0sImV4cCI6MTU5OTIwMTk1OCwiYXV0aG9yaXRpZXMiOlsiUk9MRV9BRE1JTiJdLCJqdGkiOiJmYzQ3YTI0MC1kNzk3LTQwMDEtYTU4Yi0yODMwYTZiZGMzOWEiLCJjbGllbnRfaWQiOiJkZW1vLWNsaWVudCJ9.yhKGeJhrC58UYa3BONGjCeaob74eOpi6otttCcCp8Os",
    "token_type": "bearer",
    "refresh_token": "eyJhbGciOiJIUzI1NiIsInR5cCI6IkpXVCJ9.eyJ1c2VyX25hbWUiOiJhZG1pbiIsImp3dC1leHQiOiJKV1Qg5omp5bGV5L-h5oGvIiwic2NvcGUiOlsiYWxsIl0sImF0aSI6ImZjNDdhMjQwLWQ3OTctNDAwMS1hNThiLTI4MzBhNmJkYzM5YSIsImV4cCI6MTU5OTIzNDM1OCwiYXV0aG9yaXRpZXMiOlsiUk9MRV9BRE1JTiJdLCJqdGkiOiJjNTliMDlmYS03MWQ3LTRkZjctOGY3YS00MTQ2MDU1ODAxODIiLCJjbGllbnRfaWQiOiJkZW1vLWNsaWVudCJ9.Tau7vV0CYcVdwnIOZutO1-GEM73Fyh49rBZMHf9iwm4",
    "expires_in": 3599,
    "scope": "all",
    "jwt-ext": "JWT 扩展信息",
    "jti": "fc47a240-d797-4001-a58b-2830a6bdc39a"
}
6.使用上一步返回的access_token,去请求资源服务
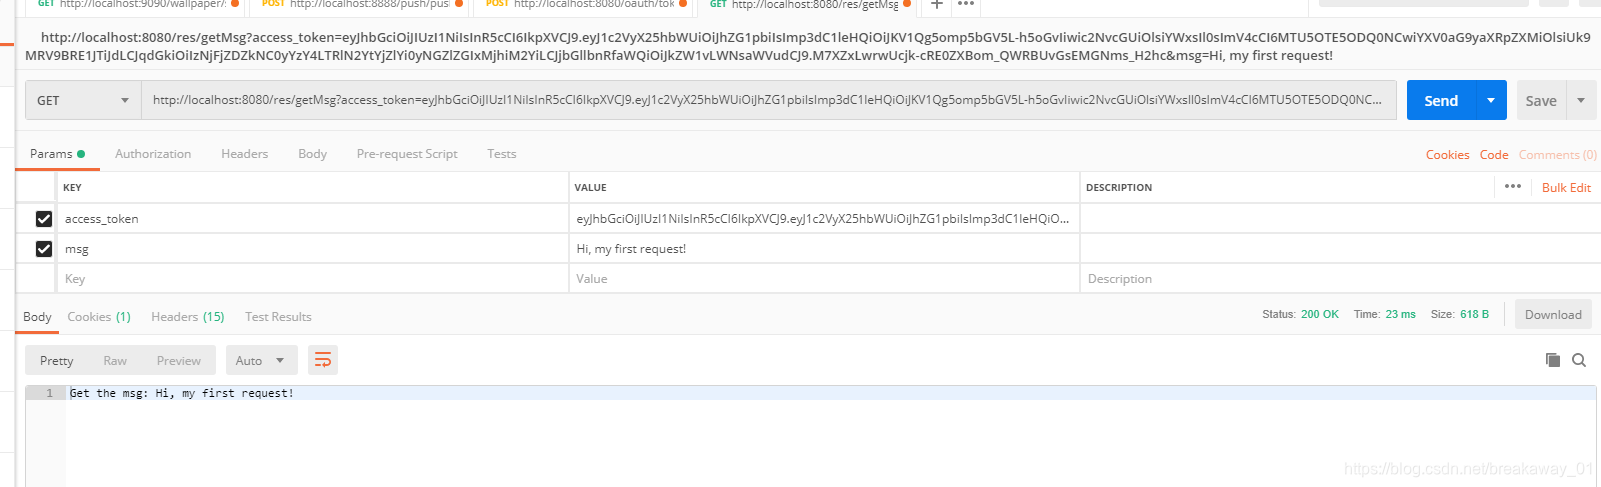
拿到资源结果,到这里所有流程完毕。
最后附上源码:源码分享


 557
557


 被折叠的 条评论
为什么被折叠?
被折叠的 条评论
为什么被折叠?
 到【灌水乐园】发言


