


Spring Boot 3.3 现已正式发布!此版本包含大量更新,包括多项新功能。我们决定进行一些挑选,并查看最重要的变化,其中包括对类数据共享 (CDS) 的支持,以加快应用程序启动速度。
Spring Boot 进入了全新的 3.x 时代了,3.1.x 和 3.0.x 也相继停止维护了,商业支持的版本也只有 2.7+ 了,2.6.x 以下的版本彻底退出历史舞台。。
Spring Boot 3.3.2新特性
1、最低环境要求
Spring Boot 3.3.2 开始支持并最低要求 Java 17,Spring Boot 3.3.2 支持 Java 21 了。
对 Java 开发环境的要求对比表:
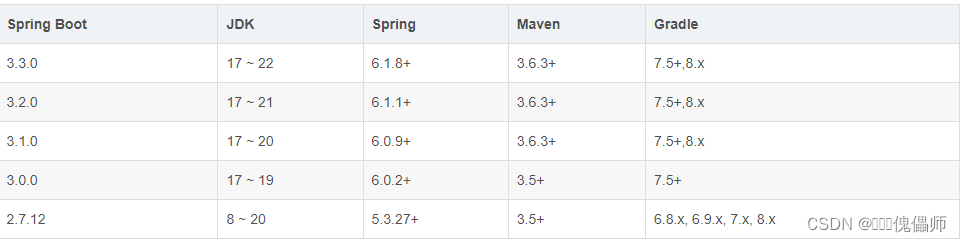
支持 Java 8 的最后一个 Spring Boot 2.x 系列版本已经退伍啦,Java 17 的新时代到来。
如果你还停留在 Java 8 就 OUT 了,过去一两年,Java 8 采用率腰斩,Java 17 暴涨 430%!!
2.新的服务连接
Spring Boot 中改进或添加了几个服务连接:
增加了对 Apache ActiveMQ Artemis 的支持;
apache/activemq-classic增加了docker镜像和ActiveMQContainertestcontainer对ActiveMQ服务连接的支持;
增加了与osixia/openldap容器的LDAP服务连接支持;
Spring Boot Docker Compose 除了将检测和配置 Bitnami 容器之外,还将为多种技术提供官方镜像,包括但不限于 Elasticsearch、MongoDB 和 PostgreSQL。
3.CDS 支持
类数据共享 (CDS) 是一项 JVM 功能,它通过创建已初始化类的档案来帮助最大限度地减少 Java 应用程序的启动,这些档案可用于进一步的应用程序启动,甚至在 JVM 实例之间共享。
-Djarmode=tools
Spring Boot 已经支持在(取代)的帮助下从应用程序 uber jar 中提取层
-Djarmode=layeredtools
,这使开发人员能够加速 docker pull 和容器镜像更新。就 CDS 而言,当您指定两个 JVM 标志时,Spring Boot 提供了一种在应用程序退出时为应用程序创建 CDS 存档 (AppCDS) 的便捷方法:
-XX:ArchiveClassesAtExit=application.jsa
创建 CDS 档案;
-Dspring.context.exit=onRefresh
启动并立即退出应用程序。
因此,一旦ApplicationContext刷新,进程就会自动退出,但生命周期尚未开始。
要为应用程序创建 CDS 存档,您的 JDK 必须具有基础映像。
如果缩短应用程序启动时间对您来说至关重要,那么 CDS 可以被视为标准 JVM 与检查点协调恢复 (CRaC)和 GraalVM Native Image 等创新解决方案之间的中介。无需更改应用程序代码即可使用 CDS,但您可能需要调整运行时设置并考虑几个重要方面(例如,类路径和 JVM 版本必须与构建存档时使用的相同)。
我们相信,将 CDS 与 Spring Boot 应用程序结合使用具有令人兴奋的前景。
4.使用 SNI 自动配置嵌入式 Web 服务器SSL
服务器名称指示 (SNI) 是 TLS 协议的扩展,可用于指定客户端设备尝试访问的域名。现在,在配置嵌入式 Web 服务器(Tomcat、Netty 或 Undertow)时,支持该功能。可以通过spring.ssl.bundle.properties 或 .yaml 文件中的属性以声明方式配置具有唯一 SSL 信任材料的多个主机名。
5.其他重要改进
5.1.观察
Spring Boot 可观察性功能进行了以下改进:
增加了对 Micrometer@SpanTag注释的支持,使您能够为自定义跨度添加标签;
现在可以使用属性来启用对简单、直接和流监听器的观察RabbitTemplate;
增加了对 Brave 和 OpenTelemetry 的标记字段的支持以及对 Brave 的本地字段的支持;
unknown_service如果未指定应用程序名称以符合 OpenTelemetry 规范,则用于 OpenTelemetry;
spring.pulsar.listener.observation-enabled将和属性的默认值spring.pulsar.template.observations-enabled从 true 更改为 false;
实现了一个新的基于 JDK HttpClient 的 Zipkin 发送器;
将 Brave 更新至 6.0,将 Zipkin 更新至 3.0。
5.2.支持 Prometheus Client 1.x
Spring Boot 3.3 支持 Prometheus Client 1.x。Prometheus Client 1.0.0是一个备受期待的流行 Java 指标库版本,它包含一些突破性的变化,包括但不限于对本机直方图的内置支持、与 OpenTelemetry 跟踪的无缝集成以及对 OpenTelemetry Exporter 的支持。
5.3.SBOM 执行器端点
spring-boot-actuator 模块现在包含 SBOM 端点。此外,spring-boot-parent-starter 还包含其他配置,以便更方便地配置 SBOM 插件。
5.4 了解OAuth2.1和Spring Authorization Server
6 OAuth2.1
关于OAuth2.1的介绍和规范可以参考官方文档:https://datatracker.ietf.org/doc/html/rfc6749#section-1
6.1 spring-security-oauth2-authorization-server
概述取自官方文档:
Spring授权服务器是一个框架,提供 OAuth 2.1 和 OpenID Connect 1.0 规范及其他相关规范的实现。它建立在 Spring Security 之上,为构建OpenID Connect 1.0 Identity Provider 和OAuth2 授权服务器产品提供了一个安全、轻量级和可定制的基础。
spring-security-oauth2-authorization-server 已经升级到1.3.0了

6.1 验证核心配置AuthorizationServerConfig
改配置完全参照官方文档,内容如下
用于协议端点的Spring Security过滤器链
此处与官方文档略有不同:
注释 .oidc(Customizer.withDefaults()),因为不清楚如何使用和验证,注释掉先
默认前往登录页的uri是/login,如果需要自定义登录页可以改为自己的,这里我就暂时先用默认
/**
 * 用于协议端点的Spring Security过滤器链
 * @author weimeilayer@gmail.com ✨
 * @date 💓💕 2024年3月4日 🐬🐇 💓💕
 */
@Bean
public SecurityFilterChain authorizationServerSecurityFilterChain(HttpSecurity http) throws Exception {
    OAuth2AuthorizationServerConfiguration.applyDefaultSecurity(http);
    http.getConfigurer(OAuth2AuthorizationServerConfigurer.class);
    http
            // 当未登录时访问认证端点时重定向至登录页面,默认前往登录页的uri是/login
            .exceptionHandling((exceptions) -> exceptions
                    .authenticationEntryPoint(new LoginUrlAuthenticationEntryPoint("/login")));
    return http.build();
}
@Bean
@Order(Ordered.HIGHEST_PRECEDENCE)
public SecurityFilterChain authorizationServerSecurityFilterChain(HttpSecurity http,
		DynamicAuthenticationSuccessEventHandler successEventHandler,
		DynamicAuthenticationFailureEventHandler failureEventHandler) throws Exception {
	OAuth2AuthorizationServerConfigurer authorizationServerConfigurer = new OAuth2AuthorizationServerConfigurer();

	http.addFilterAfter(dynamicxLoginPreFilter, UsernamePasswordAuthenticationFilter.class);
	http.with(authorizationServerConfigurer.tokenEndpoint((tokenEndpoint) -> {
		tokenEndpoint.accessTokenRequestConverter(accessTokenRequestConverter()) //注入自定义的授权认证
			.accessTokenResponseHandler(successEventHandler) // 登录成功处理
			.errorResponseHandler(failureEventHandler);// 登录失败处理
	}).clientAuthentication(oAuth2ClientAuthenticationConfigurer ->
	oAuth2ClientAuthenticationConfigurer.errorResponseHandler(failureEventHandler))// 处理客户端认证异常
	.authorizationEndpoint(authorizationEndpoint -> authorizationEndpoint// 授权码
		.consentPage(SecurityConstants.CUSTOM_CONSENT_PAGE_URI)), Customizer.withDefaults())
	.with(authorizationServerConfigurer.authorizationService(authorizationService)
		.authorizationServerSettings(AuthorizationServerSettings.builder().build()),Customizer.withDefaults());

	AntPathRequestMatcher[] requestMatchers = permitAllUrl.getIgnoreUrls().stream().map(AntPathRequestMatcher::new).toList().toArray(new AntPathRequestMatcher[] {});

	http.authorizeHttpRequests(authorizeRequests -> authorizeRequests.requestMatchers(requestMatchers)
		.permitAll()
		.anyRequest()
		.authenticated())
		.oauth2ResourceServer(
				oauth2 -> oauth2.opaqueToken(token -> token.introspector(customOpaqueTokenIntrospector))
					.authenticationEntryPoint(resourceAuthExceptionEntryPoint)
					.bearerTokenResolver(dynamicBearerTokenExtractor))
		.exceptionHandling(configurer -> configurer.authenticationEntryPoint(resourceAuthExceptionEntryPoint))
		.headers(headers -> headers.frameOptions(HeadersConfigurer.FrameOptionsConfig::disable))
		.csrf(AbstractHttpConfigurer::disable);

	http.with(authorizationServerConfigurer.authorizationService(authorizationService)
		.authorizationServerSettings(AuthorizationServerSettings.builder().build()),Customizer.withDefaults());
	DefaultSecurityFilterChain securityFilterChain = http.build();
	// 注入自定义授权模式实现
	addCustomOAuth2GrantAuthenticationProvider(http);
	return securityFilterChain;
}
6.2 UserDetailsService 的一个实例,用于检索要认证的用户。
/**
	 * UserInfo 转 UserDetails
	 *
	 * @param info
	 * @return 返回UserDetails对象
	 */
	default UserDetails convertUserDetails(UserInfo info) {
		Set<String> dbAuthsSet = new HashSet<>();
		if (ArrayUtil.isNotEmpty(info.getRoles())) {
			// 获取角色
			Arrays.stream(info.getRoles()).forEach(roleId -> dbAuthsSet.add(SecurityConstants.ROLE + roleId));
			// 获取资源
			dbAuthsSet.addAll(Arrays.asList(info.getPermissions()));
		}
		Collection<? extends GrantedAuthority> authorities = AuthorityUtils
				.createAuthorityList(dbAuthsSet.toArray(new String[0]));
		SysUser user = info.getSysUser();
		// 构造security用户

		return new DynamicUser(user.getUserId(), user.getUsername(), user.getDeptId(), user.getPhone(),
				user.getAvatar(), user.getNickname(), user.getName(), user.getEmail(), user.getTenantId(),
				SecurityConstants.BCRYPT + user.getPassword(), true, true, UserTypeEnum.TOB.getStatus()
				,!CommonConstants.STATUS_LOCK.equals(user.getPasswordExpireFlag()) // 密码过期判断
				,!CommonConstants.STATUS_LOCK.equals(user.getLockFlag()), authorities);
	}
6.3 DynamicDefaultUserDetailsServiceImpl 进行实现
	/**
	 * 根据user数据生成userDetails
	 * @param type
	 * @param inStr
	 * @param userName
	 * @return
	 */
	private UserDetails getUserDetails(String type, String inStr,String userName) {
		UserInfo user = userService.info(userName);
		if (user.getSysUser() == null) {
			throw new BadCredentialsException("用户不存在");
		}
		Integer userAttribute = user.getSysUser().getUserAttribute();
		if (!checkTypeAndUserAttribute(type, userAttribute)) {
			throw new BadCredentialsException("用户不存在,请检查登录用户类型是否正确");
		}
		Cache cache = cacheManager.getCache(CacheConstants.USER_DETAILS);
		userInfo.getData().getSysUser().setUsername(inStr);
		UserDetails userDetails = getUserDetails(userInfo);
		cache.put(inStr, userDetails);
		return userDetails;
	}
6.4 OAuth2.0定义了四种授权模式,分别是授权码授权、隐式授权、密码授权和客户端凭证授权。
(1)授权码授权(Authorization Code Grant)
这种授权方式是最安全的一种授权方式,适用于需要长时间访问用户受保护资源的客户端。其流程如下:
客户端向授权服务器请求授权,授权服务器将用户重定向到登录页面。
用户输入用户名和密码,登录成功后,授权服务器将授权码发送给客户端。
客户端使用授权码向授权服务器请求访问令牌。
授权服务器验证授权码,并向客户端发放访问令牌和刷新令牌。
(2)隐式授权(Implicit Grant)
这种授权方式适用于一些需要短时间内访问用户受保护资源的客户端。其流程如下:
客户端向授权服务器请求授权,授权服务器将用户重定向到登录页面。
用户输入用户名和密码,登录成功后,授权服务器将访问令牌直接发送给客户端。
(3)密码授权(Resource Owner Password Credentials Grant)
这种授权方式适用于用户与客户端之间有一定信任关系,且客户端可以安全存储用户凭证。其流程如下:
客户端使用用户凭证向授权服务器请求访问令牌。
授权服务器验证用户凭证,并向客户端发放访问令牌和刷新令牌。
(4)客户端凭证授权(Client Credentials Grant)
这种授权方式适用于客户端需要访问自己拥有的资源的情况。其流程如下:
客户端使用自己的凭证向授权服务器请求访问令牌。
授权服务器验证客户端凭证,并向客户端发放访问令牌。
这四种授权方式各有优缺点,在选择授权方式时需要根据实际情况进行选择。
接下来我们来看一下案例吧!--------重点来了
创建一个pom
<?xml version="1.0" encoding="UTF-8"?>
<project xmlns="http://maven.apache.org/POM/4.0.0"
	xmlns:xsi="http://www.w3.org/2001/XMLSchema-instance"
	xsi:schemaLocation="http://maven.apache.org/POM/4.0.0 https://maven.apache.org/xsd/maven-4.0.0.xsd">
	<modelVersion>4.0.0</modelVersion>
	<parent>
		<groupId>org.springframework.boot</groupId>
		<artifactId>spring-boot-starter-parent</artifactId>
		<version>3.3.2</version>
		<relativePath />
	</parent>
	<groupId>com.oauth.server</groupId>
	<artifactId>oauth-server-platform</artifactId>
	<version>0.0.1-alpha</version>
	<name>oauth_server</name>
	<properties>
		<java.version>17</java.version>
	</properties>
	<dependencies>
		<dependency>
			<groupId>org.springframework.boot</groupId>
			<artifactId>spring-boot-starter-oauth2-authorization-server</artifactId>
		</dependency>
		<dependency>
			<groupId>org.springframework.boot</groupId>
			<artifactId>spring-boot-starter-web</artifactId>
		</dependency>
	</dependencies>
	<build>
		<plugins>
			<plugin>
				<groupId>org.springframework.boot</groupId>
				<artifactId>spring-boot-maven-plugin</artifactId>
			</plugin>
		</plugins>
	</build>

</project>
启动类
package com.oauth.server;

import org.springframework.boot.SpringApplication;
import org.springframework.boot.autoconfigure.SpringBootApplication;

/**
 * @author weimeilayer@gmail.com ✨
 * @date 💓💕 2024年7月27日 🐬🐇 💓💕
 */
@SpringBootApplication
public class DynamicOauthServerYearningApplication {

	public static void main(String[] args) {
		SpringApplication.run(DynamicOauthServerYearningApplication.class, args);
	}
}
然后是AuthorizationServerConfig
package com.oauth.server.config;

import java.security.KeyPair;
import java.security.KeyPairGenerator;
import java.security.NoSuchAlgorithmException;
import java.security.SecureRandom;
import java.security.interfaces.RSAPrivateKey;
import java.security.interfaces.RSAPublicKey;
import java.util.UUID;

import org.springframework.context.annotation.Bean;
import org.springframework.context.annotation.Configuration;
import org.springframework.security.core.userdetails.User;
import org.springframework.security.core.userdetails.UserDetails;
import org.springframework.security.core.userdetails.UserDetailsService;
import org.springframework.security.crypto.bcrypt.BCryptPasswordEncoder;
import org.springframework.security.crypto.password.PasswordEncoder;
import org.springframework.security.oauth2.core.AuthorizationGrantType;
import org.springframework.security.oauth2.core.ClientAuthenticationMethod;
import org.springframework.security.oauth2.core.oidc.OidcScopes;
import org.springframework.security.oauth2.jwt.JwtDecoder;
import org.springframework.security.oauth2.jwt.JwtEncoder;
import org.springframework.security.oauth2.jwt.NimbusJwtEncoder;
import org.springframework.security.oauth2.server.authorization.client.InMemoryRegisteredClientRepository;
import org.springframework.security.oauth2.server.authorization.client.RegisteredClient;
import org.springframework.security.oauth2.server.authorization.client.RegisteredClientRepository;
import org.springframework.security.oauth2.server.authorization.config.annotation.web.configuration.OAuth2AuthorizationServerConfiguration;
import org.springframework.security.oauth2.server.authorization.settings.AuthorizationServerSettings;
import org.springframework.security.oauth2.server.authorization.settings.ClientSettings;
import org.springframework.security.provisioning.InMemoryUserDetailsManager;

import com.nimbusds.jose.jwk.JWKSet;
import com.nimbusds.jose.jwk.RSAKey;
import com.nimbusds.jose.jwk.source.ImmutableJWKSet;
import com.nimbusds.jose.jwk.source.JWKSource;
import com.nimbusds.jose.proc.SecurityContext;

/**
 * @author weimeilayer@gmail.com ✨
 * @date 💓💕 2024年7月27日 🐬🐇 💓💕
 */
@Configuration
public class AuthorizationServerConfig {

	@Bean
    public PasswordEncoder passwordEncoder() throws NoSuchAlgorithmException {
		return new BCryptPasswordEncoder(12,SecureRandom.getInstanceStrong());
    }

	/**
	 * 提供登录页面用户名密码的认证
	 * @return
	 */
	@Bean
	public UserDetailsService userDetailsService(PasswordEncoder passwdEncoder) {
        UserDetails user= User.builder()
                .username("user")
                .password(passwdEncoder.encode("123456")) // 使用 {noop} 前缀表示密码不会被编码
                //.password("{noop}123") // 使用 {noop} 前缀表示密码不会被编码
                .accountExpired(false)
                .credentialsExpired(false)
                .accountLocked(false)
                .authorities("ROLE_USER") // 用户的权限
                .build();

		return new InMemoryUserDetailsManager(user);
	}

	/**
	 * 应用注册
	 * @return
	 */
	@Bean
	public RegisteredClientRepository registeredClientRepository(PasswordEncoder passwdEncoder) {

		RegisteredClient oidcClient = RegisteredClient.withId(UUID.randomUUID().toString())
				.clientId("clientid")
				.clientSecret(passwdEncoder.encode("client_secret"))//如果是CLIENT_SECRET_POST才会用到
				.clientAuthenticationMethod(ClientAuthenticationMethod.CLIENT_SECRET_BASIC)
				.clientAuthenticationMethod(ClientAuthenticationMethod.CLIENT_SECRET_POST)
				.clientAuthenticationMethod(ClientAuthenticationMethod.NONE)
				.authorizationGrantType(AuthorizationGrantType.AUTHORIZATION_CODE)
				.authorizationGrantType(AuthorizationGrantType.CLIENT_CREDENTIALS)
				.authorizationGrantType(AuthorizationGrantType.REFRESH_TOKEN)
				.redirectUri("http://localhost:8080/login/oauth2/code/authcode")
				.postLogoutRedirectUri("http://localhost:8080/")
				.scope(OidcScopes.OPENID)
				.scope(OidcScopes.PROFILE)
				.clientSettings(ClientSettings.builder().requireAuthorizationConsent(true).build())
				.build();
		return new InMemoryRegisteredClientRepository(oidcClient);
	}

	/**
	 * 生成jwk,用在jwt编码和jwt解码器上
	 * @return
	 */
	@Bean
	public JWKSource<SecurityContext> jwkSource() {
		KeyPair keyPair = generateRsaKey();
		RSAPublicKey publicKey = (RSAPublicKey) keyPair.getPublic();
		RSAPrivateKey privateKey = (RSAPrivateKey) keyPair.getPrivate();
		RSAKey rsaKey = new RSAKey.Builder(publicKey)
				.privateKey(privateKey)
				.keyID(UUID.randomUUID().toString())
				.build();
		JWKSet jwkSet = new JWKSet(rsaKey);
		return new ImmutableJWKSet<>(jwkSet);
	}

	/**
	 * 生成RSA256非对称的秘钥对:公钥和私钥,其中公钥会发布出去。
	 * @return
	 */
	private static KeyPair generateRsaKey() {
		KeyPair keyPair;
		try {
			KeyPairGenerator keyPairGenerator = KeyPairGenerator.getInstance("RSA");
			keyPairGenerator.initialize(2048);
			keyPair = keyPairGenerator.generateKeyPair();
		}
		catch (Exception ex) {
			throw new IllegalStateException(ex);
		}
		return keyPair;
	}

	/**
	 * jwt 解码器,给资源服务器用
	 * @param jwkSource
	 * @return
	 */
	@Bean
	public JwtDecoder jwtDecoder(JWKSource<SecurityContext> jwkSource) {
		return OAuth2AuthorizationServerConfiguration.jwtDecoder(jwkSource);
	}

	/**
	 * jwt 编码器,给授权服务器用
	 * @param jwkSource
	 * @return
	 */
	@Bean
	public JwtEncoder jwtEncoder(JWKSource<SecurityContext> jwkSource) {
		return new NimbusJwtEncoder(jwkSource);
	}

	/**
	 * 默认授权服务器配置
	 * @return
	 */
	@Bean
	public AuthorizationServerSettings authorizationServerSettings() {
		return AuthorizationServerSettings.builder().build();
	}
}
最后是SecurityConfig
package com.oauth.server.config;

import org.springframework.context.annotation.Bean;
import org.springframework.context.annotation.Configuration;
import org.springframework.core.Ordered;
import org.springframework.core.annotation.Order;
import org.springframework.http.HttpMethod;
import org.springframework.http.MediaType;
import org.springframework.security.config.Customizer;
import org.springframework.security.config.annotation.web.builders.HttpSecurity;
import org.springframework.security.config.annotation.web.configuration.EnableWebSecurity;
import org.springframework.security.oauth2.server.authorization.config.annotation.web.configuration.OAuth2AuthorizationServerConfiguration;
import org.springframework.security.oauth2.server.authorization.config.annotation.web.configurers.OAuth2AuthorizationServerConfigurer;
import org.springframework.security.web.SecurityFilterChain;
import org.springframework.security.web.authentication.LoginUrlAuthenticationEntryPoint;
import org.springframework.security.web.util.matcher.MediaTypeRequestMatcher;

/**
 * @author weimeilayer@gmail.com ✨
 * @date 💓💕 2024年7月27日 🐬🐇 💓💕
 */
@Configuration
@EnableWebSecurity
public class SecurityConfig {

	@Bean
	@Order(Ordered.HIGHEST_PRECEDENCE)
	public SecurityFilterChain authorizationServerSecurityFilterChain(HttpSecurity http)
			throws Exception {

		OAuth2AuthorizationServerConfiguration.applyDefaultSecurity(http);
		http.getConfigurer(OAuth2AuthorizationServerConfigurer.class)
			.oidc(Customizer.withDefaults());
		http.exceptionHandling((exceptions) -> exceptions
				.defaultAuthenticationEntryPointFor(
					new LoginUrlAuthenticationEntryPoint("/login"),
					new MediaTypeRequestMatcher(MediaType.TEXT_HTML)
				)
			)
			.oauth2ResourceServer(resourceServer -> resourceServer.jwt(Customizer.withDefaults() ));
		return http.build();
	}

	@Bean
	@Order(2)
	public SecurityFilterChain defaultSecurityFilterChain(HttpSecurity http)
			throws Exception {
		http
			.authorizeHttpRequests((authorize) -> authorize.requestMatchers(HttpMethod.GET,"/login").permitAll()
			)
			.formLogin(Customizer.withDefaults());
		return http.build();
	}
}
源码地址:


 1611
1611

 被折叠的 条评论
为什么被折叠?
被折叠的 条评论
为什么被折叠?
 到【灌水乐园】发言


