


通过使用变换(transform),许多绘图认为将更趋简单。变换是通过不加通告地切换形状或元素使用的坐标系统来改变形状或元素绘制方式的对象。

变化形状有两种方式:RenderTransform和LayoutTransform。
这里主要讲诉这两种方式的区别:
1.不添加变换
在StackPanel中放置两个Button,不添加任何变换:
<UserControl x:Class="WpfApp3.UserControl3"
             xmlns="http://schemas.microsoft.com/winfx/2006/xaml/presentation"
             xmlns:x="http://schemas.microsoft.com/winfx/2006/xaml"
             xmlns:d="http://schemas.microsoft.com/expression/blend/2008"
             xmlns:local="clr-namespace:WpfApp3"
             xmlns:mc="http://schemas.openxmlformats.org/markup-compatibility/2006"
             d:DesignHeight="450" d:DesignWidth="800" mc:Ignorable="d">
    <StackPanel Background="White">
        <Button Canvas.Left="250" Canvas.Top="80" HorizontalAlignment="Center" Content="Button" />
        <Button Canvas.Left="250" Canvas.Top="100" HorizontalAlignment="Center" Content="Button" />
    </StackPanel>
</UserControl>
2.RenderTransform变换
通过RenderTransform将Button旋转90度:
<UserControl x:Class="WpfApp3.UserControl3"
             xmlns="http://schemas.microsoft.com/winfx/2006/xaml/presentation"
             xmlns:x="http://schemas.microsoft.com/winfx/2006/xaml"
             xmlns:d="http://schemas.microsoft.com/expression/blend/2008"
             xmlns:local="clr-namespace:WpfApp3"
             xmlns:mc="http://schemas.openxmlformats.org/markup-compatibility/2006"
             d:DesignHeight="450" d:DesignWidth="800" mc:Ignorable="d">
    <StackPanel Background="White">
        <Button Canvas.Left="250" Canvas.Top="80" HorizontalAlignment="Center" Content="Button" RenderTransformOrigin="0.5,0.5">
            <Button.RenderTransform>
                <RotateTransform Angle="90" />
            </Button.RenderTransform>
        </Button>
        <Button Canvas.Left="250" Canvas.Top="100" HorizontalAlignment="Center" Content="Button" />
    </StackPanel>
</UserControl>
3.LayoutTransform变换
通过LayoutTransform将Button旋转90度:
<UserControl x:Class="WpfApp3.UserControl3"
             xmlns="http://schemas.microsoft.com/winfx/2006/xaml/presentation"
             xmlns:x="http://schemas.microsoft.com/winfx/2006/xaml"
             xmlns:d="http://schemas.microsoft.com/expression/blend/2008"
             xmlns:local="clr-namespace:WpfApp3"
             xmlns:mc="http://schemas.openxmlformats.org/markup-compatibility/2006"
             d:DesignHeight="450" d:DesignWidth="800" mc:Ignorable="d">
    <StackPanel Background="White">
        <Button Canvas.Left="250" Canvas.Top="80" HorizontalAlignment="Center" Content="Button" RenderTransformOrigin="0.5,0.5">
            <Button.LayoutTransform>
                <RotateTransform Angle="90"/>
            </Button.LayoutTransform>
        </Button>
        <Button Canvas.Left="250" Canvas.Top="100" HorizontalAlignment="Center" Content="Button" />
    </StackPanel>
</UserControl>
通过上面3张图可以发现,二图没有改变原先的布局的情况下将Button旋转,而三图改变了另一个Button的布局,导致该Butoon位置下移了。
- LayoutTransform属性以相同的方式变换元素,但在布局之前执行其工作。
- 另外注意的是当布局之后元素范围超过父元素时进行RenderTransform变换会导致显示范围不完全。
4.变换超出范围
<UserControl x:Class="WpfApp3.UserControl2"
             xmlns="http://schemas.microsoft.com/winfx/2006/xaml/presentation"
             xmlns:x="http://schemas.microsoft.com/winfx/2006/xaml"
             xmlns:mc="http://schemas.openxmlformats.org/markup-compatibility/2006"
             xmlns:d="http://schemas.microsoft.com/expression/blend/2008"
             xmlns:local="clr-namespace:WpfApp3"
             mc:Ignorable="d"
             d:DesignHeight="100" d:DesignWidth="100">
    <Grid Background="White">
        <Grid.ColumnDefinitions>
            <ColumnDefinition/>
            <ColumnDefinition/>
        </Grid.ColumnDefinitions>
        <TextBlock HorizontalAlignment="Center" VerticalAlignment="Center" RenderTransformOrigin="0.5,0.5" Text="这是一首简单的小情歌">
            <TextBlock.RenderTransform>
                <RotateTransform Angle="90" />
            </TextBlock.RenderTransform>
        </TextBlock>
        <TextBlock Grid.Column="1" HorizontalAlignment="Center" VerticalAlignment="Center" RenderTransformOrigin="0.5,0.5" Text="这是一首简单的小情歌">
            <TextBlock.LayoutTransform>
                <RotateTransform Angle="90" />
            </TextBlock.LayoutTransform>
        </TextBlock>

    </Grid>
</UserControl> 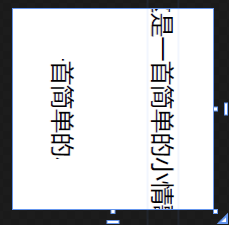
RenderTransform:第一个TextBlock显示几个字取决于父元素的宽度
LayoutTransform:第二个TextBlock显示几个字取决于父元素的高度
这就是在布局前变换和布局后变换对元素的影响。


 6732
6732


 被折叠的 条评论
为什么被折叠?
被折叠的 条评论
为什么被折叠?
 到【灌水乐园】发言


