


This article describes how to automate Excel 2007 and create charts using a C++ MFC application.
Introduction
This article describes how to automate Excel 2007 using a C++ MFC application. The solution also works for Excel 2010. I have also highlighted some of the issues faced while accomplishing this task. In this article I describe how to open up the Excel Application, how to create a worksheet and enter data into the worksheet and to create charts using the data in the worksheet. I used Visual studio 2008 for this project but I believe that it should work with VS 2010 as well.
Using the code
Assuming you have Microsoft Excel 2007 installed, open visual studio and create a new MFC application named as AutomateExcel.

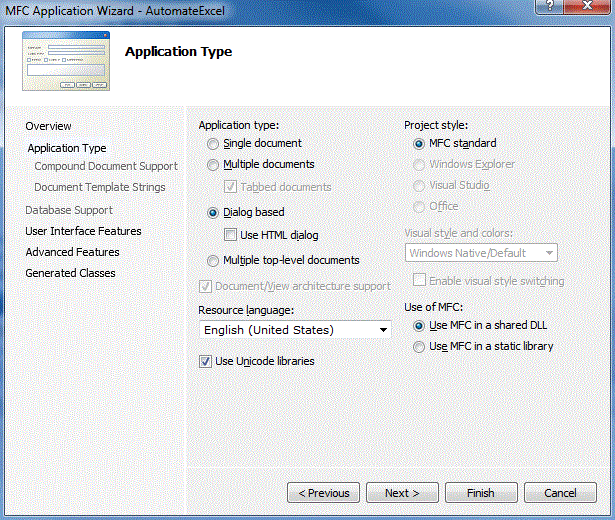
Chose the application type as Dialog based and click on Finish.
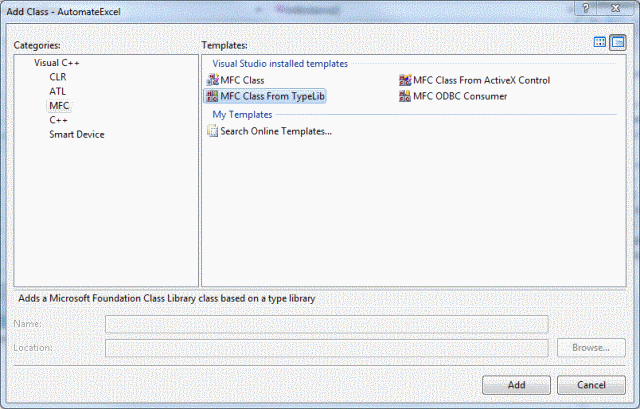
Click on Add Class from the Project menu and select MFC Class From TypeLib.
In the Add Class From Typelib Wizard select the Registry option and select Microsoft Excel 12.0 Object Library<1.6> from the dropdown list.
Select the following interfaces:
_Application
_Chart
_Workbook
_Worksheet
Charts
Font
Range
Workbooks
Worksheets
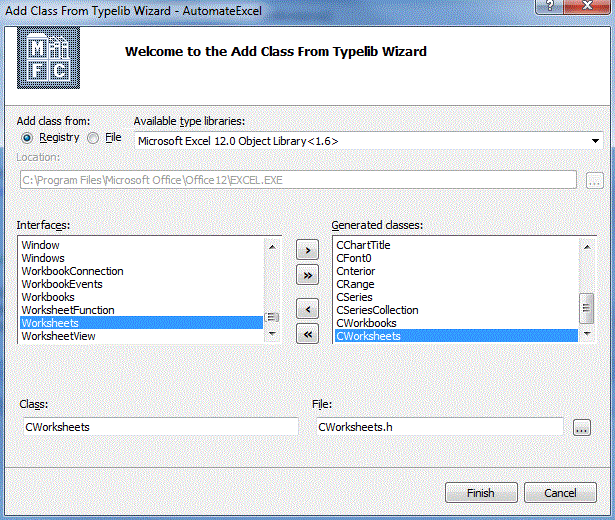
On clicking Finish, all the related header files will be created. Open AutomateExcelDlg.cpp and include all these header files.
#include "CApplication.h"
#include "CFont0.h"
#include "CRange.h"
#include "CWorkbook.h"
#include "CWorkbooks.h"
#include "CWorksheet.h"
#include "CWorksheets.h"
#include "CChart.h"
#include "CCharts.h"
Try building your project at this point. You will get a large number of errors in excel.tlh file. In order to get rid of these errors you will need to comment out all the #import statements in all the header files that were created by Visual Studio. You can do a find all for “#import” and quickly go to each of the header files and comment those lines.
//#import "C:\\Program Files\\Microsoft Office\\Office12\\EXCEL.EXE" no_namespace
...
Once you have commented out all the #import statements and saved all those files, try building your project again. You will get some syntax error in the file crange.h on the line “VARIANT DialogBox()”. The key to resolving this error is to put an underscore in front of DialogBox().
VARIANT _DialogBox()
...
Build again to make sure that your build succeeds. Now we are ready to write some code Smile | :)
Open the AutomateExcel.cpp file and inside the InitInstance function add the following code:
if(!AfxOleInit())
{
  AfxMessageBox(_T("Cannot initialize COM dll"));
  return FALSE;
}
...
AfxEnableControlContainer();
From your solution explorer expand Resource Files and double click on AutomateExcel.rc. In the Resource View expand the Dialog folder and double click on IDD_AUTOMATEEXCEL_DIALOG to open the dialog page of your application. Delete the initial label and also delete the Cancel button. Change the caption of the OK button to Run and rename the ID as IDRUN. Double click the Run button to create the OnBnClickedRun() event handler. Add the following code into this function:
void CAutomateExcelDlg::OnBnClickedRun()
{
    // Commonly used OLE variants.
    COleVariant
      covTrue((short)TRUE),
      covFalse((short)FALSE),
      covOptional((long)DISP_E_PARAMNOTFOUND, VT_ERROR);

    CApplication app;

   // Start Excel and get an Application object.
   if(!app.CreateDispatch(TEXT("Excel.Application")))
   {
      AfxMessageBox(TEXT("Couldn't start Excel and get Application object."));
      return;
   }

   app.put_Visible(TRUE);
   app.put_UserControl(TRUE);
}
Build the solution and run it. Click on the Run button and notice the Excel application open up. Congratulations! you have successfully completed your first automation task - Opening up the Excel application. Now lets add a workbook in it and add some information in the first sheet of the workbook.
if(!app.CreateDispatch(TEXT("Excel.Application")))
{
  AfxMessageBox(TEXT("Couldn't start Excel and get Application object."));
  return;
}
.
.
.
CWorkbooks books;
CWorkbook book;
CWorksheets sheets;
CWorksheet sheet;
CRange range;
CFont0 font;

books = app.get_Workbooks();
book = books.Add (covOptional);


//Get the first sheet.
sheets =book.get_Sheets();
sheet = sheets.get_Item(COleVariant((short)1));

range = sheet.get_Range(COleVariant(TEXT("A1")),COleVariant(TEXT("A1")));
range.put_Value2(COleVariant(TEXT("Average precipation (mm)")));
range = sheet.get_Range(COleVariant(TEXT("A1")),COleVariant(TEXT("C1")));
range.Merge(covOptional);
range = sheet.get_Range(COleVariant(TEXT("B2")),COleVariant(TEXT("B2")));
range.put_Value2(COleVariant(TEXT("Acapulco")));
range = sheet.get_Range(COleVariant(TEXT("C2")),COleVariant(TEXT("C2")));
range.put_Value2(COleVariant(TEXT("Amsterdam")));


//Fill A3:A6 with an array of values (Months).
COleSafeArray saRet;
DWORD numElements[]={4,1};   //4x1 element array
saRet.Create(VT_BSTR, 2, numElements);

FillSafeArray(L"January", 0, 0, &saRet);
FillSafeArray(L"April", 1, 0, &saRet);
FillSafeArray(L"July", 2, 0, &saRet);
FillSafeArray(L"October", 3, 0, &saRet);

range = sheet.get_Range(COleVariant(TEXT("A3")), COleVariant(TEXT("A6")));
range.put_Value2(COleVariant(saRet));
saRet.Detach();

//Fill B3:C6 with values
range = sheet.get_Range(COleVariant(TEXT("B3")),COleVariant(TEXT("B3")));
range.put_Value2(COleVariant(short(10)));
range = sheet.get_Range(COleVariant(TEXT("B4")),COleVariant(TEXT("B4")));
range.put_Value2(COleVariant(short(69)));
range = sheet.get_Range(COleVariant(TEXT("B5")),COleVariant(TEXT("B5")));
range.put_Value2(COleVariant(short(5)));
range = sheet.get_Range(COleVariant(TEXT("B6")),COleVariant(TEXT("B6")));
range.put_Value2(COleVariant(short(53)));
range = sheet.get_Range(COleVariant(TEXT("C3")),COleVariant(TEXT("C3")));
range.put_Value2(COleVariant(short(208)));
range = sheet.get_Range(COleVariant(TEXT("C4")),COleVariant(TEXT("C4")));
range.put_Value2(COleVariant(short(76)));
range = sheet.get_Range(COleVariant(TEXT("C5")),COleVariant(TEXT("C5")));
range.put_Value2(COleVariant(short(145)));
range = sheet.get_Range(COleVariant(TEXT("C6")),COleVariant(TEXT("C6")));
range.put_Value2(COleVariant(short(74)));

//Format A1:C1 as bold, vertical alignment = center.
range = sheet.get_Range(COleVariant(TEXT("A1")), COleVariant(TEXT("C1")));
font = range.get_Font();
font.put_Bold(covTrue);
range.put_VerticalAlignment(COleVariant((short)-4108));   //xlVAlignCenter = -4108

//AutoFit columns A:D.
range = sheet.get_Range(COleVariant(TEXT("A1")), COleVariant(TEXT("D1")));
CRange cols;
cols = range.get_EntireColumn();
cols.AutoFit();
.
.
.
app.put_Visible(TRUE);
app.put_UserControl(TRUE);
Here we grab the first sheet of the workbook and enter data into it by using ranges. The FillSafeArray function is below:
void FillSafeArray(OLECHAR FAR* sz, int iRow, int iCol,
                   COleSafeArray* sa)
{

   VARIANT v;
   long index[2];

   index[0] = iRow;
   index[1] = iCol;

   VariantInit(&v);
   v.vt = VT_BSTR;
   v.bstrVal = SysAllocString(sz);
   sa->PutElement(index, v.bstrVal);
   SysFreeString(v.bstrVal);
   VariantClear(&v);

}
Let’s now add a chart real quick.
CCharts charts;
CChart chart;
charts = book.get_Charts();
chart = charts.Add(covOptional, covOptional, covOptional);
Build and run the project. Click on the Run Button. Here's how it looks for Excel 2007.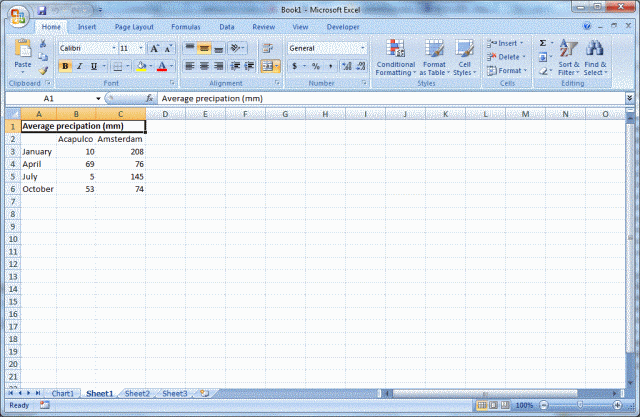
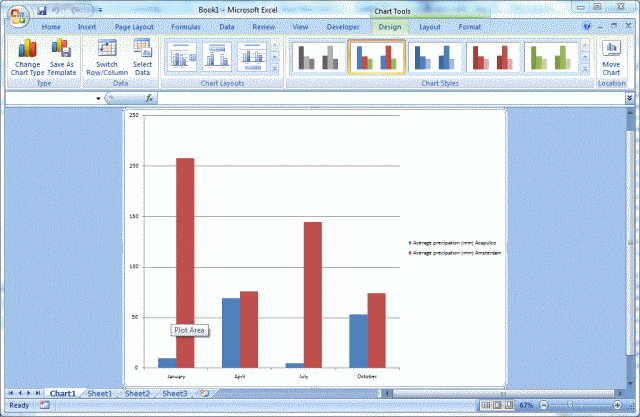
The charts are created using the data from the currently active sheet by Excel 2007 and 2010. This sheet is the one we just created. There is a lot more that can be done with charts specially when you want to create your own charts choosing your series and axes. But for this article, I am going to keep it simple and end here. I will try to cover more things in a future article.
History
Version 1.0
License
This article, along with any associated source code and files, is licensed under The Code Project Open License (CPOL)
Sourse:http://www.codeproject.com/Articles/476238/Automating-Excel-2007-and-creating-charts-using-Cp


 2156
2156

 被折叠的 条评论
为什么被折叠?
被折叠的 条评论
为什么被折叠?
 到【灌水乐园】发言


